Best Wood Off Cut Ideas 2024
- September 1, 2023
- 0 comment
Woodworking, a timeless craft that dates back to the earliest civilizations, has continuously evolved, not just in techniques but also in how we handle its by-products. In the heart of this evolution lies the humble wood off-cut. Historically, our ancestors made every bit of their resources count, creating artifacts and tools even from the tiniest wooden shards. From ancient Mesopotamia to the skilled carpenters of the Ming Dynasty, off-cuts were never truly ‘off’. They were reshaped, reused, and repurposed into functional tools, intricate art pieces, and even as currency in some cultures!
Today, in an era of sustainability and creativity, these off-cuts—often seen as mere remnants—become an artist’s goldmine. To a novice, they might seem like insignificant scraps, but for the adept craftsperson, every off-cut tells a story waiting to be sculpted. Let’s embark on a journey through the enchanting realm of wood-off-cut projects and unearth the hidden masterpieces that await within these overlooked slivers.
Best Wood Off Cut Ideas List:
- Coasters with Character
- Intricate Inlay Work
- Handmade Jewelry
- Garden Markers
- Candle Holders
- Miniature Shelves
- Handcrafted Toys
- Artful Mosaics
- Keychains and Magnets
- Customized Guitar Picks
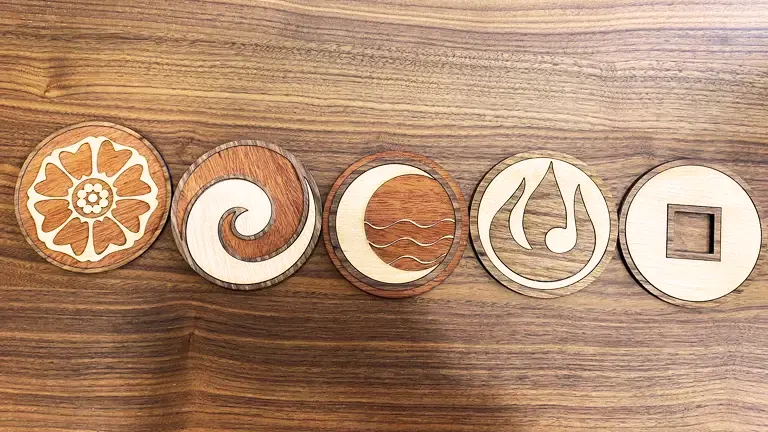
1. Coasters with Character
Transforming humble wood off-cuts into coasters is not just an exercise in creativity but a statement of style and sustainability. Wooden coasters offer a rustic charm that enhances any decor style, from vintage to modern, adding a natural touch that’s both beautiful and functional. Beyond aesthetics, wood is durable and eco-friendly, making these coasters a practical choice for reducing waste and extending the usefulness of every tree.
Creating Your Own Unique Coasters
- Select Your Wood: Choose off-cuts with interesting colors and grain patterns. Mixing different woods can create appealing designs.
- Shape Your Coasters: Cut the wood into your desired shapes, commonly squares or circles, about 4×4 inches or with a 4-inch diameter.
- Design Creatively:
- Multi-Wood Patterns: Craft designs like a checkerboard pattern mixing oak and mahogany.
- Stenciled Paintings: Apply stencils for painting simple icons or intricate designs.
- Burned Designs: Use a pyrography tool to burn detailed patterns into the wood, offering durability and a unique flair.
- Finishing Touches:
- Sanding: Smooth the edges and surfaces starting with coarse grit and moving to finer grit for a polished finish.
- Staining: Enhance the natural wood color or darken it with a stain for added richness.
- Sealing: Apply a clear sealant to protect against moisture and stains, ensuring longevity and maintenance of the coaster’s appearance.
- Add Extras: Attach felt or cork to the bottom to protect table surfaces from scratches.
These DIY coasters are more than just functional; they are a piece of sustainable art. Each coaster not only protects surfaces but also tells a story of environmental responsibility and individual creativity. Next time you set down your drink, you’ll appreciate the artistry and intention behind these eco-friendly creations.
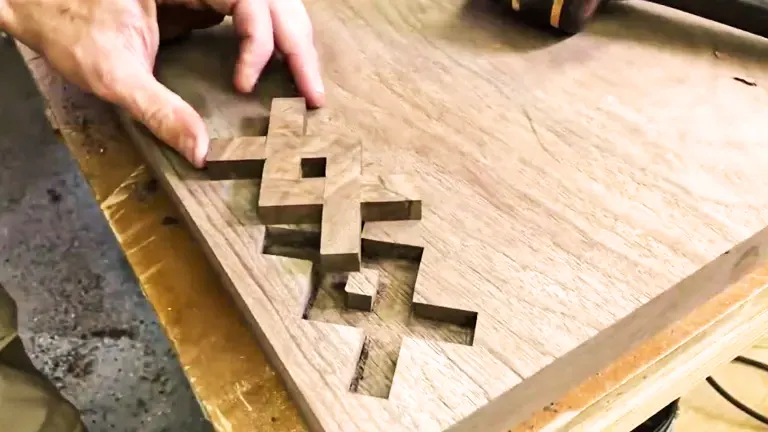
2. Intricate Inlay Work
Woodworking transcends mere craft to become an art form, particularly evident in the technique of inlay work. This method involves embedding contrasting pieces of wood, or sometimes other materials, into a wooden surface to create intricate patterns and designs. The result is a mesmerizing display of craftsmanship that enhances any piece it adorns.
The Rich History of Inlay Work
Wood inlay is an ancient technique, with roots tracing back to ancient civilizations. Egyptian tombs, for example, housed furniture decorated with ivory inlaid into wood. Over time, cultures across the world, from the Italian Renaissance artisans to the master craftsmen of India, have developed and perfected this art.
Materials and Techniques
While traditional wood-on-wood inlay is popular, contemporary artists often incorporate diverse materials to add depth and contrast to their work:
- Metals such as brass, silver, and gold for a lustrous contrast.
- Shells like mother-of-pearl and abalone provide a unique iridescence.
- Stones such as turquoise or lapis lazuli introduce vibrant colors.
Crafting the Inlay
- Design: Start with a clear design—geometric, floral, or abstract—that will guide the entire crafting process.
- Selection of Woods: Choose woods that offer stark contrasts, like dark walnut against light maple, to highlight the design.
- Cutting: Use precision tools like a fine-bladed saw or a CNC machine to cut both the base wood and the inlay materials accurately.
- Setting the Inlay: Secure the pieces using adhesive, ensuring they fit snugly into the carved recesses of the base wood.
- Finishing: After the adhesive sets, sand the surface smooth, fill any gaps, and apply a sealant to protect and enhance the wood’s natural beauty.
Applications and Care
Inlay work is versatile, enhancing everything from furniture and musical instruments to decorative flooring and standalone art pieces. To maintain the beauty of inlay work:
- Dust regularly with a soft cloth to avoid buildup.
- Avoid exposure to direct sunlight which can fade the materials.
- Clean gently using wood-friendly products.
- Apply wax or oil periodically to preserve the luster.
Inlay work is not only a testament to the skill and patience of the craftsman but also a celebration of the diverse materials that can be incorporated into woodworking. It offers a glimpse into the traditions of the past while providing a timeless elegance to modern designs. Whether it’s a subtle floral motif on a cabinet or the bold statement of an inlaid floor, inlay work continues to be a cherished art form, blending tradition with contemporary aesthetics.
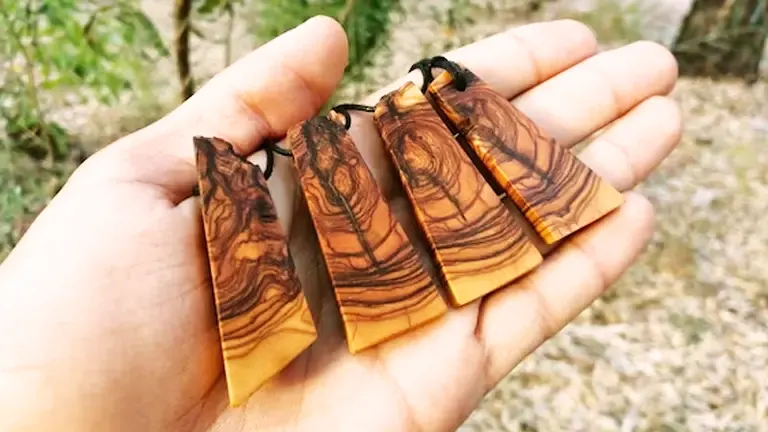
3. Handmade Jewelry
In the world of jewelry, metals and gemstones are often the top choices for their beauty. But there’s something special about wooden jewelry. When carefully shaped and polished, wood offers a natural charm that’s hard to beat. With more people leaning towards eco-friendly options, using leftover wood pieces is a smart way to create unique jewelry. Let’s dive into the world of handmade wooden jewelry and discover its beauty and craftsmanship.
Why Choose Wooden Jewelry?
- Good for the Environment: Using leftover wood reduces waste and supports sustainability, unlike mining metals and gems, which can harm the environment.
- One-of-a-Kind Look: Each piece of wooden jewelry has its own patterns and colors, making it truly unique and special.
- Lightweight and Safe: Wooden jewelry is light to wear and great for people with metal allergies.
How Wooden Jewelry is Made
- Designing and Shaping: Start with a design and then cut the wood into shape using tools like saws or machines for precision.
- Adding Details: Carve intricate designs or mix different types of wood for a contrasting effect. Personal touches can be added with wood-burning tools.
- Making it Smooth: Polish the wood with sandpaper until it feels smooth and looks shiny.
- Adding Metal Parts and Protection: Attach strong metal parts like silver or stainless steel to make sure the jewelry lasts long. Finish with wax or oil to protect it from water and wear.
Innovative Ideas for Wooden Jewelry
- Layered Pendants: Layer contrasting wood types or combine with materials like resin to create pendants with depth and intrigue.
- Wood & Stone: Inlay small gemstones or crystals into wooden rings or pendants for a fusion of natural elements.
- Geometric Earrings: Fashion contemporary earrings using geometric shapes, showcasing the grain of the wood.
- Adjustable Rings: Craft wooden focal pieces and set them on adjustable metal ring bases.
- Charm Bracelets: Use smaller wood off-cuts to make individual charms, each telling a different story.
Caring for Wooden Jewelry
- Keep Dry: Avoid prolonged exposure to water. While sealants provide some protection, it’s best not to wear wooden jewelry while swimming or showering.
- Store Properly: Store in a dry place, away from direct sunlight.
- Occasional Maintenance: Reapply a natural wax or oil every once in a while to maintain the wood’s sheen.
Handmade wooden jewelry is loved by those who appreciate nature’s beauty and want something unique. It’s not just jewelry—it’s a statement of style and caring about the planet in a world where mass-produced items are everywhere.
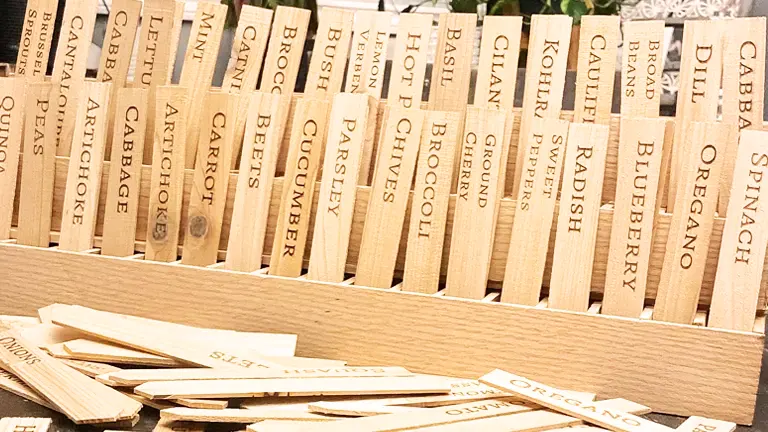
4. Garden Markers
Every garden, regardless of its size, is a manifestation of love, effort, and patience. As seeds grow and flowers bloom, keeping track of what’s planted becomes crucial, especially for avid gardeners juggling a plethora of plants. This is where garden markers come into play. And what better way to mark your prized plants than with eco-friendly wooden markers made from off-cuts? Here’s a comprehensive guide to crafting and using wooden garden markers.
Why Wooden Garden Markers?
- Eco-friendly: Wood is biodegradable and sustainable, especially when repurposed from off-cuts.
- Aesthetic Appeal: Wooden markers effortlessly blend with the natural garden setting, adding a rustic charm.
- Customizable: Wood is a versatile medium that’s easy to paint, carve, or burn designs into.
Creating Wooden Garden Markers: Step-by-step
- Selection of Wood: Start with dry, untreated off-cuts. Hardwoods like oak or cedar are preferable due to their resistance to decay.
- Shape & Design: Cut the off-cuts into stakes using a saw. A typical size might be 6 inches long and 1 inch wide, but you can adjust based on your garden’s needs.
- Personalization:
- Painting: Use acrylic paint to write the names of the plants or paint small illustrations of the veggies or flowers. Stencils can help keep the designs uniform.
- Wood Burning: For a more permanent design, use a wood-burning tool to etch names or designs into the markers.
- Carving: If you have carving tools and skills, carved designs can add a 3D touch to your markers.
- Sealing: To protect the markers from the elements and ensure longevity, seal them with a clear, outdoor-grade sealant. This step is crucial, especially if you’ve painted the markers.
- Installation: Push the markers into the soil, ensuring they’re deep enough to stand firm yet visible enough to be easily read.
Creative Ideas & Tips
- Color Code: Assign different colors for different types of plants. For example, green for herbs, red for vegetables, and blue for flowers.
- Add Icons: Paint or carve small icons next to the plant’s name, like a tiny tomato for tomato plants or a rose for rose bushes.
- Natural Finish: If you prefer an even more natural look, skip the paint and simply use the wood-burning technique for labeling.
- Themed Gardens: If you have themed garden beds (like a salsa garden with tomatoes, cilantro, and peppers), consider crafting a larger, central marker with a fun name or illustration.
Caring for Wooden Markers
- Regular Checks: Over time, even sealed wood can deteriorate. Check markers periodically and reapply a sealant if they start to look worn.
- Winter Storage: If you live in a region with harsh winters, consider removing the markers during the cold months and storing them indoors.
Wooden garden markers are more than just functional tools; they’re a reflection of the gardener’s personality and creativity. Crafting them from wood off-cuts is not only an eco-friendly choice but also a testament to sustainable and conscious gardening. As you watch your garden thrive, these markers stand as silent, steadfast sentinels, guiding you through your horticultural journey.
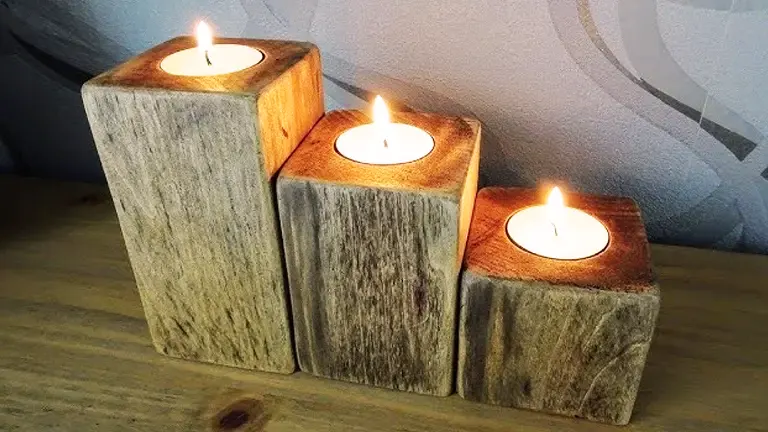
5. Candle Holders
The soft, warm glow of candles has charmed humanity for centuries. They not only light up spaces but also set moods, from romantic dinners to tranquil meditation sessions. Enhancing their allure are the holders they rest in. Crafting candle holders from wood off-cuts not only embraces sustainability but also imparts a touch of rustic elegance. Here’s how to craft and celebrate these wooden luminous wonders.
Why Opt for Wooden Candle Holders?
- Natural Aesthetic: Wooden candle holders exude a raw, earthy charm that complements both contemporary and traditional settings.
- Versatility: Wood can be carved, painted, or combined with other materials, offering endless design possibilities.
- Sustainability: Repurposing off-cuts into candle holders reduces waste and promotes eco-friendly practices.
Crafting Wooden Candle Holders: A Step-by-Step Guide
- Selection of Wood: Choose dry, sturdy off-cuts. Woods like oak, walnut, or cherry are ideal due to their dense nature and beautiful grains.
- Size & Shape: Decide on the design – whether you want a single candle holder or a cluster of varying heights. Trim the wood accordingly using a saw.
- Creating Recess for Candles:
- Measure the diameter of the candle you’ll be using.
- Mark the center of the wood off-cut.
- Using a drill with the right-sized spade bit or first bit, create a recess for the candle. Ensure it’s deep enough to hold the candle securely but shallow enough for the candle to protrude for easy lighting.
- Sanding: Sand the entire piece, starting with a coarser grit and moving to a finer grit. This ensures a smooth finish, highlighting the wood’s natural patterns.
- Design & Personalization:
- Painting: Acrylic paints or wood stains can give your candle holder a distinct color or enhance the wood’s natural hue.
- Carving: Add decorative patterns, initials, or symbols for a personalized touch.
- Combining Materials: Attach metal plates, leather strips, or even lace for added flair.
- Sealing: Apply a wood sealant or wax to protect the wood from candle drips and enhance its longevity.
Safety Tips
- Stability: Ensure that the base of the candle holder is flat and stable to prevent tipping.
- Heat Resistance: Consider attaching a metal or glass plate on top to prevent direct heat exposure to the wood.
- Location: Place away from flammable materials and out of reach of children and pets.
Styling Ideas
- Centerpieces: Group several wooden candle holders of varying heights and place them in the center of dining tables or coffee tables.
- Themed Decor: For festive occasions, adorn the candle holders with relevant decorations like ribbons, pinecones, or flowers.
- Outdoor Ambiance: Wooden candle holders can be a lovely addition to patios or gardens, casting a warm glow during evening gatherings.
Wooden candle holders are more than just functional objects; they’re symbols of creativity, sustainability, and the timeless beauty of natural materials. Whether they’re lighting up festive celebrations, intimate dinners, or meditative spaces, these holders, crafted from off-cuts, prove that with a bit of imagination, even discarded pieces can shine brilliantly.
6. Miniature Shelves
In the world of interior design, small details often make the most significant impact. And when it comes to showcasing treasured miniature collectibles or petite plants, the right display shelf can turn a mundane corner into a captivating focal point. Utilizing wood off-cuts to craft miniature shelves is an ingenious way to merge sustainability, creativity, and functionality. Let’s explore this enchanting concept further.

Why Embrace Miniature Wooden Shelves?
- Space Savvy: Mini shelves maximize vertical space, making them perfect for compact living areas or cluttered rooms.
- Customization: Wood off-cuts come in varied sizes, grains, and shades, allowing for endless design possibilities.
- Eco-friendly: Repurposing off-cuts not only reduces waste but also champions a sustainable approach to home decor.
Crafting Miniature Shelves: A Detailed Guide
- Selection of Wood: Opt for sturdy off-cuts free of cracks or splits. Hardwoods like maple, cherry, or oak offer durability and an attractive grain.
- Design Decisions:
- Floating Shelves: These give a clean, modern look. You’ll need brackets or floating shelf hardware.
- Corner Shelves: A brilliant way to utilize room corners, these can be triangular or L-shaped.
- Magnetic Fridge Shelves: Equipped with strong magnets, they can hold spices, notes, or succulents on your fridge.
- Size & Shape: Measure the space where you plan to install the shelf and cut the wood accordingly. For magnetic shelves, smaller sizes (around 3×3 inches) work best.
- Sanding & Smoothing: Sand the off-cut well, ensuring all edges are smooth and the surface is ready for finishing.
- Finishing Touches:
- Painting & Staining: Choose colors that complement your decor or apply wood stain to enhance the natural grain.
- Sealing: Protect the shelf from moisture and wear by applying a clear sealant or wood wax.
- Installation:
- Floating & Corner Shelves: Use appropriate wall anchors, brackets, or floating shelf kits to secure them to the wall.
- Magnetic Fridge Shelves: Attach strong neodymium magnets using adhesive or recess them into the wood for a cleaner look.
Styling Miniature Shelves: Tips & Ideas
- Layering: Place multiple floating shelves vertically with equal spacing for a tiered look.
- Theme-Based Displays: Dedicate each shelf to specific collectibles – one for mini succulents, another for figurines, etc.
- Integrated Lighting: Add small LED lights beneath the shelves to highlight the displayed items.
- Mix & Match: Combine wood off-cuts of different shades or grains for a diverse, eclectic look.
Miniature shelves crafted from wood off-cuts are not just an innovative decor solution but also a testament to the idea that beauty often lies in the smallest details. By elevating miniature treasures, both literally and figuratively, these shelves breathe life into overlooked spaces, turning them into delightful visual narratives. So, the next time you stumble upon a pile of wood off-cuts, remember: that potential masterpieces are just a few cuts, sands, and paints away.
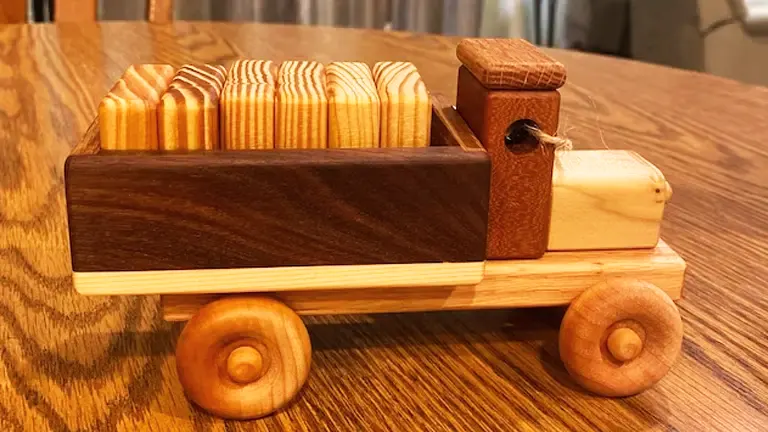
7. Handcrafted Toys
In an era dominated by digital screens and plastic toys, there’s a unique, enduring charm in wooden toys. They are not only tactile and warm but also evoke a sense of nostalgia, reminiscent of a time when toys were simple, yet endlessly captivating. Using wood off-cuts to craft toys is not only sustainable but also a way to introduce children to the magic of nature. Here’s a dive into the world of handcrafted wooden toys and how to bring them to life from scraps.
The Allure of Wooden Toys
- Timelessness: Wooden toys have been cherished across generations, with their appeal remaining undiminished over time.
- Durability: They’re long-lasting, often becoming cherished heirlooms.
- Safety: With no batteries or small plastic parts, they pose fewer hazards for children.
- Educational Value: Wooden toys often enhance motor skills, creativity, and spatial awareness.
Creating Toys from Wood Off-Cuts: Step-by-step
- Ideation & Design:
- Cars & Trucks: Simple designs with added wooden wheels.
- Blocks: Various shapes and sizes for stacking and building.
- Jigsaw Puzzles: Create scenes or patterns and cut them into interlocking pieces.
- Selecting the Wood: Opt for untreated, smooth off-cuts. Woods like beech, maple, or cherry are commonly used for toys due to their durability and smooth grain.
- Cutting & Shaping: Use a saw to cut the desired shape. For intricate designs, a jigsaw or scroll saw works best.
- Sanding: This is crucial. Sand all edges and surfaces thoroughly to ensure the toy is safe for little hands. Begin with a coarse grit sandpaper and progress to finer grits for a smooth finish.
- Decoration & Detailing:
- Painting: Use non-toxic, child-safe paints. Bold, primary colors are always a hit with kids.
- Burning: For a rustic touch, use pyrography (wood burning) to add details.
- Carving: Add textures or patterns through carving for a tactile experience.
- Finishing: Apply a child-safe finish, such as beeswax or mineral oil, to protect the wood and give it a gentle sheen.
Safety Precautions
- Smooth Finish: Ensure there are no sharp edges or splinters.
- Non-Toxic Materials: Always use paints, glues, and finishes that are child-safe.
- Size Considerations: For younger children, ensure parts aren’t small enough to be a choking hazard.
Styling & Packaging Ideas
- Eco-Friendly Packaging: Use cloth bags or recyclable boxes to package the toys.
- Instruction Cards: For puzzles or complex toys, include cards with fun stories or assembly instructions.
- Personalization: Add the child’s name or a personal message to make the gift even more special.
Handcrafted wooden toys, born from wood off-cuts, are a testament to the beauty of simplicity. They connect children to nature, inspire imaginative play, and stand as symbols of sustainability and creativity. Whether it’s the vroom of a wooden car, the towering achievement of stacked blocks, or the satisfaction of completing a jigsaw puzzle, the joy these toys bring is as pure and timeless as the wood they’re carved from. So, the next time you see wood scraps, envision them not as waste but as potential bearers of joy and laughter.
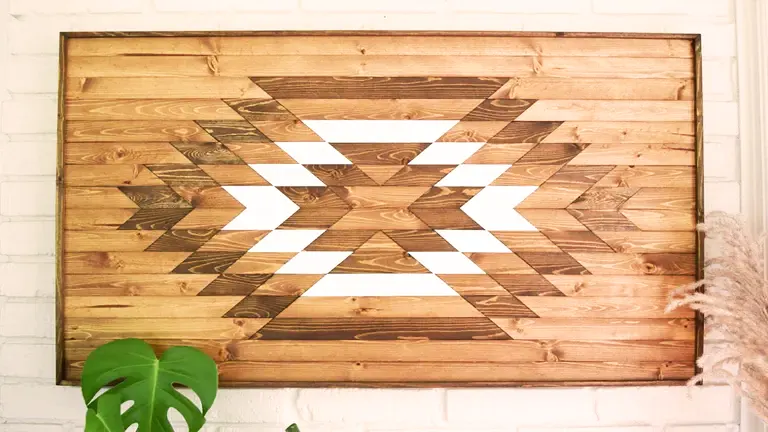
8. Artful Mosaics
The art of mosaic is as ancient as civilization itself. Traditionally, mosaics have been crafted from pieces of stone, glass, or ceramic, pieced together to depict stories, symbols, or abstract designs. However, the rich textures and colors of wood offer a different dimension to this age-old art form. Using wood off-cuts to create mosaics is a celebration of nature’s diversity and an exercise in sustainable artistry. Here’s how to embark on this creative journey.
The Magic of Wooden Mosaics
- Texture and Tone: Unlike traditional mosaic materials, wood offers a range of grains and textures, giving depth and character to the artwork.
- Natural Palette: The spectrum of wood shades, from pale beech to dark walnut, allows for a rich play of colors.
- Sustainability: Utilizing off-cuts reduces waste, making your art piece environmentally friendly.
Crafting Wooden Mosaics: A Guided Exploration
- Concept & Design: Begin with an idea. Whether it’s a geometric pattern, a landscape, or an abstract expression, sketch it out on paper first.
- Selection of Wood: Sort your off-cuts by shades and grains. This will help you decide which pieces fit best with different parts of your design.
- Cutting the Pieces: Depending on your design’s complexity:
- Use a saw for larger pieces.
- For intricate designs, tools like a scroll saw or precision knife might be necessary.
- Layout: Before attaching, lay out the pieces on your base (could be a wooden board or canvas) to see how they fit together. Adjust as necessary.
- Attachment:
- For Wall Hangings: Wood glue is sufficient. Ensure each piece is firmly pressed down and allow adequate drying time.
- For Tabletops or Functional Items: Consider using a more robust adhesive or even small nails for added durability.
- Finishing Touches:
- Sanding: Once all pieces are attached, gentle sanding (using fine-grit sandpaper) can help smoothen the edges and even out the surface.
- Sealing: A clear sealant or varnish will protect your mosaic and give it a glossy finish. Ensure the sealant is compatible with the wood types you’ve used.
- Framing or Edging: For wall hangings, a frame can accentuate the artwork. For tabletops, consider adding a protective edge.
Inspiration & Ideas
- Nature Themes: Create landscapes, with different wood types representing elements like the sky, mountains, or forests.
- Abstract Art: Play with geometric shapes, lines, and patterns. The natural wood grains can add an unexpected twist to your designs.
- Functional Art: Beyond wall pieces, consider creating mosaic tabletops, cabinet door panels, or even decorative trays.
- Integrated Art: Incorporate other elements like stones, glass pieces, or metal into your wooden mosaic for a multi-textured effect.
Wooden mosaics bring together the organic charm of timber with the detailed craftsmanship of mosaic art. Each piece, sourced from an off-cut, tells its own story, and when pieced together, they weave a tapestry of nature’s beauty. So the next time you’re faced with a pile of wood scraps, see them not as remnants but as potential strokes of an artistic masterpiece. The canvas awaits; all it needs is your vision and touch.
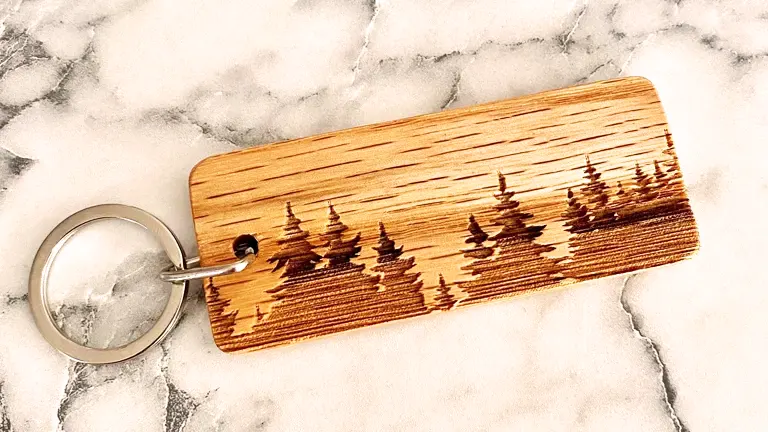
9. Keychains and Magnets
Wood, with its inherent warmth and timeless charm, offers a tactile satisfaction that few materials can rival. Transforming wood off-cuts into everyday items like keychains and magnets is not just an eco-friendly venture but also an opportunity to infuse a mundane routine with a touch of artistry. Here’s how you can turn those wooden remnants into prized possessions.
The Appeal of Wooden Accessories
- Tactile Pleasure: The texture of wood is comforting to touch, making it perfect for items we use frequently.
- Aesthetic Value: Wood, with its grains and hues, brings an organic, rustic charm to modern homes and lifestyles.
- Customization: Wood is a versatile canvas, allowing for various treatments to reflect personal style or sentiments.
Creating Wooden Keychains & Magnets: A Step-by-Step Guide
- Designing & Shaping:
- Keychains: Consider shapes that are easy to hold and fit comfortably in pockets. Common shapes include rectangles, circles, or personalized silhouettes.
- Magnets: Shapes can vary based on preference or fridge aesthetics. From abstract designs to miniature landscapes, the sky’s the limit.
- Cutting & Sanding:
- Use a scroll saw jigsaw, or even hand tools for precise cuts.
- Sanding is vital. Start with coarse grit and gradually move to finer grits to ensure a smooth, splinter-free finish.
- Decorative Techniques:
- Painting: Use acrylic or wood paints to adorn your pieces. Whether it’s a splash of color, intricate patterns, or even a minimalistic design, painting allows for immense creativity.
- Engraving: Using pyrography tools or carving sets, etch designs or messages onto the wood.
- Staining: Enhance the natural grain of the wood with stains, offering a more rustic appearance.
- Assembly:
- Keychains: Drill a small hole at one end, ensuring it doesn’t split the wood. Attach a key ring through this hole.
- Magnets: Using a strong adhesive, attach a magnet to the back of the wooden piece. Neodymium magnets are ideal due to their strong holding power.
- Protective Finishing: Apply a sealant or wax to protect the wood from moisture, scratches, and everyday wear. It also adds a polished finish to your creations.
Gifting & Personalization
- Personal Messages: Engrave names, dates, or messages, turning these accessories into memorable gifts.
- Thematic Designs: Seasonal motifs, favorite animals, or even pop culture references can make these items fun and relatable.
- Gift Packaging: Present them in eco-friendly packaging or a handcrafted box, enhancing the personal touch.
Keychains and magnets, in their essence, are reminders — of places, people, or moments. When crafted from wood off-cuts, they become tokens of sustainability, artistry, and personal stories. So, the next time you stumble upon wood scraps, remember that within them lies the potential to craft memories, holding keys not just to doors but to hearts and homes as well.
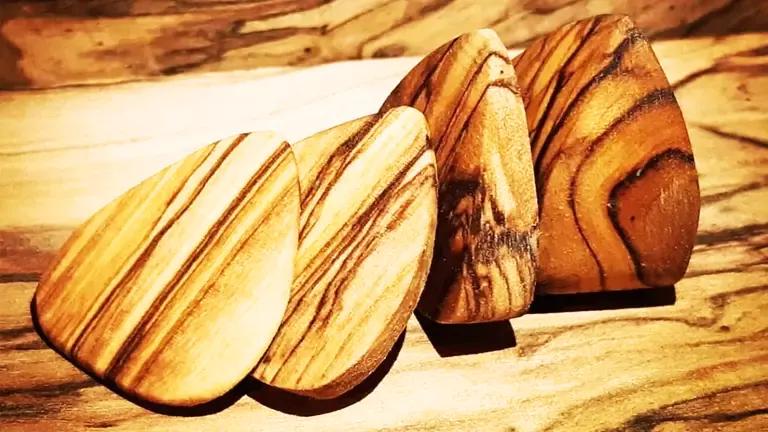
10. Customized Guitar Picks
From the profound resonance of an aged Stradivarius violin to the rich timbre of a grand piano, wood has long played a foundational role in the world of music. But beyond these large instruments, even in the humble guitar pick, wood finds its voice. For ardent musicians and hobbyists alike, wooden guitar picks are more than just functional—they’re a bridge to a unique auditory experience.
The Resonance of Wooden Picks
- Distinct Tone: Compared to their plastic counterparts, wooden picks produce a warmer, more resonant tone. The natural material interacts with the guitar strings in a way that can mellow out sharp edges and enhance the instrument’s organic sound.
- Varied Textures: The grain and texture of the wood offer a tactile experience, potentially offering better grip and control during playing.
- Eco-friendly Choice: For the environmentally-conscious musician, wooden picks are biodegradable and often made from sustainable sources or off-cuts.
Crafting Wooden Guitar Picks: A Harmonic Guide
- Selection of Wood:
- Hardwoods like maple, rosewood, or walnut are durable and can withstand the stress of strumming. They generally produce a fuller, rounder sound.
- Softer Woods like cedar can be used, but they wear out faster. However, they may produce a softer, more delicate tone.
- Shaping & Cutting:
- Trace the shape of a standard pick onto the wood or design a custom shape that suits your style.
- Use precision cutting tools, like a scroll saw or a jigsaw, to carve out the pick shape.
- Sanding & Smoothing:
- Begin with a coarse grit sandpaper to shape the pick’s edges and then transition to finer grits for a smooth, comfortable finish.
- Personalizing:
- Engraving: Use pyrography tools to etch designs, initials, or symbols onto the pick.
- Staining: Enhance or alter the wood’s natural color using wood stains.
- Finishing Touches:
- Apply a sealant or natural oil (like linseed or tung oil) to protect the pick and give it a slight sheen. This also enhances the wood’s natural patterns and colors.
Understanding the Sound Dynamics
- Thickness & Flexibility: The thickness of the pick can greatly affect the sound. Thicker picks generally produce louder and brighter tones, while thinner picks yield softer, mellow sounds.
- Shape & Edges: A sharper point can lead to brighter tones and is suitable for lead guitarists, while a rounded edge offers a warmer sound ideal for rhythm guitar.
For many, the act of playing an instrument is deeply personal, a communion of spirit and sound. Wooden guitar picks, with their distinct tonal qualities, offer musicians a chance to further customize this experience. They are not only an ode to sustainability but also a testament to the nuanced relationship between nature and music. So, the next time you strum a chord, let it be with a pick that sings of forests, winds, and the timeless dance of trees.
Tips to Keep in Mind
- Safety First: Always use gloves, and safety glasses, and maintain a well-ventilated work area.
- Finishing Touches: Sanding your projects well and adding a finish can enhance their durability and aesthetic appeal. You can consider varnishing, staining, or painting, depending on the project.
- Stay Sustainable: Before embarking on any project, remember the importance of sustainability. Always source your wood responsibly and recycle or repurpose it as much as possible.
All in All Conclusion
Wood off-cuts are not just discarded pieces but are windows to a world of creativity. They challenge us to think outside the box, harness our imagination, and create something meaningful. So, next time you find yourself with a pile of off-cuts, see it as a golden opportunity waiting to be explored. Happy crafting!
If you’re in need of tools to bring these ideas to life, be sure to check our articles Must Have Tools for Woodworking: Beginner’s Guide 2023 and Essential Wood Carving Tools 2023 for valuable guidance and support!
FAQs
- What are wood off-cuts?
Off-cuts are the smaller pieces of wood left over after larger woodworking projects. Instead of being wasted, these remnants often have the potential to be repurposed into unique crafts and designs. - Why are wood off-cuts historically significant?
Throughout history, artisans and builders have valued resources. Off-cuts, being a by-product of larger projects, were repurposed into tools, art, or even currency, showcasing the importance of sustainability and resourcefulness in ancient civilizations. - Can off-cuts be used in structural projects?
While off-cuts can be used for smaller structural items like shelves or frames, it’s essential to ensure they have the required strength and durability. Generally, they’re better suited for decorative or non-load-bearing projects. - How do modern carpenters view off-cuts?
With the rising importance of sustainability, many modern carpenters see off-cuts as an opportunity to minimize waste, showcasing their creativity by turning these remnants into beautiful and functional pieces. - What are some popular projects made from wood off-cuts?
From intricate jewelry, decorative bowls, coasters, and art installations to functional items like cutting boards, stools, and toys, the possibilities with off-cuts are vast and varied! - How can I ensure the quality of wood off-cuts?
Always check for signs of damage, decay, or pests. Good off-cuts should be free of these issues, and if stored correctly, they can retain their quality over time. - Are there any environmental benefits to using off-cuts?
Absolutely! Utilizing off-cuts reduces waste, promotes recycling, and minimizes the need to harvest fresh wood, thereby conserving forests and decreasing the environmental impact of woodworking. - How do wood species affect the potential use of off-cuts?
Different wood species have varying properties. Hardwoods, for example, are durable and can be used for more wear-resistant projects, while softer woods might be ideal for decorative items. - Where can I purchase or find wood off-cuts?
Many woodworking shops, lumber yards, or craft stores sell or even give away off-cuts. Additionally, some online platforms and communities trade or share these remnants for creative endeavors. - Are there any safety concerns with using off-cuts?
As with any woodworking project, it’s essential to handle off-cuts with care. Ensure they are free of nails, splinters, or any harmful chemicals, and always use appropriate safety equipment when crafting.
We’d love to hear from you! Share your personal experiences and creative projects inspired by the ‘Best Wood Off-Cut Ideas 2024’ in the comments section below. Your unique creations and insights could inspire fellow craftsmen and woodworking enthusiasts!

David Murray
Forestry AuthorI'm David Murry, a forestry equipment specialist with a focus on chainsaw operation. With over 13 years of experience, I've honed my skills in operating and maintaining a wide range of machinery, from chainsaws to log splitters. My passion for the outdoors and commitment to sustainable forestry drive my work, which emphasizes safety, efficiency, and staying updated with industry advancements. Additionally, I'm dedicated to sharing my expertise and promoting environmental awareness within the forestry community.


Leave your comment