Easy DIY Drip Watering System Using Water Bottles: Garden Hack
- June 17, 2024
- 0 comment
Learn this garden hack to build an easy DIY drip watering system using water bottles for efficient and eco-friendly plant care. Are you looking for a clever way to keep your garden thriving without the fuss? Our easy DIY drip watering system using water bottles is the ultimate garden hack for busy plant lovers.
This guide will show you how to set up an effective watering solution that saves time, conserves water, and nurtures your plants, even on the busiest days. Let’s dive in and get your garden flourishing with minimal
Table of Contents
- Benefits of DIY Drip Watering Systems
- Materials Needed
- Step-by-Step Guide to Creating Your Water Bottle Drip System
- Using Your Drip System: Best Practices
- Solving Common Problems with Your DIY Drip System
- Enhancing Your Watering System
- Conclusion
- FAQs
Benefits of DIY Drip Watering Systems
Water Efficiency: Drip irrigation stands out for its exceptional water conservation capabilities. By delivering water directly to the soil near plant roots, the system minimizes evaporation and runoff. Research shows that drip irrigation can increase water efficiency by up to 60% compared to traditional methods like sprinkler systems. This precision watering is not only crucial during drought conditions but also for water-wise gardening, ensuring that plants receive precisely the hydration they need, directly at their roots, without wasting valuable resources.
Cost-Effective: While commercial drip irrigation systems can be costly, particularly for casual or small-scale gardeners, using materials like recycled water bottles can drastically reduce expenses. Typically, a homemade system costs less than 10% of a professional setup. This DIY approach not only saves money but also repurposes waste materials, turning potential trash into a valuable gardening tool. The savings extend beyond initial costs, as the efficient use of water can also reduce monthly water bills.
Plant Health: The benefits of drip irrigation extend deeply into plant health. By providing a slow, steady release of water, this system helps maintain an optimal moisture level in the soil, crucial for healthy root development. Consistent moisture can enhance nutrient uptake and reduce plant stress caused by fluctuations in water availability. This is particularly beneficial for plants like tomatoes and peppers, which are sensitive to irregular watering and can suffer from conditions such as blossom end rot in uneven moisture conditions.
Eco-Friendly: Using DIY systems made from recycled water bottles significantly contributes to environmental conservation. This practice helps reduce the amount of plastic waste, as each bottle reused is one less in the landfill. Additionally, the reduction in water usage contributes to sustainable water management practices, essential in areas facing water scarcity. The carbon footprint associated with manufacturing and transporting commercial irrigation systems is also avoided, further reducing the environmental impact.
Comparative Table: DIY Drip Irrigation vs. Traditional Watering Methods
| Aspect | DIY Drip Irrigation | Traditional Watering Methods |
|---|---|---|
| Water Efficiency | Up to 90% efficiency, minimal evaporation and runoff. | 50-70% efficiency, significant evaporation and runoff. |
| Cost | Approximately 10% of commercial systems, significant savings on water bills. | High initial costs, higher ongoing water expenses. |
| Plant Health Impact | Enhances nutrient uptake, reduces stress, optimal for sensitive plants. | Can cause uneven moisture, stress to plants. |
| Environmental Impact | Reduces plastic waste, lowers carbon footprint. | Higher resource usage, including water and fuel. |
Materials Needed
To begin building your drip irrigation system, you will need a few basic supplies, most of which you likely already have at home. Here’s what you’ll need:
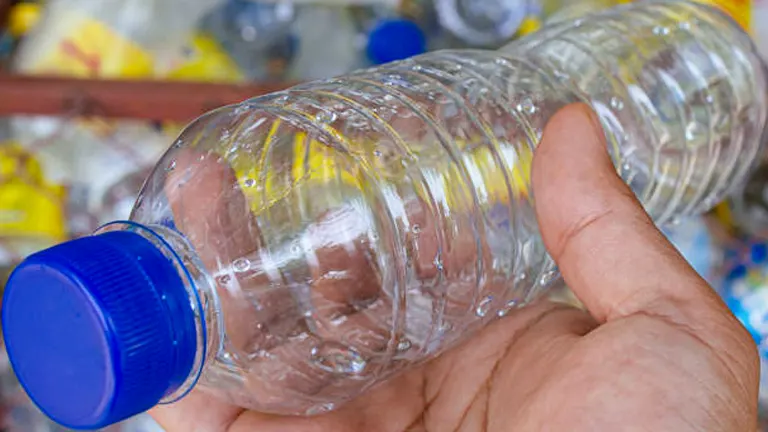
- Empty Water Bottles: Standard plastic bottles are suitable, with 1-liter bottles recommended for their capacity to maintain longer watering intervals without frequent refills. Ensure bottles are thoroughly cleaned to remove any residues or contaminants that could clog the watering holes. It’s advisable to use a bottle brush and a mild detergent, and rinse well.
- Sharp Needle or Small Drill Bit: Used for making precise water flow holes in the caps of the bottles. The size of the holes will directly influence the rate at which water drips out, allowing for controlled irrigation. Choose for a needle for smaller, more precise holes, or a small drill bit for creating slightly larger holes efficiently.
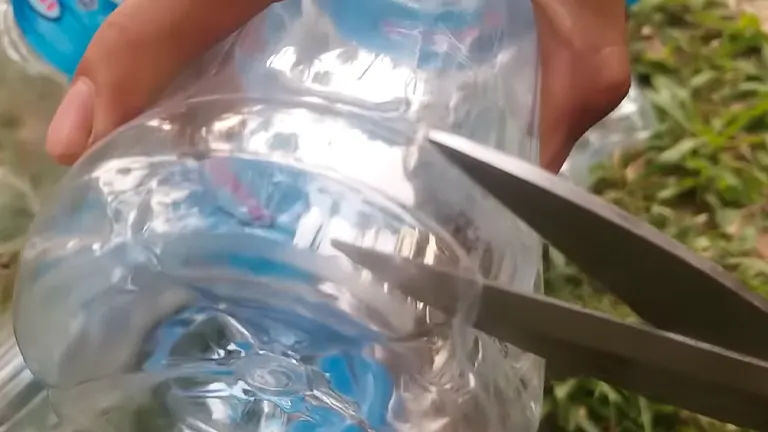
- Scissors: Necessary for cutting the bottoms off the water bottles. A sturdy pair of scissors is recommended to make clean cuts, ensuring the edges are not jagged which could pose a hazard during handling.
- Water-Soluble Fertilizer (optional): This allows for the simultaneous delivery of water and nutrients directly to the plant roots, enhancing growth and soil health. Choose a fertilizer that complements the needs of your specific plants and dilute it according to the instructions to prevent over-fertilization.
Step-by-Step Guide to Creating Your Water Bottle Drip System
1. Preparing the Water Bottles
Begin by thoroughly washing the bottles with warm, soapy water to remove any labels and adhesive residues. Ensure all soap is rinsed off to prevent any possible contamination of the soil. A clean bottle is crucial to prevent any blockages in the watering holes. For bottles with stubborn labels, soak them in warm water for a few hours, and then use a scrubbing sponge to remove any remaining adhesive.
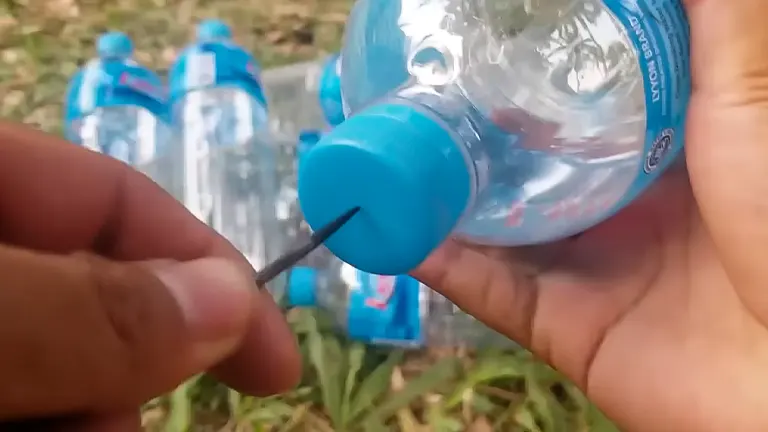
Use a sharp needle or a small drill bit to carefully create 4-5 small holes in each bottle cap. The size of these holes will significantly affect the water flow rate; smaller holes mean a slower drip, ideal for consistent moisture. Experiment by filling a bottle with water and observing the drip rate—adjust the number of holes or their size as needed for your specific plant requirements.
- For an eco-friendlier option to remove stubborn labels, mix baking soda and cooking oil into a paste, apply it over the labels, and leave it for about 30 minutes before scrubbing off.
- To ensure uniform hole sizes in the caps, consider using a heated needle or small drill bit; the heat can make puncturing smoother and more consistent.
- After puncturing the holes, test the flow rate with various amounts of water to simulate light and heavy rains, adjusting the hole sizes to mimic natural rainfall as needed for your plants.
2. Installation Process
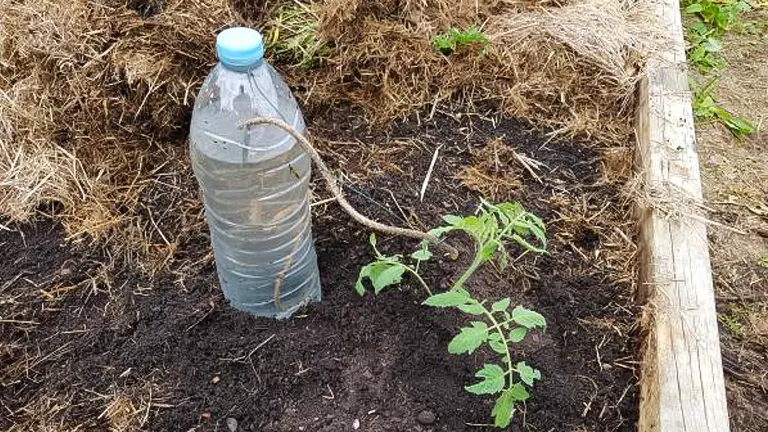
Using a pair of sharp scissors, cut off the bottom of each water bottle smoothly to avoid any sharp edges. This allows for easier refilling without disturbing the setup.
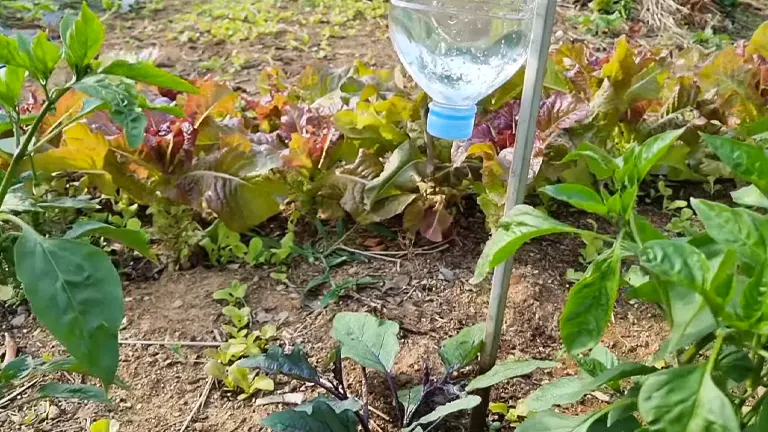
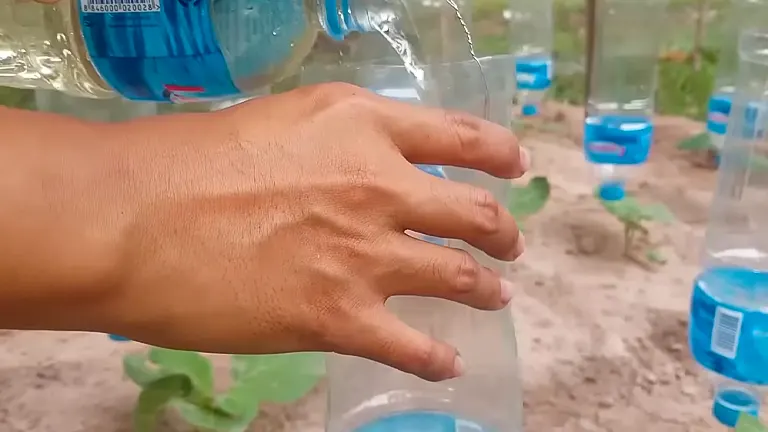
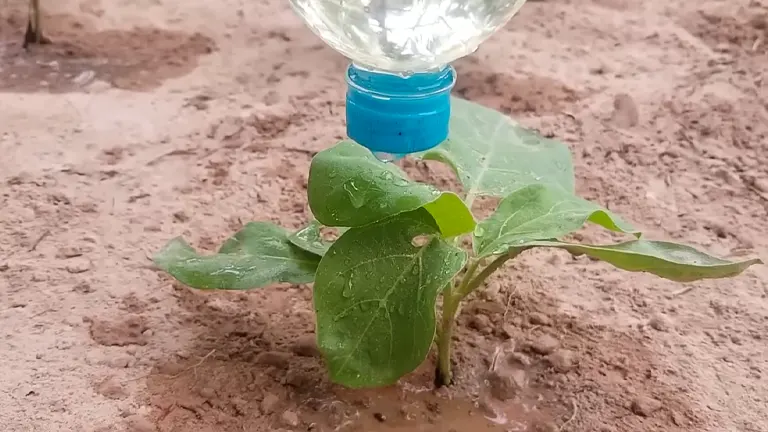
Select the location for each bottle near the plants you wish to water. Dig a small hole about 6-8 inches deep next to the plant roots. Insert the bottle neck-first into the soil, ensuring the cap with the punctured holes is facing downward. The cut edge should be above ground to facilitate easy refilling. The placement should be strategic—close enough to the root zone to be effective but not so close as to disrupt the roots.
To prevent the bottles from tipping over or shifting, pack soil firmly around each bottle’s base. Consider using a small amount of gravel or stones for added stability, especially in windy areas or if the soil is very loose.
- Before cutting the bottles, use a permanent marker to draw a straight line around them to serve as a cutting guide. This ensures a smoother and more even cut.
- When inserting the bottle into the soil, angle it slightly towards the plant to concentrate the water flow directly to the roots where it’s most needed.
- Instead of just using stones, wrap the base of the bottle with chicken wire or a small mesh to create a cage-like structure that can be filled with stones for increased stability without obstructing refilling.
3. Adjustment and Water Flow Control
Fill the bottles with water and observe the initial water flow. Make sure the water drips at a consistent and appropriate rate for your plants. This step is crucial to ensure your plants don’t get too much or too little water. If the water flows too quickly, add more holes with a smaller diameter or partially cover some holes with waterproof tape to slow the rate. If the flow is too slow, enlarge the existing holes slightly.
Over the first few days, keep a close watch on the soil moisture and the overall health of the plants. Adjust the number of holes or their size as necessary, depending on weather conditions and the water needs of your plants.
If desired, you can dissolve water-soluble fertilizer in the water you add to the bottles. This can be an efficient way to feed your plants directly at the root level. Ensure the solution is well mixed to prevent any sediment from clogging the holes.
- If adjusting hole sizes is challenging, consider using adjustable caps from other containers (like those with twistable sports cap nozzles) that allow for easy flow rate modifications.
- Place a small, clear ruler in the soil next to the bottle to monitor the water level decrease over time, helping you quantify the exact water usage per day and adjust accordingly.
- For those adding fertilizer, use a small funnel to ensure that the fertilizer powder doesn’t spill outside the bottle and is directed straight into the water, reducing waste and mess.
Using Your Drip System: Best Practices
Once your drip system is in place, following best practices for operation and maintenance will maximize its effectiveness and longevity. Here are key tips to ensure your watering system works smoothly:
Filling and Refilling
- Accessibility: Ensure the cut end of the bottle is accessible for easy refilling. Consider using a funnel to add water quickly and cleanly.
- Regular Checks: Make it a habit to check and refill the bottles as needed. During hot weather, your plants might require more frequent refilling.
Incorporating Nutrients
- Using Water-Soluble Fertilizer: If desired, you can dissolve a suitable water-soluble fertilizer in the water you add to the bottles. This method provides a steady supply of nutrients directly to the roots, promoting healthy growth.
- Consistency is Key: For the best results, maintain a consistent fertilization schedule, adjusting as needed based on plant response and growth stages.
Monitoring System Efficiency
- Observe Plant Health: Watch how your plants respond to the watering schedule. Adjust the number of holes in the bottle caps or the placement of the bottles if you notice signs of over or under-watering.
- Seasonal Adjustments: Be prepared to make changes with the seasons. Plants often require more water in the summer and less during cooler months. Adjusting your system to meet these changes will ensure optimal plant health year-round.
Solving Common Problems with Your DIY Drip System
Even the most well-planned systems can encounter issues. Here’s how to troubleshoot common problems in your DIY drip irrigation system:
Clogged Nozzles
- Regular Cleaning: Check and clean the holes in the bottle caps periodically to remove any sediment or debris.
- Filtering Water: If your tap water is high in minerals, consider using filtered or distilled water to reduce clogging.
Bottle Placement
- Adjusting for Coverage: If some plants are receiving too much water while others are too dry, reposition the bottles for more even distribution.
- Depth Adjustments: Ensure that the cap end of the bottle is placed deep enough in the soil to target the root zone but not so deep that it limits the root’s growth space.
Maintenance Tips
- Routine Inspections: Regularly inspect your system for leaks or damage to the bottles.
- Winter Care: If you live in a freezing climate, remove the bottles from your garden in winter to prevent damage from frozen water.
Enhancing Your Watering System
Scalability: The modular nature of a DIY drip irrigation system using water bottles allows for easy expansion to suit any garden size or plant need. As your garden grows, you can incrementally add more bottles, ensuring that each new addition is calibrated similarly to the existing setup to maintain efficiency and effectiveness.
- Uniformity in Expansion: Use a template or a jig to make the new bottle setups identical to the original, ensuring that the water distribution remains consistent across all areas of your garden.
- Zoning: Consider creating zones within your garden, each with its specific watering needs catered to by a certain number of bottles. This can help manage different plant species that require varying amounts of water.
Automation Ideas: Introducing automation to your DIY system can save time and enhance the precision of watering.
- Automated Reservoirs: Utilize a programmable timer attached to a water pump in a large reservoir to automate the watering schedule. This can be particularly effective during peak growing seasons or dry spells.
- Solar Power: To make the system more sustainable, consider powering your automated setup with a small solar panel kit. This can power timers and small pumps, ensuring the system is environmentally friendly and efficient.
Integration with Other Systems: Integrating your DIY system with existing irrigation solutions can provide comprehensive coverage and ease of management.
- Complementary Systems: Set up your DIY drippers to complement areas under-served by sprinkler systems or soaker hoses, ensuring that all parts of your garden receive adequate moisture.
- Hybrid Approach: Use the DIY system for targeted watering of high-need, sensitive areas, while relying on broader systems for general irrigation tasks.
Enhancing Drip Irrigation Systems
| Enhancement | Benefits | Considerations |
|---|---|---|
| Scalability | Flexibility to expand; tailored to specific needs | Must maintain uniformity to ensure effective watering |
| Automation | Time-saving; precise control | Initial setup cost; requires basic programming knowledge |
| Integration | Comprehensive coverage; efficient resource use | Coordination needed between different systems for optimization |
Related Post
- How to Build a Barn: A Step-by-Step Guide for Beginners
- How to Build a Sustainable Compost Bin: Easy and Eco-Friendly DIY
- How to Fertilize Bougainvillea: A Complete Guide for Stunning Blooms
- How to Fertilize Apple Trees: Essential Tips for a Bountiful Harvest
- How to Fertilize Lemon Trees: Secrets for Thriving Citrus
- How to Fertilize Avocado Tree: A Step-by-Step Guide for Lush Growth
- 10 Best Bow Saws to Buy in 2024: Top Picks for the Money
- Best Miter Saw For Beginners
- Top 10 Pruning Saws to Buy in 2024: Best for the Money
- 7 Best Pocket Chainsaw
Conclusion
Creating a DIY drip irrigation system using water bottles is more than just a practical gardening solution; it’s a step towards sustainable and efficient plant care. This system not only conserves water and saves money but also gives you the flexibility to tailor watering practices to the specific needs of your garden. By using recycled materials, you contribute to environmental conservation, making this DIY project a rewarding endeavor for any gardener.
FAQs
- What type of water bottle is best for a DIY drip irrigation system?
Any clean, empty plastic water bottle can be used, but 1-liter bottles are ideal because they hold enough water to minimize frequent refills and are large enough to handle easily during setup. - How do I prevent the water from draining too quickly from my drip system?
Control the water flow by adjusting the size and number of holes in the bottle cap. Start with smaller holes, and increase the size if the water drains too slowly. Testing different configurations will help you find the perfect balance for your plants. - Can I add fertilizer to the water in my DIY drip system?
Yes, water-soluble fertilizer can be added directly to the water in your drip system. Make sure the fertilizer is fully dissolved to prevent clogging and distribute nutrients evenly to your plants. Monitor the plants for any signs of over-fertilization and adjust as needed. - How often should I refill the bottles in my drip irrigation system?
Refill frequencies depend on the climate, soil type, and the needs of your plants. Check the system every few days to determine how quickly the water depletes and adjust your refilling schedule accordingly. - Is there a risk of the water bottles tipping over or getting dislodged?
To prevent bottles from tipping over, bury them deep enough so that part of the bottle is snug within the soil, or place stones around them for additional stability. Ensure the setup is secure, especially in windy conditions or if you have active pets or wildlife in your garden. - How can I expand my DIY drip system as my garden grows?
Expanding your system is as simple as adding more bottles. Make sure each new addition mimics the setup of the existing ones to ensure consistent water distribution. You can also connect several bottles to a central reservoir to streamline the refilling process. - What should I do if the water flow stops or decreases significantly?
First, check if the holes in the bottle cap are clogged. Clean them out with a needle or thin wire. If the problem persists, consider whether sediment or algae might be blocking the flow and clean the entire bottle and cap thoroughly. - Can this system be used for both indoor and outdoor plants?
Absolutely! This drip irrigation system is versatile enough for both indoor and outdoor use. For indoor plants, be mindful of water overflow and place a tray or saucer under the bottles to catch any excess water.
Start your sustainable gardening journey today with this easy DIY drip watering system using water bottles. Save water, reduce waste, and keep your garden thriving. Happy gardening!
Kristine Moore
Forestry AuthorI'm Kristine Moore, a seasoned garden landscaping professional with over 30 years of experience. My extensive career has been dedicated to transforming outdoor spaces into stunning, sustainable landscapes. With a deep understanding of horticulture, design principles, and environmental stewardship, I have become a respected figure in the field, known for creating harmonious, visually appealing, and eco-friendly gardens. My commitment to excellence and continuous learning in landscaping trends and techniques has solidified my reputation as an expert in garden design and implementation.


Leave your comment