How To Build Chicken Nesting Boxes
- January 12, 2024
- 1 comment
Whether you maintain an extensive flock or just a handful of backyard chickens, crafting your own nesting boxes presents a straightforward and cost-effective means to enjoy a regular supply of fresh eggs. By engaging in a bit of thoughtful preparation, utilizing basic tools, and repurposing scrap wood, you can construct personalized nesting boxes for your feathered companions. These homemade boxes not only foster a conducive environment for egg laying but also contribute to the overall contentment and well-being of your chickens, ensuring a harmonious and fulfilling experience in tending to their needs.
List on How To Build Chicken Nesting Boxes:
- Crafting Your Nesting Boxes
- Measuring and Cutting the Pieces
- Assembling the Boxes
- Promoting Nesting Behavior in Your Hens
- Encouraging Your Chickens to Lay Eggs in Nesting Boxes
Is a Nesting Box Necessary?
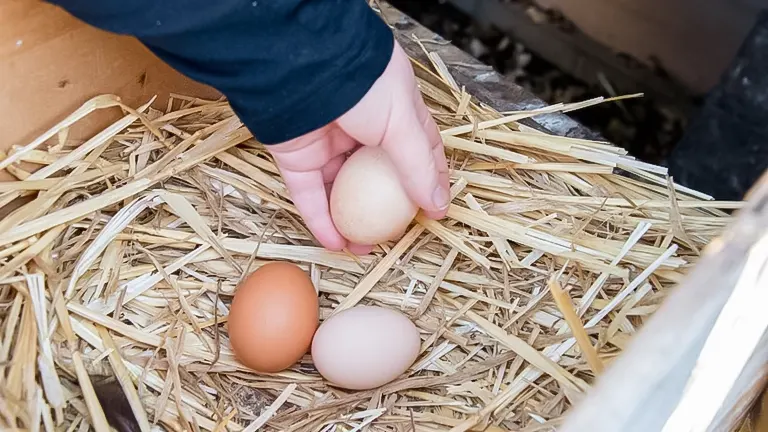
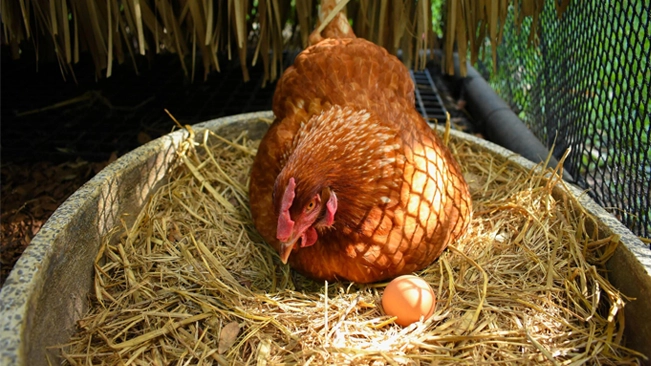
In the natural course of avian behavior, birds instinctively seek out secluded spots to establish nests, and your chickens are no exception. They too will instinctively search for a quiet, hidden location to lay their eggs. While it’s true that nesting boxes were specifically designed to streamline the egg-laying process, offering a secure and centralized location for chickens to deposit their eggs, it’s worth noting that chickens may lay eggs elsewhere if such boxes are not provided.
Although chickens are capable of laying eggs without the aid of nesting boxes, the absence of designated spaces might prompt them to choose alternative, less secure locations, potentially exposing the eggs to predators and competition from other chickens. To better understand the implications of chickens opting for alternative nesting sites, I invite you to view the accompanying video, which illustrates the potential challenges that may arise when chickens forgo the use of designated nesting boxes.
Determining the Ideal Number of Chicken Nesting Boxes
The appropriate quantity of nesting boxes to incorporate into your chicken coop hinges on the size of your flock. Seasoned poultry keepers commonly advocate allocating one chicken nesting box for every 4-5 hens, emphasizing the importance of a minimum of two boxes.
While your hens might display a penchant for congregating around a single favored nesting box, providing the recommended number helps mitigate the risk of simultaneous egg-laying attempts and potential disputes.
It’s noteworthy that hens often exhibit a tendency to prefer a specific box for laying, and having the recommended number ensures that they can comfortably take turns. As a strategic consideration, especially for novice chicken keepers, it is prudent to contemplate future flock expansion when planning your coop layout and nesting box provision, ensuring a seamless and accommodating environment for both existing and prospective feathered residents.
Crafting Your Nesting Boxes
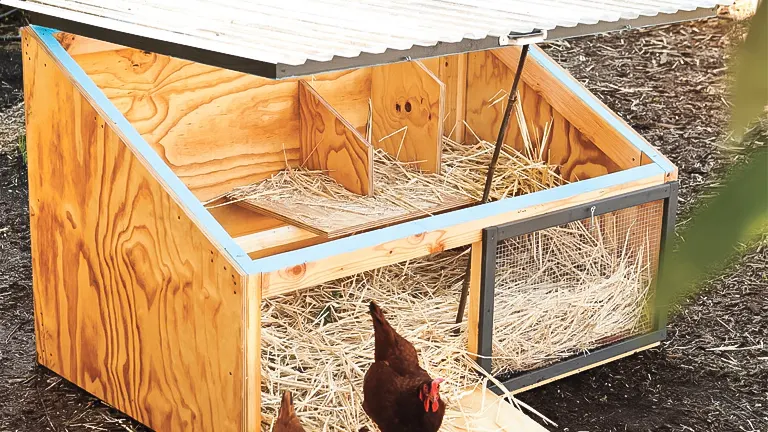
Crafting your nesting boxes is a crucial aspect of creating a comfortable and productive environment for your chickens. When designing these boxes, consider making a minimum of one box for every 2 to 4 hens, allowing for ample space and minimizing potential conflicts. The dimensions are significant, with 16 by 16 by 16 inches often deemed suitable for most chicken breeds, though adjustments may be necessary for larger breeds like Orpingtons or Rhode Island Reds.
Thoughtful construction using appropriate tools and materials ensures the durability of the boxes. The goal is to provide a secure and inviting space for egg-laying, contributing to the overall well-being of your flock. Additionally, if future expansion of your chicken family is in the plans, contemplating the construction of extra nesting boxes from the outset can be a strategic decision for a seamless and accommodating coop environment.
1. Craft a Minimum of One Nesting Box for Every 2 to 4 Hens
When embarking on the design phase of your nesting boxes, a key consideration is to produce a minimum of one box for every 2-4 hens. This thoughtful approach takes into account the natural rhythm of laying, allowing hens to take turns utilizing the boxes based on their individual laying schedules. By adhering to this ratio, you not only guarantee ample space for each hen but also mitigate the likelihood of conflicts arising over box occupancy.
It’s important to recognize that hens exhibit a cooperative nesting behavior, and having a sufficient number of boxes facilitates a harmonious environment. Nonetheless, if your future plans involve expanding your flock, it would be prudent to contemplate the construction of additional nesting boxes to accommodate the anticipated growth in poultry numbers, ensuring continued comfort and convenience for your feathered companions.
2. Establishing Optimal Box Dimensions
When determining the dimensions of your nesting boxes, it’s crucial to tailor the size to suit the specific needs of your chickens. For the majority of chicken breeds, a dimension of 16 by 16 by 16 inches (41 × 41 × 41 cm) is deemed suitable. However, if you’re tending to larger breeds such as Orpingtons or Rhode Island Reds, it is advisable to opt for more spacious boxes, measuring around 18 by 18 by 18 inches (46 × 46 × 46 cm).
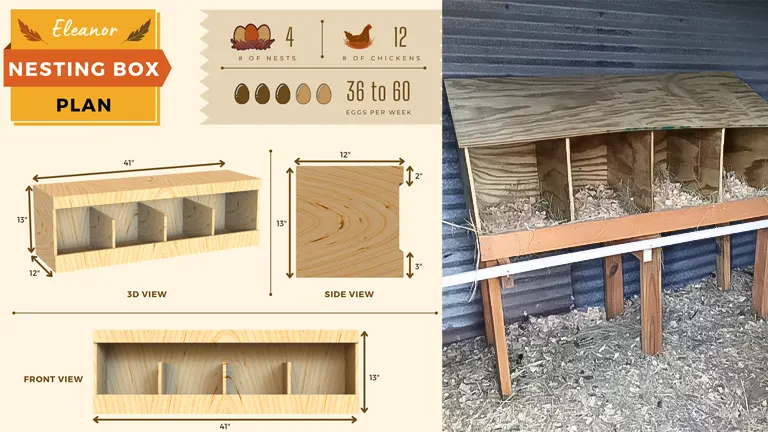
It’s worth noting that flexibility exists, allowing for the customization of box dimensions to align with spatial constraints. In instances of limited space, smaller boxes can be fashioned, but it’s recommended that even in such cases, the dimensions should not fall below 12 by 12 by 12 inches (30 × 30 × 30 cm) to ensure the comfort and functionality of the nesting environment. Taking into account the specific size requirements of your chicken breeds contributes to the overall well-being and contentment of your feathered companions.
3. Selecting an Ideal Location for Your Nesting Boxes
Optimal placement of your nesting boxes involves careful consideration of both safety and functionality. It is advisable to position the boxes inside the coop, ensuring they are situated at a height of 3–4 feet (0.91–1.22 m) above the ground. This placement serves the dual purpose of providing a secure environment for your birds while safeguarding them from potential predators.
However, it is essential to maintain a strategic balance. The nesting boxes should be lower than your chickens’ designated roosting spot, with a recommended distance of 4–5 feet (1.2–1.5 m) to prevent unintended roosting in the nesting boxes. This precautionary measure helps prevent the undesirable outcome of chickens using the nesting boxes as roosts, which can lead to messy nests. Ensuring a thoughtful placement of the nesting boxes contributes to a harmonious and hygienic nesting environment for your feathered companions.
Measuring and Cutting the Pieces
Measuring and cutting the pieces for your chicken nesting boxes is a critical step in ensuring their functionality and durability. Accurate measurements are key to constructing boxes that suit the specific needs of your flock. Begin by measuring the dimensions meticulously, keeping in mind the recommended sizes for the comfort of your chickens. Once the measurements are established, employ precise cutting techniques to fashion the individual pieces.
Attention to detail during this phase ensures that the components fit seamlessly during assembly, promoting sturdiness and structural integrity. Whether using scrap wood or purpose-purchased materials, a well-executed measuring and cutting process lays the foundation for crafting nesting boxes that provide a secure and comfortable space for your hens to lay eggs.
1. Select a 2-Inch (5.1 cm) Thick Flat Wood, such as Plywood
Procure this material from a construction supply store such as Lowe’s or Home Depot. Alternatively, consider utilizing leftover pieces from a source like Habitat for Humanity’s ReStore, which often offers more economical options.
- Take advantage of any spare wood you may have from previous projects, as it can be well-suited for this purpose. For crafting boxes with dimensions of 16 × 16 × 16 inches (41 × 41 × 41 cm), ensure that the scraps are at least 16 inches (41 cm) square. Additionally, gather 6 pieces that collectively match the length of all your boxes and ensure that 3 of them are at least 16 inches (41 cm) in width.
2. Use a Circular or Table Saw to Cut Out the Side and Divider Pieces Precisely
For every box you intend to create, produce one set of these pieces, and include an extra set. Ensure that the dimensions of these pieces match the desired width and length of each box.
- Specifically, if you are crafting boxes with dimensions of 16 × 16 × 16 inches (41 × 41 × 41 cm), your side and divider pieces should be precisely 16 inches (41 cm) square. Before initiating the cutting process, measure and mark the designated cutting points. Prioritize safety by wearing work gloves, safety glasses, and a dust mask throughout the cutting procedure, and conduct the task on a stable surface.
3. Create Precise Support Pieces for your Side and Divider Components
Design these support pieces to match the length of your side and divider sections, maintaining a width of only 2 inches (5.1 cm).
These specially crafted pieces play a crucial role in stabilizing the boxes by securing the sides and dividers in place. Ensure you produce one support piece for each side and two for each divider to enhance the overall stability of the boxes.
4. Create Back and Top Panels that Fully Cover your Boxes
The width of these panels should match that of your side and divider components. To determine the required length, multiply the width by the number of boxes you intend to construct.
- For example, if you are crafting three boxes each measuring 16 inches (41 cm) in width, ensure that your top and back panels are also 16 inches (41 cm) wide but extend to a length of 48 inches (120 cm).
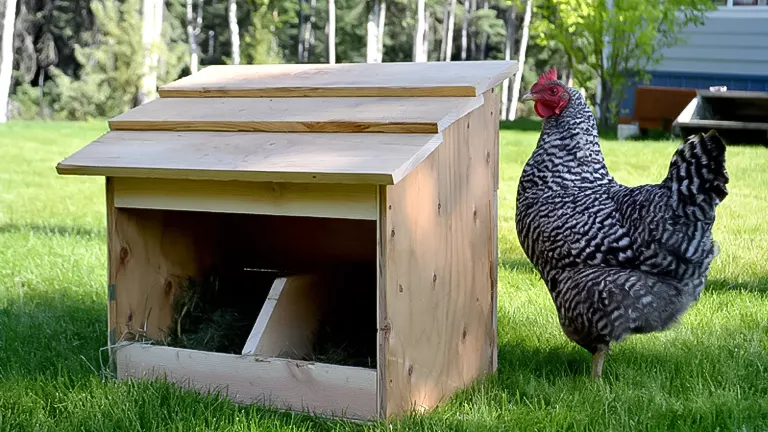
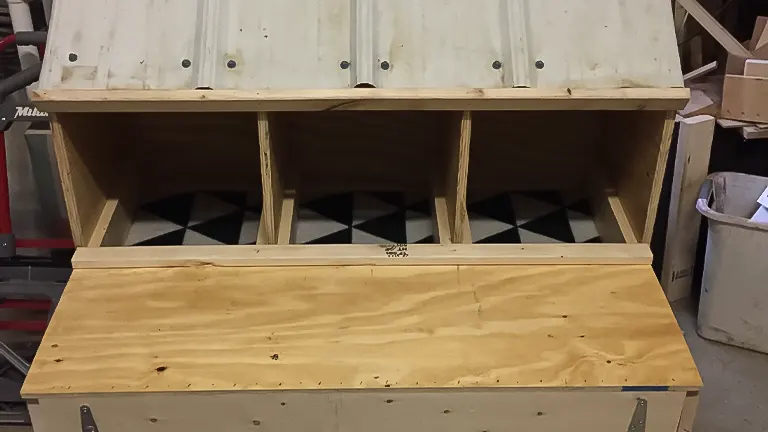
5. Make a Bottom Piece Equal in Length to the Top Piece but 10 Inches (25 cm) Wider
Craft a bottom piece that matches the length of the top section but extends an additional 10 inches (25 cm) in width.
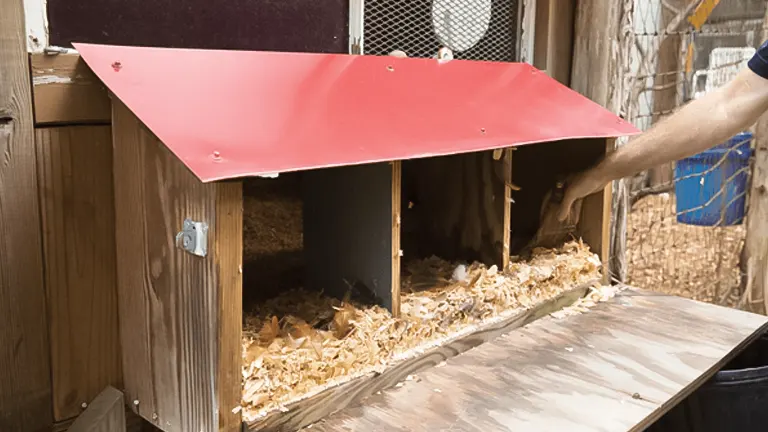
This design choice serves a dual purpose: it not only adds stability to the structure but also forms a protruding ledge at the front. This ledge serves as a platform for a perch bar, providing a convenient spot for your hens to hop onto as they enter the nesting boxes.
6. Create a Single Elongated Piece Designated for the Front Lip
To ensure the containment of bedding and eggs within the nesting boxes, fashion a concise board that spans the entire front bottom section of the boxes. This board should match the length of your top piece and possess a width of at least 3 inches (7.6 cm).
- Alternatively, opt for a lengthy wire as a substitute for the board to serve as the lip. While this choice facilitates easier cleaning by allowing effortless removal, it may not be as efficient in preventing the spillage of eggs and bedding. Secure the wire by hooking it onto screws or nails on each side of the boxes, enabling its removal when cleaning soiled bedding materials from the boxes becomes necessary.
7. Cut Two Pieces for the Top Trim and Perch Bar
Prepare two pieces with dimensions matching that of your top piece, measuring 2–3 inches (5.1–7.6 cm) in width. One of these pieces will be positioned along the front top section of your boxes, securely fastened to both the top and sides to enhance overall stability.
The second piece is intended to be affixed to the front of the protruding bottom component, serving as a designated perching bar for your chickens. This perching bar not only contributes to structural support but also provides a convenient gripping surface for the chickens as they ascend onto the platform to access their nesting boxes.
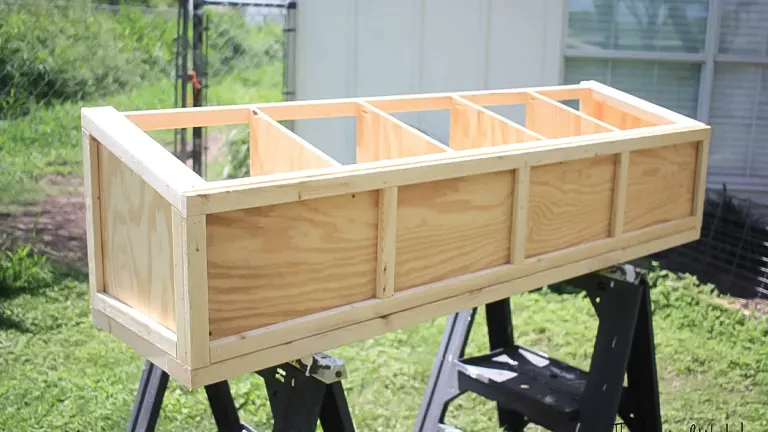
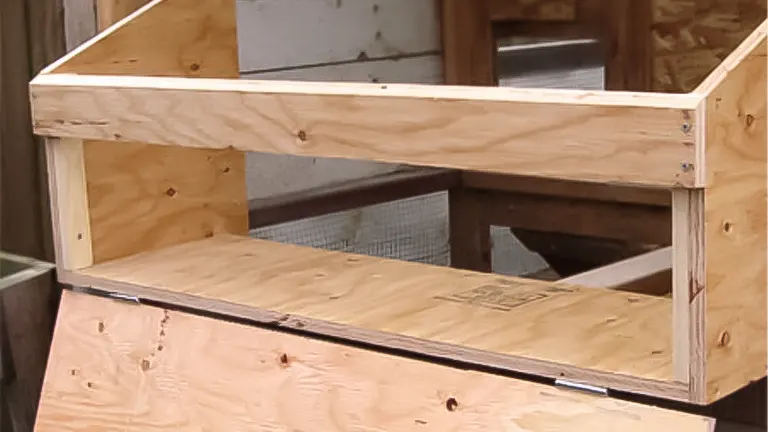
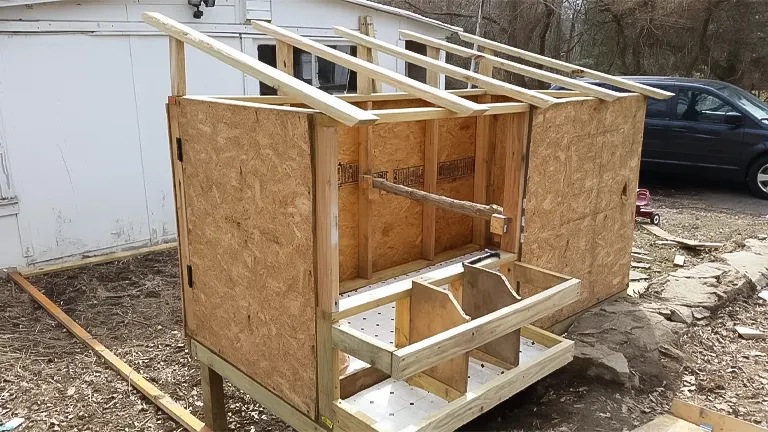
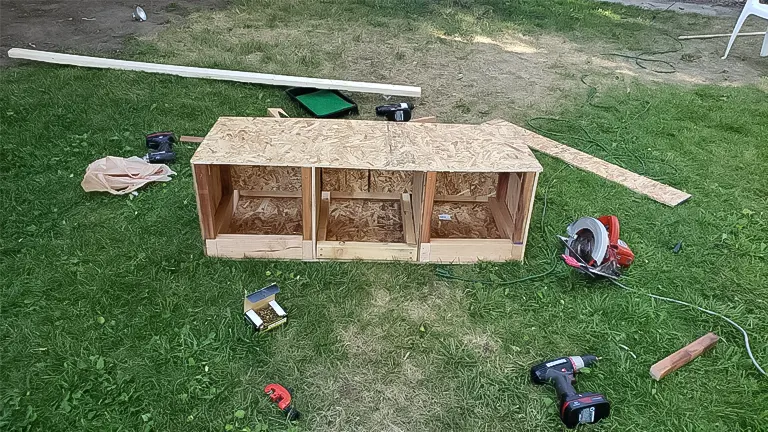
Assembling the Boxes
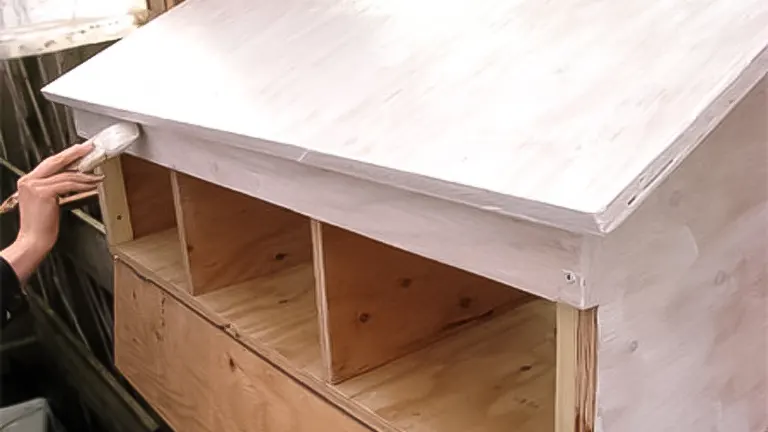
Assembling the nesting boxes is a pivotal phase in constructing a functional and secure space for your chickens. Begin by arranging the cut pieces, ensuring they align precisely to form the designated box dimensions. Utilize screws or nails to secure the pieces firmly, focusing on stability and durability. Pay close attention to the corners, reinforcing them adequately to withstand the rigors of everyday use.
If you’ve incorporated a slanted roof design, ensure it is securely attached to provide adequate protection from the elements. A well-assembled nesting box not only contributes to the overall structural integrity but also ensures a safe and comfortable environment for your hens to lay eggs.
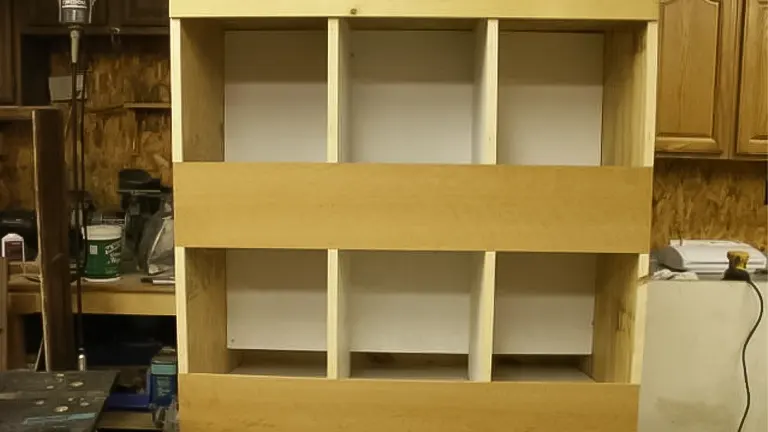
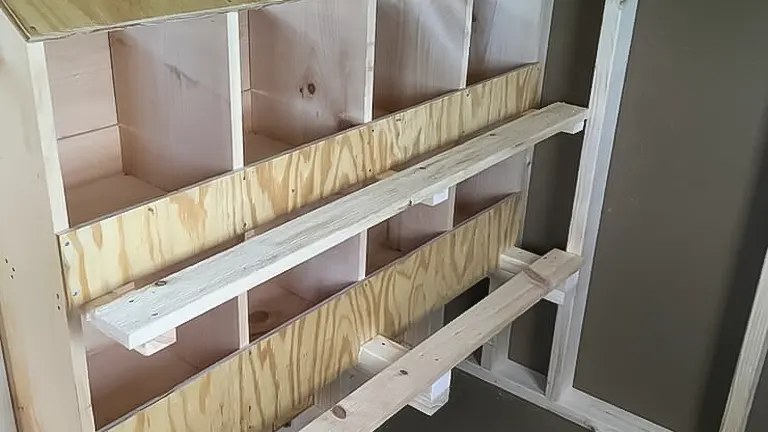
1. Mark the Locations for your Dividers on the Bottom Piece by Measuring
When crafting nesting boxes with a width of 16 inches (41 cm), meticulously measure and mark 16 inches (41 cm) from one side for each divider. This step is crucial for achieving uniform placement of dividers, guaranteeing that all boxes attain identical dimensions.
To enhance accuracy, extend the measuring and marking process along both lengthwise edges of the bottom piece, ensuring that your measurements align consistently and maintain straight lines.
- This precision in measurement and marking is fundamental to the construction process, facilitating an even distribution of dividers and ultimately yielding nesting boxes of consistent size and structural integrity.
2. Affix the Sides and Dividers to the Bottom Piece Using Wood Glue
Adhere to the markings previously made on the bottom piece as you affix the dividers in place with glue. Utilize a heavy object to support each side of the dividers during the drying process.
Simultaneously, apply glue to the side pieces and position them along the short edges of the bottom piece, securing them with additional support.
- To ensure proper alignment, use a level while propping up the components to guarantee they are positioned vertically. This meticulous approach is crucial as it sets the foundation for attaching the top piece seamlessly, preventing complications during the final stages of box assembly.
3. Affix Supports to the Bottom Piece Beside Each Side and Divider
After the adhesive on the sides and dividers has thoroughly dried, proceed to the next step by attaching support pieces to the bottom piece. Securely affix these support pieces, cut to the appropriate dimensions, by utilizing screws or nails on both sides of each divider and adjacent to each side piece.
This meticulous process ensures the structural stability of the nesting box, providing additional reinforcement for the dividers and sides. The careful attachment of supports contributes to the overall durability of the box, making it more resilient and capable of withstanding the daily use and movement of your chickens.
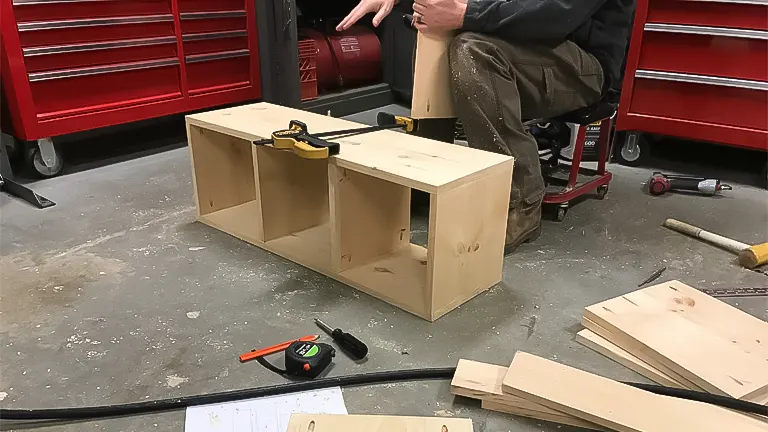
4. Install the Upper Component Onto your Boxes in a Meticulous Manner
Ensure a precise fit by aligning it seamlessly with the upper edges of each side and the divider. Fasten it securely using 2-3 screws or nails at every point where it intersects with a side or divider.

- Confirm that the length of your screws or nails is sufficient to penetrate through the top piece and extend at least 1 inch (2.5 cm) into the sides or dividers beneath it.
- Enhance structural integrity by inverting the boxes and affixing 2-3 screws or nails into the lower piece at every juncture with a side or divider. This additional step contributes to heightened stability.
5. Invert the Boxes and Affix the Rear Component
Position the boxes with their back side facing upward, providing a stable surface for attaching the back piece. Utilize a minimum of 6-8 nails or screws per box to guarantee a robust and secure connection.
- Due to the extended protrusion of the bottom piece at the front, it might be necessary to elevate the boxes by placing them on cinder-blocks, allowing the bottom piece to lie flat. Alternatively, enlist the assistance of two individuals to hold the back piece in position while you affix it, eliminating the need to overturn the boxes.
6. Secure the Front Lip and Trim
These components consist of two elongated, slender boards that will be affixed to the upper front and lower front sections of the boxes, serving the dual purpose of reinforcement and preventing bedding from spilling out.
Invert the boxes to position the front side facing upwards, with the back piece resting on the ground. Align the front lip along the lower edge and fasten it securely, employing one screw or nail for each side and divider. Repeat the process for the trim along the upper edge.
7. Install the Perch Board onto the Bottom Piece
Carefully affix the perch board to the bottom piece by aligning it precisely along the front edge where the bottom piece extends beyond the boxes. This strategic placement not only ensures a secure fit but also contributes to the overall stability of the structure.
Execute the attachment process meticulously, employing one screw or nail for each box, allowing for a robust connection between the perch board and the bottom piece. This detail-oriented approach ensures that the perch board is firmly in place, enhancing both the structural integrity and functionality of the assembled construction.
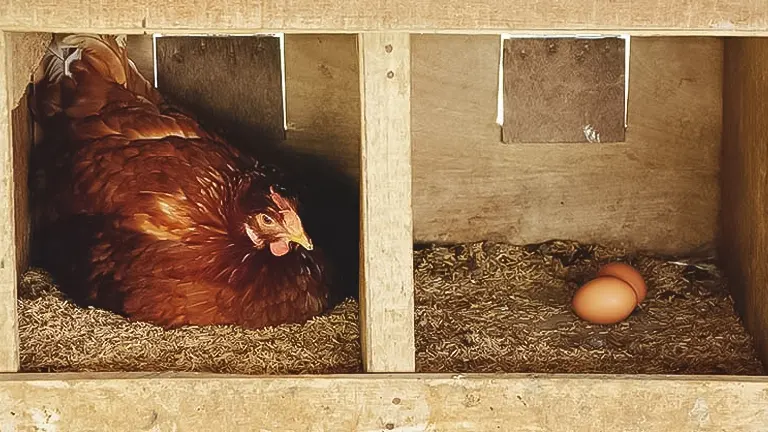
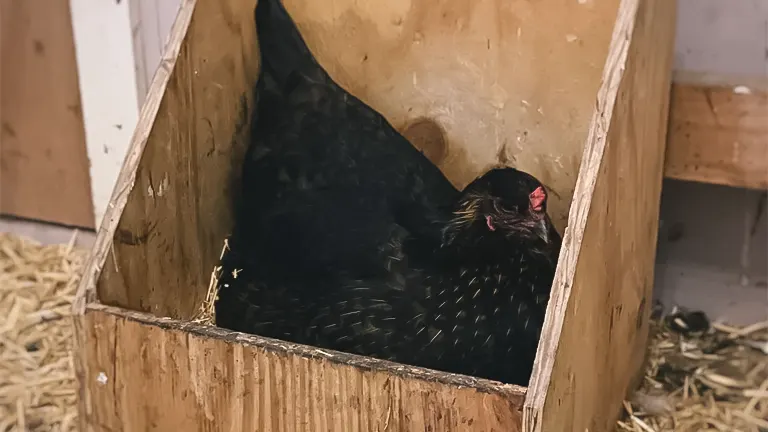
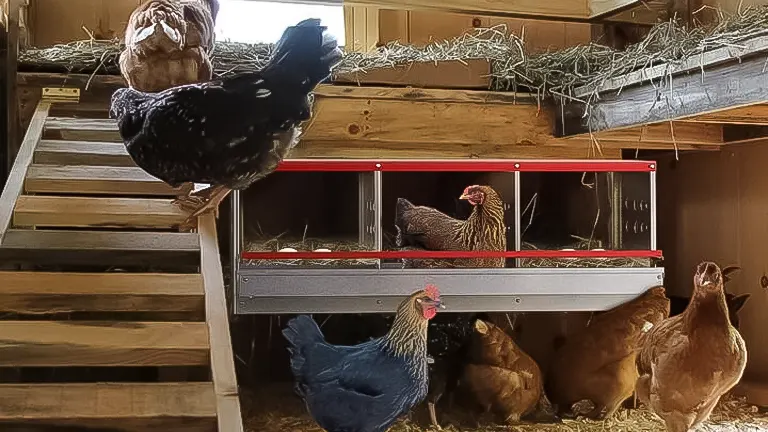
Promoting Nesting Behavior in Your Hens
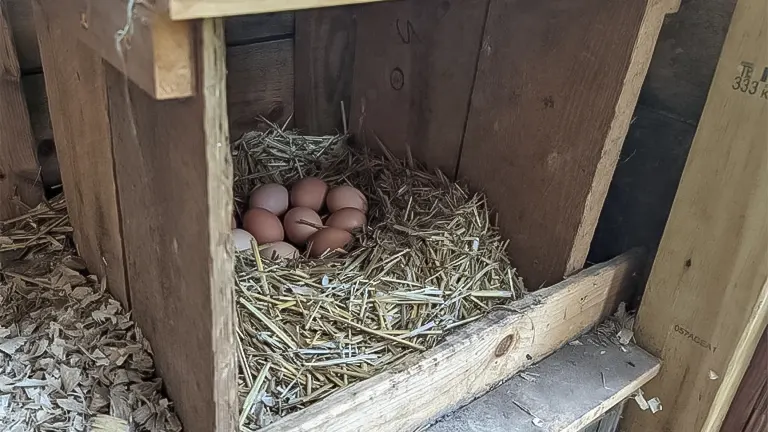
Encouraging nesting behavior in your hens is crucial for fostering a comfortable and productive environment. Providing appropriate nesting boxes in a quiet and secluded area of the coop can simulate a secure nesting space, encouraging hens to lay their eggs consistently. It’s essential to maintain a clean and comfortable setting within these nesting boxes, using materials like straw or hay for bedding.
Additionally, ensuring proper lighting and ventilation in the coop contributes to a stress-free atmosphere, promoting natural nesting instincts. Regularly collecting eggs promptly from the nesting boxes helps maintain cleanliness and encourages hens to continue using them. By addressing these factors, you create an environment that supports and enhances the nesting behaviors of your hens, ultimately contributing to the overall well-being of your flock.
1. Prepare Nesting Material for Your Boxes
Enhance the likelihood of your hens utilizing the nesting boxes by incorporating nest-like materials. Straw and dried grass serve as excellent bedding options, provided they haven’t been exposed to pesticides or chemicals.
Alternatively, shredded paper can be a cost-effective choice, but it’s essential to avoid colored inks, glossy paper, and receipt paper, as they can pose toxicity risks for your hens. Optimal bedding material is wood shavings due to their easy cleaning process and typically pleasant aroma.
- Maintain a minimum of 3 inches (7.6 cm) of bedding within the boxes, periodically adding more if it becomes compressed or displaced.
- When utilizing wood shavings, steer clear of cedar, as its aromatic oils can be detrimental to chickens; instead, opt for pine shavings for the well-being of your flock.
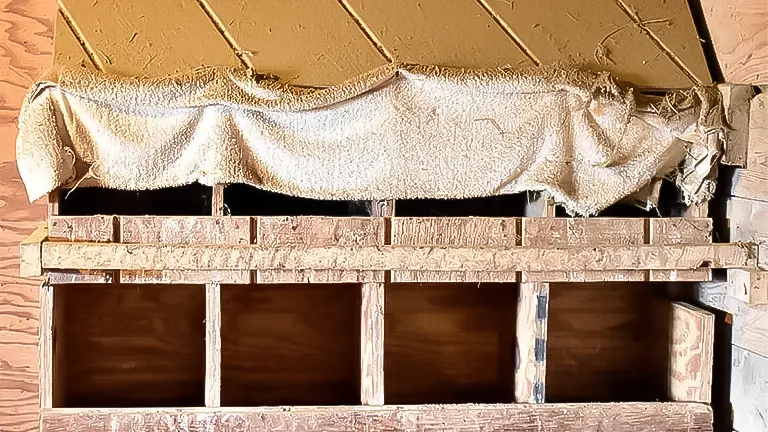
2. Craft Curtains from Fabric Scraps or Feed Sacks
Promote a sense of privacy and security in your nesting boxes to encourage hens to nest effectively. Cut two pieces for each box, creating a welcoming entrance for the hens to easily access the nesting space. Secure these fabric pieces to the top of each box using thumbtacks, staples, or glue.
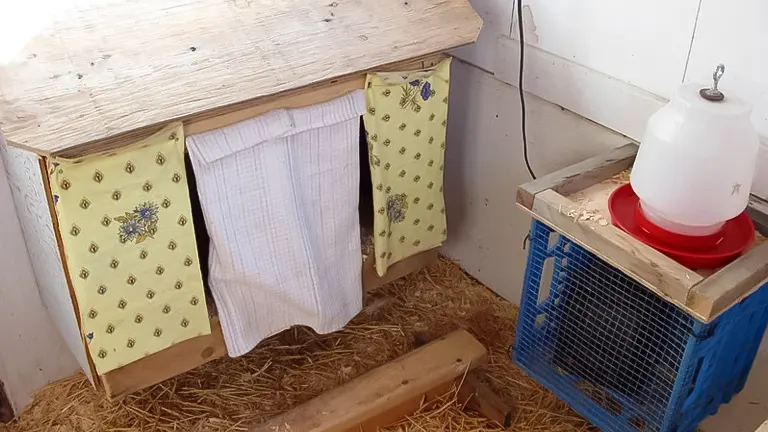
- Ensure the curtains are sufficiently large to cover the entire opening of the box. If your hens exhibit reluctance to enter the boxes, consider pinning or tying the bottoms of the curtains to the sides to make the entrance more conspicuous.
- While any fabric can be used, opt for stretchier knit fabrics or hem the edges to prevent unsightly unraveling and enhance the overall durability and appearance of the curtains.
3. Incorporate Golf Balls or Artificial Eggs to Stimulate Egg Laying
Create an environment conducive to egg laying and broodiness by giving the impression that there are existing eggs in the nest. Obtain artificial eggs from farm supply outlets or hobby stores as they serve as effective substitutes.
Strategically place golf balls or fake eggs within the nesting boxes, mimicking the presence of authentic eggs. This visual cue can encourage hens to engage in egg-laying behavior, fostering a natural and productive atmosphere within the coop. By providing these simulated eggs, you enhance the likelihood of hens feeling inclined to lay and exhibit broody tendencies.
4. Maintain the Hygiene of Your Boxes
Ensure the cleanliness of your nesting boxes by conducting regular inspections, ideally on a weekly basis. Check for any signs of damp or malodorous bedding and promptly replace it, particularly with materials like straw, dried grass, or shredded paper that are prone to developing unpleasant odors over time.
Regular cleaning is vital in preventing the accumulation of manure within the boxes, which can pose health risks to your hens. A well-maintained and clean nesting environment is crucial for safeguarding your hens against potential diseases and infections.
- During the bedding replacement process, assess the condition of the box itself, especially if it appears crusted with dirt or manure. If necessary, use a gentle cleaning solution such as Dr. Bronner’s, coupled with water and a scrub brush, to clean the box effectively, ensuring it remains sanitary and conducive to a healthy nesting environment.
5. Prevent Pest Infestations Through Herb Application
Enhance the pest resistance of your nesting boxes by incorporating dried herbs like lavender, rosemary, and thyme into the bedding mix. This not only serves as a natural deterrent for pests such as mites but also contributes to maintaining a fresh aroma within the boxes.
Exercise caution by avoiding the use of fresh herbs, as their quick decomposition may lead to unpleasant odors or mold development. By carefully integrating dried herbs into the bedding, you establish an aromatic and pest-resistant environment, ensuring the well-being of your hens and the longevity of a clean and healthy nesting space.
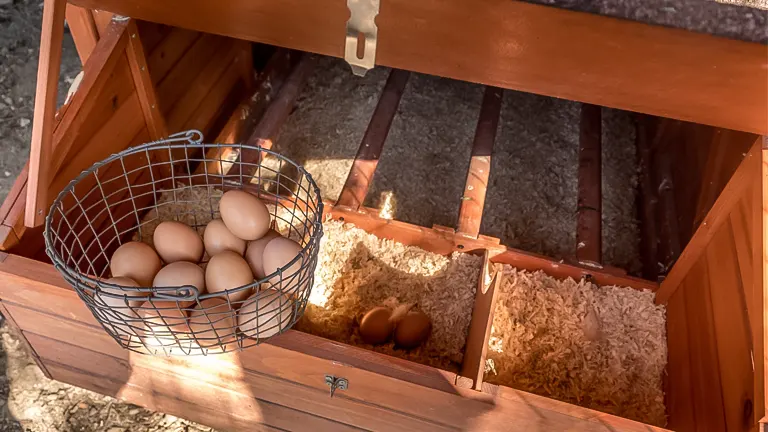
Choosing Bedding for Chicken Nesting Boxes
Creating a comfortable environment for egg-laying is essential for chickens, and selecting the right bedding for your nesting boxes plays a crucial role in achieving this. Common and effective bedding options include straw and wood shavings, though commercially available nesting box liners can also be considered. The key is to ensure that the chosen bedding is appealing to your chickens, promoting a cozy space for egg-laying while also maintaining the cleanliness of the eggs.
Additionally, incorporating herbs into the nesting box bedding can offer numerous health benefits. Apart from providing a pleasant aroma, herbs contribute to pest control and may stimulate egg production. The inclusion of herbs, such as those discussed in detail in the post on Herbs for Chicken Nesting Boxes, adds a thoughtful dimension to the nesting environment, promoting the well-being of your chickens and the quality of their laid eggs.
Encouraging Your Chickens to Lay Eggs in Nesting Boxes
While some chickens may naturally gravitate towards nesting boxes, others may require a bit of encouragement. To facilitate this, consider the following strategies:
- Ensure Comfortable Surroundings: Evaluate the placement of your nesting boxes and eliminate any factors that might be causing discomfort for your chickens. Hanging a cloth or curtain over the opening can create a more inviting environment.
- Optimal Number of Nesting Boxes: Ensure an adequate number of nesting boxes to accommodate all your chickens. Having too few may lead some hens to lay eggs in alternative locations.
- Introduce a Fake Egg or Golf Ball: Provide a sense of safety and familiarity by placing a fake egg or golf ball in the nesting boxes. This signals to your chickens that the boxes are a secure and acceptable place for egg-laying, instilling confidence.
- Confinement Till Mid-Morning: To align with the natural laying patterns of most chickens, confine them to the coop until mid-morning. This can encourage them to use the designated nesting boxes instead of alternative locations in the run.
- Regular Cleaning: Create a conducive environment for egg-laying by maintaining cleanliness in the nesting boxes. Regular cleaning ensures that the boxes remain comfortable and safe, further motivating your chickens to consistently lay their eggs in the designated space.
Detailed Cleaning Routine for Chicken Nesting Boxes
To ensure the hygiene and appeal of your nesting boxes, follow a thorough cleaning routine. While nesting boxes ideally remain free of chicken droppings if placed correctly, occasional dirtiness may occur. Incorporating these steps into your egg-gathering routine helps maintain clean and inviting nesting spaces for your hens:
- Regular Monitoring During Egg Collection: As you gather eggs, inspect each nesting box. If you notice any dirtiness, promptly remove soiled bedding, feces, or feathers, replacing it with fresh, clean bedding as necessary. This proactive approach encourages hens to continue using the box for laying, keeping eggs free from contamination.
- Monthly Deep Cleaning: Given that chickens roam in the run or free-range, it’s advisable to perform a more extensive cleaning of the nesting boxes approximately once a month. This prevents the introduction of unwanted bacteria or pests. Begin by removing all bedding from the boxes and clean them with a chicken-friendly natural cleaner (various recipes can be found in resources like the Natural Homesteading Ebook). Allow the nesting boxes to air-dry thoroughly before refilling them with fresh bedding of your choice.
By incorporating these detailed cleaning practices, you not only contribute to the health and well-being of your hens but also ensure consistently clean eggs, fostering a hygienic environment within your coop.
Utilizing Chicken Nesting Boxes for Egg Production
Chicken nesting boxes serve as a practical solution for those seeking greater self-sufficiency through the maintenance of laying hens. The versatility in acquiring these boxes allows for various options, including purchasing pre-made ones, constructing custom boxes, repurposing existing materials, or exploring creative combinations of these approaches. Regardless of the chosen method, the primary objective is to establish nesting boxes that offer a secure and hygienic environment for both hens and the eggs destined for the kitchen.
In navigating the extensive realm of chicken keeping, it’s common to encounter a wealth of information, potentially leading to a sense of overwhelm. For those seeking additional insights into chicken keeping, consider exploring the episode “Ingenious Chicken Keeping with Harvey Ussery” from the Old Fashioned on Purpose Podcast, providing valuable perspectives and guidance on this multifaceted aspect of poultry care.
Final Closing Remarks
In concluding the process of building chicken nesting boxes, it’s crucial to emphasize the significance of meticulous planning and attention to detail in crafting a functional and comfortable space for your hens. Ensuring the appropriate dimensions, secure attachments, and the use of suitable bedding materials contribute to creating an environment conducive to consistent egg-laying. Regular maintenance, including cleaning routines and strategic placement, is paramount for the health and well-being of both your hens and the eggs they produce. Incorporating thoughtful additions, such as herbs for pest control or artificial eggs for a sense of security, adds an extra layer of consideration to the nesting experience.
As you embark on this endeavor, drawing from a diverse range of resources and expert insights, like those available in podcasts such as “Ingenious Chicken Keeping with Harvey Ussery,” can further enrich your understanding of effective chicken care practices. Building nesting boxes is not merely a construction project; it’s a commitment to providing a safe and inviting haven for your poultry, ensuring a harmonious and productive relationship between you and your feathered companions.
Frequently Asked Questions
- What materials do I need to build chicken nesting boxes?
The essential materials include plywood, lumber, screws or nails, and appropriate tools for cutting and assembling. - How many nesting boxes do I need for my flock?
It is recommended to have one nesting box for every 3-4 hens to ensure they have sufficient space and options. - What are the ideal dimensions for chicken nesting boxes?
Standard dimensions are often around 12x12x12 inches, but ensuring enough space for the hen to turn around comfortably is crucial. - Can I repurpose materials for building nesting boxes?
Yes, you can repurpose materials like old crates or wooden boxes, as long as they provide a secure and comfortable space for the hens. - How should I clean and maintain the nesting boxes?
Regularly remove soiled bedding, feces, and feathers, and perform a monthly deep cleaning with a chicken-friendly natural cleaner. - What bedding materials are suitable for chicken nesting boxes?
Common bedding options include straw, wood shavings, or commercial nesting box liners, ensuring they are comfortable and easy to clean. - Should I add herbs to the nesting boxes, and why?
Adding herbs like lavender or rosemary can contribute to pest control and stimulate egg production, enhancing the nesting environment. - Do I need to place fake eggs or golf balls in the nesting boxes?
It can be beneficial to place fake eggs or golf balls to signal to hens that the boxes are safe for egg-laying, providing a sense of security. - How often should I check the nesting boxes for eggs?
Daily checks are ideal, especially during the egg-laying hours in the morning, to collect fresh eggs promptly and monitor the condition of the boxes. - Can I use the nesting boxes for other poultry, like ducks?
While chickens are the primary users, nesting boxes can be adapted for other poultry with adjustments to dimensions and materials, ensuring a suitable nesting space.
We’d love to hear about your chicken nesting box projects! Feel free to share your DIY experiences, tips, and any innovative ideas you’ve implemented in the comments section below. Your insights and expertise can greatly assist fellow poultry enthusiasts in making well-informed decisions as they embark on their own nesting box construction journeys!

Edward Smith
Forestry AuthorWoodworking is about more than crafting; it's a harmonious connection with nature, mastering tools, and preserving our environment. I'm here to share my knowledge and experiences with you, forging a future where we can embrace wood's beauty and utility while safeguarding our forests' health and diversity.


very good idea
Eric
January 16, 2024 6:59 pm