Propagating Spider Plant in Water: A Step-by-Step Guide
- February 15, 2024
- 0 comment
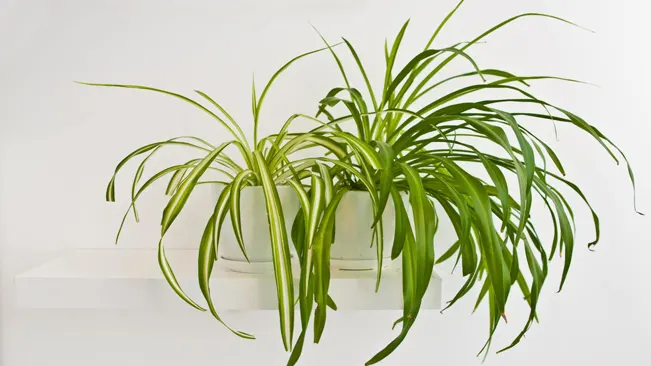
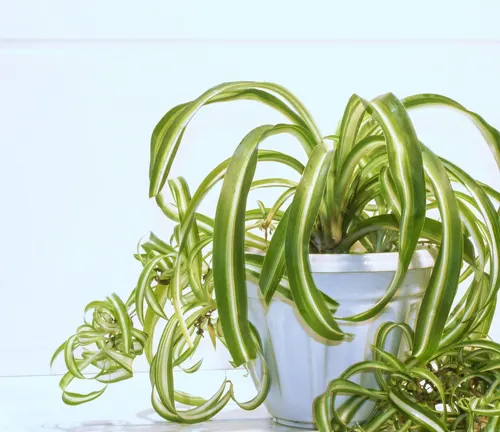
Spider plants (Chlorophytum comosum) are popular houseplants known for their hardiness and ease of care. One of the most fascinating aspects of spider plants is their ability to easily propagate through their spiderettes or baby plants. Propagating spider plants in water is a simple and effective method, ideal for beginners and experienced gardeners alike. This guide will take you through the process step by step.
Materials Needed
- Healthy spider plant with spiderettes
- Clean scissors or pruning shears
- Glass jar or vase
- Water
- Optional: Rooting hormone
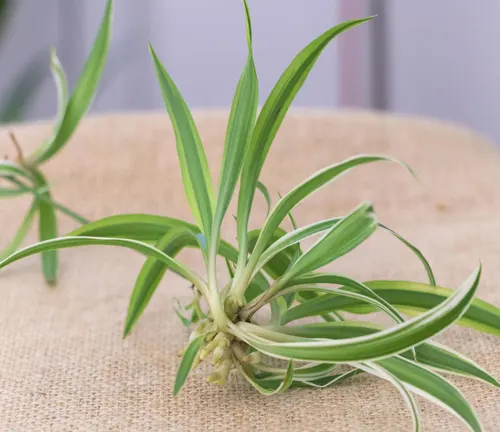
Selecting Spiderettes
Choose healthy spiderettes from your spider plant. Look for those with small roots already developing as they have a higher success rate in rooting.
Selecting Healthy Spiderettes
When choosing spiderettes for propagation, the key is to look for signs of health and vigor. Here are some tips:
Size and Development
Opt for spiderettes that are not too small. A good size indicates that they’ve had enough time to develop some essential structures. Spiderettes that are too young might struggle to develop roots quickly.
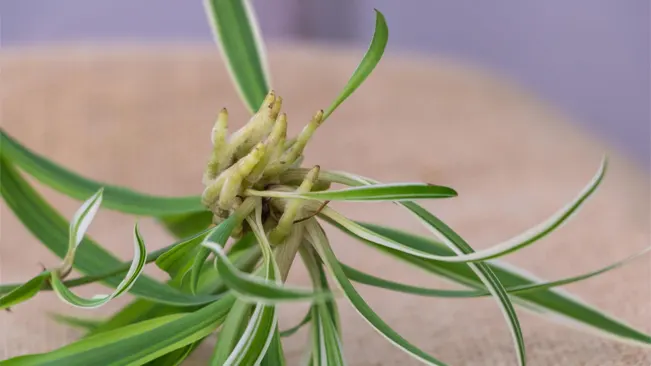
Root Nubs
Ideally, select spiderettes that already have small roots or nubs. These initial roots are a clear indicator that the spiderette is ready to start growing independently. The presence of these nubs significantly increases the chances of successful water rooting.
Leaf Health
Look at the leaves of the spiderettes. They should be green, firm, and free from yellowing or brown spots. Healthy leaves are a good indicator of the overall health of the spiderette.
Attachment to the Mother Plant
Choose spiderettes that are still attached to the mother plant. It’s usually best to propagate them while they’re still connected, as this ensures they are still receiving nutrients and are not stressed from premature removal.
When to Propagate
Timing is also crucial. The best time to propagate spider plants is during the growing season, which is typically spring through early fall. During this period, the plants are actively growing, and the spiderettes are more likely to root quickly and successfully.
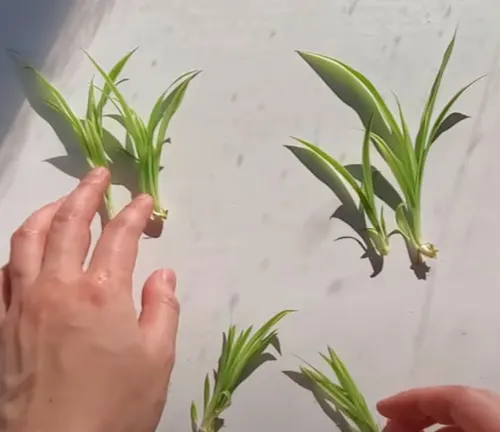
Preparing the Spiderettes
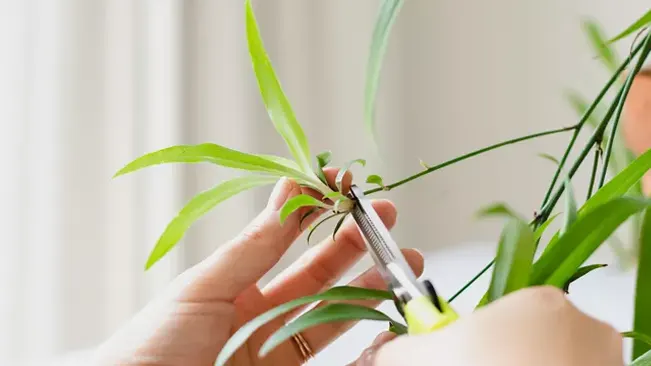
Using clean scissors or pruning shears, snip the spiderettes from the mother plant. Make sure to cut close to the base of the spiderette, but be careful not to damage the baby plant or its roots.
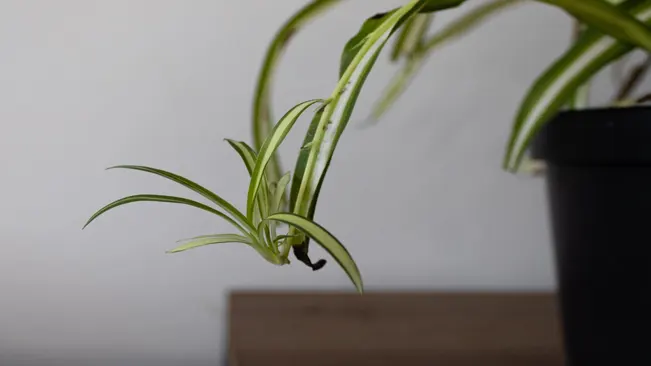
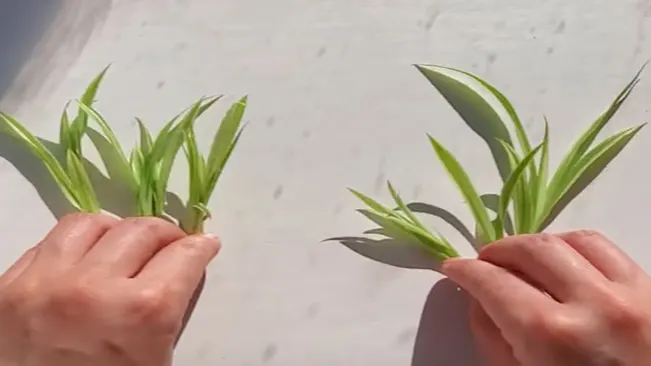
Identify the Spiderettes
Spiderettes are the small, baby plants that grow from the flowering stems of the mother spider plant. They often have a few leaves and may already have small roots forming. These are the parts you’ll be propagating.
Choose the Right Spiderettes
Look for spiderettes that are healthy and robust. Ideally, they should have a couple of well-formed leaves and tiny roots already present. If the spiderettes don’t have roots yet, they can still root in water, but the presence of roots gives them a head start.
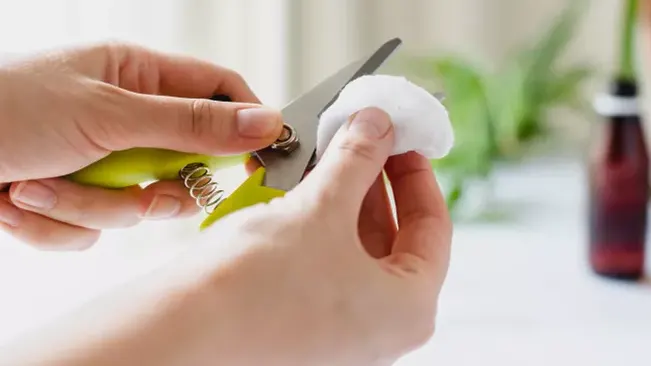
Tools for Snipping
Use clean, sharp scissors or pruning shears. It’s essential that the tools are clean to prevent the transfer of any disease or pathogens to the spiderettes or the mother plant. You can wipe the blades with rubbing alcohol or a bleach solution to sterilize them.
Making the Cut
Carefully snip the spiderette from the stolon (the long, thin stem that connects it to the mother plant). Make the cut as close to the base of the spiderette as possible without damaging its leaves or roots. A clean cut helps the spiderette heal faster and reduces the risk of infection.
Handling the Spiderettes
Once cut, handle the spiderettes gently. Avoid squeezing or damaging the young roots or leaves, as they are quite delicate at this stage.
Timing of the Cut
It’s best to propagate during the plant’s growing season, typically in spring or summer. During this time, the plant is more resilient and likely to recover quickly from the loss of spiderettes.
Immediate Placement in Water
After cutting, promptly place the spiderettes in water. This minimizes the stress on the plants and gives them the best chance to start developing new roots.
What to Avoid:
- Do not leave the spiderettes out for too long after cutting, as this can lead to dehydration.
- Avoid cutting too far from the base of the spiderette, as this can leave a portion of the stolon attached, which might not root as effectively.
Observing the Mother Plant
After removing spiderettes, observe the mother plant for any signs of stress. It’s normal for the plant to have a slight reaction, but it should not be significant. Proper care, such as regular watering and appropriate lighting, will ensure the mother plant continues to thrive and produce more spiderettes in the future.
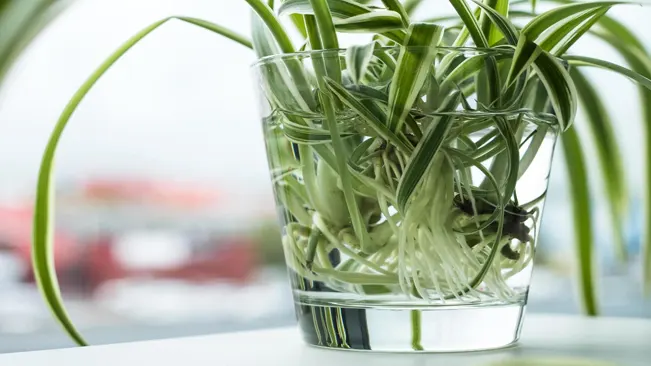
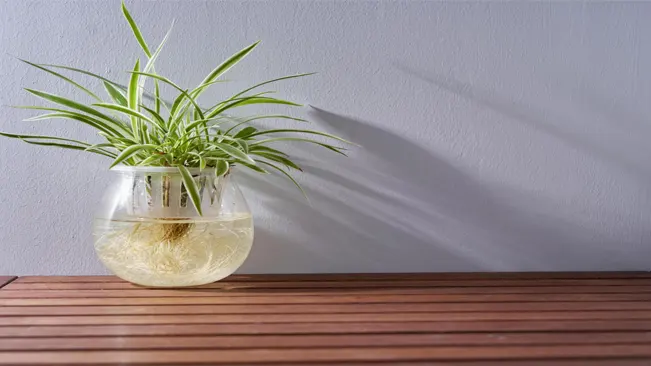
Rooting in Water
Fill your glass jar or vase with water. You can use tap water, but letting it sit for a day before use can help dissipate any chlorine, which is better for the plant. Submerge the roots of the spiderette in the water, ensuring that the leaves remain above the water line.
Preparing the Water

- Fill a clean glass jar or vase with water. The container should be large enough to accommodate the roots of the spiderette without overcrowding.
- If using tap water, let it sit uncovered for a day to allow chlorine to dissipate.
- Check the pH level of the water if possible. Spider plants prefer a pH around 6.0 to 7.2. Adjusting the pH is typically not necessary unless your water is highly alkaline or acidic.
Submerging the Spiderette
- Gently place the spiderette in the prepared water. Ensure that only the roots are submerged. The base of the spiderette, where the roots meet the foliage, should be just above the water line.
- It’s important to keep the leaves above water to prevent rot and fungal growth. The leaves need access to air and light for photosynthesis, which is vital for the plant’s growth and health.
Positioning the Container
- Place the container in an area with bright, indirect light. A north- or east-facing windowsill is usually ideal. Avoid direct sunlight, especially during the hot midday hours, as it can cause the water to heat up and damage the delicate new roots.
- Ensure the environment is stable, without extreme temperature fluctuations. Spider plants prefer temperatures between 65°F to 75°F (18°C to 24°C).
Monitoring and Maintenance
- Keep an eye on the water level and top it up as necessary to keep the roots submerged.
- Change the water completely every few days to prevent the growth of bacteria and algae, which can harm the developing roots.
- If the water becomes cloudy or starts to develop an odor, change it immediately.
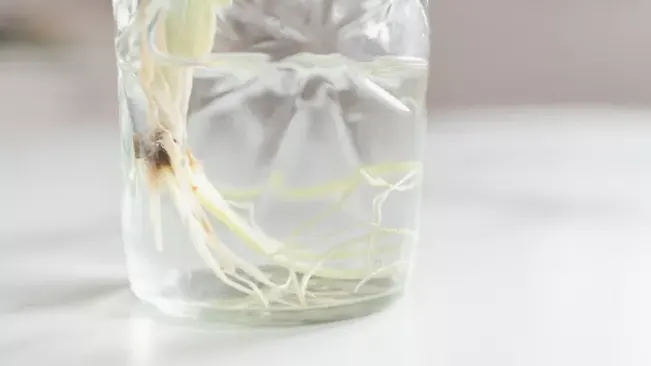
- Watch for signs of root development. Initial root growth can be seen in as little as a week, but it may take longer depending on the conditions.
Location and Light
Place the jar in a location with bright, indirect light. Avoid direct sunlight as it can scorch the leaves and hinder root development.
Finding the Perfect Spot
- Near a Window: A spot near a window that receives plenty of natural light but is shielded from the direct rays of the sun is ideal. For example, a window with a sheer curtain can provide a perfect balance of light.
- Avoiding South-Facing Windows: In many regions, south-facing windows receive the most intense sunlight. It’s best to avoid placing your spider plant directly in front of these windows unless there’s a sheer curtain or some form of shade.
- East or West-Facing Windows: These are typically great choices. East-facing windows capture the gentle morning sun, while west-facing windows get the softer afternoon light.
- Artificial Lighting: If you don’t have a spot with suitable natural light, you can use artificial plant lights. These lights can mimic the spectrum of natural sunlight and are an excellent alternative for indoor plant care.
Monitoring Your Plant
- Watch for Signs: Pay attention to the spiderette’s leaves. If they start to turn yellow or brown, this might indicate too much light. Conversely, if the plant seems leggy or stretched out, it might not be getting enough light.
- Rotate the Jar: To ensure even growth and exposure to light, rotate the jar or vase every few days. This helps prevent the plant from leaning towards the light source.
Monitoring Water Levels
Check the water level regularly and add more as needed to keep the roots submerged. Change the water every few days to prevent bacterial growth.
Regular Checks
Inspect the water level daily. Evaporation or absorption by the plant can lower water levels.
Adding Water
When the water level drops, add fresh water to keep the roots fully submerged. This is crucial for consistent root hydration.
Water Changes
Replace the water completely every 2-3 days. This practice prevents the buildup of bacteria and keeps the water fresh, promoting healthier root development.
- Use room temperature water to avoid shocking the plant’s roots.
- Avoid using water with high chlorine content; letting tap water sit overnight can reduce chlorine levels.
Benefits:
- Maintains optimal conditions for root growth.
- Prevents root rot and bacterial infections, ensuring the health of the spiderette.
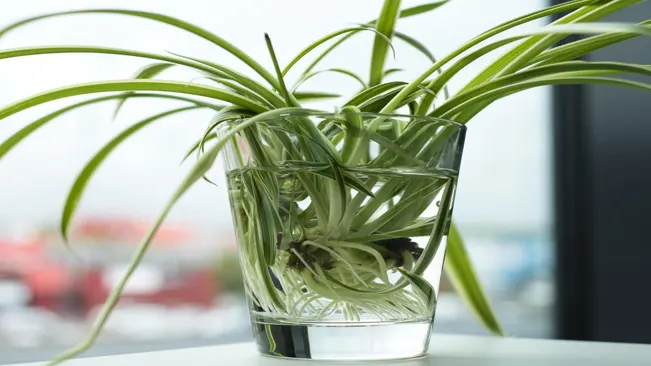
Root Development
Roots should start to appear or increase in size within a few weeks. Once the roots are a few inches long, the spiderette is ready to be planted in soil, though you can also continue to grow it in water if you prefer.
Observation Period
Within a few weeks, new roots will start emerging or existing roots will grow on the spiderette submerged in water.
Length Check
Once these roots reach a few inches in length, the spiderette is ready for the next stage.
Options for Growth
- Planting in Soil: At this stage, you can transfer the spiderette to soil for traditional growth.
- Continued Water Growth: Alternatively, you can choose to keep growing the spiderette in water, a method known as hydroponic growth.
Planting in Soil (Optional)
If you decide to plant the spiderette in soil, choose a well-draining potting mix. Gently plant the rooted spiderette, ensuring the roots are covered with soil. Water the plant and place it in bright, indirect light.
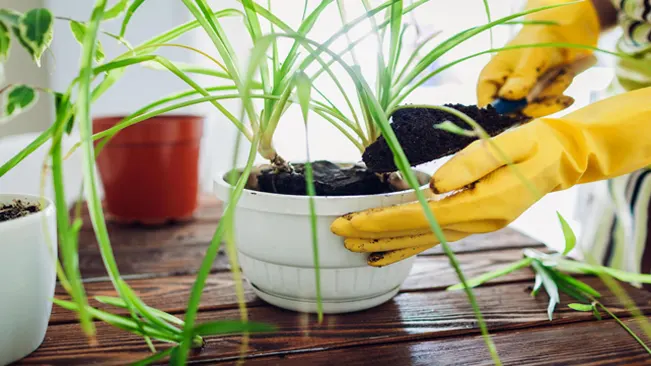
- Choose Potting Mix: Select a well-draining potting mix, which is essential for healthy root growth.
- Plant the Spiderette: Carefully plant the rooted spiderette in the soil. Ensure that the roots are fully covered with the potting mix.
- Water the Plant: After planting, water the soil thoroughly. This helps settle the roots into their new environment.
- Find the Right Spot: Place the plant in a location with bright, indirect light. Avoid direct sunlight to prevent leaf burn.
Conclusion
Propagating spider plants in water is a rewarding experience. Not only does it help increase your collection of plants, but it also offers a great way to share these delightful plants with friends and family. With patience and proper care, your spiderettes will thrive and grow into healthy, independent plants.
FAQs (Frequently Asked Questions)
- Can Any Spider Plant Be Propagated in Water?
Yes, most spider plants can be propagated in water, especially those that have developed spiderettes or baby plants. - How Long Does It Take for Roots to Appear?
Typically, roots will start to appear within a few weeks, but it can sometimes take up to a month. - Do I Need to Use Special Water for Propagation?
Tap water is generally fine, but it’s a good idea to let it sit for 24 hours before use to allow chlorine to evaporate. - How Often Should I Change the Water?
It’s best to change the water every few days to prevent bacterial growth and ensure a healthy rooting process. - Can Spider Plants Grow Permanently in Water?
Yes, spider plants can continue to grow in water, although they might not grow as large as they would in soil. - Do I Need to Add Fertilizer to the Water?
While not necessary, you can add a water-soluble fertilizer at a quarter of its strength every month for additional nutrients. - How Do I Know When to Transfer the Plant to Soil?
When the roots are a few inches long, the plant is ready to be transferred to soil, but this step is optional. - What Type of Container Should I Use for Water Propagation?
A clear glass jar or vase is ideal so you can easily monitor root growth and water level. - What Is the Best Temperature for Propagating Spider Plants in Water?
Room temperature, around 65-75°F (18-24°C), is ideal for spider plant propagation. - Can I Propagate a Spider Plant in Water Any Time of the Year?
While you can technically propagate spider plants year-round, doing so in the spring or summer aligns with their natural growth cycle and may yield faster results.

Kristine Moore
Forestry AuthorI'm Kristine Moore, a seasoned garden landscaping professional with over 30 years of experience. My extensive career has been dedicated to transforming outdoor spaces into stunning, sustainable landscapes. With a deep understanding of horticulture, design principles, and environmental stewardship, I have become a respected figure in the field, known for creating harmonious, visually appealing, and eco-friendly gardens. My commitment to excellence and continuous learning in landscaping trends and techniques has solidified my reputation as an expert in garden design and implementation.


Leave your comment