How to Grow and Care for Chickpeas: Master Techniques for Lush Growth
- May 10, 2024
- 0 comment
Learn how to grow and care for chickpeas with expert techniques for lush, bountiful crops. Discover essential planting and harvesting tips today. Curious about cultivating chickpeas successfully? Whether you’re a novice gardener or an experienced cultivator, this guide will equip you with essential knowledge to grow these nutritious legumes with lush results.
From selecting the right soil to mastering care and harvesting techniques, you’ll find every step needed to ensure your chickpea plants thrive and yield a plentiful harvest. Let’s embark on this green journey together to transform your garden with a bountiful chickpea crop!
Table of Contents
- Understanding Chickpeas
- Pre-Planting Considerations
- Planting Techniques
- Care and Maintenance
- Harvesting and Storage
- Troubleshooting Common Problems
- Conclusion
- FAQs
Understanding Chickpeas
Types of Chickpeas
Chickpeas, scientifically known as Cicer arietinum, are classified into two primary types, each with unique characteristics and uses:
- Kabuli Chickpeas: Often referred to as ‘Garbanzo Beans’, Kabuli chickpeas are characterized by their large, cream-colored seeds with a smooth coat. Originating from the Mediterranean and commonly cultivated in North America and Europe, they are popular in salads, hummus, and canned goods. Their size and mild flavor make them particularly versatile in Western cuisine.
- Desi Chickpeas: Smaller, with a thicker and darker coat, Desi chickpeas are more common in Indian and Middle Eastern cuisines. They are known for their robust flavor and firm texture, making them ideal for curries and as a primary ingredient in besan (chickpea flour). Desi chickpeas have a higher fiber content and a lower glycemic index compared to their Kabuli counterparts.
Nutritional Benefits
Chickpeas are a nutritional powerhouse, providing extensive health benefits due to their high content of protein, dietary fiber, vitamins, and minerals. Here’s a scientific breakdown of the essential nutrients found in chickpeas, which support everything from muscle growth to cardiovascular health:
- Protein: Essential for muscle repair and growth, chickpeas offer a substantial amount of plant-based protein, making them an excellent protein source for vegetarians and vegans.
- Dietary Fiber: High in both soluble and insoluble fiber, chickpeas help improve digestive health, reduce cholesterol levels, and regulate blood sugar levels.
- Iron: Crucial for forming hemoglobin, which carries oxygen through the blood, iron in chickpeas helps prevent anemia.
- Magnesium: Supports muscle and nerve function and maintains heart rhythm, bone health, and immune system strength.
- B Vitamins: Involved in a variety of cellular processes, including energy metabolism and brain function.
Additionally, chickpeas contribute to soil health by fixing nitrogen, enhancing soil fertility, and reducing the need for chemical fertilizers.
Nutritional Table
| Nutrient | Amount per 100g (Cooked) | % Daily Value* |
|---|---|---|
| Calories | 164 kcal | 8% |
| Protein | 8.9 g | 18% |
| Dietary Fiber | 7.6 g | 30% |
| Iron | 2.9 mg | 16% |
| Magnesium | 48 mg | 12% |
| Potassium | 291 mg | 6% |
| Zinc | 1.5 mg | 14% |
| Vitamin B-6 | 0.1 mg | 6% |
| Folate (B9) | 172 µg | 43% |
*% Daily Values are based on a 2,000 calorie diet.
Pre-Planting Considerations
Climate Requirements
Chickpeas are highly adaptable but perform best in specific climatic conditions. They thrive in regions where the average daily temperature ranges between 70°F and 80°F (21°C to 27°C). They are moderately frost-tolerant, but young plants are vulnerable to frost damage, which can severely impair growth and yield. In temperate climates, it’s advisable to sow chickpeas in early spring as soon as the soil is workable and the risk of frost has diminished. In warmer tropical or subtropical zones, planting in the late summer or early fall can capitalize on the cooler post-summer months, avoiding the peak heat which can stress plants.
Soil Preparation
Soil quality is paramount for cultivating healthy chickpeas. They flourish in well-drained, loamy soils with a neutral to slightly acidic pH, ideally between 6.0 and 7.0. Prior to planting, performing a detailed soil analysis can help identify any nutrient deficiencies or pH imbalances. Enriching the soil with organic matter such as well-rotted compost or aged manure can significantly enhance soil fertility and structure, which promotes better root development and water retention. Deep tilling and the removal of debris and weeds will also optimize seedbed conditions, reducing competition and improving nutrient availability to the plants.
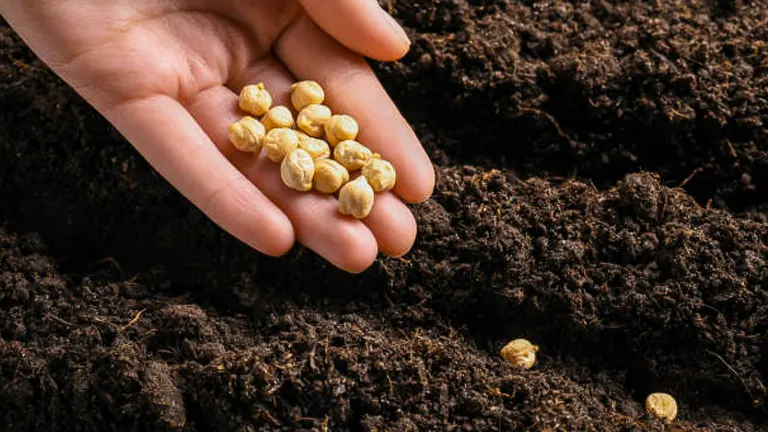
Choosing the Right Seeds
Selecting the appropriate seed variety is crucial for optimizing chickpea production. Varietal choice should be guided by regional climate adaptability, disease resistance, and the intended use of the chickpeas:
- Kabuli Chickpeas: Best suited for cooler, temperate climates. These varieties are generally larger and have a smoother seed coat, making them popular in Western cuisines.
- Desi Chickpeas: More tolerant of heat and minimal water conditions, making them ideal for warmer climates. They have smaller, rougher seeds and are commonly used in Indian and Middle Eastern dishes.
For gardeners practicing sustainable agriculture, choosing certified organic seeds ensures that the plants are free from genetically modified organisms (GMOs) and have not been treated with synthetic chemicals.
Scientific Considerations Table
| Consideration | Ideal Conditions | Notes |
|---|---|---|
| Temperature | 70°F – 80°F (21°C – 27°C) | Avoid planting below 50°F (10°C) |
| Soil pH | 6.0 – 7.0 | Slightly acidic to neutral |
| Soil Type | Loamy, well-drained | High organic matter content preferred |
| Frost Tolerance | Moderate | Protect seedlings from frost |
| Seed Variety | Region-specific adaptations | Choose based on climate and culinary use |
By addressing these pre-planting considerations with meticulous preparation and strategic planning, gardeners can significantly improve their chances for a successful chickpea crop. Understanding these foundational elements ensures that the chickpeas are provided with the optimal starting conditions for growth, leading to healthier plants and more bountiful yields.
Planting Techniques
When to Plant
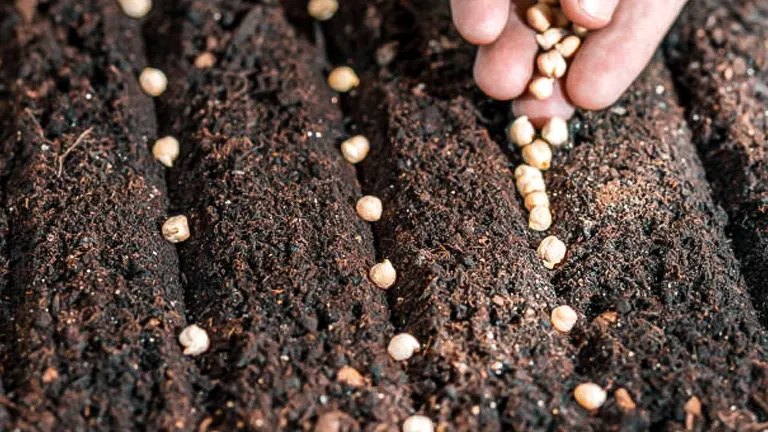
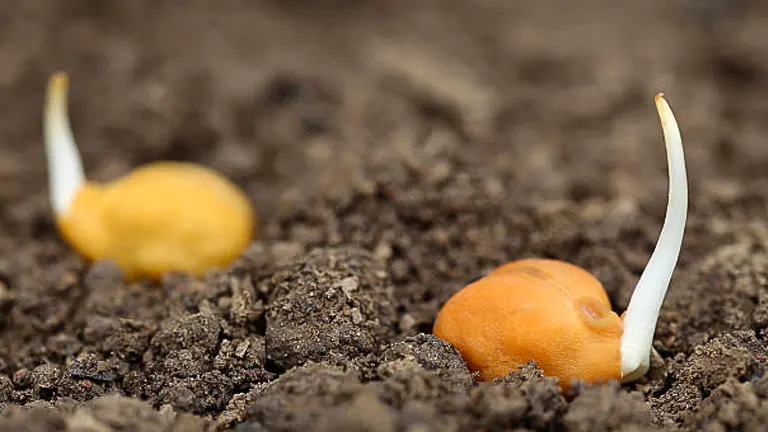
Planting chickpeas at the right time is essential to ensure healthy germination and robust growth. In temperate climates, sow chickpea seeds in early spring after the risk of frost has passed, usually between March and April, to give the plants ample time to establish before warmer temperatures set in. In warmer regions, where summers can be excessively hot, consider fall planting (late September to October). This allows chickpeas to thrive in the cooler winter months, avoiding the risk of heat stress and improving pod quality.
Spacing Guidelines
Proper spacing helps optimize yield, manage disease risk, and ensure good airflow. Here’s a scientific breakdown of spacing considerations:
- Plant-to-Plant: In medium-density farming, space seeds 4-6 inches (10-15 cm) apart. For high-density farming, reduce the spacing to 3-4 inches (8-10 cm) to maximize yield while allowing sufficient airflow.
- Row-to-Row: Maintain 18-24 inches (45-60 cm) between rows. This spacing provides enough room for the plants to branch and facilitates easier weeding, pest control, and harvesting.
Watering Requirements
Chickpeas are relatively drought-tolerant once established, but they require consistent moisture during critical growth stages like germination and flowering. Here’s a detailed guide to their watering needs:
- Germination: Ensure soil remains consistently moist but not waterlogged. Frequent, light watering can help stimulate early growth.
- Flowering: Deep watering once or twice a week supports flowering and pod formation.
- Maturity: Reduce watering as the pods mature to prevent mold, encourage uniform ripening, and enhance seed quality.
Scientific Analysis Table
| Aspect | Optimal Conditions | Notes |
|---|---|---|
| Planting Season | Early spring (temperate climates) | Fall planting (warm climates) |
| Soil Temperature | Minimum 50°F (10°C) | Ensure soil is warm enough for proper germination |
| Plant-to-Plant Spacing | 3-6 inches (8-15 cm) | Adjust based on density goals |
| Row-to-Row Spacing | 18-24 inches (45-60 cm) | Allows sufficient room for branching |
| Watering Frequency | Deep watering once or twice a week | Adjust frequency based on weather and soil moisture |
| Total Growing Period | 90-110 days | Days to harvest depend on variety and planting season |
Care and Maintenance
Fertilization Practices
Although chickpeas are legumes capable of fixing atmospheric nitrogen, they still benefit from targeted fertilization to optimize growth and yield. Apply a balanced fertilizer low in nitrogen but rich in phosphorus and potassium at the time of planting to promote strong root development and enhance pod formation. For organic gardening, use well-composted manure or a specially formulated organic legume fertilizer that slowly releases essential nutrients without overwhelming the plants. This strategic supplementation ensures robust growth without excessive foliage that can reduce pod yield.
Pest Management
Chickpeas can be susceptible to a variety of pests, which can impact their health and productivity. Common pests include:
- Aphids: These sap-sucking insects can cause stunted growth and transmit viruses. Natural predators like ladybugs and lacewings are effective biological controls.
- Cutworms: These larvae can sever young plants at the base. Use collars around seedlings for protection.
- Spider Mites: These tiny pests can cause leaf discoloration and defoliation. Increase humidity or apply sulfur-based miticides to manage infestations.
Implementing an Integrated Pest Management (IPM) strategy involves regular monitoring of the crop, encouraging natural predator populations, and using physical barriers such as floating row covers. When chemical controls are necessary, opt for targeted organic insecticides to minimize impact on non-target organisms and maintain ecological balance.
Disease Prevention
Effective disease management in chickpea cultivation is crucial for maintaining plant health. Key practices include:
- Proper Spacing: Ensure plants are spaced adequately to allow for optimal air circulation, which reduces the humidity that fosters fungal growth.
- Crop Rotation: Rotate chickpeas with non-leguminous crops to reduce the risk of soil-borne diseases like fusarium wilt and root rot.
- Sanitation: Keep the field free from plant debris and weeds that can harbor pathogens.
Regular scouting for symptoms of diseases such as leaf spots, blights, and wilts is essential. At the first sign of infection, remove and destroy affected plants to prevent the spread of the disease.
Pruning Techniques
Chickpeas generally do not require extensive pruning, but strategic trimming can be beneficial, especially in dense plantings. Pruning the upper growth slightly can enhance air circulation and light penetration, reducing the risk of disease and promoting more even maturation of pods. Use clean, sharp shears to make precise cuts, which help prevent damage and potential disease entry points.
Maintenance Table
| Activity | Details | Frequency/Timing |
|---|---|---|
| Fertilization | Low-nitrogen, high-phosphorus, and potassium | At planting and flowering |
| Pest Control | Monitor and use biological controls or organic pesticides | Regularly/as needed |
| Disease Prevention | Space plants properly, rotate crops, and practice sanitation | Throughout the growing season |
| Pruning | Trim top growth to improve light and air penetration | Mid-season or as needed |
Harvesting and Storage
Signs of Maturity
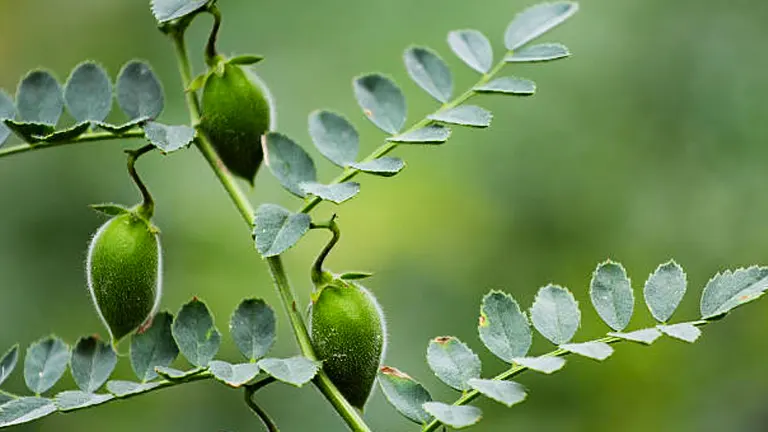
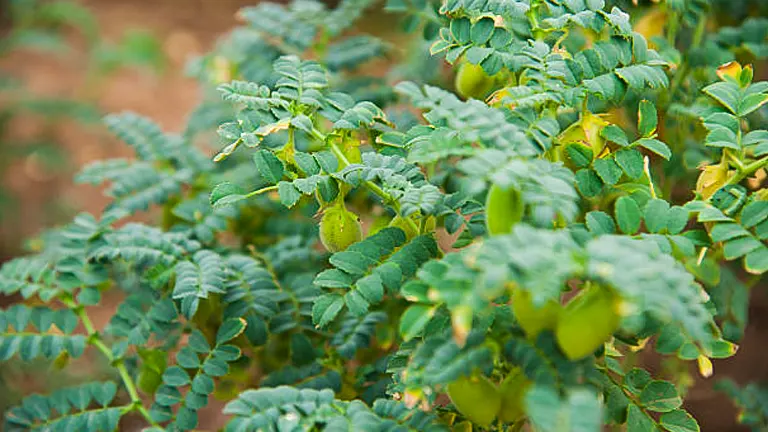
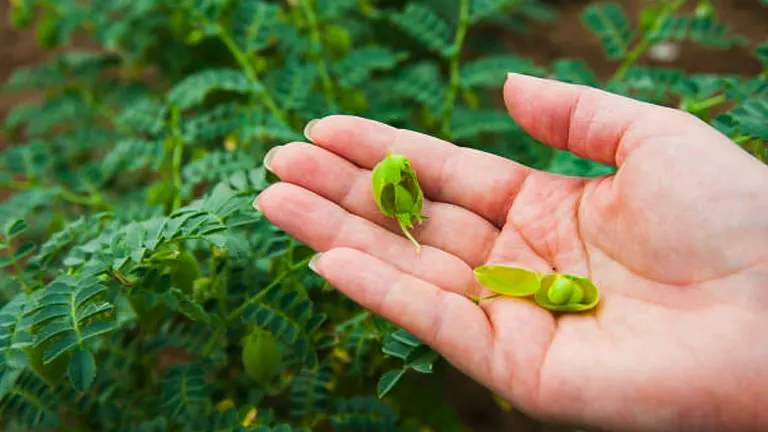
Determining the right time to harvest chickpeas is crucial for maximizing both yield and nutritional value. The pods are ready when they have hardened, and the plant’s leaves transition to a yellow or brown color, indicating senescence. This typically happens around 100 to 120 days after planting, depending on the variety and local climate conditions. You should feel a firm texture when you squeeze the pods, and the seeds inside should rattle slightly when shaken, indicating they are dry enough.
Harvesting Techniques
Effective harvesting of chickpeas ensures the best quality and ease of subsequent processing. Here’s a step-by-step approach:
- Uprooting: Gently pull the entire plant from the ground to ensure no pods are left behind in the soil.
- Shaking: Vigorously shake the plants to remove loose soil and any small debris without damaging the pods.
- Drying: Hang the uprooted plants upside down in a dry, well-ventilated area away from direct sunlight. This helps the remaining pods to mature further and simplifies the threshing process.
- Threshing: Once completely dry, thresh the pods manually or use a mechanical thresher to separate the chickpeas from the pods.
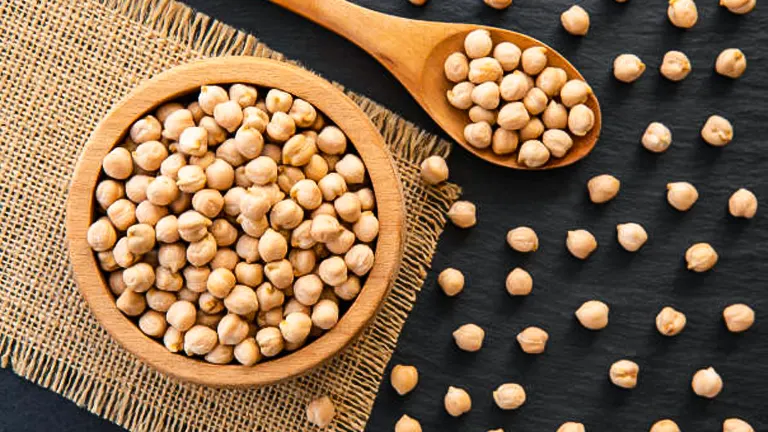
Storage and Preservation
Proper storage techniques are vital for maintaining the quality and longevity of chickpeas:
- Initial Storage: Store the dried chickpeas in a cool, dry place. Use airtight containers or heavy-duty storage bags to protect them from moisture and pests.
- Long-Term Preservation: For extended storage beyond a year, use food-grade desiccant packets to absorb any residual moisture and consider vacuum sealing to prevent air exposure. Both methods will help maintain freshness and prevent spoilage.
- Pest Prevention: Regularly inspect the storage area for signs of pests. If necessary, use environmentally friendly pest control methods to safeguard your stored chickpeas.
Storage Tips Table
| Storage Aspect | Details | Recommended Practices |
|---|---|---|
| Container Type | Airtight containers or vacuum-seal bags | Protects against moisture and pests |
| Temperature | Cool and dry conditions (below 60°F/15°C) | Prevents germination and mold growth |
| Humidity Control | Use of desiccants | Absorbs unwanted moisture |
| Inspection Routine | Monthly inspection for pests and spoilage | Early detection and management of potential issues |
By following these enhanced harvesting and storage techniques, you can ensure that your chickpeas are not only harvested at their peak but also maintained in excellent condition for long-term use, whether for culinary applications or future planting.
Troubleshooting Common Problems
Addressing Poor Growth
If your chickpea plants are not thriving, consider several factors that might be influencing their growth. Poor soil fertility, inadequate watering, and competition from weeds are common culprits. Enhance soil nutrition with a side dressing of compost mid-season, adjust your watering schedule to ensure deep, infrequent waterings that reach the roots, and maintain a weed-free environment to allow chickpeas to access necessary nutrients and moisture.
Watering Issues
Chickpeas require careful watering to thrive. Overwatering can lead to root rot and other fungal diseases, while underwatering, especially during pod formation, can stunt growth and reduce yields. Use mulch to retain soil moisture and establish a consistent watering routine that adjusts according to weather conditions—more frequent watering during prolonged dry spells and reduced watering when rainfall is adequate.
Nutrient Deficiencies
A lack of key nutrients can manifest in several ways. Nitrogen deficiency, although rare due to chickpeas’ nitrogen-fixing ability, might appear if the plants are yellowing prematurely. Phosphorus deficiency can delay maturation, and potassium deficiency can cause older leaves to yellow and die. Adjust your fertilization practices based on a soil test report to ensure balanced nutrition tailored to the specific needs of your crop.
Related Post
- How to Fertilize Bougainvillea: A Complete Guide for Stunning Blooms
- How to Fertilize Apple Trees: Essential Tips for a Bountiful Harvest
- How to Fertilize Lemon Trees: Secrets for Thriving Citrus
- How to Fertilize Avocado Tree: A Step-by-Step Guide for Lush Growth
Conclusion
Growing chickpeas can be a straightforward and rewarding endeavor when armed with the right knowledge and techniques. This guide has equipped you with detailed information on everything from soil preparation and planting to pest management and harvesting. By applying these master techniques, you can expect to see lush growth and bountiful chickpea yields in your garden.
Encourage your efforts and patience in nurturing these versatile legumes, and remember that every gardening experience is an opportunity to learn and improve. Share your chickpea cultivation stories and successes to inspire and educate others within the gardening community.
FAQs
- What is the best time of year to plant chickpeas in a temperate climate?
In temperate climates, the best time to plant chickpeas is early spring, after the last frost has passed. This typically falls between March and April. Planting during this time ensures that the soil is warm enough for seed germination without the risk of frost harming the seedlings. - Can chickpeas be grown in containers, and if so, what are the considerations?
Yes, chickpeas can be successfully grown in containers. Ensure the container is at least 8-10 inches deep and has good drainage holes. Use a well-draining potting mix and keep the soil consistently moist but not waterlogged. Container-grown chickpeas may need more frequent watering than those in the ground. - What are the signs that chickpeas are ready to be harvested?
Chickpeas are ready for harvest when the pods are firm, and the plant leaves begin to yellow and die back. The pods should feel hard, and the seeds inside should be firm and not squishy. This usually occurs about 100 days after planting, depending on the variety. - How should chickpeas be stored after harvesting to maintain their quality?
After harvesting, dry the chickpeas thoroughly in a dry, well-ventilated area. Once completely dry, store them in an airtight container in a cool, dry place. Properly stored, dried chickpeas can last for up to a year. - Are chickpeas susceptible to any specific pests or diseases, and how can these be managed organically?
Chickpeas can attract aphids, cutworms, and occasionally spider mites. Manage these pests organically by encouraging beneficial insects, using neem oil, or applying insecticidal soap. For disease prevention, ensure good air circulation and avoid overhead watering to keep foliage dry. - What soil pH is optimal for growing chickpeas, and how can I adjust it?
Chickpeas prefer a soil pH between 6.0 and 7.0. If your soil test indicates a pH outside this range, you can adjust it by adding lime to raise the pH or sulfur to lower it. It’s best to amend the soil based on a soil test performed by a local extension service. - How much spacing is needed between chickpea plants for optimal growth?
For medium-density planting, space chickpea seeds about 4-6 inches apart within rows. For high-density farming, reduce spacing to 3-4 inches. Ensure there is 18-24 inches between rows to allow adequate room for growth and airflow. - Can chickpeas improve soil quality, and if so, how?
Yes, chickpeas can improve soil quality. As legumes, they have the ability to fix atmospheric nitrogen into the soil through a symbiotic relationship with root-borne bacteria. This process enriches the soil with nitrogen, enhancing its fertility for future crops.
We hope this guide helps you successfully grow and care for chickpeas, bringing lush growth and bountiful harvests to your garden. With these expert techniques at your fingertips, you’re well on your way to enjoying fresh, nutritious chickpeas from your own backyard. Happy gardening!
Kristine Moore
Forestry AuthorI'm Kristine Moore, a seasoned garden landscaping professional with over 30 years of experience. My extensive career has been dedicated to transforming outdoor spaces into stunning, sustainable landscapes. With a deep understanding of horticulture, design principles, and environmental stewardship, I have become a respected figure in the field, known for creating harmonious, visually appealing, and eco-friendly gardens. My commitment to excellence and continuous learning in landscaping trends and techniques has solidified my reputation as an expert in garden design and implementation.


Leave your comment