How to Grow Napa Cabbage
- March 28, 2024
- 0 comment
Learn how to grow Napa Cabbage, a key ingredient in Asian cuisine known for its sweet flavor and versatility in dishes like kimchi and stir-fries. This guide offers detailed instructions for gardeners of all levels to cultivate this nutritious leafy vegetable, ensuring a rewarding harvest.

| Benefit | Description |
|---|---|
| Nutritional Value | High in vitamins C and K, and contains vitamins A and B. Also a good source of minerals like calcium, potassium, and magnesium. |
| Low in Calories | An excellent choice for weight management diets due to its low calorie count. |
| Rich in Antioxidants | Contains antioxidants like glucosinolates and isothiocyanates, which may reduce cancer risk. |
| Improves Digestion | High in dietary fiber, which aids in digestion and promotes gut health. |
| Heart Health | The fiber, potassium, and other heart-healthy nutrients support cardiovascular health. |
| Anti-inflammatory Properties | Contains compounds that may help reduce inflammation in the body. |
| Bone Health | The vitamin K and calcium in Napa cabbage contribute to strong, healthy bones. |
| Hydration | High water content helps keep the body hydrated. |
| Skin Health | Vitamins A and C, along with antioxidants, can contribute to healthy skin. |
| Immune System Support | Vitamin C is essential for a robust immune system, helping to fight off illnesses. |
List on How To Grow Napa Cabbage
- Choosing the Right Variety
- Planting Time
- Sowing and Spacing
- Watering and Mulching
- Fertilizing
- Pest and Disease Management
- Harvesting
Choosing the Right Variety
Firstly, select a variety of Napa cabbage that is suitable for your climate and gardening space. There are several varieties, each with its own size, taste, and growing duration. Popular varieties include ‘Blues’, ‘Minuet’, and ‘Rubicon’.
Blues
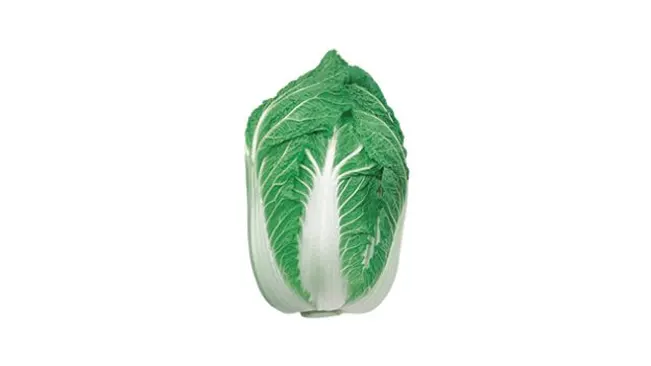
- Characteristics: This variety is known for its excellent disease resistance, particularly against clubroot and yellows (fusarium wilt).
- Growth Habit: ‘Blues’ forms large, dense heads and is often praised for its uniform shape.
- Taste and Texture: It has a crisp texture with a sweet flavor, making it versatile for both raw and cooked dishes.
- Climate Suitability: It’s suitable for a wide range of climates but performs exceptionally well in cooler regions.
Minuet
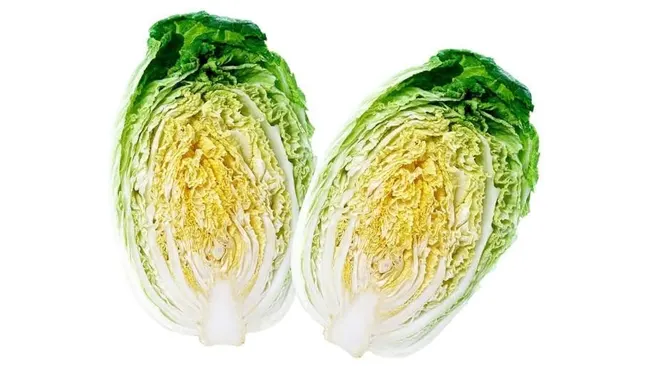
- Characteristics: A smaller, more compact variety, Minuet is designed for tighter spaces and can be ideal for container gardening.
- Growth Habit: It produces small to medium-sized heads that are ideal for single-meal use, reducing waste.
- Taste and Texture: Minuet has tender leaves with a mild, sweet flavor, perfect for salads and slaws.
- Climate Suitability: It’s well-suited to a variety of climates and can tolerate slightly warmer temperatures better than some other varieties.
Rubicon
- Characteristics: Renowned for its long storage life, Rubicon is a great choice if you want a variety that keeps well after harvest.
- Growth Habit: This variety forms medium to large, dense heads that are uniform in shape and size.
- Taste and Texture: It offers a crisp texture and a robust flavor, making it excellent for fermenting (like for kimchi) and cooking.
- Climate Suitability: It’s adaptable to many climates, including cooler regions, and is resistant to bolting.
When choosing a variety, consider your specific growing conditions, the space you have available, and how you plan to use the cabbage. For example, if you have limited space or are growing in containers, ‘Minuet’ might be the best choice. If you’re interested in long-term storage or fermenting, ‘Rubicon’ could be ideal. And for general use, especially in cooler climates prone to certain diseases, ‘Blues’ might be your go-to choice.
Soil Preparation
Napa cabbage prefers well-draining, fertile soil with a pH between 6.0 and 7.5. Prepare your garden bed by adding organic matter like compost or well-rotted manure. This will improve soil fertility and drainage, essential for healthy cabbage growth.
Soil Type
- Well-Draining: Napa cabbage does not tolerate waterlogged conditions, which can lead to root rot and other diseases. A well-draining soil allows excess water to drain away efficiently.
- Fertile: This vegetable thrives in nutrient-rich soil. A fertile soil ensures a steady supply of essential nutrients that are crucial for the growth of lush, healthy leaves.
Soil pH
- pH Range: Napa cabbage prefers a soil pH between 6.0 and 7.5. This slightly acidic to neutral pH range is ideal for most vegetable crops, as it ensures optimal nutrient availability.
- Testing and Adjusting pH: Before planting, it’s a good idea to test your soil’s pH. If the soil is too acidic (below 6.0), you can raise the pH by adding lime. If it’s too alkaline (above 7.5), you can lower the pH with sulfur or organic mulches like pine needles.
Steps for Soil Preparation
- Testing the Soil: Begin by testing your soil to understand its current state in terms of pH and nutrient levels. This information will guide your soil amendment process.
- Clearing the Bed: Remove any weeds, debris, or previous crop residues from the planting area. This reduces competition and pest issues.
- Adding Organic Matter:
- Compost: Mix in well-aged compost. Compost improves soil structure, provides a range of nutrients, and enhances the soil’s ability to retain moisture and nutrients.
- Well-Rotted Manure: Another excellent amendment is well-rotted manure, which adds nutrients and improves soil texture. Avoid fresh manure, as it can be too strong and burn the plants.
- Tilling or Turning the Soil: Loosen the soil to a depth of at least 12 inches. This aerates the soil and ensures that the added organic matter is well incorporated.
- Leveling the Bed: After tilling, level the bed with a rake to create a smooth, even surface. This is essential for uniform planting and watering.
- Final Check for Drainage: Ensure the planting bed does not collect standing water. If drainage is poor, consider raised beds or amend the soil further with coarse sand or organic material to improve drainage.
Planting Time
Napa cabbage, known for its preference for cooler temperatures, requires strategic timing for planting. This timing is essential to avoid the stress of extreme weather conditions, which can adversely affect the plant’s growth and quality.
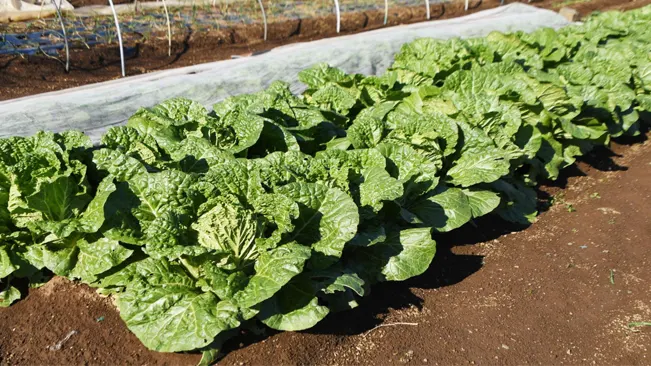
- Early Spring Planting: In most regions, the ideal time to start planting Napa cabbage is in early spring, as soon as the soil is workable. This period typically falls after the last frost date when the soil temperature is around 45°F (7°C) or warmer. Planting in early spring allows the cabbage to utilize the cool spring weather to establish itself and mature before the onset of the hot summer months.
- Late Summer Planting: For a fall harvest, planting in late summer is recommended. This period usually falls about 6 to 8 weeks before the first expected frost in fall. The key here is to allow the Napa cabbage to mature in the cooler fall temperatures, which are conducive to its growth. Cooler weather during the maturation phase can even enhance the flavor of the cabbage.
- Mild Winter Regions: In areas with mild winters, where the temperatures don’t drop too drastically, planting Napa cabbage in the fall is a great option. These regions enjoy an extended growing season, allowing the cabbage to mature without the threat of hard freezes. Fall-planted Napa cabbage often yields sweeter and tender leaves due to the mild weather conditions.
- Avoiding Hot Weather: It’s crucial to avoid planting Napa cabbage during periods of hot weather. High temperatures, especially those over 75°F (24°C), can cause the plant to bolt. Bolting is a process where the plant starts to flower and set seeds prematurely, leading to a bitter taste and poor head development. This issue is particularly pertinent in areas with short springs or early and intense summers.
- Microclimate Considerations: If your garden has microclimates, use them to your advantage. For instance, a spot that receives shade during the hottest part of the day can be a good location for summer-planted Napa cabbage, as it provides some protection from the heat.
- Season Extension Techniques: Utilize season extension techniques such as cold frames, row covers, or greenhouses to protect Napa cabbage from unexpected late frosts in spring or to extend the growing season into the cooler parts of fall.
Sowing and Spacing
You can start Napa cabbage seeds indoors or sow them directly in the garden. Plant seeds about a half-inch deep, and when seedlings are a few inches tall, thin them to about 12 to 18 inches apart. Proper spacing allows for adequate air circulation, reducing the risk of disease.
Starting Seeds Indoors
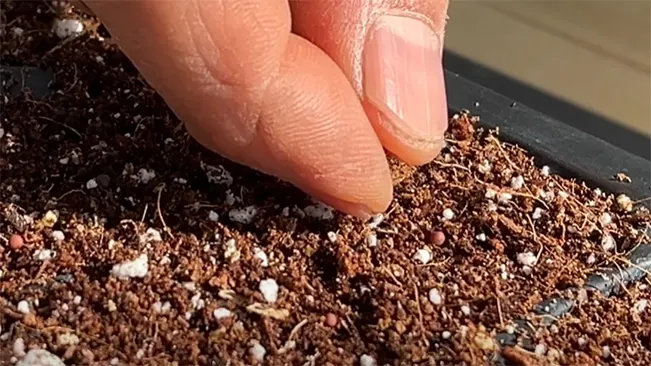
- Begin by planting Napa cabbage seeds in small pots or seed trays about 4-6 weeks before the last expected frost date. This head start is especially beneficial in regions with short growing seasons.
- Use a well-draining, seed-starting mix and sow seeds about a half-inch deep. Keep the soil moist but not waterlogged.
- Place the seed trays in a warm, well-lit area. A south-facing window or under grow lights are good options. The ideal germination temperature is between 65°F and 75°F.
- Once seedlings emerge, usually within 5-10 days, ensure they receive plenty of light to prevent them from becoming leggy.
Transplanting Seedlings
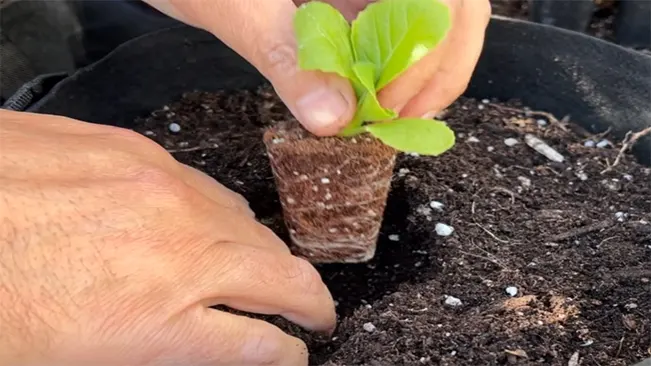
- Before transplanting seedlings outdoors, it’s crucial to harden them off. This process involves gradually exposing the seedlings to outdoor conditions over a week to reduce transplant shock.
- Transplant the seedlings when they have at least two sets of true leaves and the outdoor temperatures are consistently above 50°F.
Direct Sowing
- If you choose to sow directly in the garden, wait until the soil has warmed and there is no longer a risk of frost.
- Sow seeds a half-inch deep and about 3 inches apart. Once the seedlings are a few inches tall, thin them to 12 to 18 inches apart.
Spacing Considerations
- Proper spacing is crucial for healthy growth. Napa cabbage plants need room to spread out and develop their heads. A distance of 12 to 18 inches between plants allows for this.
- Adequate spacing also improves air circulation around the plants, which is essential in preventing fungal diseases and ensuring even sunlight exposure.
- If space is limited, consider growing smaller varieties or using raised beds to optimize your gardening space.
Watering and Mulching
Napa cabbage requires consistent moisture to develop its lush leaves. Water regularly, keeping the soil evenly moist but not waterlogged. Mulching with organic material helps retain soil moisture and control weeds.
Watering Napa Cabbage
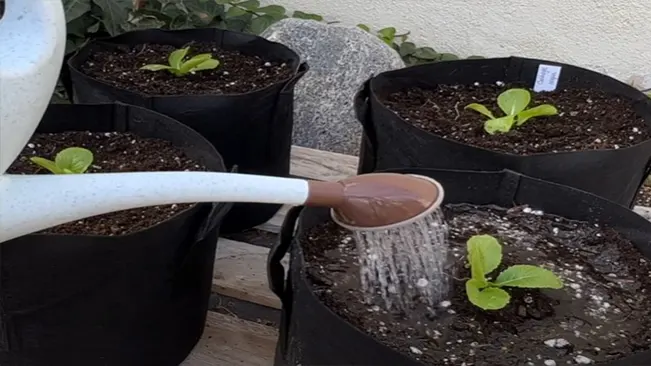
- Consistency is Key: Napa cabbage needs regular watering to ensure the soil remains evenly moist. This consistency in moisture levels is vital for the development of tender and lush leaves.
- Amount of Water: The amount of water needed can vary based on weather conditions and soil type. As a general rule, Napa cabbage requires about 1 to 1.5 inches of water per week. In hotter, drier conditions, more frequent watering may be necessary.
- Method of Watering: Using a drip irrigation system or a soaker hose is ideal, as these methods deliver water directly to the root zone and minimize leaf wetness. This can help prevent leaf diseases that thrive in moist conditions. If using overhead watering, do it early in the day so the foliage has time to dry.
- Monitoring Soil Moisture: It’s important to check the soil moisture regularly. The soil should feel moist at about an inch below the surface. Avoid overwatering, as this can lead to root rot and other diseases.
Mulching Napa Cabbage
- Purpose of Mulching: Applying mulch around Napa cabbage serves multiple purposes. It helps maintain soil moisture, suppresses weeds, keeps the soil temperature stable, and can also prevent soil-borne diseases from splashing up onto the leaves.
- Types of Mulch: Organic mulches are preferable. Straw, grass clippings, or shredded leaves are good choices. These materials also gradually break down, adding organic matter to the soil.
- Applying Mulch: Spread the mulch around the base of the plants, covering the soil evenly. Keep the mulch a few inches away from the plant stems to prevent moisture accumulation against the stem, which could cause rot.
- Thickness of Mulch: A layer of 2-3 inches of mulch is typically sufficient. If the mulch is too thick, it can hinder water penetration; too thin, and it may not effectively retain moisture or suppress weeds.
- Refreshing Mulch: Check the mulch periodically and add more if needed, especially during the peak of the growing season or in very hot or dry weather.
Fertilizing
Feed Napa cabbage with a balanced, slow-release fertilizer to encourage robust growth. Over-fertilizing can lead to excessive leaf growth at the expense of the cabbage head, so follow the recommended rates.

Understanding Fertilizer for Napa Cabbage
- Balanced Fertilizer: Napa cabbage benefits from a balanced fertilizer, typically one with equal parts nitrogen, phosphorus, and potassium (N-P-K). This balanced approach ensures that the plant receives all the necessary nutrients in the right proportions.
- Slow-Release Formulas: Slow-release fertilizers are preferred for Napa cabbage as they provide a steady supply of nutrients over a longer period. This is crucial for the cabbage’s gradual growth and helps prevent the sudden spurts that can occur with fast-release fertilizers.
Application and Timing
- Initial Fertilization: Apply fertilizer at the time of planting to give your Napa cabbage a good start. This initial feeding provides essential nutrients to support early growth and root development.
- Mid-Season Feeding: A second application, usually about midway through the growing season, can help sustain the plant’s growth as it develops its head. This is particularly important if the growth seems to be slowing or the leaves are losing their vibrant green color.
Over-Fertilizing Risks
- Leaf Overgrowth: Excess nitrogen, which is a common issue with over-fertilizing, can lead to rapid leaf growth. While this might seem beneficial, it’s often at the expense of the cabbage head, which might remain underdeveloped.
- Plant Health: Over-fertilizing can also lead to an imbalance in soil nutrients, potentially causing poor plant health and making the cabbage more susceptible to diseases and pests.
Pest and Disease Management
Keep an eye out for common pests like aphids, cabbage worms, and slugs. Use organic pest control methods like neem oil or insecticidal soap. Practice crop rotation and good sanitation to prevent fungal diseases.
Pest Management
- Aphids:
- Description: Small, sap-sucking insects that can be green, black, brown, or pink.
- Damage: They cause leaves to curl and can stunt plant growth. Aphids also excrete a sticky substance called honeydew, leading to sooty mold.
- Control: Spray with water to dislodge aphids or use insecticidal soaps and neem oil. Introduce beneficial insects like ladybugs that prey on aphids.
- Cabbage Worms:
- Description: Larvae of the cabbage white butterfly, these are velvety green caterpillars.
- Damage: They chew large holes in the leaves, affecting the plant’s health.
- Control: Hand-pick and remove caterpillars. Use floating row covers to prevent butterflies from laying eggs. Bacillus thuringiensis (Bt), a natural bacterial pesticide, can be effective.
- Slugs:
- Description: Soft-bodied mollusks that thrive in moist environments.
- Damage: Create irregular holes with smooth edges in leaves and can severely damage seedlings.
- Control: Use slug baits (preferably organic options), or traps filled with beer. Removing garden debris can reduce their hiding places.
Disease Management
- Clubroot:
- Symptoms: Swollen, distorted roots, stunted growth, and wilting during the day.
- Prevention & Control: Maintain soil pH around 7.0, as clubroot thrives in acidic soil. Practice crop rotation and avoid planting brassicas in the infected soil for several years.
- Black Rot:
- Symptoms: Yellowing of the leaf edges which eventually turns brown. The veins in the leaves can also blacken.
- Prevention & Control: Use disease-free seeds and transplants. Ensure good air circulation around plants and practice crop rotation. Remove and destroy infected plants.
- Downy Mildew:
- Symptoms: Yellow patches on leaves that turn to brown. Fluffy white growth may appear under leaves in humid conditions.
- Prevention & Control: Provide adequate spacing between plants for airflow, water plants at the base to keep foliage dry, and apply fungicides if necessary.
Harvesting
Napa cabbage is ready to harvest when the heads are firm and have reached a desirable size, typically 10 to 12 weeks after planting. Cut the cabbage at the base with a sharp knife. Avoid delaying harvest, as over-mature heads can split.
Understanding the Harvesting Time
- Maturation Period: Napa cabbage generally takes about 10 to 12 weeks to mature, depending on the variety and growing conditions.
- Seasonal Influence: If planted in early spring, expect a summer harvest. For late summer plantings, a fall harvest is typical.
Identifying Ready-to-Harvest Cabbage

- Size and Firmness: A mature Napa cabbage head will be firm to the touch and usually about 10 to 12 inches in diameter.
- Appearance: Look for heads that are dense and well-formed. The leaves should be crisp and vibrant, without signs of yellowing or wilting.
Proper Harvesting Technique

- Using the Right Tool: Use a sharp, clean knife to avoid damaging the plant.
- Cutting Technique: Cut the cabbage at the base where the head meets the stem. Be gentle to avoid bruising the leaves.
- Leave the Outer Leaves: Optionally, you can leave the outer leaves and root in place. In some cases, this can encourage the plant to produce smaller secondary heads.
Post-Harvest Handling

- Immediate Use: Freshly harvested Napa cabbage can be used immediately in cooking for the freshest flavor.
- Storage: If you’re not using it right away, wrap the cabbage in plastic and store it in the refrigerator. It can last for several weeks if kept cool.
- Preparation: Before using, remove any outer leaves that may be damaged or soiled.
Conclusion
Growing Napa cabbage in your garden is a gratifying experience that leads to a fresh, healthy addition to your meals. With proper care and attention, you can enjoy a bountiful harvest of this versatile vegetable. Remember, successful gardening is a journey of learning and adaptation. Monitor your plants regularly and adjust your care as needed. With time and experience, you’ll become a seasoned hand at growing Napa cabbage.
FAQs (Frequently Asked Questions)
- What is the best time to plant Napa cabbage?
- Plant Napa cabbage in early spring for a summer harvest or in late summer for a fall harvest. It thrives in cooler temperatures.
- Plant Napa cabbage in early spring for a summer harvest or in late summer for a fall harvest. It thrives in cooler temperatures.
- How much sunlight does Napa cabbage need?
- Napa cabbage prefers full sun but can tolerate partial shade. Aim for at least 4-6 hours of sunlight per day.
- Napa cabbage prefers full sun but can tolerate partial shade. Aim for at least 4-6 hours of sunlight per day.
- What type of soil is ideal for Napa cabbage?
- It grows best in well-drained, fertile soil with a pH between 6.0 and 7.5. Enriching the soil with compost or aged manure is beneficial.
- It grows best in well-drained, fertile soil with a pH between 6.0 and 7.5. Enriching the soil with compost or aged manure is beneficial.
- How do I space Napa cabbage plants?
- Space the plants about 12 to 18 inches apart to ensure they have enough room to grow and receive adequate airflow.
- Space the plants about 12 to 18 inches apart to ensure they have enough room to grow and receive adequate airflow.
- How often should I water Napa cabbage?
- Keep the soil consistently moist but not waterlogged. Watering once a week is usually sufficient, but adjust based on rainfall and soil type.
- Keep the soil consistently moist but not waterlogged. Watering once a week is usually sufficient, but adjust based on rainfall and soil type.
- Do I need to fertilize Napa cabbage?
- Yes, use a balanced, slow-release fertilizer at planting and midway through the growing season to support growth.
- Yes, use a balanced, slow-release fertilizer at planting and midway through the growing season to support growth.
- What are common pests and how can I manage them?
- Watch for aphids, cabbage worms, and slugs. Use organic methods like neem oil, insecticidal soap, or hand-picking pests off plants.
- Watch for aphids, cabbage worms, and slugs. Use organic methods like neem oil, insecticidal soap, or hand-picking pests off plants.
- How long does it take for Napa cabbage to mature?
- Napa cabbage typically matures in 10 to 12 weeks after planting, depending on the variety and growing conditions.
- Napa cabbage typically matures in 10 to 12 weeks after planting, depending on the variety and growing conditions.
- How can I tell when Napa cabbage is ready to harvest?
- Harvest when the heads are firm and have reached a size of about 10 to 12 inches in diameter. Avoid waiting too long as the heads may split.
- Can Napa cabbage be grown in containers?
- Yes, Napa cabbage can be grown in large containers. Ensure the pot is at least 12 inches deep and has good drainage.

Kristine Moore
Forestry AuthorI'm Kristine Moore, a seasoned garden landscaping professional with over 30 years of experience. My extensive career has been dedicated to transforming outdoor spaces into stunning, sustainable landscapes. With a deep understanding of horticulture, design principles, and environmental stewardship, I have become a respected figure in the field, known for creating harmonious, visually appealing, and eco-friendly gardens. My commitment to excellence and continuous learning in landscaping trends and techniques has solidified my reputation as an expert in garden design and implementation.






Leave your comment