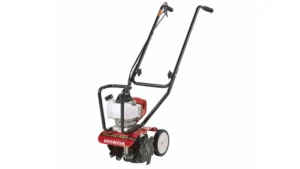
Tazz 2-in-1 Front Tine Tiller Cultivator Review
- February 23, 2024
- 0 comment
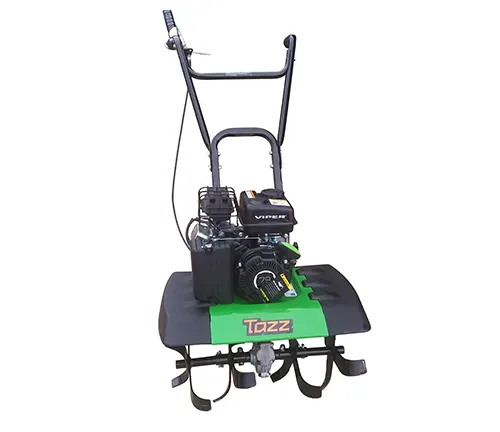
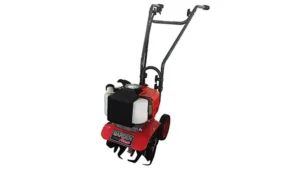
The Tazz 2-in-1 Tiller Cultivator is two garden tools in one! As a cultivator, Tazz can weed, mulch and aerate soil. As a tiller, the high-performance 79cc Viper engine and design delivers the right amount of power to turn all kinds of soil. Prepare wide open spaces of land in the Spring, maintain rows in the Summer, and do major cleanup in the Fall.
Specifications
- Engine: 79cc 4-cycle Viper (powerful!)
- Tilling/Cultivating: Both!
- Width: Adjustable (11″, 16″, 21″) – fits various gardens
- Tines: 4 forged steel (durable)
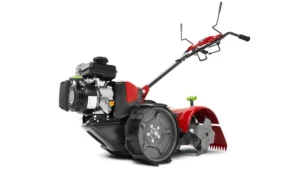
Unboxing and First Impressions
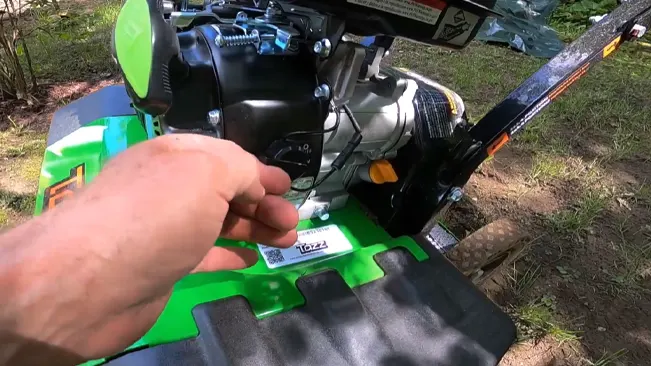
Unboxing the Tazz 35310 Tiller Cultivator was an experience filled with anticipation. The sturdy packaging was the first good sign, hinting at the quality that awaited inside. As I opened the box, I found the tiller’s components neatly arranged and well-protected, a testament to the manufacturer’s attention to detail. The parts, including the main body, tines, handlebars, and shields, all felt robust and were in perfect condition, free from any shipping damage. The presence of a clear and concise instruction manual was a pleasant surprise, deviating from the often confusing guides we’re used to.
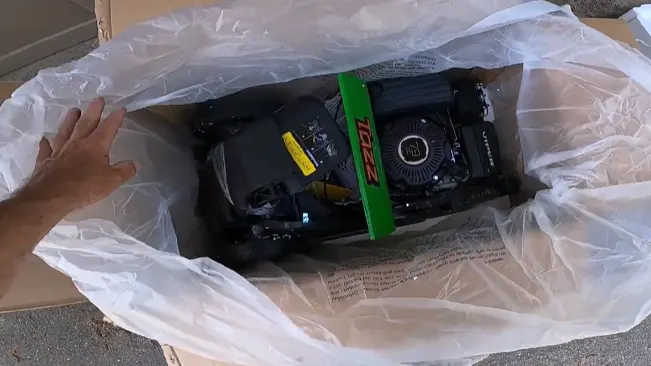
The tines stood out for their sturdy build, promising effective soil cultivation. However, the manual’s note about potentially needing to drill the holes for bolt fitting was unexpected for a new product but seemed like a minor issue in an otherwise smooth unboxing process. Overall, the Tazz 35310 made a strong first impression as a well-crafted piece of equipment ready for garden challenges. Despite the small hiccup about drilling, my enthusiasm remained high, eager to see how the tiller would perform in actual garden work.
Detailed Assembly Guide
Preparing the Tines
Start by arranging the tines, making sure they’re oriented correctly as indicated by the directional arrows, which are there to ensure they rotate properly. This initial step is crucial as it sets the foundation for the effective operation of the tiller, aligning the tines for optimal soil penetration and turnover.
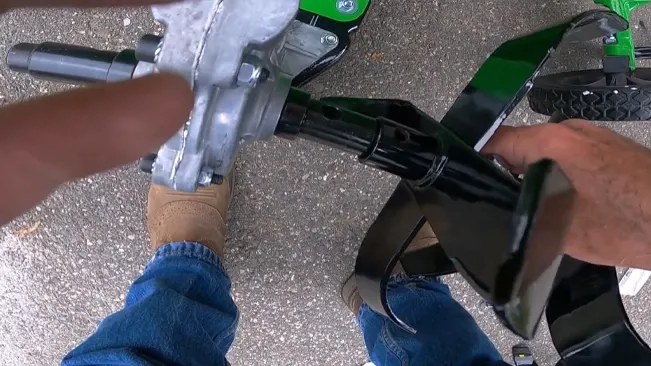
During this process, you might come across a slight issue where the bolts supplied with the tiller don’t quite fit through the pre-drilled holes in the tines. While it might seem counterintuitive to alter a brand-new tool, taking a drill to carefully enlarge these holes can be necessary. This minor modification doesn’t detract from the tool’s integrity; rather, it’s a small tweak to guarantee that all components fit together securely, ensuring the tines are firmly attached and ready to tackle the task at hand.
Attaching the Tines
After making the necessary adjustments to the holes, it’s time to attach the tines to the main body of the tiller. This is done using the bolts and nuts included in the package. For this step, you’ll require a pair of wrenches, specifically 15mm and 16mm sizes, to properly tighten the hardware. Ensuring that these bolts are securely fastened is crucial, as it directly impacts the tiller’s performance and durability, especially during the rigorous task of breaking through soil.
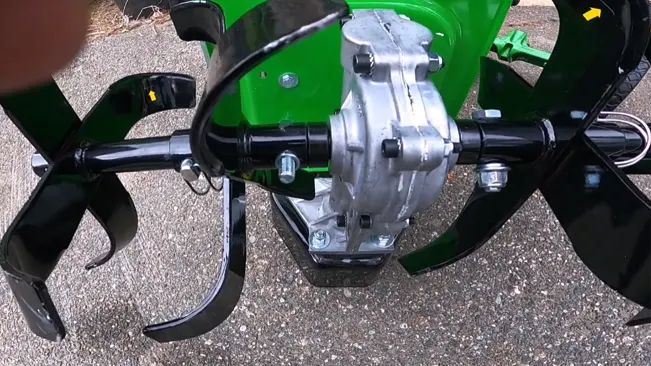
Securing the tines is more than just a mechanical step; it’s about setting up your tiller for optimal functionality. The firm attachment of the tines ensures that they remain stable and effective even under the strain of tilling tough soil. This step, while seemingly straightforward, plays a pivotal role in preparing the tiller for the demanding work ahead, laying the groundwork for a smooth and efficient gardening experience.
Handlebar Assembly
The assembly of the handlebars follows, starting with a loose setup to facilitate any necessary adjustments during the process. The instruction manual comes in handy here, offering a clear diagram that guides the assembly, ensuring that each part aligns correctly. This step is crucial for achieving the ergonomic setup of the tiller, allowing for comfortable use and maneuverability during operation.
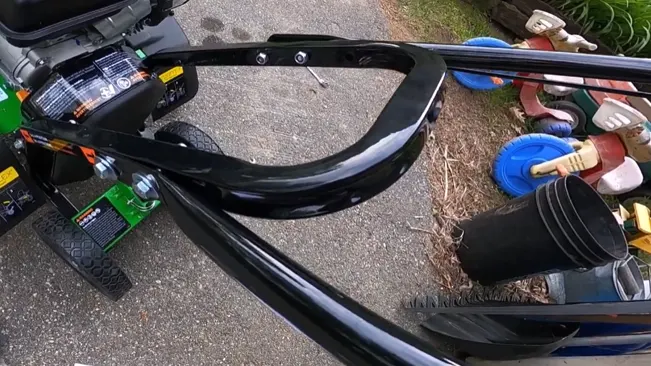
To properly align the handlebars, use the bottom tire of the tiller as a reference point, ensuring the bolts align with their corresponding holes in the lower part of the tiller. This might require a gentle tap to snugly fit everything into place, securing the handlebars in the correct position. This careful alignment is key to ensuring the tiller is easy to control and navigate, making your tilling work more efficient and less strenuous.
Installing the Shields
Installing the shields is a straightforward step in the assembly process, where the shields are slid onto the sides of the tiller. When aligned correctly, these shields should easily click into place, signaling that they are securely attached. This addition is crucial for safety, as it protects the user from flying debris that can be kicked up during the tilling process, ensuring a safer working environment.
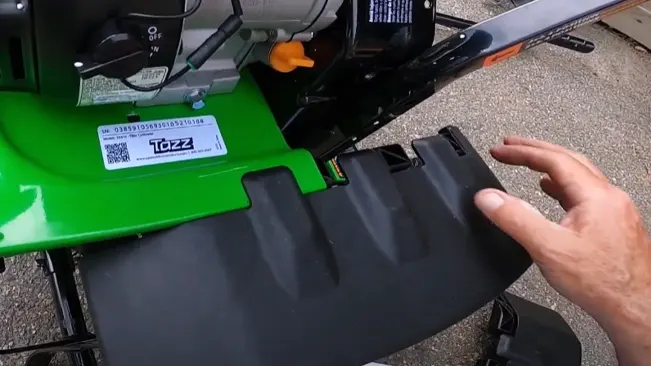
Moreover, the shields contribute to the overall aesthetics and functionality of the tiller, giving it a polished and complete appearance. They are designed not only for protection but also to enhance the usability of the tiller, preventing soil and debris from scattering too widely and keeping the work area more contained and manageable. Slide the shields onto the sides of the tiller. They should click into place easily if aligned correctly. This not only protects you from flying debris but also gives the tiller a finished look.
Finalizing the Handle and Controls
Finalizing the handle and controls involves adjusting the handle to the user’s preferred height and then securing it tightly. This step is vital for ensuring that the tiller is comfortable to operate, allowing for a more enjoyable and less strenuous tilling experience. A well-adjusted handle can significantly reduce user fatigue and increase precision in maneuvering the tiller through various soil conditions.
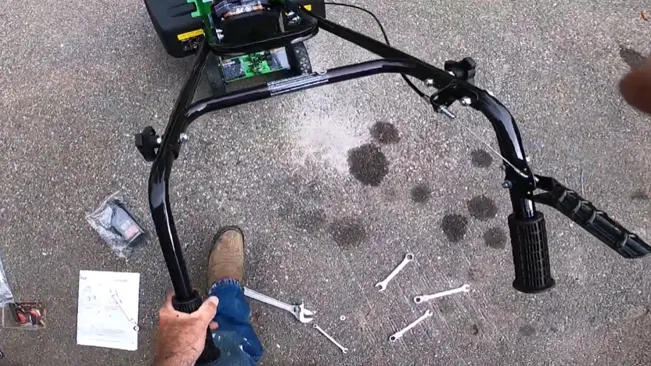
The next phase is attaching the pulley cover, which requires the removal and reattachment of screws to ensure it is firmly in place. While performing this task, it’s not unusual to find that one screw may not tighten as expected. However, this minor issue typically doesn’t compromise the tiller’s functionality. The pulley cover is an essential safety feature, shielding moving parts and contributing to the overall durability and reliability of the tiller.
Adding Oil and Fuel
The final step before you can start using your tiller involves adding the necessary fluids to ensure the engine runs smoothly. Begin by taking the 12-ounce bottle of oil that comes with the tiller and pouring the entire contents into the engine. It’s important to use the correct type of oil, which in this case is a 4-cycle 10W-30 oil, to maintain the engine’s health and efficiency. This step is crucial for lubricating the engine’s internal components, reducing wear and tear, and extending the lifespan of your tiller.
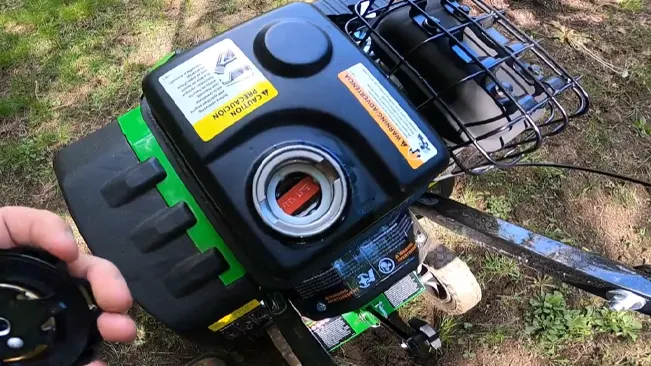
Once the oil is added, the next step is to fuel up the tiller with regular gasoline. Fill the fuel tank up to the designated level, being careful not to overfill. This step is just as important as adding oil because the right fuel level ensures the engine starts up properly and runs at optimal performance. With both oil and fuel in place, your tiller is now ready to spring into action, transforming hard soil into a well-tilled garden bed ready for planting.
Starting the Tiller Cultivator
Before attempting to start the Tiller Cultivator, it’s crucial to have completed all assembly steps and filled the engine with the correct oil and fuel. Place the tiller on a level and stable surface in a well-ventilated area, ensuring there are no obstructions nearby. Verify that all controls are within reach and that the tiller’s switch is in the “OFF” position. To initiate the starting process, adjust the choke to the “START” position if the engine is cold; however, if the engine has been active recently, the choke may not be necessary. Turn the fuel valve to “ON” to permit fuel flow to the engine. Locate the primer bulb near the carburetor and press it 3-5 times to prime the carburetor, being cautious not to overdo it.
Once priming is complete, firmly hold the tiller with one hand and grasp the starter handle with the other. Gently pull the starter cord until resistance is felt, then pull sharply to start the engine, which may require several attempts. If the engine struggles to start, double-check the choke’s setting based on the engine’s temperature. After the engine starts, let it idle briefly to warm up, adjusting the choke back to the “RUN” position as it does so. This ensures the tiller is primed for optimal operation. With the engine running smoothly, you’re set to start tilling; simply approach the desired tilling area, engage the tines, and allow the tiller to efficiently break up the soil.
Pros and Cons of Tazz 2-in-1 Tiller Cultivator
Pros
- Versatility: The Tazz 2-in-1 design allows it to function both as a tiller and a cultivator, making it suitable for a wide range of gardening tasks, from breaking new ground to aerating existing plots.
- Powerful Engine: Typically equipped with a robust engine, this tiller cultivator can tackle tough soil conditions, including hard, compacted earth and dense clay, with relative ease.
- Adjustable Tilling Width and Depth: The ability to adjust the tilling width and depth makes this tool adaptable to various garden sizes and soil types, allowing for customized soil preparation.
- Durability: Built with high-quality materials, the Tazz 2-in-1 Tiller Cultivator is designed for longevity and reliability, even in demanding gardening environments.
- Ease of Use: Features such as easy-start engines and ergonomic handles contribute to a user-friendly experience, reducing physical strain and making the tool accessible to gardeners of all skill levels.
Cons
- Weight and Maneuverability: Depending on the model, the Tazz 2-in-1 can be relatively heavy, which might make it challenging to maneuver in tight spaces or for users with limited physical strength.
- Noise and Vibrations: Like many gas-powered garden tools, this tiller cultivator can generate significant noise and vibrations, which might be uncomfortable during extended use and could be a disturbance in residential areas.
- Maintenance Requirements: The gas engine necessitates regular maintenance, including oil changes, air filter replacements, and spark plug checks, which could be a drawback for those seeking low-maintenance gardening tools.
- Cost: The initial purchase price, along with ongoing maintenance and fuel costs, can make the Tazz 2-in-1 Tiller Cultivator a more expensive option compared to simpler, manually operated garden tools.
- Environmental Impact: Being gas-powered, this tool emits pollutants, contributing to its environmental footprint, which might be a concern for eco-conscious gardeners.
Proper Maintenance Tips and Care of Tazz 2-in-1 Tiller Cultivator
- Inspect the Tiller: Check for loose bolts, damaged parts, or tine obstructions. Ensure safety guards and shields are secure.
- Check the Oil Level: Maintain the oil according to the manufacturer’s guidelines. Use the specified oil type to avoid engine damage.
- Fuel Check: Ensure there’s enough fresh gasoline. Avoid old or contaminated fuel to prevent carburetor issues.
- Clean the Tiller: Remove dirt, debris, and plant material to prevent rust and mechanical issues.
- Inspect for Wear: Check tines for damage or wear. Replace if necessary.
- Air Filter Maintenance: Clean or replace the air filter to ensure engine efficiency.
- Spark Plug Care: Regularly check and replace the spark plug as needed to avoid wear or corrosion.
- Tine Care: Sharpen tines to maintain effectiveness and reduce engine strain.
- Lubrication: Lubricate moving parts like the tine shaft and wheels to ensure smooth operation and prevent rust.
- Storage: For long-term storage, especially over winter, drain the fuel, run the engine until it stops, disconnect the spark plug, and store in a dry, protected space to prevent rust and damage.
Conclusion
In conclusion, the Tazz 2-in-1 Tiller Cultivator stands out as a versatile and robust tool for gardeners looking to maintain and prepare their soil with ease. Its 2-in-1 functionality offers both tilling and cultivating capabilities, making it a valuable asset for a range of gardening tasks. Regular maintenance and proper care, including routine checks, cleaning, and periodic maintenance, are essential to ensure its longevity and optimal performance. By adhering to the recommended maintenance schedule, such as checking oil levels, cleaning the air filter, and sharpening the tines, users can significantly extend the life of their Tazz Tiller Cultivator. Proper storage during off-season periods further protects the equipment, ensuring it remains in good condition for the next planting season. Overall, the Tazz 2-in-1 Tiller Cultivator is a reliable and efficient choice for gardeners seeking a high-quality tool to enhance their gardening projects.
FAQs
- How often should I perform routine maintenance on my Tazz 2-in-1 Tiller Cultivator?
Routine maintenance, such as checking oil levels, fuel, and cleaning the tiller, should be done before and after each use to ensure optimal performance and longevity. - Can I use any type of oil for my Tazz Tiller Cultivator?
It’s important to use the type of oil recommended by the manufacturer, typically 4-cycle 10W-30 oil, to ensure the engine runs smoothly and to avoid damage. - What should I do if my tiller’s tines become dull?
If the tines become dull, you can sharpen them using a suitable file or grinder, following the manufacturer’s instructions to maintain effective tilling performance. - How do I store my Tazz Tiller Cultivator during the off-season?
For long-term storage, especially over winter, drain the fuel tank, run the engine until it stops to clear the fuel system, disconnect the spark plug, and store the tiller in a dry, protected space to prevent rust and damage. - What should I do if my tiller won’t start?
If your tiller won’t start, check the fuel, oil levels, and spark plug. Ensure the fuel valve is on and the choke is correctly set. If problems persist, consult the manufacturer’s troubleshooting guide or a professional technician.

Joel Cunningham
Forestry AuthorI'm Joel Cunningham, an expert in pruning and weed management with over a decade of experience. My skills are rooted in formal training and extensive practice, focusing on advanced pruning techniques and efficient weed control. I'm known for my quality work, precision, and deep understanding of plant health and soil dynamics. My contributions extend to educational initiatives where I share sustainable practices and advice, establishing myself as a reliable and authoritative figure in the gardening community.


Leave your comment