How to Make Wood Charcoal 2024
- September 22, 2023
- 2 comment
Charcoal, the blackened, lightweight descendant of wood, has played a pivotal role in human history. From metallurgy to grilling, its versatile applications span across various industries and cultures. Have you ever wondered how this transformative process occurs? Or perhaps you’ve wanted to make your own charcoal for that authentic BBQ experience? Journey with us as we dive into the art and science of making wood charcoal, and pick up some pro tips along the way.
The Basics of Charcoaling
Charcoaling, an age-old technique with profound implications, intrigues many with its simplicity and transformative power. But what exactly is happening when wood is turned into charcoal?
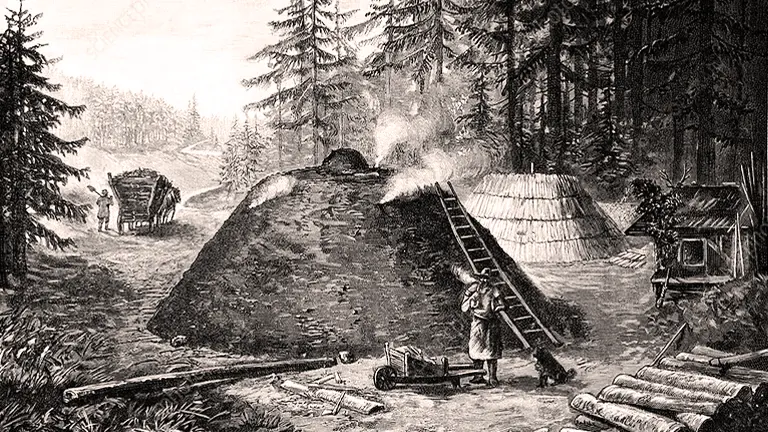
Carbonization
At the heart of charcoaling lies the principle of carbonization. It’s a thermochemical process that transforms wood, or any organic material for that matter, into a carbon-rich residue by applying heat. However, it’s not just the heat but the controlled absence of oxygen that is essential to the process. Here’s why:
- If wood is heated in the presence of ample oxygen, it simply combusts or burns, producing ashes and various gases, with very little carbon residue.
- But, when heated in an environment where oxygen is restricted, instead of burning outright, the wood undergoes pyrolysis. This is the thermal decomposition of organic material at elevated temperatures.
Driving Off Volatiles: Purifying Carbon
As the wood heats up, several things happen almost simultaneously:
- The initial, thick white smoke one sees during the early stages of charcoaling is mainly water vapor. All wood, even if it appears dry, contains moisture. As it heats up, this moisture is driven off.
- Apart from water, wood contains various organic compounds. Under the influence of heat, these break down and evaporate. These compounds can include tars, resins, and oils, which are released as a mixture of gases. This is responsible for the secondary smoke, which is often bluish or clearer than the initial white smoke.
- Once the volatile compounds and water are driven out, what remains is primarily carbon, the primary component of charcoal. Additionally, any inorganic minerals that were present in the wood, often referred to as ash content in the context of charcoal, remain behind.
Why Carbonize?
By reducing wood to its carbon essence, charcoal offers several advantages:
- Carbon is a more concentrated form of energy than raw wood, allowing charcoal to burn hotter and longer than an equivalent amount of wood.
- With most volatiles removed, charcoal produces less smoke and fewer creosote compounds, resulting in a cleaner burn. This is why many BBQ enthusiasts prefer charcoal—it imparts food with a smoky flavor without the bitterness that can come from some wood volatiles.
- Apart from cooking, the pure carbon content in charcoal has numerous applications, from metallurgy to artistry and even medicine.
Step-by-Step Guide to Making Wood Charcoal
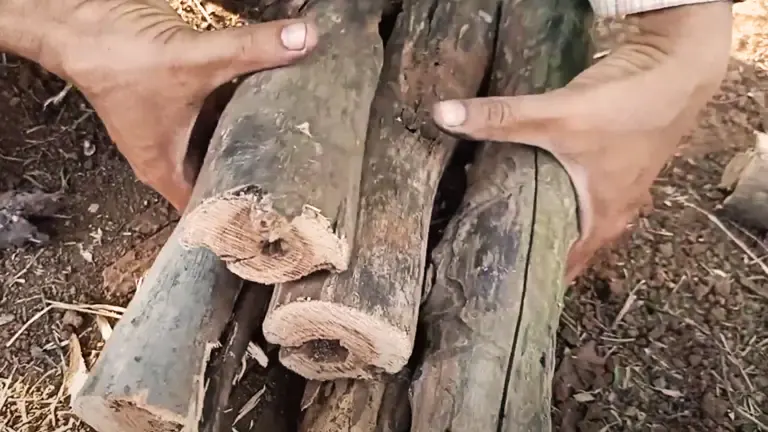
1. Choose the Right Wood
Advantages of Hardwoods
- The dense nature of hardwoods means they have a more compact cellular structure. This leads to a slower, more controlled burn, making them ideal for charcoal production.
- When used as fuel, hardwood-derived charcoal provides a steady, lasting heat, crucial for applications like grilling or blacksmithing, where consistent temperature is desired.
- Hardwoods generally produce less ash compared to softwoods, meaning less cleanup post-burn and better overall burn efficiency.
Softwoods
While they can be used for charcoal-making, softwoods like pine or spruce tend to burn faster and hotter, which can be less controlled. They also might produce more creosote, a tar-like substance, which can affect the quality of the charcoal.
Why Dry Wood?
- Efficiency: Dry wood has already undergone most of its moisture loss, meaning less energy is spent on evaporation during the burn. This results in a faster transition to the carbonization phase.
- Reduced Smoke: Excess moisture in wood leads to a smokier burn as the water content vaporizes. This smoke can contain various compounds that may not be desirable for the resulting charcoal’s intended use, especially for culinary purposes.
Green Wood Concerns
- As green wood burns, a significant portion of the energy is expended by simply boiling off the water content. This makes the process longer and less efficient.
- If the wood doesn’t dry sufficiently during the burn, it may not fully carbonize, leading to poor-quality charcoal.
Testing for Dryness: A simple test involves knocking two pieces of wood together. Dry wood will produce a sharp, crisp sound, while green wood will sound dull.
2. Prepare the Site
Safety Precautions
- Given the nature of the process, open flames and occasional flying sparks are inherent risks. Therefore, distancing the site from potential fire hazards – like structures, vehicles, or dense vegetation – is paramount for safety.
- By ensuring a buffer zone of at least 10 feet, you’re providing an ample safety margin to prevent accidental fires. This distance can also help protect from radiant heat which might cause nearby objects or plants to dry out and become more flammable.
- It’s also beneficial to be mindful of the prevailing wind direction. Setting up your site so that any wind carries sparks or embers away from flammable materials further reduces risk.
Level Terrain
- A flat ground ensures the wood pile remains stable and burns evenly. Uneven ground can lead to an unsteady stack which may collapse prematurely or burn inconsistently.
- Flat ground, especially if slightly concave, can help retain water in case you need to douse the fire quickly. This is opposed to sloped ground where water might run off easily.
Clearing Debris
- Dry leaves, twigs, and grass are highly flammable. Even a small ember can ignite these materials, leading to unintended fires. By clearing the area of such debris, you minimize the chances of stray sparks causing a fire.
- If possible, it’s a good idea to dampen the ground around the pit slightly. This added moisture will further reduce the risk of stray embers igniting any residual debris.
- Clearing the ground also gives you a better view of the underlying soil or sand. This can act as a natural indicator of the fire’s heat and progression. For instance, if the soil starts to turn reddish or white, it indicates intense heat below.
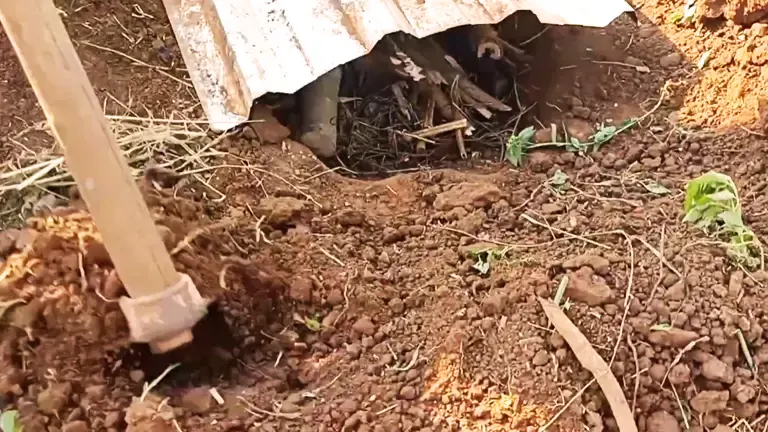
3. Dig a Shallow Pit
Shape & Size
- A rectangular pit provides distinct advantages. The straight edges and corners allow for more systematic placement and arrangement of wood, which can contribute to more even carbonization throughout the pit.
- Choosing dimensions such as a length of 4-5 feet and a width of 2-3 feet combines both efficiency and ease of management. A pit too small might not yield a substantial amount of charcoal, while an overly extensive pit can present challenges, particularly for those new to the process.
- The dimensions can be tailored based on the specific requirements or the quantity of wood at hand. However, for typical personal or household needs, a pit size within the mentioned range proves optimal.
Depth
- A pit that’s approximately a foot deep offers a natural barrier to the spread of fire. This is especially useful in ensuring safety and managing the burn efficiently.
- Depth plays a crucial role in the transition from open burning to smoldering, which is vital for charcoal production. A deeper pit can retain heat better and restrict the amount of oxygen reaching the wood. This promotes the smoldering process, ensuring the wood turns into charcoal rather than ash.
- The depth can also provide some protection against external factors like wind, which might otherwise disrupt the evenness of the burn.
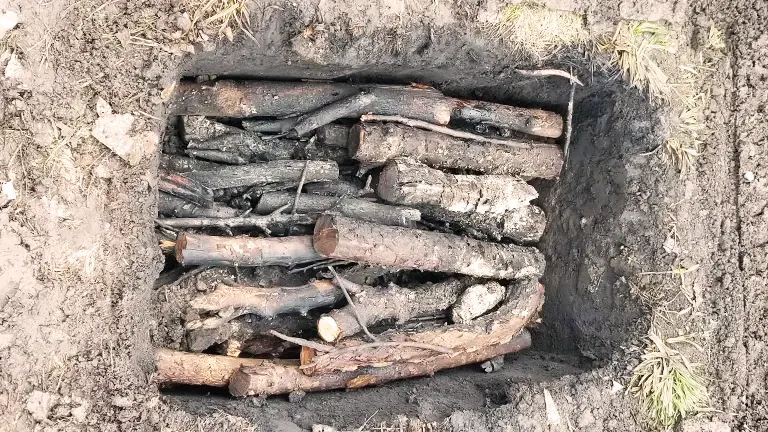
4. Stack the Wood
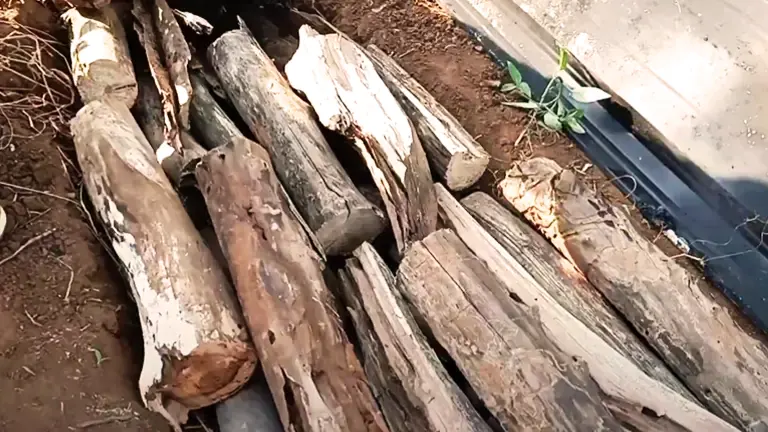
Method
- By visualizing your wood stack as building a log cabin, you create a structure where logs crisscross over each other. This design has been used for centuries due to its stability and efficiency in burning.
- When wood is placed perpendicularly, it creates natural gaps between the pieces. These gaps are crucial for maintaining adequate airflow throughout the burning process. Proper airflow ensures that every piece of wood receives enough oxygen to promote even carbonization.
- Without these gaps, there’s a risk that the wood could smother the flames, leading to an incomplete or inefficient burn.
Size of Wood Pieces
- When wood pieces are of similar size, they tend to burn at a comparable rate. This uniformity is essential for producing consistent charcoal, where each piece has a similar carbon content and burning quality.
- Larger logs have a more extended burn time compared to smaller ones due to their volume and surface area ratio. By splitting these logs into smaller pieces, you can achieve a more consistent size across your wood stack. Using tools like a splitting maul or axe can help you accomplish this. Remember to take safety precautions when splitting wood, including wearing protective eyewear and gloves.
- While exact dimensions can vary based on personal preference and specific wood types, aiming for pieces around 3-6 inches in diameter is a good benchmark. This size range offers a balance between manageability and efficient carbonization.
5. Start a Fire
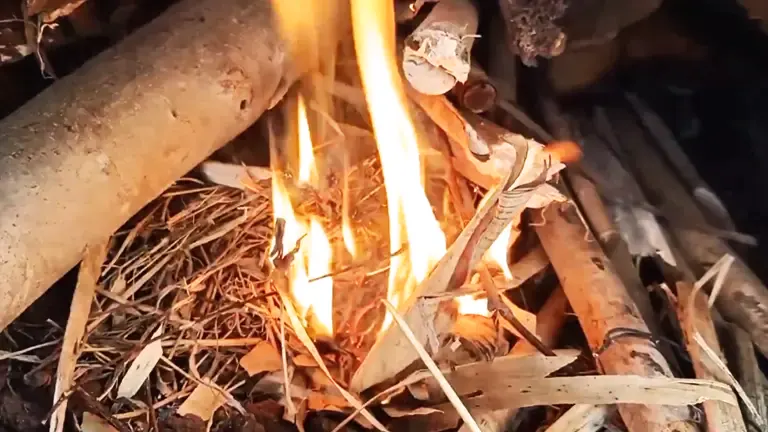
Lighting Point
- By lighting the wood at the top, you’re taking advantage of the natural tendency of heat to rise. This means the flames will naturally move downwards, heating and carbonizing the layers of wood beneath the topmost layer.
- Starting from the top allows for a more controlled burn rate. As the fire travels downward, it consumes the available oxygen, which can slow the burn and help in the carbonization process.
- Most of us are familiar with lighting fires from the bottom, as seen in campfires or fireplaces. However, for charcoal-making, the top-down method is more efficient because it promotes even heating and effective carbonization, critical for good-quality charcoal.
Burning off Impurities
- When you first light the wood, the bright, intense flames primarily work to expel the moisture present in the wood. This phase is critical because moisture can prevent efficient carbonization.
- Wood contains various resins, tars, and organic compounds. These are driven off as gases during the burning process. Removing these compounds is essential as they can affect the quality of the charcoal, especially if it’s used for cooking. By burning off these impurities, you’re left with almost pure carbon in the form of charcoal.
Signs to Look For: As the wood burns, you’ll notice a change in the smoke’s quality and color. Initially, it might be white and dense, indicating moisture being burned off. As it progresses, the smoke may turn bluish-grey, indicating volatile compounds are being released.
6. Monitor the Burn
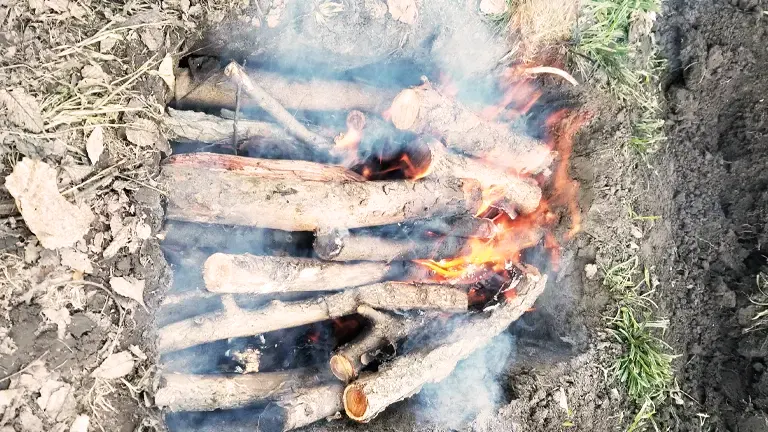
Appearance
- Initial Phase (1-2 hours): When you first begin the burn, the wood will have a bright flame, indicating it’s primarily burning off the moisture.
- Middle Phase (2-4 hours): As hours pass, you’ll notice the wood turning a deep brown. This is the caramelization and pyrolysis stage where volatile compounds start breaking down.
- Final Phase (4-6 hours): Towards the end, the wood begins to take on a blackened appearance, indicating it’s turning into charcoal. It’s essential to pay close attention during this phase to ensure the wood doesn’t turn to ash.
Smoky Flame
- Initially, the smoke will be white or steamy, indicating moisture is being burned off. As you progress, the smoke will become thicker and bluish-grey, signaling the release of volatile compounds.
- A denser, heavier smoke means the wood is releasing a lot of volatiles, which are essential for flavor if you’re using charcoal for cooking. As the process nears completion, the smoke will lessen in density.
- Early in the burn, you might notice a resinous or sap-filled aroma, especially if the wood has high sap content. As you progress, this will shift to a more woody and then almost a barbecue-like scent.
Heat
While it’s harder to quantify without specialized equipment, you can roughly gauge the heat by holding your hand (safely) away from the burn site. An increase in heat typically indicates the wood is in its peak pyrolysis stage. As the heat starts to stabilize or lessen, it’s a sign the wood is nearing its charcoal stage.
Remember, the exact hours can vary based on wood type moisture content, and external conditions like wind and ambient temperature. Over time, as you gain experience, you’ll develop an intuitive sense of these stages, making the process smoother and more efficient.
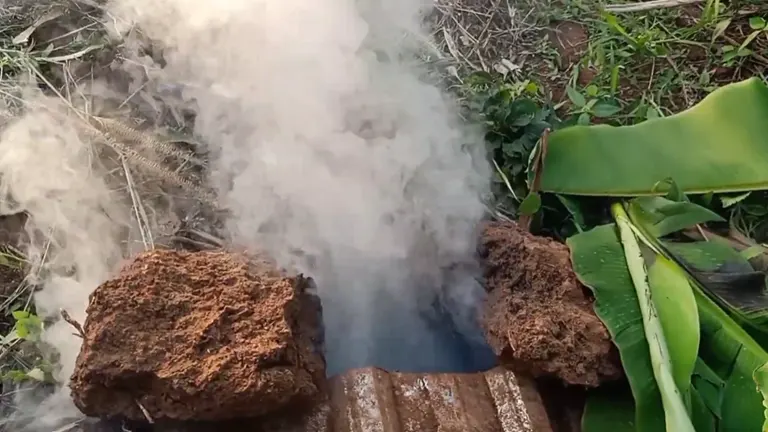
7. Cover the Pit
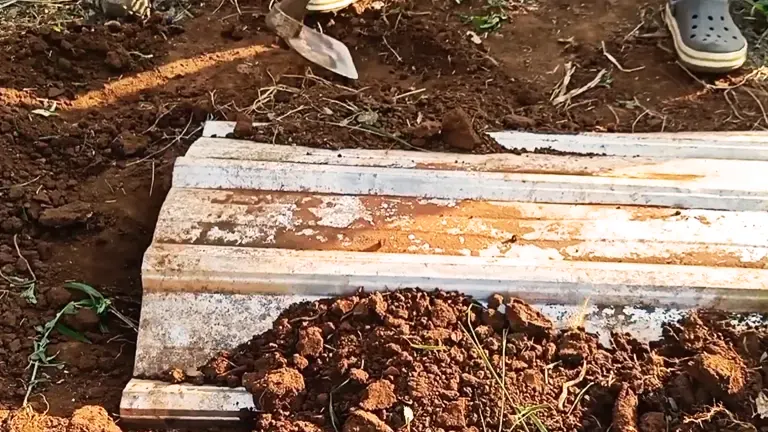
Why Restrict Oxygen
- When wood burns in the presence of abundant oxygen, it undergoes complete combustion, turning into ash. However, for charcoal production, the goal is carbonization – a process that preserves the carbon content of the wood while eliminating volatile components.
- When oxygen is restricted, the wood doesn’t burn with open flames. Instead, it smolders. During smoldering, the wood releases volatile compounds as gases, leaving behind carbon-rich charcoal.
- Limited oxygen not only ensures the wood turns into charcoal rather than ash but also helps in producing higher-quality charcoal. This charcoal burns longer and provides a more consistent heat, which is especially valuable for cooking or metalwork.
Cover Material
- These are highly effective in blocking oxygen. They’re also malleable, allowing them to be shaped to fit the pit’s contours. Additionally, metal sheets can reflect heat back into the pit, promoting even carbonization. However, they can become extremely hot, so handle them with care and use protective gloves.
- While they might not provide as tight a seal as metal sheets, flat rocks can still be an effective cover, especially if arranged carefully to minimize gaps. They have the added advantage of being a natural, readily available material in many areas. Over time, with repeated use, rocks can crack due to the heat, so it’s a good idea to have replacements on hand.
- Regardless of the material used, it’s crucial to ensure there are no sudden gusts of wind or other factors that might displace the cover. A displaced cover could introduce more oxygen, potentially causing the wood to burn to ash or reignite with open flames.
8. Wait
Duration
- The exact waiting time can vary significantly based on several factors. The type of wood, its moisture content, the size of the wood pieces, and external conditions like ambient temperature and wind can all impact how long it takes for the wood to fully carbonize.
- Typically, hardwoods like oak or maple take longer to convert into charcoal than softwoods like pine. This is due to their denser nature and different cellular structures.
- Dry wood will generally carbonize faster than green or moist wood. This is because the initial phase of the process will be dedicated to evaporating any water content from the wood before carbonization can occur in earnest.
- While it’s hard to pin down an exact number, waiting anywhere from 4 to 8 hours is typical for many charcoal-making endeavors. However, always remember to monitor the process periodically.
Observation
- Every hour or so, from a safe distance, observe the pit. If there’s less smoke or it appears to be dissipating, it could be a sign that the carbonization process is nearing its end.
- Avoid the urge to frequently uncover the pit to check the wood. This can introduce more oxygen and disrupt the carbonization process. Trust the process and use visual cues.
Patience is Key: Charcoal-making is as much an art as it is a science. Over time, as you gain more experience, you’ll develop a better sense of how long to wait. Until then, patience is your best ally. Quality charcoal can’t be rushed, and the wait will be well worth it when you see the final result.
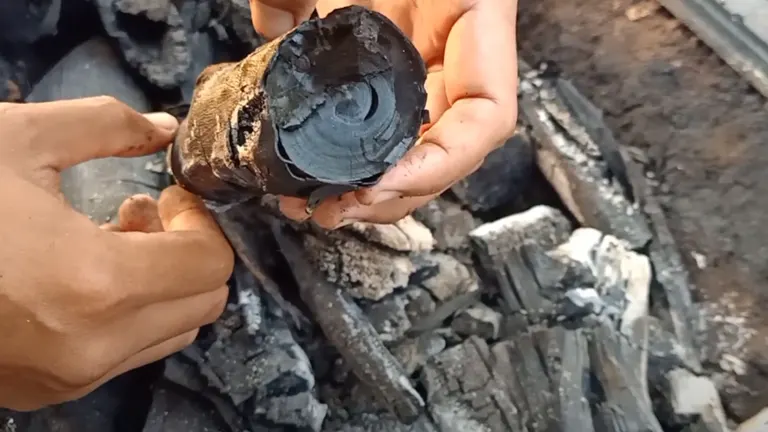
9. Check the Charcoal
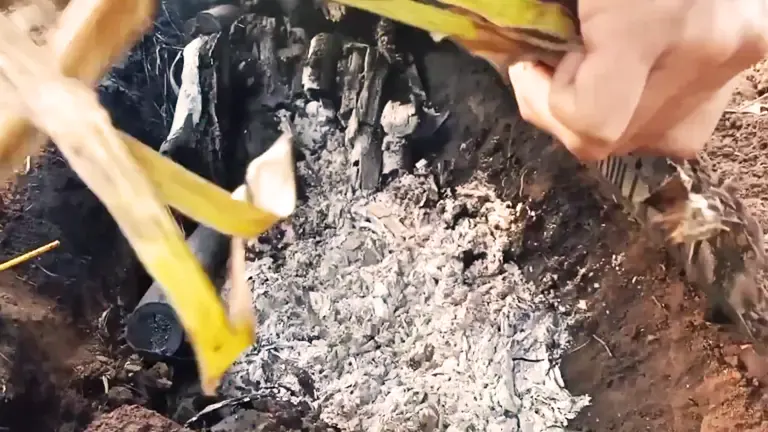
Observation
Visual Inspection
- Properly carbonized wood will be deep black, signaling that it’s been fully transformed into charcoal. In contrast, wood that’s brown or retains any of its original color hasn’t been fully carbonized.
- Good charcoal will often have a slightly shiny or lustrous surface. It should appear free from the original wood’s grain patterns, indicating complete carbonization.
Auditory Inspection
- One of the distinctive features of well-made charcoal is the sound it produces when tapped or knocked against another piece. It should produce a clear, metallic, almost bell-like ring. This sound indicates that the volatile compounds in the wood have been burned off, leaving mostly pure carbon.
- Good charcoal will also be relatively brittle. If you apply slight pressure, it should break cleanly. If it’s spongy or retains its wooden structure, it’s not fully carbonized.
Tactile Inspection
- When handled, good charcoal shouldn’t leave too much black residue on your hands. While some residue is expected, excessive blackness might indicate that the charcoal still contains unburned tars or resins.
Safety First: Before checking the charcoal, ensure you’re using protective gloves or tools. Even if it looks cool, the charcoal could still be hot.
If Under-Carbonized
- In cases where the charcoal hasn’t fully transformed, you might need to recover the pit and extend the smoldering phase. Ensure there’s still some heat left to continue the process. If it has cooled too much, you may need to reignite the wood and repeat the process.
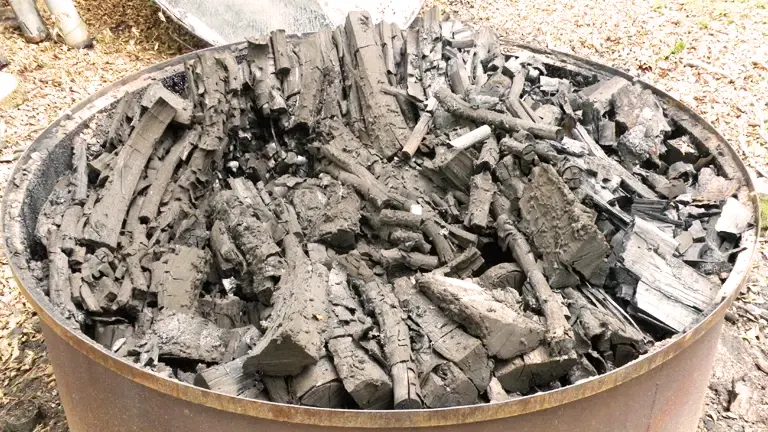
10. Extinguish & Cool
Safety First
Charcoal, by its very nature, retains heat for extended periods. Beneath the blackened surface of seemingly inert charcoal, red-hot embers can linger, posing a potential fire hazard.
Dousing with Water
- Immediate Extinguishing: Water rapidly absorbs and disperses heat, making it an effective method for ensuring all embers are extinguished. Pouring water slowly and steadily over the entire pit ensures that all areas are covered.
- Steam Production: Be prepared for a significant amount of steam when adding water, especially if the charcoal is still hot. It’s essential to stand clear to avoid steam burns.
- Listening for Sounds: As water interacts with hot charcoal, you’ll hear a sizzling sound. Once this sound stops entirely, it’s a good indicator that the temperature has dropped significantly.
Cooling
- Why Wait?: While dousing with water will significantly reduce the charcoal’s temperature, pockets of heat can remain trapped within. Transferring warm or hot charcoal to a storage container can lead to unintentional combustion, especially if stored in confined spaces with combustible materials.
- Natural Cooling: Allowing charcoal to cool naturally in the open air is the best approach. This ensures heat dissipates evenly and thoroughly.
- Touch Test: After a waiting period, you can use the back of your hand to feel above the charcoal for any residual heat. It’s crucial not to directly touch the charcoal, as even seemingly cool charcoal might have hot spots.
- Duration: Depending on the quantity of charcoal and ambient temperature, cooling can take anywhere from a few hours to an entire day.
11. Store
Storage Conditions
- Moisture Concerns: Charcoal, being porous, can act like a sponge. In a humid environment, it can absorb moisture from the air, which can hinder its ability to burn efficiently and produce consistent heat.
- Dry Locations: Ideally, charcoal should be stored in a dry place, such as a shed, garage, or any indoor location where it’s protected from direct exposure to rain or ambient moisture.
- Containers: Using airtight containers, like metal bins with sealing lids or plastic buckets with sealable tops, can further protect charcoal from external moisture. However, ensure the charcoal is completely cool before sealing it in any container to prevent the risk of combustion.
- Pallets or Raised Platforms: If storing in bulk, consider placing the charcoal bags on pallets or raised platforms. This prevents direct contact with the ground, which can be a source of moisture, especially in damp environments.
Usage
- Cooking: Homemade charcoal provides a clean, consistent burn, making it excellent for grilling. Its pure carbon nature, free from additives found in some commercial charcoals, can impart a more natural flavor to the food.
- Forging and Blacksmithing: The consistent heat produced by hardwood charcoal makes it a favorite among blacksmiths. It can reach the high temperatures required for metalwork without introducing impurities to the metal.
- Horticulture: Some gardeners use crushed charcoal (biochar) as a soil amendment. Its porous nature can improve soil aeration and water retention.
- Artistry: Charcoal sticks, derived from specific wood types, have been used for centuries in sketching and drawing.
- Odor Neutralization: Due to its porous nature, charcoal can also act as a natural odor neutralizer, absorbing unpleasant smells in confined spaces.
Remember, making charcoal is as much an art as it is a science. Experience will help refine the process over time. Always prioritize safety and enjoy the rewarding process of turning wood into valuable charcoal.
Safety Tips
- Always ensure you’re making charcoal in a well-ventilated area, far from flammable materials.
- Never leave the burning wood unattended.
- Have a water source nearby in case you need to extinguish the fire quickly.
- Always ensure the charcoal is fully extinguished before storage.
Pro Tips for Perfect Charcoal
1. Monitor Moisture
- Importance: Efficient carbonization hinges on dry wood. Wet/green wood is prone to excessive smoking and inefficient conversion.
- How-To: Engage in seasoning or air-drying. Store wood in a ventilated area, shielded from direct rainfall. Elevate the wood for air circulation, crucial for moisture reduction, especially in freshly chopped wood.
2. Safety First
- Understanding: Charcoal production, by nature, involves risks—fire hazards, accidental burns, etc.
Protective Measures
- Location: Opt for expansive, open locales, distanced from flammable entities like structures or trees.
- Equipment: Arm yourself with heat-resistant gloves and safety goggles to fend off ash or errant sparks.
- Preparedness: A fire extinguisher should always be within arm’s reach. Precaution is paramount.
3. Experiment with Different Woods
- Insight: Varieties of wood have distinct cellular structures that release unique aromatic flavors upon carbonization.
Suggestions
- Mesquite: Perfect for southwestern and Texas BBQ—earthy tones dominate.
- Cherry: Mild with a touch of fruitiness—ideal for poultry and pork.
- Tip: Mix woods for a bespoke flavor. Recognize the primary flavors each wood imparts.
4. Re-use and Recycle
- Wisdom: Occasionally, the carbonization might leave semi-burned remnants. They are not waste.
- Action: Harvest these pieces for future burns. Over successive sessions, they’ll completely carbonize.
5. Optimal Oxygen
- Essence: The right oxygen balance is fundamental. It powers combustion but in excess, can affect charcoal quality.
Control Techniques
- Kiln/Drum Method: These tools offer oxygen control. Tweak vents/openings to regulate air intake.
- Observation: Be vigilant of smoke hues. Dense, white smoke often signals high moisture or oxygen scarcity. Conversely, a slender blue trail indicates optimal carbonization.
Charcoal Beyond the Grill
While BBQ enthusiasts swear by the flavors of wood charcoal, its applications extend beyond grilling. Artists value it for drawing, gardeners for improving soil health, and it even has roles in water purification and metallurgy.
Making wood charcoal is a blend of tradition and technique. It offers a rewarding experience for those willing to engage in this age-old craft. So, next time you’re planning a BBQ, remember the craftsmanship that goes into that seemingly simple piece of blackened wood, and maybe, just maybe, it’ll inspire you to make your own.
FAQs
- Why choose hardwood over softwood for charcoal making?
Hardwoods, like oak and maple, tend to produce denser, longer-burning charcoal with consistent heat, making it more suitable for various applications like cooking and forging. - Is homemade charcoal better than store-bought?
Homemade charcoal can have a purer, more natural quality, free from additives. However, consistency and burn time may vary compared to commercial charcoal, which is often standardized. - Can I make charcoal from wood scraps or old furniture?
Yes, but ensure the wood hasn’t been treated with chemicals, paints, or varnishes, which can produce harmful fumes when burned. - How can I identify if the wood is dry enough for charcoal making?
Dry wood will produce a clear, ringing sound when knocked together, while green wood will produce a dull thud. Also, dry wood is noticeably lighter than green wood. - Can I use a metal drum instead of a pit for charcoal production?
Absolutely! Metal drum or “retort” methods are popular and can offer more control over the burn process and potentially yield a higher quality charcoal. - What can I do with the ash remnants from the charcoal-making process?
Wood ash can be used as a garden fertilizer, pest repellent, or even in soap making. Always research and ensure its suitability for your intended purpose. - Can wood charcoal purify water?
Activated charcoal, a derivative of wood charcoal, is used for water purification. However, homemade wood charcoal may not have the same purification properties unless it’s processed into activated charcoal. - How long can wood charcoal be stored?
If kept in a dry environment, wood charcoal can be stored indefinitely. However, exposure to moisture will reduce its effectiveness when burned. - Are there any ecological concerns with making wood charcoal?
Yes, making charcoal requires wood, so sustainable harvesting or using wood scraps is recommended. The process also releases carbon dioxide, but this is offset when new trees (that absorb CO2) are grown. - I’ve heard of “biochar.” Is it the same as wood charcoal?
Both are similar, but biochar is specifically produced to be added to soil as a soil enhancer. It’s made under specific conditions to maximize its benefits to soil health. - Can I use wood charcoal for artistic purposes?
Yes! Artists often use charcoal for sketching and drawing due to its range of tones and easy manipulability. - Is there a risk of spontaneous combustion with stored charcoal?
While rare, if charcoal is stored in a confined space with poor ventilation, especially if it’s not fully cooled, there’s a risk of spontaneous combustion. Always ensure charcoal is cold and stored in a well-ventilated area.
As we wrap up our journey into the world of wood charcoal-making for 2024, it’s evident that this age-old craft blends both art and science. Whether you’re a seasoned pro or a budding enthusiast taking their first step, your experiences and insights are invaluable. We encourage you to share your thoughts, tips, and maybe even a photo or two of your charcoal-making adventures in the comments below. Every shared story enriches our community, helping both novices and experts alike. So, let’s keep the embers of knowledge glowing—comment, discuss, and let’s keep the conversation burning bright!

David Murray
Forestry AuthorI'm David Murry, a forestry equipment specialist with a focus on chainsaw operation. With over 13 years of experience, I've honed my skills in operating and maintaining a wide range of machinery, from chainsaws to log splitters. My passion for the outdoors and commitment to sustainable forestry drive my work, which emphasizes safety, efficiency, and staying updated with industry advancements. Additionally, I'm dedicated to sharing my expertise and promoting environmental awareness within the forestry community.
2 comments
Interesting and very helpful


Oh nice more informative document with briefly details about hardwood charcoal... Thanks
Muji chandia
April 20, 2024 5:28 pm