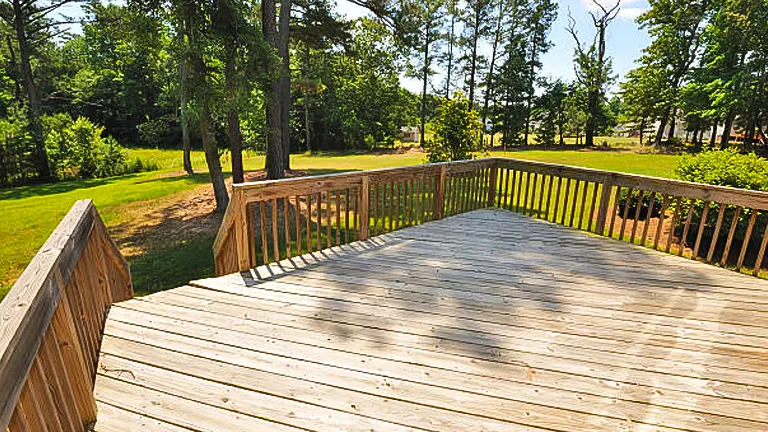
How to Build a Wooden Deck
- January 31, 2024
- 0 comment
Discover the essentials of building a wooden deck: planning, materials, tools, and step-by-step instructions for a DIY project. Building a wooden deck is a rewarding DIY project that enhances your outdoor living space. This guide covers everything from initial planning to the essential tools and materials you’ll need.
Follow our step-by-step instructions to create a beautiful and functional deck that complements your home. Whether you’re a beginner or an experienced DIYer, you’ll find valuable tips to help you build the perfect deck.
Disclaimer: Please note that the specific dimensions and sizes mentioned in this article regarding building a wooden deck are suggestions and may vary based on personal preferences, space availability, and local building codes. We encourage readers to customize the measurements according to their individual needs and to consult local building regulations to ensure compliance and safety. This guide is meant to provide a general framework and should be adapted as necessary to fit the unique specifications of your project.
List of Guides on How to Build a Wooden Deck
- Planning Your Deck
- Gathering Tools and Materials
- Laying Out the Deck Perimeter
- Digging Post Holes
- Preparing and Pouring Concrete
- Setting Posts and Beams
- Installing Rim Joists
- Fitting Inner Joists
- Laying Deck Boards
- Finishing the Deck
Materials
- Decking Boards (Composite or Pressure-Treated Wood)
- Wooden Posts (Cedar, Redwood, or Pressure-Treated)
- Ready-Mix Concrete Bags
- Concrete Footing Forms or Tubes
- Pressure-Treated Lumber for Joists
- Pressure-Treated Boards for Rim Joists
- Pressure-Treated Lumber for Beams
- 10D Common Nails
- 3-Inch Galvanized Screws
- Joist Hangers
- Post Bases
- Anchor Bolts
- Angle Brackets
- Self-Adhesive Flashing Tape (Optional)
- Gravel (Optional)
- Exterior Nails
- Wood Stain or Sealant
- Sandpaper (Various Grits)
Tools
- Tape Measure
- Carpenter’s Square or T-square
- Level
- Circular Saw
- Handsaw or Power Saw
- Chalk Line
- Mason’s String Lines
- Batter Boards
- Shovel
- Post Hole Digger
- Nail Gun
- Power Drill
- Sawhorse
- Orbit Sander
- Tamper
- Mortar Hoe
Step-by-Step Guide Building a Wooden Deck
1. Planning Your Deck
When planning your deck, the first and most crucial step is selecting the right location. This choice affects both the construction process and the deck’s long-term utility. Consider factors like water drainage, the slope of your yard, and soil stability. A flat, easily accessible area is often the best choice, providing a stable foundation and simplifying construction. If your yard has a slope, consider grading a level base at the bottom or building a retaining wall to accommodate it.

Additionally, think about the pattern of sunlight and shade throughout the day. Areas shaded by trees and shrubs can protect your deck from excessive sun, enhancing comfort and longevity. Once you’ve chosen the location, sketch a rough plan of your deck. This plan should include the deck’s size, the number and placement of posts or footings, and the overall design. Keep in mind that ground-level decks are generally 12 to 30 inches above the ground, and you can use concrete blocks or posts to achieve this elevation. This initial planning phase is vital in setting the stage for a successful deck-building project, ensuring the end result is both functional and aesthetically pleasing.
Pro Tips:
- Evaluate the sun’s path across your yard to optimize deck placement for desired sun or shade.
- Consider future landscaping plans in your deck location choice to ensure harmony with garden or outdoor features.
- Use a garden hose or ropes to outline the deck’s shape on the ground, helping visualize the space before building.
- Check local building codes early to understand any restrictions or permit requirements for deck construction.
- Investigate the soil type in your chosen location; sandy or clay soils may require different footing approaches.
- Think about deck orientation in relation to your house for ease of access and privacy.
- Consider the view from the deck and from inside your house to maximize enjoyment of the outdoor space.
- Plan for deck utilities early, like electrical outlets or plumbing for an outdoor kitchen, to integrate them seamlessly into the design.
- Always leave a little extra space in your plan for adjustments during construction.
2. Gathering Tools and Materials

Before commencing your deck project, ensure you have all necessary tools and materials for a seamless build. This includes selecting sturdy posts (consider cedar, redwood, or pressure-treated wood), and optionally, gravel for effective drainage under your deck. Essential tools like a circular saw for precise cuts, a level for an even deck surface, and a power drill for assembling components are critical. Choose decking boards based on your maintenance preference: composite for durability with less upkeep, or pressure-treated wood for a classic look. Also, prepare a set of galvanized or stainless steel fasteners (nails or screws) to prevent rust, a tape measure for accuracy, and safety gear like gloves and goggles. Depending on your design, additional tools such as a post hole digger or a router for edging the decking boards might be necessary. Having these tools and materials ready streamlines the building process, minimizing potential delays and ensuring a quality deck construction.
Pro Tips:
- Invest in quality tools for better performance and longevity.
- Choose screws over nails for added strength and ease of future repairs.
- Store wood and materials flat to prevent warping before use.
- Have extra materials on hand to account for mistakes or design changes.
- Pre-sort and label materials for efficient access during building.
- Use a wheelbarrow or cart for easy transportation of heavy materials.
- Consider renting specialized tools like power augers for one-time use.
- Keep a first-aid kit nearby for safety during construction.
3. Laying Out the Deck Perimeter
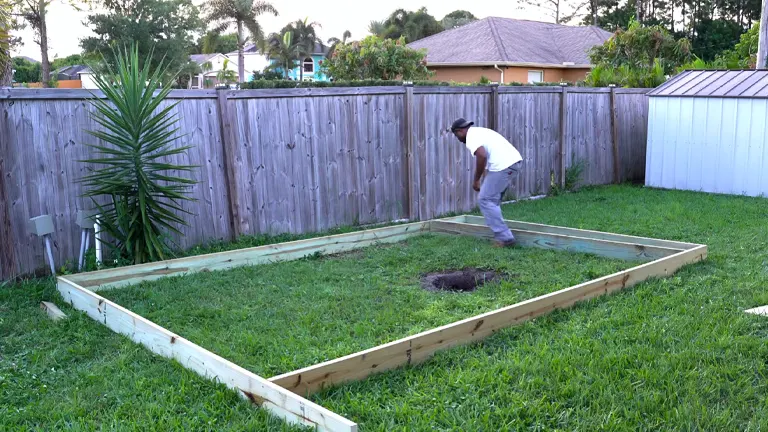
To start building your deck, first outline its perimeter using batter boards and mason’s string lines. This step is crucial for defining the deck’s shape and ensuring it fits your planned area. Make sure the corners are square for a precise layout, using the 3-4-5 method: measure three feet on one line, four feet on the adjacent line, and the diagonal between these points should be five feet. This simple yet effective technique ensures your deck’s foundation is accurately laid out, setting the stage for a successful build.
Pro Tips:
- Double-check measurements before making any cuts or final placements.
- Use brightly colored string for better visibility during layout.
- Keep a tape measure handy to frequently recheck distances between string lines.
- For uneven terrain, adjust the height of batter boards to maintain level string lines.
- Mark the location of underground utilities before finalizing the perimeter.
- Consider the deck’s relationship to existing structures for a harmonious design.
- Leave extra space for adjustments in case of measurement discrepancies.
- Always verify squareness at various points, not just at corners, for consistent accuracy.
4. Digging Post Holes
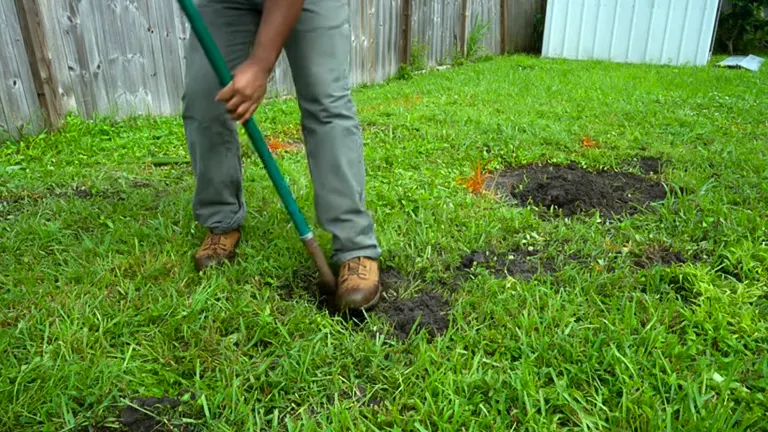
After marking your deck’s layout, dig holes for the deck’s piers or footings. These holes need to reach below the frost line to ensure stability against ground movement. For digging, use a posthole digger or a power auger, which makes the process more efficient. Once the holes are dug, insert concrete tubing forms into them. These forms will shape the concrete footings. Make sure to level the forms properly, as they determine the stability and levelness of the deck. This step is crucial for a sturdy foundation.
Pro Tips:
- Check local building codes for required depth of footings.
- Use a long level or straightedge to ensure all forms are at the correct height.
- Dig a wider base at the bottom of each hole for added stability.
- Clear debris and loose soil from the holes for solid footing placement.
- If digging multiple holes, use a string line to keep them aligned.
- In rocky soil, use a digging bar to ease the process.
- Space the holes consistently according to your deck plan for uniform support.
- Fill any gaps around the forms with soil to hold them in place.
5. Preparing and Pouring Concrete
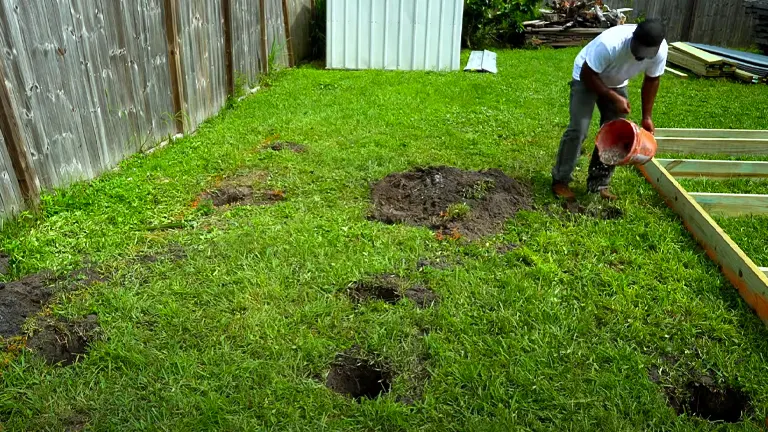
Mix the concrete according to the manufacturer’s instructions, aiming for a consistent and stable mixture. Pour this mixture into the tubing forms set in the post holes. Immediately insert a post anchor bolt into the center of each wet concrete footer, ensuring they are correctly positioned for attaching the deck posts later. Allow the concrete to fully cure as per the manufacturer’s recommended time, which is crucial for establishing a strong and durable foundation for your deck.
Pro Tips:
- Wet the inside of the tubing forms before pouring concrete to prevent sticking.
- Tap the sides of the forms gently after pouring to remove air bubbles.
- Use a level to check that the tops of the concrete footings are even.
- If using a concrete mixer, clean it immediately after use to prevent hardening.
- Cut the anchor bolts to the correct length before inserting them into the concrete.
- Cover the wet concrete with a plastic sheet to slow the drying process on hot days.
- Mark the top of each footing to indicate the north side for consistent post alignment.
6. Setting Posts and Beams
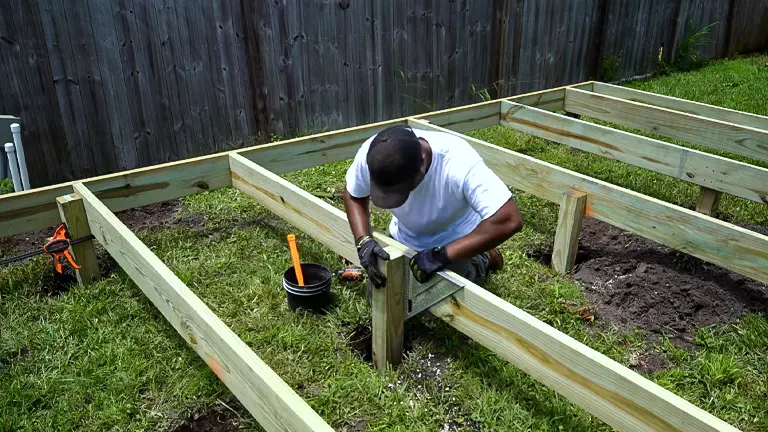
After the concrete footings have set, begin setting the posts and beams for your deck. First, measure and cut the deck posts to the desired height, considering the planned elevation of your deck. Securely fasten each post to the anchor bolts embedded in the concrete footings. Next, position the beams on top of the posts. Ensuring these beams are level is crucial, as they provide the main support for your deck’s structure. Properly executing this step is key to creating a stable and level deck framework.
Pro Tips:
- Pre-drill holes in the posts to make attaching them to the anchor bolts easier.
- Use a carpenter’s square to ensure posts are perpendicular to the ground.
- Brace the posts temporarily for stability while attaching the beams.
- Apply a wood preservative to the cut ends of the posts to prevent rot.
- Use clamps to hold beams in place while securing them to the posts.
- Check the alignment of beams with a string line for consistency.
- Ensure equal overhang of beams on both ends for a symmetrical look.
7. Installing Rim Joists
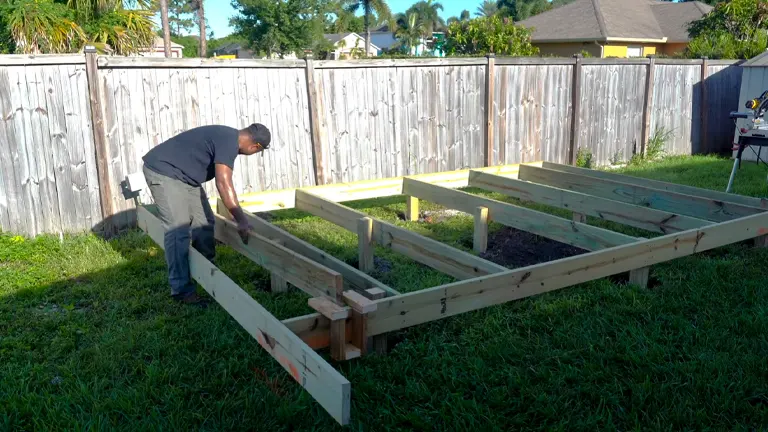
Installing rim joists is a key step in deck construction, as they establish the deck’s perimeter and shape. Attach the rim joists to the deck posts using either nails or screws, making sure they are level and align flush with the top of the posts. This ensures a consistent and structurally sound frame. For decks that terminate with beams, it’s important to attach rim joists along the sides of these beams to finalize the framing. This installation is crucial for the deck’s stability and provides the framework necessary for the next step of laying the decking boards.
Pro Tips:
- Use a carpenter’s square to verify right angles at the corners.
- Apply wood preservative to the cut ends of rim joists to prevent rot.
- Stagger the joints of the rim joists for improved structural strength.
- Ensure rim joists are the same width as the rest of the framing for consistency.
- Tighten all connections securely but avoid over-tightening which can split the wood.
- If possible, have an assistant hold the rim joists in place during installation for better accuracy.
8. Fitting Inner Joists
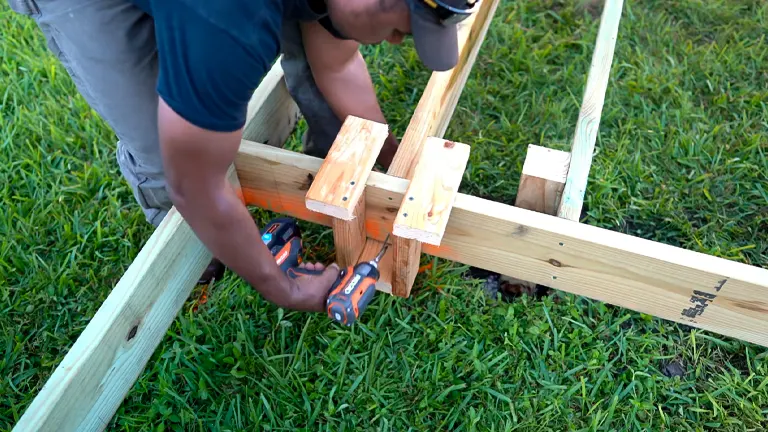
Begin by marking the positions for these joists along the rim joists or beams, maintaining a standard spacing of 12, 16, or 24 inches apart. After marking, attach joist hangers at these locations. Next, measure and cut the joists to fit, and then place them into the hangers. Ensuring that each joist is level and firmly attached is vital, as they are key to supporting the deck’s surface.
Pro Tips:
- Use a chalk line for straight and uniform joist spacing.
- Double-check measurements before cutting each joist.
- Employ a joist leveler or a long straight edge to ensure all joists are level across the top.
- Temporarily brace the joists in place while securing them to enhance stability.
- Consider using joist tape on top of the joists to protect against moisture and prolong their life.
- If the deck is large, stagger the joist layout to distribute the load evenly.
- Ensure joist hangers are the correct size and type for the joists being used.
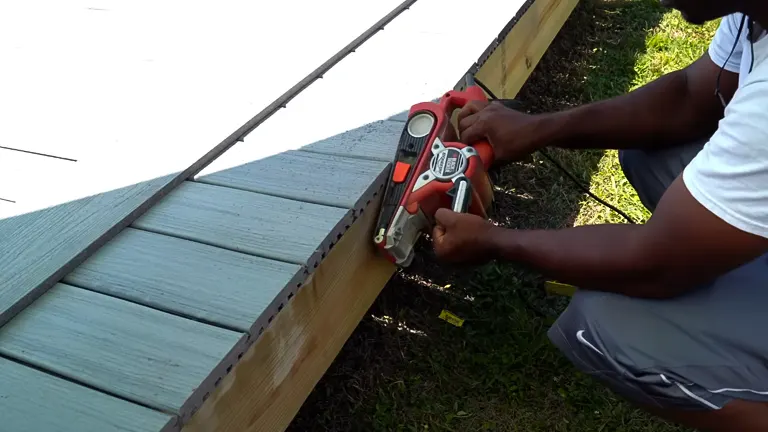
9. Laying Deck Boards
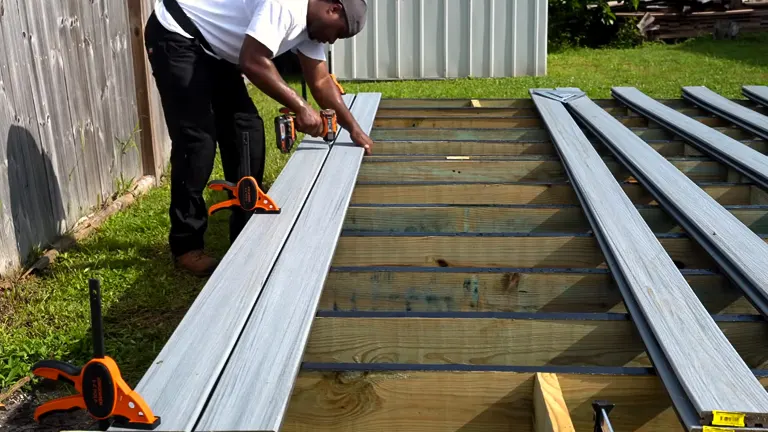
Start by aligning the boards either parallel to the house or in line with the framing. When using wood, ensure to leave a small gap between each board for drainage and to accommodate wood expansion. Fasten each board with two screws or nails at every joist junction. This method provides a robust build and keeps the spacing between the boards even, resulting in a clean and organized finish for your deck.
Pro Tips:
- Start laying boards from the edge of the house for a clean alignment.
- Use spacers for consistent gap widths between boards.
- Pre-drill holes near the ends of the boards to prevent splitting.
- Consider the pattern or grain of the wood for a cohesive visual effect.
- Use a countersink bit for screws to create a smooth decking surface.
- Trim the board ends after installation for a uniform edge.
- Treat cut ends of wood boards with preservative to protect against decay.
10. Finishing the Deck
The final step in deck construction is giving it a polished finish. Start by trimming any overhanging deck boards to create a clean, straight edge, using a circular saw for accuracy. Then, smooth out any rough edges through sanding, which is important for both aesthetics and safety. The last task is applying a sealant or stain to the wood. This not only enhances the deck’s appearance but also provides protection against weather elements and extends the life of the wood.
Pro Tips:
- Choose a sealant or stain appropriate for your wood type and climate conditions.
- Test the stain on a small, inconspicuous area first to ensure desired color.
- Apply sealant or stain with a brush or roller for an even coat.
- Follow the grain of the wood when sanding and staining for the best finish.
- Allow sufficient drying time after applying sealant or stain before using the deck.
- Consider adding a waterproofing agent to the sealant for extra protection.
- Periodically check and reapply sealant or stain as needed for ongoing maintenance.
Factors To Consider When Building a Wooden Deck
- Location and Environment: The location of your deck plays a pivotal role in its functionality and longevity. Consider factors like sunlight exposure, prevailing winds, and proximity to your home. A deck too exposed to sun might require shading solutions, while one in a windy area might need protective barriers. Additionally, consider privacy from neighbors and the integration of your deck with existing landscape features.
- Deck Size and Design: The size of your deck should align with its intended use, whether it’s for intimate family dinners or large gatherings. Also, the design should complement your home’s architecture. Consider various aspects like the shape of the deck, railing design, and whether you want built-in seating or planters. Remember, the more complex the design, the higher the cost and maintenance might be.
- Materials: Choosing the right materials is crucial for both the appearance and durability of your deck. Options range from natural woods like cedar or redwood to composite materials. Each comes with different maintenance needs, lifespans, and costs. Natural wood may require more maintenance but offers a classic look, while composites offer longevity with less upkeep.
- Budget: Your budget will dictate many aspects of your deck-building project, from size to materials. It’s important to set a realistic budget early on and factor in costs for materials, labor (if hiring professionals), and any additional features like lighting or custom railings.
- Building Codes and Permits: Before construction begins, check local building codes and acquire necessary permits. These regulations will influence various aspects of your deck design, including its size, height, railing requirements, and the need for a professional contractor.
- Safety Features: Safety should never be compromised. This includes strong railings, non-slip surfaces, and secure stairs. If your deck is high off the ground, consider additional safety features like child-proof locks on gates or taller railings.
- Accessibility: Consider the accessibility of your deck, especially if you plan to use it for many years. Features like wide, gently sloping ramps instead of stairs and ample space for maneuvering can make your deck more accessible to everyone, including those with mobility issues.
- Drainage and Foundation: Proper drainage and a solid foundation are key to the longevity of your deck. Ensure your design allows for water runoff and doesn’t harm your home’s foundation. The foundation should be dug below the frost line to prevent shifting during freeze-thaw cycles.
- Maintenance Requirements: Maintenance is an ongoing aspect of owning a deck. Different materials require different levels of upkeep. Wood decks might need regular staining or sealing, while composite decks require less maintenance but should still be regularly cleaned.
- Future Upgrades: Consider future upgrades or additions you might want. This could include things like a hot tub, a pergola, or an outdoor kitchen. Ensure your initial design and structure can accommodate these enhancements without major modifications.
Maintenance Tips
- Choose Durable Materials: Start by selecting high-quality, durable materials for your deck. While the initial cost might be higher, materials like pressure-treated lumber, cedar, or composite decking can withstand weather elements better and last longer. This reduces the frequency of repairs and replacements in the long run.
- Apply Protective Sealants: Protect your wooden deck from moisture, UV rays, and insect damage by applying a high-quality sealant. This should be done soon after construction and periodically throughout the deck’s life. Sealants help prevent rot and fading, maintaining the deck’s appearance and structural integrity.
- Regular Cleaning: Regular cleaning is essential to maintain your deck’s appearance and longevity. Sweep it frequently to remove debris and clean it with a deck cleaner at least once a year. This prevents mold, mildew, and grime buildup, which can damage the wood over time.
- Inspect and Repair Promptly: Periodically inspect your deck for signs of wear, loose boards, protruding nails, or other potential hazards. Addressing these issues promptly can prevent more significant problems and costly repairs in the future. Regular maintenance checks are crucial, especially after harsh weather conditions.
- Manage Plant Growth: Keep plant growth around your deck under control. Overgrown plants can trap moisture against the deck and promote rot. Additionally, vines or large plants growing onto the deck can cause structural damage over time.
- Control Moisture: Design your deck with proper drainage in mind to prevent standing water, which can lead to wood decay. Ensure that the deck is slightly sloped away from the house for effective water runoff, and avoid placing pots without saucers on the deck, as they can leave water stains.
- Avoid Direct Soil Contact: If possible, design your deck to avoid direct contact with soil, which can accelerate rot and invite pests. Use concrete footings or blocks to elevate the wooden structure off the ground.
- Sun Damage Protection: Consider using a UV-protective finish on your deck, especially in areas with high sun exposure. This can prevent the wood from graying and reduce the impact of UV rays.
- Furniture and Fixture Care: Use protective pads under outdoor furniture to avoid scratches and scuffs on your deck. Regularly move planters and furniture to ensure even weathering and prevent moisture accumulation underneath.
- Seasonal Preparation: Prepare your deck for different seasons. Before winter, clear away leaves and debris to prevent mold growth. In spring, check for any winter damage and address necessary repairs.
Maintaining your deck requires consistent effort, but it pays off by extending the lifespan of your deck and keeping it looking great year after year. Regular upkeep and attention to detail can ensure that your deck remains a safe and enjoyable outdoor space.
Conclusion
In conclusion, building a wooden deck is a rewarding project that enhances outdoor living spaces. While it requires careful planning, selection of quality materials, and adherence to safety practices, the effort pays off in the form of a durable and aesthetically pleasing extension to your home. By following the outlined steps and considering the provided tips and maintenance advice, homeowners can successfully construct a deck that not only adds value to their property but also offers a comfortable retreat for relaxation and entertainment. Remember, patience and attention to detail are key to creating a deck that you’ll enjoy for years to come.
FAQs
- How do I choose the right location for my deck?
Consider factors like sun exposure, privacy, proximity to your house, and the terrain of your yard. A flat, stable area is preferable, but sloped terrains can be worked with using additional structures like retaining walls. - What type of wood is best for decking?
Popular choices include pressure-treated lumber, cedar, and redwood for their durability and resistance to rot. Composite decking is a great low-maintenance alternative. - Do I need a permit to build a deck?
This depends on your local building codes. Typically, permits are required for decks that are a certain height above ground or attached to a house. Always check with your local building authority. - How can I ensure my deck is safe?
Use sturdy materials, ensure all fastenings are secure, and follow local building codes, especially for railings and staircases. Regular inspections for any wear or damage are also crucial. - How often should I maintain my wooden deck?
Inspect your deck annually and clean it at least once a year. Wooden decks usually require resealing or staining every 2-3 years, depending on the climate and wood type. - Can I build a deck over an uneven yard?
Yes, you can build a deck over uneven terrain. It might require additional groundwork like leveling or the installation of a raised platform with structural supports. - What should I consider when deciding the size of my deck?
Think about the intended use (dining, lounging, entertaining), the size of your outdoor space, and how it will affect your yard’s overall functionality. - Is it better to use nails or screws for decking?
Screws are generally better for decking as they provide a stronger hold and are less likely to pop up over time. They also make future repairs or adjustments easier.
Have you tried building your own wooden deck, or are you planning to start soon? Share your experiences, tips, or questions in the comments below. We’d love to hear about your projects and help you along the way!

Benjamin Brooks
Forestry AuthorGreetings! I'm Benjamin Brooks, and my journey over the past 15 years has revolved around the fascinating realms of content creation, expertise in snow clearing, and the intricate world of lumberjacking and landscaping. What began as a simple curiosity about the natural world and heavy machinery has evolved into a passionate profession where my love for crafting words intertwines seamlessly with my lumberjacking and garden skills.


Leave your comment