How to Grow Plants From Stem Cuttings: Master the Art Effortlessly
- June 18, 2024
- 0 comment
Learn how to grow plants from stem cuttings effortlessly with our expert guide. Discover simple, effective techniques to expand your garden today. Want to expand your garden? This guide shows you how to grow plants from stem cuttings.
Learn simple steps to propagate your favorite plants easily and efficiently. Let’s get started and see how a single cutting can become a new plant in your garden.
Table of Contents
- Understanding Stem Cuttings
- Best Plants for Stem Cutting Propagation
- Tools and Materials Needed
- Preparing Your Cuttings
- Rooting Your Cuttings
- Caring for Stem Cuttings
- Transplanting Rooted Cuttings
- Advanced Tips and Common Pitfalls
- Conclusion
- FAQs
Understanding Stem Cuttings
What are Stem Cuttings?
Stem cuttings are a horticultural technique where a segment of a plant’s stem is used to generate a new plant. This method stands out from other forms of propagation such as seed sowing or division, as it allows for the creation of a genetically identical clone of the parent plant. The physiological basis behind this method involves the induction of root formation from stem tissues, typically mediated by the presence of auxins, a class of plant hormones that regulate growth.
Detailed Types of Stem Cuttings
There are three primary types of stem cuttings, each suited to different plant species and times of the year. Their effectiveness can be influenced by factors such as the concentration of inherent rooting hormones (auxins) and the physiological state of the plant tissue.
Types of Stem Cuttings:
- Softwood Cuttings: These are taken from new, soft growth of woody plants, typically in late spring or early summer. Softwood cuttings are ideal for fast rooting and are perfect for beginners due to their high success rate.
- Semi-Hardwood Cuttings: Cut during late summer from partially mature wood of the current season’s growth, these cuttings strike a balance between flexibility and firmness, suitable for a wide range of plants.
- Hardwood Cuttings: Taken from fully matured stems in late autumn or winter, these are used for plants that go dormant in the cold months. Though slower to root, hardwood cuttings require minimal care during the rooting process.
Table of Stem Cutting Types and Their Characteristics
| Type of Cutting | Time of Year | Rooting Time | Ideal Plants | Care Level | Success Rate |
|---|---|---|---|---|---|
| Softwood | Late spring to early summer | 3-4 weeks | Many deciduous shrubs, some perennials | Moderate | High |
| Semi-Hardwood | Late summer | 4-6 weeks | Broadleaf evergreens, some conifers | Moderate | Medium |
| Hardwood | Late autumn to winter | Several months | Fruit bushes, some trees | Low | Variable |
Understanding these types will help you choose the right approach depending on the plant species and the time of year.
Best Plants for Stem Cutting Propagation
Choosing the right plants for stem cutting propagation can significantly impact your success rates. Ideal candidates are those with robust growth habits and the ability to heal quickly. Here are some popular choices that are well-suited for beginners:
- Pothos: Known for its hardiness and vigorous growth, pothos can root effortlessly in water or soil, making it a perfect start for novices.
- Geraniums: These colorful blooms not only brighten gardens but also adapt well to the stem cutting technique, thriving in a variety of environments.
- Ficus: With its fast growth and resilience, Ficus varieties, including the popular Fiddle Leaf Fig, are excellent for more ambitious projects.
- Hydrangeas: Their woody stems make hardwood cuttings a good option, promising lush foliage and beautiful blooms.
Table of Plant Characteristics for Stem Cutting Propagation
| Plant | Growth Rate | Rooting Time | Light Requirement | Optimal Cutting Type | Ease for Beginners |
|---|---|---|---|---|---|
| Pothos | Up to 12 inches/month | 7-14 days | Low to moderate | Softwood | Very easy |
| Geraniums | Variable, rapid in warm seasons | 2-3 weeks | Full sun to partial sun | Softwood | Easy |
| Ficus | 12-24 inches/year | 4-8 weeks | Bright, indirect | Semi-Hardwood | Moderate |
| Hydrangeas | Several inches/year | Over winter | Partial shade | Hardwood | Moderate |
Each of these plants responds well to propagation, ensuring that beginners can see successful outcomes quickly, which is crucial for building confidence in new gardeners.
Tools and Materials Needed
Successful stem cutting propagation requires not only the right plant but also the appropriate tools and materials. Ensuring you are well-equipped can make the difference between thriving plants and disappointing failures. Here are the essentials:
- Sharp Pruning Shears: Clean cuts are vital to prevent damage and disease; always use sterilized, sharp shears or scissors.
- Rooting Hormone: This enhances rooting success rates, especially for hardwood cuttings that are generally more challenging to root.
- Appropriate Containers: Small pots or trays that are deep enough to support the new root growth without overcrowding.
- Soil Mix: A light, well-draining mix suited to cuttings, often a blend of peat, perlite, and vermiculite, provides the ideal environment for root development.
- Sterilization Supplies: Alcohol or a bleach solution to sterilize tools before and after use to prevent the spread of pathogens.
Proper preparation of these tools and materials sets the stage for effective propagation, reducing the risk of infection and increasing the chances of your cuttings taking root successfully.
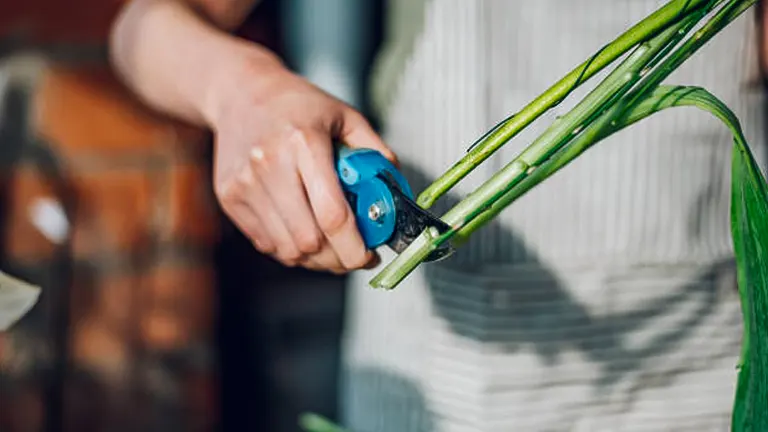
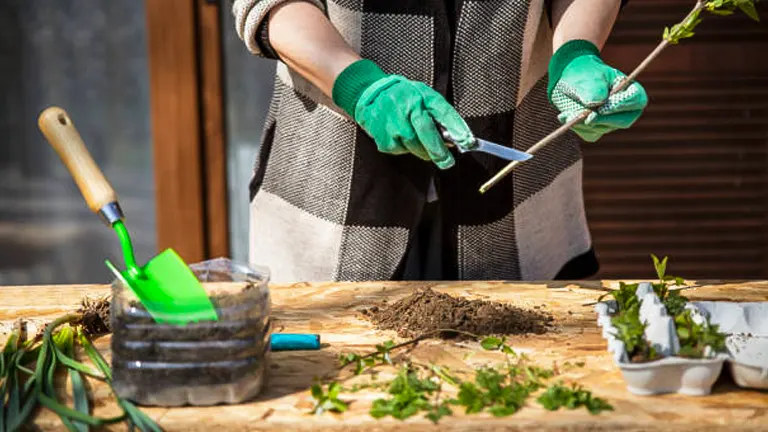
Preparing Your Cuttings
The initial step in successful stem cutting propagation is the meticulous selection and preparation of the cuttings. This stage is crucial as it sets the foundation for the future growth and health of the new plant. Here’s a refined approach to preparing your cuttings:
- Selection of the Stem: Choose healthy, vigorous stems from the parent plant, free from any signs of disease or pest infestation. Opt for stems that are neither too young nor too old, as the age of the stem can significantly impact the rooting success. Young, but mature stems often exhibit the best balance of flexibility and resilience, enhancing rooting probabilities.
- Cutting Length: Cuttings should be approximately 4 to 6 inches long. This length is ideal as it allows enough room for multiple nodes, which are crucial for root development. Nodes are points on the stem where leaves are attached and contain meristematic cells capable of differentiating into roots.
- Making the Cut: Use sterilized pruning shears to make a clean, angled cut just below a node. An angled cut increases the surface area exposed to the rooting medium, facilitating better absorption of water and nutrients. This technique also promotes quicker sealing of the cut, reducing the risk of infection.
- Leaf Management: Remove leaves from the lower half of the stem to reduce moisture loss through transpiration and minimize the energy expended by the cutting on maintaining leaves rather than developing roots. This step also reduces the risk of fungal infections, which are more prevalent in a high-humidity rooting environment.
- Application of Rooting Hormone: If using a rooting hormone, dip the cut end of the stem into the hormone solution or powder to enhance root development. Rooting hormones, containing synthetic auxins like indolebutyric acid (IBA) or naphthaleneacetic acid (NAA), mimic natural growth hormones and accelerate root initiation.
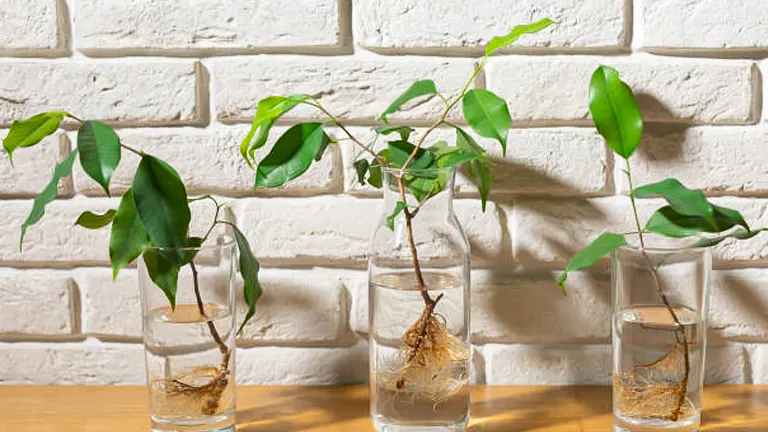
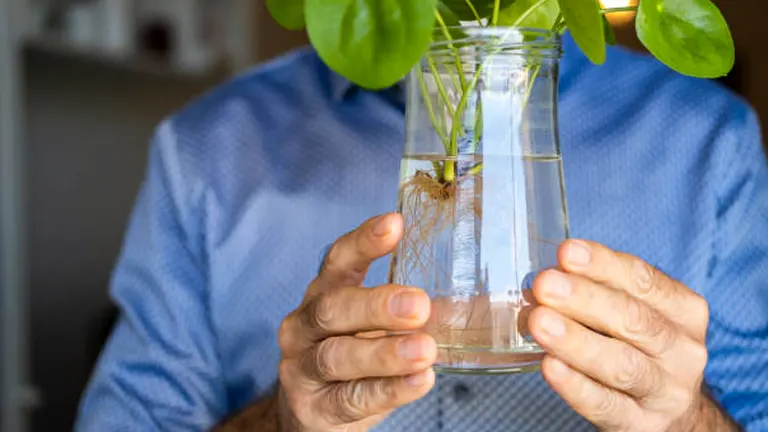
Rooting Your Cuttings
With your cuttings prepared, the next step is rooting them. The method you choose can depend on the type of cutting and your personal preference:
- Soil Rooting: This is the most common method. Insert the prepared cutting into a pot filled with your pre-moistened soil mix, ensuring at least two nodes are buried. This provides stability and maximizes the area for root development. Cover the pot with a plastic bag to create a humid microenvironment, which helps retain moisture and encourages rooting.
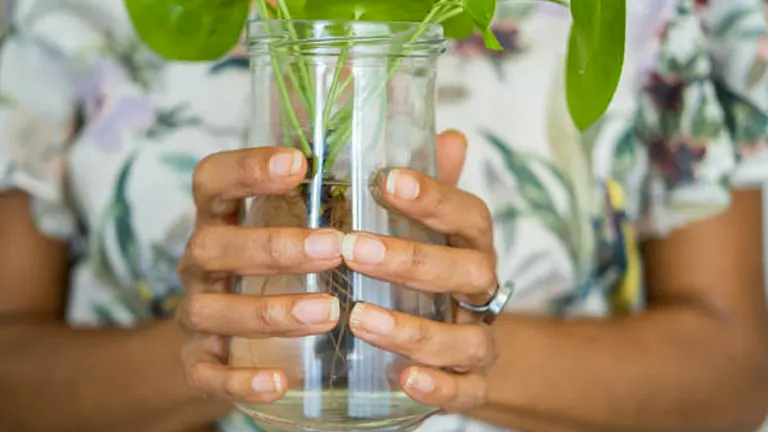
- Water Rooting: Ideal for softwood cuttings like pothos or philodendron, this method involves placing the cutting in a container of water. Ensure no leaves are submerged to prevent rot. Change the water every few days to keep it fresh and oxygen-rich, which is crucial for healthy root development.
- Using a Growth Medium: Some gardeners prefer using a sterile growth medium like vermiculite or perlite, especially for semi-hardwood or hardwood cuttings. These mediums provide excellent aeration and moisture retention, facilitating root growth without the risk of soil-borne diseases.
Throughout the rooting process, keep the cuttings in a warm, bright location out of direct sunlight to avoid scorching the tender new roots and leaves. Patience is key; rooting can take anywhere from a few weeks to several months, depending on the plant and conditions.
Caring for Stem Cuttings
Proper care of stem cuttings after they have developed roots is critical to their growth into robust, healthy plants. This phase demands precise control over several environmental factors to ensure optimal development.
Watering Regimen
Water management is crucial during the early stages of root development. Newly rooted cuttings require a delicate balance—sufficient moisture to support growth but not so much as to cause waterlogging. Overwatering is a common mistake that can lead to root rot, particularly in environments with poor drainage. Ideally, the soil should feel damp to the touch but not soggy. A moisture meter can be used to monitor soil moisture levels accurately, aiming for a reading that consistently stays around the ‘moist’ indicator without reaching ‘wet’.
Light Requirements
Light conditions play a significant role in the health of young plants. Stem cuttings should be placed in an area where they receive gentle, indirect sunlight. Excessive direct sunlight can burn the delicate new growth, while too little light can lead to weak, leggy plants. An ideal setup might involve using a diffused light source or positioning the cuttings near a north-facing window where the light is bright yet indirect.
Temperature and Humidity Control
The optimal growth of cuttings is significantly influenced by ambient temperature and humidity:
- Temperature: Aim for a consistent temperature range of 65-75°F (18-24°C), which is ideal for most cuttings to thrive.
- Humidity: High humidity levels help prevent the cuttings from drying out. This can be achieved by covering the cuttings with a clear plastic dome or using a humidity tray. Over time, as the plants develop, gradually decrease the humidity to acclimate them to less controlled environments.
Table of Optimal Environmental Conditions for Rooted Cuttings
| Environmental Factor | Ideal Condition | Purpose | Tips for Maintenance |
|---|---|---|---|
| Watering | Soil consistently moist | Supports growth without causing root rot | Use a moisture meter; water as necessary |
| Light | Gentle, indirect sunlight | Promotes healthy growth without stress | Use diffused light or shade from direct sun |
| Temperature | 65-75°F (18-24°C) | Ensures active growth | Maintain with indoor climate control |
| Humidity | Start high, reduce gradually | Prevents desiccation of cuttings | Use plastic domes or humidity trays, adjust over time |
Transplanting Rooted Cuttings
Transplanting rooted cuttings into their new homes is a crucial step that can significantly affect their survival and future growth. This stage requires meticulous attention to the roots and the external environment to ensure a smooth transition.
Selecting the Right Potting Mix and Container
Choosing the appropriate potting mix is vital for the continued growth of your plant. The mix should be light and well-draining to prevent waterlogging, yet capable of retaining enough moisture to support plant growth. A common mix might include components like peat moss, perlite, and vermiculite, each contributing to aeration and water retention.
When selecting a new container, ensure it is only slightly larger than the root ball—typically 1-2 inches wider. This helps prevent excess moisture buildup around the roots, which can lead to root rot.
Handling and Planting the Cuttings
When transplanting, handle the roots with utmost care to prevent any mechanical damage that could stress the plant or impede its growth. Here’s how to do it right:
- Gently remove the cutting from its current container, minimizing disturbance to the roots.
- Place the cutting in the center of the new pot.
- Fill around the roots with your potting mix, pressing down lightly to remove any air pockets.
- Water the plant thoroughly to help settle the soil around the roots and provide necessary hydration for growth initiation.
Acclimatizing to Outdoor Conditions
If your cuttings were started indoors, they need to be gradually introduced to outdoor conditions—a process known as hardening off. This step is crucial to enhance the plant’s resilience to natural elements such as sunlight, wind, and fluctuations in temperature.
- Start by placing the plants outdoors in a shaded, protected spot for a few hours each day.
- Gradually increase their exposure to direct sunlight and the duration they spend outside over the course of a week.
- Monitor the plants for signs of stress (e.g., wilting, sunburn) and adjust their exposure accordingly.
Table of Key Steps for Transplanting Rooted Cuttings
| Step | Description | Importance | Tips |
|---|---|---|---|
| Potting Mix Selection | Use a light, well-draining mix | Prevents root rot, supports growth | Include peat, perlite, vermiculite |
| Container Size | Slightly larger than the root ball | Ensures adequate room for growth | 1-2 inches wider than the root ball |
| Handling Roots | Minimize damage during transplant | Reduces stress, enhances survival | Be gentle, avoid excessive pulling |
| Hardening Off | Gradually introduce to outdoor conditions | Increases resilience to environmental stress | Incrementally increase exposure to elements |
Advanced Tips and Common Pitfalls
To further enhance your success rate with stem cuttings, consider implementing advanced techniques such as:
- Humidity Control: Using a humidity dome or regular misting can significantly improve the environment for cuttings, especially in dry conditions.
- Leaf Trimming: Reducing the size of larger leaves can help prevent excessive moisture loss through transpiration, focusing the plant’s energy on root development.
Beware of common pitfalls like:
- Overwatering: While it’s important to keep the soil moist, overwatering can lead to fungal diseases and root rot.
- Neglecting to Sterilize Tools: Always sterilize your cutting tools before and after use to prevent the spread of disease between plants.
Related Post
- How to Build a Barn: A Step-by-Step Guide for Beginners
- How to Build a Sustainable Compost Bin: Easy and Eco-Friendly DIY
- How to Fertilize Bougainvillea: A Complete Guide for Stunning Blooms
- How to Fertilize Apple Trees: Essential Tips for a Bountiful Harvest
- How to Fertilize Lemon Trees: Secrets for Thriving Citrus
- How to Fertilize Avocado Tree: A Step-by-Step Guide for Lush Growth
- 10 Best Bow Saws to Buy in 2024: Top Picks for the Money
- Best Miter Saw For Beginners
- Top 10 Pruning Saws to Buy in 2024: Best for the Money
- 7 Best Pocket Chainsaw
Conclusion
Growing plants from stem cuttings is a rewarding endeavor that not only expands your garden but also deepens your connection with your plants. With patience and practice, this propagation method can become a fundamental part of your gardening routine, offering a sustainable way to beautify your environment and preserve your favorite species.
FAQs
- What is the best time of year to take stem cuttings for different types of plants?
For softwood cuttings, spring to early summer is ideal. Semi-hardwood cuttings are best taken in late summer, while hardwood cuttings should be done in late autumn or winter. - Can I use honey as a natural rooting hormone for my stem cuttings?
Yes, honey has natural antifungal properties and can be used as a rooting hormone. Dip the cut end of your stem into honey before planting to help prevent infection and encourage root growth. - How do I ensure high humidity for my stem cuttings without a humidity dome?
You can place the pot inside a clear plastic bag and seal it to create a mini greenhouse effect. Be sure to open the bag periodically to allow fresh air in and prevent mold growth. - What are the signs that a stem cutting is not thriving?
Yellowing leaves, slimy stem sections, and a lack of new growth are common signs that a cutting may be struggling due to poor conditions or disease. - Is there a difference in success rate between water and soil rooting?
Success rates can vary depending on the plant species. Generally, water rooting allows for easier observation of root development but may require a transition to soil later, which can be stressful for the plant. Soil rooting is more direct but keeps roots hidden, making monitoring more challenging. - How often should I water my newly planted stem cuttings?
Water them just enough to keep the soil moist but not soggy. Overwatering can lead to root rot, so it’s crucial to let the soil slightly dry out between waterings. - Can LED lights be used to promote growth in stem cuttings?
Yes, LED grow lights are excellent for propagating cuttings, especially in environments lacking natural light. Ensure the lights are not too close to prevent heat damage and provide 12-16 hours of light per day for optimal growth. - How long should I wait before fertilizing newly rooted cuttings?
Wait until the cuttings are well-established and showing new growth, which typically takes a few weeks. Start with a diluted, balanced fertilizer to avoid overwhelming the young roots.
With these steps and tips, you’re well on your way to successfully growing plants from stem cuttings. Embrace the process, enjoy watching your garden flourish, and remember, every cutting you nurture brings more green into the world.

Benjamin Brooks
Forestry AuthorGreetings! I'm Benjamin Brooks, and my journey over the past 15 years has revolved around the fascinating realms of content creation, expertise in snow clearing, and the intricate world of lumberjacking and landscaping. What began as a simple curiosity about the natural world and heavy machinery has evolved into a passionate profession where my love for crafting words intertwines seamlessly with my lumberjacking and garden skills.


Leave your comment