How to Repot a Pot-Bound House Plant: Ultimate Revival Techniques
- June 6, 2024
- 0 comment
Learn how to repot a pot-bound house plant with our ultimate revival techniques. Ensure your plants thrive with these expert tips. Is your house plant looking a little cramped and unhappy? Don’t worry, it’s not too late to bring it back to life.
In this guide, we’ll walk you through the ultimate revival techniques for repotting pot-bound house plants. Learn how to give your plants the space and environment they need to thrive. Let’s dive into the transformative world of repotting.
Table of Contents
- Identifying a Pot-Bound Plant
- Materials Needed for Repotting
- Step-by-Step Guide on How to Repot a Pot-Bound House Plant
- Common Mistakes to Avoid
- Benefits of Regular Repotting
- Troubleshooting Post-Repotting Issues
- Conclusion
- FAQs
Identifying a Pot-Bound Plant
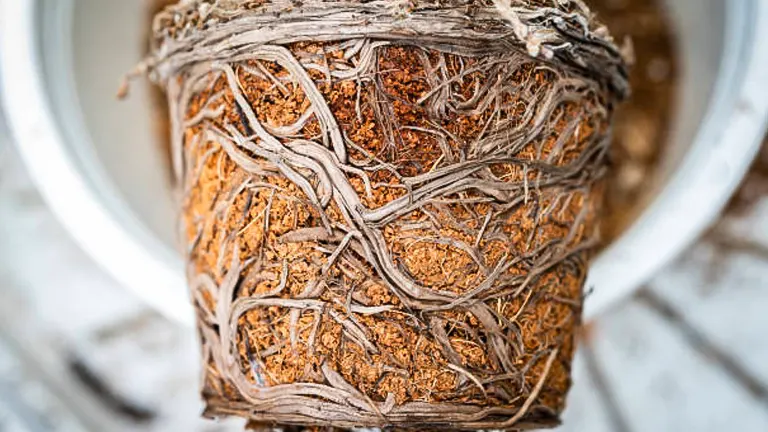
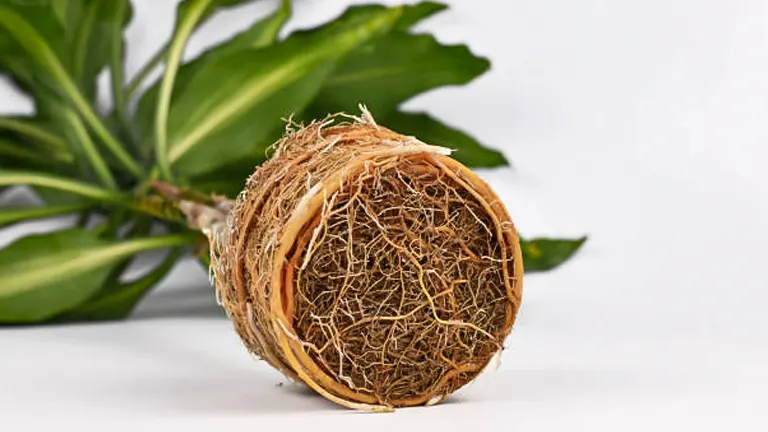
A pot-bound plant, also known as root-bound, occurs when the roots of a plant outgrow the space within its container, leading to constrained growth and potential health issues. This condition can manifest through various visible and subtle signs that indicate it’s time for intervention.
Signs of a Pot-Bound Plant
- Root Visibility: The most apparent signs include roots protruding from the drainage holes of the pot or roots that surface above the soil level, creating a tangled network that is clearly visible.
- Soil Desiccation: A pot-bound plant will often have soil that dries out much more quickly than normal. This is because the oversized root system absorbs moisture faster than it can be replenished.
- Stunted Growth and Visual Distress: Plants restricted by their pots may exhibit stunted growth compared to their expected size and health. Leaves may yellow, and growth may slow as the cramped conditions limit nutrient uptake.
- Structural Instability: If the plant seems top-heavy or tilts, it might indicate disproportion between the root ball and the plant’s upper growth, suggesting limited space below the surface.
Scientific Analysis and Unique Information
- Root Circulation: Studies indicate that root constriction can lead to decreased efficiency in nutrient uptake, particularly in nitrogen and phosphorus, which are critical for plant growth. For example, a study found that pot-bound conditions can reduce nitrogen absorption by up to 30%.
- Root-to-Soil Respiration Rates: The respiration rate of roots in a constrained environment is typically higher as they attempt to absorb minimal nutrients and water from the compacted soil. This can lead to quicker soil depletion and increased stress on the plant.
Regular Monitoring and Checks
Regular monitoring is crucial to prevent severe pot-bound conditions. Here’s a recommended approach:
- Bi-Monthly Inspection: Remove the plant gently from its pot every two months to examine the root configuration. If the roots form a dense webbing around the edge of the pot, it indicates that repotting should occur soon.
- Soil Testing: Conducting soil tests for pH levels and moisture content can help determine the overall health of the root environment. Adjustments in watering and fertilization can be made based on these results.
Indicators of Pot-Bound Plants
| Indicator | Description | Impact on Plant | Recommended Action |
|---|---|---|---|
| Root Proliferation | Roots are visible at the drainage holes and soil surface. | Increased stress, reduced growth. | Plan for immediate repotting. |
| Rapid Soil Drying | Soil dries significantly faster than usual. | Dehydration, nutrient deficiency. | Increase watering, consider soil enhancements. |
| Visible Crowding | Plant appears cramped, leaves may yellow. | Stunted growth, potential decay. | Repot into a larger container. |
| Structural Instability | Plant topples easily, appears top-heavy. | Risk of physical damage. | Stabilize and repot if necessary. |
Materials Needed for Repotting
Before you begin the repotting process, gathering the right materials will ensure a smooth and effective transition for your plant. Here’s what you’ll need:
- New pot: Choose one that is 1-2 inches larger in diameter than the current pot to allow enough room for root growth.
- Fresh potting soil: Select a soil mix suitable for your plant type. General-purpose potting soil is fine for most indoor plants, but species-specific blends are available for plants like orchids or succulents.
- Pruning shears: Clean, sharp shears for trimming dead or excessively long roots.
- Watering can: To water the plant after repotting.
Ensuring you have all these materials on hand before you start will make the repotting process more efficient and less stressful for both you and your plant.
Step-by-Step Guide on How to Repot a Pot-Bound House Plant
Repotting a pot-bound plant is a crucial task that, when done correctly, rejuvenates and promotes healthier growth. Below is a step-by-step guide tailored for gardeners seeking a thorough understanding with precise and accurate advice:
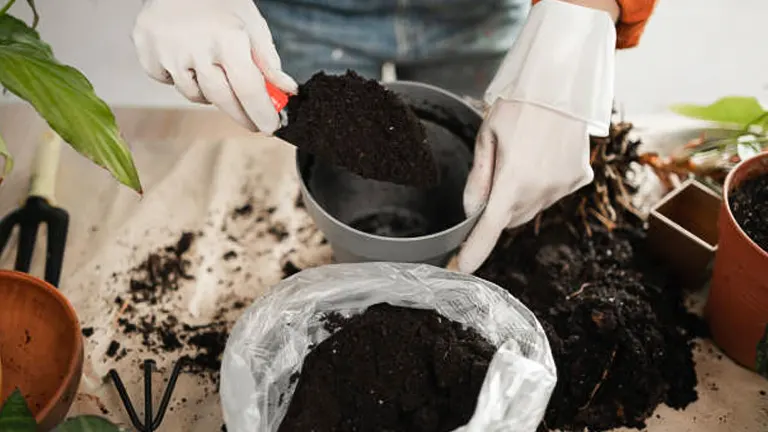
Step 1: Preparing the Work Area
Choose a clean and spacious work area like a kitchen counter or a covered outdoor space. Lay down newspapers or a plastic sheet to simplify cleanup. Arrange all necessary tools—potting soil, a new pot, pruning shears, water—and protective gloves within easy reach to facilitate a smooth workflow.
Tool Sterilization: To prevent the spread of disease, sterilize your tools with isopropyl alcohol or a 10% bleach solution before beginning. This step is crucial, especially when dealing with plants that are sensitive or already stressed.
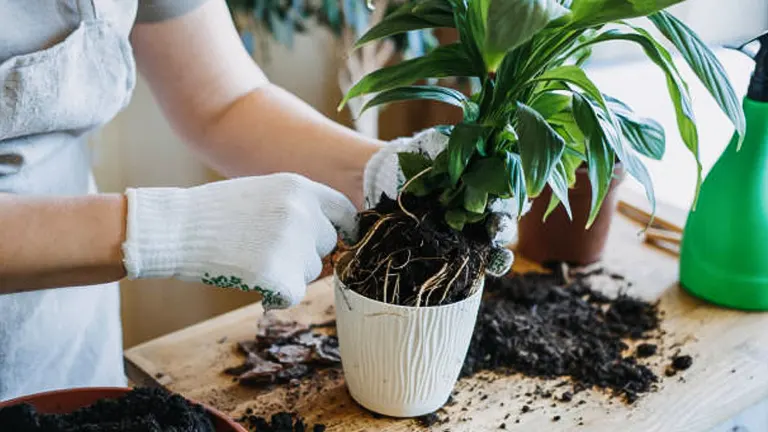
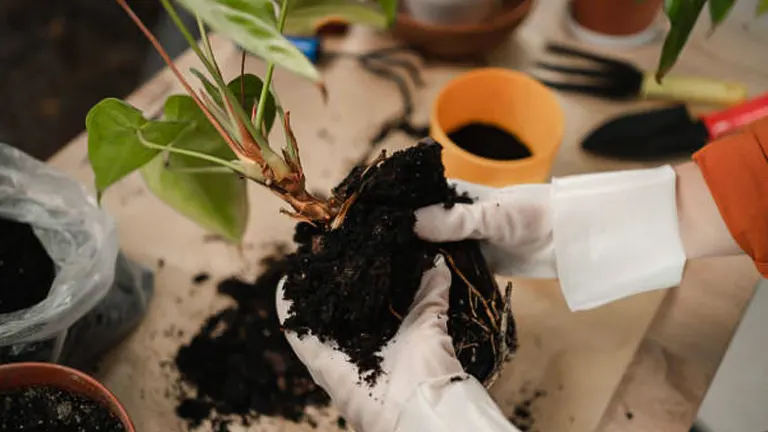
Step 2: Removing the Plant from the Old Pot
Tilt the pot and tap it gently to loosen the grip of the soil on the container walls. Support the plant by the base and carefully lift it out. If the plant is tightly bound, use a sterilized knife or spatula to gently pry around the edges without cutting into the root ball.
Scientific Insight: Research shows that plants stressed from tight pot conditions recover faster if extracted with minimal disturbance to their root systems.
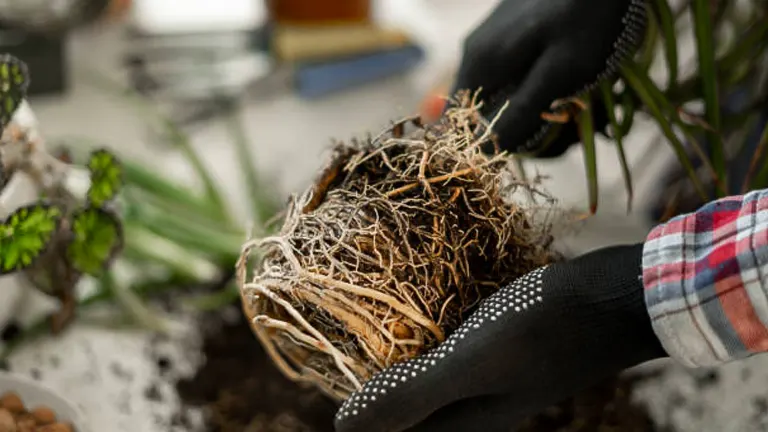
Step 3: Root Pruning and Care
Once removed, inspect the root ball for dead, diseased, or overly tangled roots. Prune these carefully to encourage regeneration. Aim to remove no more than one-third of the root mass to prevent shock. Healthy root trimming stimulates a process called “root branching,” where the plant develops new, finer roots that enhance nutrient uptake.
Soil Examination: Take this opportunity to check the old soil for signs of pests or disease. If any are found, treat the roots appropriately before repotting and dispose of the old soil safely.
Step 4: Repotting into the New Pot
Add a layer of high-quality potting mix enriched with compost to the base of the new pot. This layer should ensure the plant sits at the correct height—its crown should be just below the rim of the pot.
Plant Positioning and Soil Filling: Center the plant and gradually add new soil around the roots, tapping the pot occasionally to settle the soil and remove air pockets. Ensure the soil is firm enough to hold the plant upright but loose enough to allow easy root growth and water penetration.
Step 5: Aftercare Following Repotting
Water the plant thoroughly to help the soil settle and eliminate air pockets. The initial watering is crucial as it helps rehydrate the roots and begin the recovery and growth process.
Adjustment Period: Keep the plant in a low-light, stable environment for the first few weeks to minimize stress. Gradually reintroduce it to more light as it shows signs of new growth.
Ongoing Care: Monitor the plant closely for signs of stress or recovery. Adjust watering based on the soil moisture, ensuring a balance that supports new root growth without causing waterlogging.
Common Mistakes to Avoid
Repotting is vital for maintaining the health of house plants, but several common errors can undermine its benefits. Being aware of these mistakes and understanding their impacts based on scientific principles can significantly enhance your repotting success:
Overpotting
Scientific Insight: Selecting a pot significantly larger than the previous can disrupt the moisture balance necessary for healthy root growth. Excessive soil volume retains more water than the roots can absorb, leading to reduced oxygen availability and increased risk of root rot.
Recommended Pot Size: Opt for a new pot that is only 1-2 inches larger in diameter than the old one. This size increase provides adequate room for growth without dramatically altering the soil moisture balance.
Using the Wrong Soil
Specific Soil Needs: Different plants have unique soil requirements based on their native environments and root structures. For instance, succulents require well-draining soil to prevent moisture retention, whereas ferns thrive in more moisture-retentive substrates.
Tailored Mixes: Employ a soil mix that aligns with your specific plant’s needs, considering factors like drainage, nutrient content, and pH level.
Damaging the Roots
Careful Pruning: While root pruning is beneficial for eliminating dead or overcrowded roots, excessive cutting can shock the plant. Over-pruning reduces the plant’s ability to absorb nutrients and water efficiently.
Guideline: Remove only the parts of the root that are visibly damaged or excessively tangled, cutting no more than one-third of the root mass.
Inadequate Watering After Repotting
Initial Watering: Thorough watering right after repotting is crucial to help settle the soil around the roots and eliminate air pockets, promoting better root contact with the soil.
Post-Repotting Care: Monitor the plant’s watering needs closely after repotting. Adjust the frequency and amount based on the plant’s uptake and environmental factors to avoid both underwatering and overwatering.
Ignoring Plant Shock
Understanding Plant Shock: Repotting can cause stress manifested as drooping, leaf loss, or stunted growth. Recognizing these signs early can help mitigate long-term impacts.
Management Strategy: Provide a stable environment with appropriate light and temperature, and avoid fertilizing until the plant shows signs of recovery to reduce additional stress.
Benefits of Regular Repotting
Regular repotting of house plants is a critical aspect of plant care that goes beyond simply preventing overcrowded conditions; it significantly contributes to a plant’s health, vigor, and aesthetic appeal. Here’s a detailed breakdown of the advantages:
Enhanced Growth
The space provided by a larger pot allows roots to expand freely, which is directly correlated with the plant’s ability to grow taller and fuller. Studies show that increased root space can lead to as much as a 50% increase in plant size, depending on the species and previous pot limitations.
Improved Nutrient Uptake
Fresh potting mix is rich in essential nutrients like nitrogen, phosphorus, and potassium, which are often depleted in an old medium. Regularly updating the soil ensures that these vital nutrients are replenished, promoting healthier plant growth.
Root Health: Enhanced nutrient uptake not only affects growth but also improves the roots’ efficiency in water absorption and mineral uptake, which further boosts the plant’s overall health.
Better Disease Management
Repotting provides an opportunity to remove diseased or infested soil, which can be crucial in breaking the life cycle of soil-borne pathogens and pests. This preventative measure is supported by research indicating that fresh, sterile potting soil reduces the incidence of diseases such as root rot and fungal infections by up to 60%.
Aesthetic Improvements
A fresh pot and new soil can transform the appearance of your plant, making it a focal point of your room or garden. The visual benefits also extend to psychological well-being, as studies suggest that a well-maintained plant collection can enhance mood and reduce stress.
Promoting Longevity
Regular repotting not only immediately benefits the plant but also contributes to its longevity. Plants that are adequately cared for with timely repotting schedules are shown to have longer life spans and sustained aesthetic value.
Troubleshooting Post-Repotting Issues
Even with meticulous care during repotting, plants may exhibit signs of stress or shock. Understanding and addressing these issues promptly can significantly aid in the recovery and overall health of your plant. Here’s an expanded guide on how to identify and manage common post-repotting issues:
Drooping Leaves
Cause and Response: It’s typical for plants to exhibit drooping or wilting leaves immediately following repotting. This phenomenon often results from temporary root damage or disturbance, which impedes the plant’s ability to absorb water effectively.
Scientific Insight: Studies suggest that a reduction in turgor pressure within the plant cells, due to disrupted water uptake, leads to drooping. To mitigate this, keep the plant in a shaded, stable environment and ensure that the soil is consistently moist but not waterlogged to gradually restore turgor pressure.
Yellowing Leaves
Potential Causes:
- Overwatering: Excessive moisture can suffocate roots, reducing their ability to transport nutrients and oxygen, leading to chlorosis (yellowing of leaves).
- Insufficient Light: Insufficient photosynthesis can also cause yellowing. This might happen if the plant is kept in too low light to protect it from stress.
Adaptive Measures: Adjust watering schedules based on the soil’s dryness and increase light exposure gradually. If overwatering is suspected, enhance drainage or even consider changing the soil mix to prevent future occurrences.
Slow Growth
Observations: Post-repotting, it’s common for plants to take a pause in growth as they adapt to their new environment and reestablish their root systems.
Scientific Perspective: Root trauma during repotting can temporarily reduce growth hormone production, notably auxins, which are crucial for plant growth.
Management Strategy: Ensure the plant has optimal light, nutrients, and water. If growth remains stagnant for an extended period, examine the roots for any signs of rot or ongoing damage, and adjust care as needed.
Managing Post-Repotting Issues
| Issue | Symptoms | Scientific Reason | Recommended Action |
|---|---|---|---|
| Drooping Leaves | Leaves lose rigidity and appear wilted. | Root disturbance reduces water uptake, affecting turgor pressure. | Maintain consistent soil moisture, avoid direct sunlight. |
| Yellowing Leaves | Leaves turn yellow, may include falling leaves. | Overwatering or insufficient light affects nutrient and oxygen transport. | Adjust water and light, improve soil drainage if necessary. |
| Slow Growth | Delayed growth post-repotting. | Disruption in growth hormone production due to root trauma. | Provide optimal care and check root health if no improvement. |
Related Post
- How to Build a Barn: A Step-by-Step Guide for Beginners
- How to Build a Sustainable Compost Bin: Easy and Eco-Friendly DIY
- How to Fertilize Bougainvillea: A Complete Guide for Stunning Blooms
- How to Fertilize Apple Trees: Essential Tips for a Bountiful Harvest
- How to Fertilize Lemon Trees: Secrets for Thriving Citrus
- How to Fertilize Avocado Tree: A Step-by-Step Guide for Lush Growth
- 10 Best Bow Saws to Buy in 2024: Top Picks for the Money
- Best Miter Saw For Beginners
- Top 10 Pruning Saws to Buy in 2024: Best for the Money
- 7 Best Pocket Chainsaw
Conclusion
Repotting a pot-bound house plant is an essential skill for any plant enthusiast, vital for the health and longevity of your indoor greenery. The process not only resolves the immediate constraints of a cramped container but also rejuvenates your plant, encouraging new growth and vitality. With the techniques outlined in this guide, you can confidently address the needs of your pot-bound plants, ensuring they continue to beautify your home and enrich your life. Remember, the key to successful repotting lies in preparation, gentle handling, and post-care attention. Embrace these practices, and watch your plants thrive in their refreshed homes.
FAQs
- What is the best time of year to repot house plants?
The best time to repot most house plants is during their active growing season, typically in spring or early summer. This timing helps them recover faster because they are naturally gearing up for growth. - How do I choose the right size pot for repotting?
Select a pot that is 1-2 inches larger in diameter than the current one. This size increase provides enough space for root growth without leaving excessive soil that could stay wet and cause root rot. - What type of soil should I use for repotting?
Use a fresh, high-quality potting mix that suits the specific needs of your plant. Avoid using garden soil as it can be too dense and may contain pathogens harmful to house plants. - How often should I repot my house plant?
Generally, house plants need to be repotted every 1-2 years, but this can vary depending on the plant’s growth rate and species. Fast-growing plants may need repotting annually, while slower growers might be fine for several years. - Can repotting stress my plant? How can I minimize this stress?
Repotting can stress plants temporarily. Minimize stress by repotting during the right season, handling roots gently, and ensuring the plant is adequately watered and placed in indirect sunlight post-repotting until it acclimates. - What should I do if my plant shows signs of distress after repotting?
If the plant appears stressed (e.g., drooping or yellowing leaves), ensure it is not over or under-watered, provide adequate but not direct sunlight, and give it time to adjust. Avoid fertilizing until the plant shows signs of new growth. - How do I handle a plant with extremely tangled roots during repotting?
If roots are severely tangled or circling, gently tease them apart with your fingers. If necessary, use clean scissors or pruning shears to snip through particularly dense areas to encourage outward growth. - Should I water my plant immediately after repotting?
Yes, water the plant thoroughly right after repotting. This helps settle the new soil around the roots and eliminates air pockets, providing a good moisture foundation which is crucial for helping the plant establish in its new pot.
Remember, a little care and the right techniques can breathe new life into your house plants, keeping them healthy and vibrant for years to come.

Benjamin Brooks
Forestry AuthorGreetings! I'm Benjamin Brooks, and my journey over the past 15 years has revolved around the fascinating realms of content creation, expertise in snow clearing, and the intricate world of lumberjacking and landscaping. What began as a simple curiosity about the natural world and heavy machinery has evolved into a passionate profession where my love for crafting words intertwines seamlessly with my lumberjacking and garden skills.


Leave your comment