How To Fix A Stuck Chainsaw Brake: Practical Solutions and Tips
- February 20, 2024
- 0 comment
Chainsaws are essential tools for many outdoor tasks, yet they can encounter mechanical issues, such as a stuck chain brake, that hinder their performance. Understanding the fundamentals of a chainsaw’s brake system, the reasons behind its seizure, and the steps to remedy the issue can ensure your chainsaw operates smoothly and safely. This article will guide you through diagnosing, cleaning, lubricating, and finally resetting a stuck chain brake on a chainsaw.
Understanding the Chain Brake System
The chain brake system is a crucial safety feature on a chainsaw, designed to stop the chain from moving in case of a kickback. It consists of a handle connected to a spring mechanism, which in turn controls a band around the chainsaw’s clutch drum. When the brake is engaged, the band tightens around the drum, stopping the chain’s movement. However, sawdust and debris accumulation can cause the brake to seize, preventing it from functioning properly.
STEP 1: Diagnosing the Issue
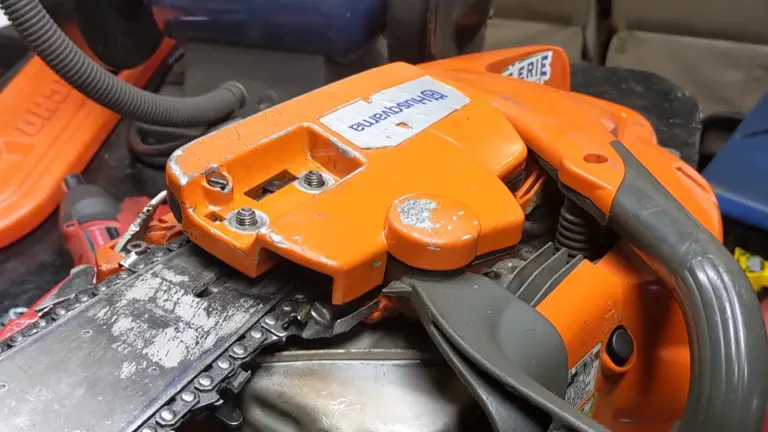
The initial step towards resolving a stuck chain brake involves a comprehensive understanding of its operational mechanics. The chain brake system, a pivotal safety feature, particularly in models such as the Husqvarna chainsaw, is intricately designed to halt the chain’s movement instantly during kickbacks. Central to this system is a centrifugal clutch drum that propels the chain, governed by a strategically placed handle. Activating this handle adjusts a tension band around the clutch drum, effectively stopping the chain.
The most prevalent issue leading to a stuck chain brake is the accumulation of debris and sawdust within the brake system. This obstruction can hinder the smooth operation of the brake mechanism, preventing the handle from effectively adjusting the tension band around the clutch drum. Over time, without regular maintenance, this accumulation can exacerbate, leading to the brake being firmly stuck, posing significant safety risks during operation.
Initial Assessment Steps
- Begin with a thorough visual examination of the brake system. Look for visible signs of clogging or debris accumulation around the clutch drum and brake band area. This step can often reveal the extent of cleaning needed.
- Carefully attempt to engage and disengage the chain brake using the handle. Note the responsiveness and ease of movement. A fully functional brake should move smoothly without excessive force. Difficulty in movement or inability to activate the brake suggests a deeper issue within the mechanism.
- Prioritize safety by ensuring the chainsaw is powered off and the spark plug is disconnected before any inspection or maintenance. This precaution prevents accidental starts while handling the chainsaw.
STEP 2: Cleaning the Brake System
Cleaning the brake system is essential for its proper functioning. Disassemble the outer casing to access the brake and clutch assembly. Remove any accumulated gunk and sawdust using an ultrasonic cleaner or a degreaser, ensuring all parts, especially the spring mechanism and the band, are free of debris. This not only resolves the immediate issue but also prevents future seizures.

For the removal of gunk and sawdust, two primary methods have proven effective: ultrasonic cleaning and chemical degreasing. An ultrasonic cleaner can deeply penetrate the nooks and crannies of each component, dislodging even the most stubborn dirt particles through high-frequency sound waves. Alternatively, a high-quality degreaser offers a practical solution for breaking down oily residues and sawdust build-up. Regardless of the method chosen, it’s essential to ensure that all parts, with particular attention to the spring mechanism and the brake band, are thoroughly cleaned.
Detailed Cleaning Steps
- Ultrasonic Cleaning: If using an ultrasonic cleaner, submerge the disassembled parts in the cleaning solution and follow the manufacturer’s instructions regarding duration and settings. After the cycle, rinse the parts with clean water and allow them to dry completely.
- For degreasing, spray or apply the cleaner directly onto the parts, using a brush to gently scrub away the debris. Pay special attention to the areas around the spring mechanism and the brake band, as these are prone to heavy build-up. Rinse the parts with water or a clean cloth and dry them thoroughly.
STEP 3: Lubricating the System
After the thorough cleaning of the brake system, the next pivotal step is lubrication. Proper lubrication is not just a maintenance task; it’s a performance enhancer and a protector of the chainsaw’s brake system. The choice of lubricant and the application process play significant roles in ensuring the longevity and efficient operation of the system.
The key to effective lubrication lies in selecting the appropriate lubricant. Dry graphite lubricant and light penetrating oils are highly recommended for their exceptional qualities. Dry graphite lubricant, known for its ability to withstand high temperatures and not attract dust or dirt, is ideal for components within the brake system that are prone to heat and friction. Light penetrating oils, on the other hand, offer excellent lubrication while ensuring that the moving parts remain free from gunk buildup. These oils penetrate deeply into the pivot points and protect against rust and corrosion without leaving a sticky residue.
Application Techniques
- Focus on the brake system’s pivot points and any moving parts. These typically include the area around the brake handle, the mechanism controlling the brake band, and any linkages or springs within the system. Each of these points plays a crucial role in the brake’s operation and demands attention during lubrication.
- When using dry graphite lubricant, apply it sparingly to the identified points. Since it’s a dry lubricant, it won’t leave a wet residue but will create a smooth, frictionless surface that aids in the movement of the brake components.
- For components that benefit from penetrating oil, apply a small amount directly onto the pivot points. Use a clean cloth or a brush to ensure even distribution. The goal is to coat the parts lightly without over-lubricating, as excess oil can attract debris.
- After lubricating, manually operate the brake mechanism several times to ensure the lubricant is evenly distributed and that the brake moves smoothly without hesitation. This step also helps identify any areas that may need additional lubrication or attention.
STEP 4: Resetting the Chain Brake
Resetting the chain brake is essential for ensuring the safety and functionality of your chainsaw. This intricate process involves compressing the spring mechanism to relax the tension on the band around the clutch drum, thereby allowing the chain to move freely. Given the precision required and the potential risk of the spring mechanism releasing suddenly, it’s critical to undertake this task with care and attention to safety precautions.
Before you begin, prioritize safety by donning gloves and protective eyewear to shield yourself from potential harm. Ensure your workspace is well-organized and provides ample visibility and control over the chainsaw components you’ll be handling. This precautionary setup is crucial to mitigate the risk of accidents during the reset process. Securely fix the chainsaw in place to prevent any movement during the operation using a clamp or vise.
Detailed Reset Instructions
- Arm yourself with a 9/16 wrench and a number three Phillips screwdriver, or an equivalent piece of steel that fits through the boxed end of the wrench. These tools are essential for the precise manipulation required in the reset process.
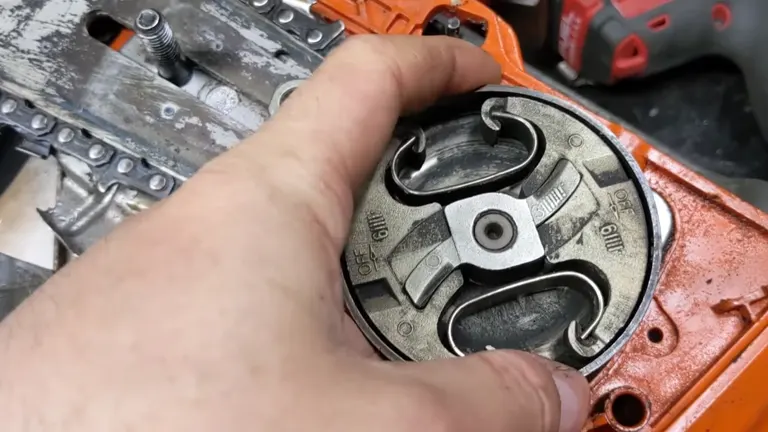
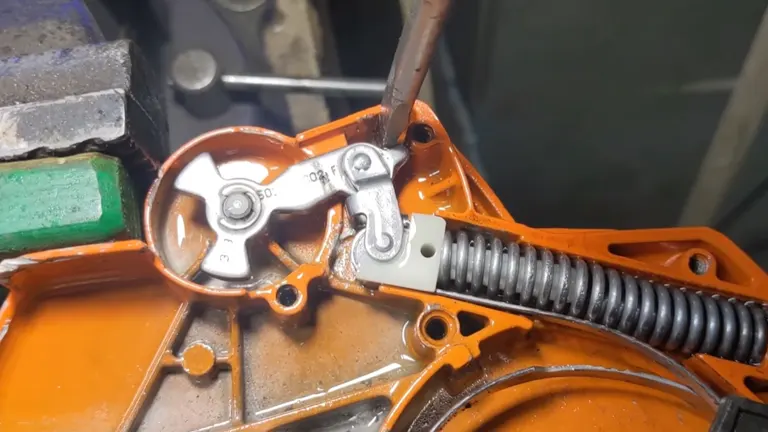
- Identify the three-piece gear within the brake mechanism. Position the open end of the wrench against two of the gear’s segments, preparing to apply torque.
- Insert the Phillips screwdriver (or the steel substitute) through the boxed end of the wrench. Carefully apply a clockwise rotation to engage the gear and compress the spring mechanism. Monitor the brake band around the clutch drum as you do this; it should begin to loosen, indicating that the chain brake is being effectively reset. Ensure this action is performed evenly to maintain alignment and prevent issues during reassembly.
- Following the reset, it’s time to meticulously reassemble the chainsaw. Place each component back into its precise position, ensuring perfect alignment. Pay close attention to the fit and security of each part, as accurate reassembly is fundamental to the chainsaw’s performance and operational safety.
- Once reassembly is complete, perform a manual test of the chain brake’s functionality by engaging and disengaging it. This test, which does not require starting the chainsaw, helps confirm the correct tension and release of the brake mechanism.
STEP 5: Final Checks and Reassembly
The culmination of the repair process involves crucial final checks and the careful reassembly of the chainsaw. This stage is vital to ensure not just the functionality of the brake system, but also the overall performance and safety of the chainsaw.
Proper chain tension is critical for efficient cutting and to prevent accidents. After the brake system has been reset and before the chainsaw is fully reassembled, it’s essential to adjust the chain tension:
- The chain should be snug against the bar but still able to rotate freely without binding. At the midpoint of the bar, lift the chain. It should have a slight give, allowing you to slightly see the drive links, but it shouldn’t hang loose or be too tight.
- Use the chainsaw’s tensioning mechanism, typically a screw or knob located near the base of the bar, to adjust the chain’s tension. Turn the adjuster until the tension is correct as per the guidelines above.
Reinstalling the Cover, Adjuster, and Nuts
Once the chain tension is correctly adjusted, the next step is to reassemble the chainsaw:
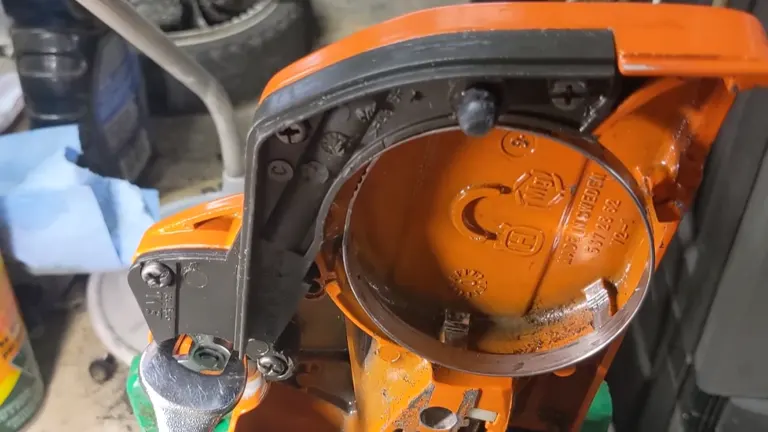
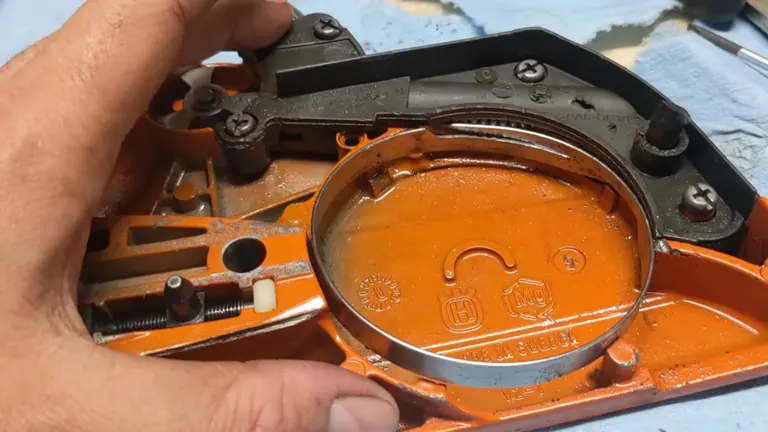
- Carefully place the cover back over the brake mechanism and clutch drum, ensuring it sits flush and aligns with the mounting points.
- If your chainsaw uses a separate chain tensioner, make sure it aligns correctly with the corresponding holes or slots in the bar and cover.
- Thread the nuts by hand initially to ensure they’re not cross-threaded, then tighten them with a wrench. However, do not overtighten, as this could strip the threads or damage the cover. The nuts should be firmly secured but not forced.
STEP 6: Testing and Maintenance
The reassembly of the chainsaw marks the beginning of an essential phase: testing the brake mechanism and committing to a regimen of regular maintenance.
This step is crucial for validating the efficacy of the repair and ensuring the chainsaw remains in peak condition for reliable and safe operation.
Testing the Brake Mechanism
- With the chainsaw reassembled, manually engage and disengage the chain brake several times. This test checks the brake’s responsiveness and ensures it functions as intended to stop the chain quickly in case of an emergency.
- Start the chainsaw in a safe, open area, free from obstructions. With the engine running, engage the brake and confirm that it stops the chain’s movement immediately. Then, disengage the brake and verify that the chain can move freely without hindrance.
- During testing, listen carefully for any unusual noises or signs of distress from the chainsaw. Uncommon sounds can indicate misalignment or other issues that may need further attention.
Commitment to Regular Maintenance
Maintaining your chainsaw is as critical as any repair work. A consistent maintenance schedule ensures the longevity, safety, and efficiency of your equipment.
- After each use, clean the chainsaw to remove debris, focusing on the brake mechanism, chain, and bar. This prevents build-up that can lead to future problems.
- Regularly lubricate the chain, bar, and brake system components with suitable lubricants. This reduces wear and ensures smooth operation. Pivot points and moving parts in the brake system should receive particular attention to prevent seizing.
- Regularly check and adjust the chain tension to ensure it’s neither too tight nor too loose. Proper tension is crucial for effective cutting and reduces the risk of chain derailment or breakage.
- Periodically inspect the chainsaw for signs of wear, especially the brake band, chain, and drive sprocket. Replace worn components promptly to maintain optimal performance and safety.
- Annually, or as recommended by the manufacturer, have the chainsaw serviced by a professional. They can perform a comprehensive check, address any underlying issues, and make adjustments that might be beyond the scope of routine maintenance.
Fixing a stuck chain brake on a chainsaw requires a systematic approach, from diagnosing the issue to cleaning, lubricating, and resetting the brake system. By following these steps, you can ensure your chainsaw operates safely and efficiently, ready to tackle any task. Regular maintenance will prevent future issues, saving you time and ensuring your safety while using this powerful tool.
FAQs
- Why does a chainsaw brake get stuck in the first place?
A chainsaw brake can become stuck due to the accumulation of dirt, sawdust, and debris within the brake system. Lack of regular maintenance and lubrication can also contribute to the problem, causing the brake mechanism to seize up. - How can I prevent my chainsaw brake from getting stuck?
Regular cleaning and lubrication of the chainsaw’s brake system are crucial. After each use, clear any debris from the brake mechanism. Periodically, apply a suitable lubricant to pivot points and moving parts to ensure smooth operation and prevent seizing. - What kind of lubricant should I use on the chainsaw brake system?
Use a dry graphite lubricant or a light penetrating oil. These lubricants do not attract dirt or create a sticky residue, which can help prevent the brake mechanism from getting clogged or stuck. - Can I fix a stuck chainsaw brake myself, or should I seek professional help?
If you’re comfortable with basic chainsaw maintenance and have the necessary tools, you can attempt to fix a stuck brake yourself by following detailed instructions. However, if you’re unsure or the problem persists, it’s best to consult a professional to avoid potential safety hazards. - How often should I check the chainsaw brake for potential issues?
It’s advisable to inspect the brake mechanism before each use for signs of wear or debris buildup. A more thorough check, cleaning, and lubrication should be performed every few months, depending on the frequency of use. - What are the safety precautions I should take when fixing a stuck chainsaw brake?
Always ensure the chainsaw is turned off and the spark plug is disconnected before attempting any repairs. Wear protective gloves to prevent cuts or abrasions, and follow the manufacturer’s instructions closely. If you’re not confident in performing the fix safely, seek professional assistance. - Can a stuck chainsaw brake cause other issues with the chainsaw?
Yes, a stuck brake can put additional strain on the chainsaw’s engine and other components, potentially leading to overheating, reduced performance, or further mechanical failures. It’s important to address brake issues promptly to maintain the chainsaw’s overall health. - Are there any signs that indicate my chainsaw brake might be about to get stuck?
Yes, signs include the brake lever becoming increasingly difficult to engage or disengage, unusual noises when operating the brake, or the chain not stopping as quickly as it should. These signs suggest it’s time to inspect and possibly clean or lubricate the brake system. - What should I do if cleaning and lubricating the brake system doesn’t fix the issue?
If the brake remains stuck after cleaning and lubricating, the problem may lie with worn or broken components within the brake mechanism. Parts such as the spring, band, or gears might need replacement. Consulting the chainsaw’s manual or a professional is recommended in such cases. - Is there a way to test the chainsaw brake’s functionality after repairing it?
Yes, after reassembling the chainsaw, perform a stationary test by engaging and disengaging the brake to ensure it operates smoothly. Then, start the chainsaw and test the brake’s effectiveness by ensuring it stops the chain quickly when engaged. Always perform these tests in a safe environment, free from potential hazards.
We hope this guide helps you get your chainsaw back in action and ensures your safety while using it. Your experiences and tips are invaluable to us and our community of readers. Did you try fixing a stuck chainsaw brake yourself? Do you have any additional advice or questions? Please share your thoughts and questions in the comments below. Let’s learn from each other and keep our chainsaw adventures safe and productive. Don’t forget to share this article with fellow chainsaw enthusiasts. Your feedback not only supports our work but helps everyone in the DIY community. Happy sawing!

David Murray
Forestry AuthorI'm David Murry, a forestry equipment specialist with a focus on chainsaw operation. With over 13 years of experience, I've honed my skills in operating and maintaining a wide range of machinery, from chainsaws to log splitters. My passion for the outdoors and commitment to sustainable forestry drive my work, which emphasizes safety, efficiency, and staying updated with industry advancements. Additionally, I'm dedicated to sharing my expertise and promoting environmental awareness within the forestry community.


Leave your comment