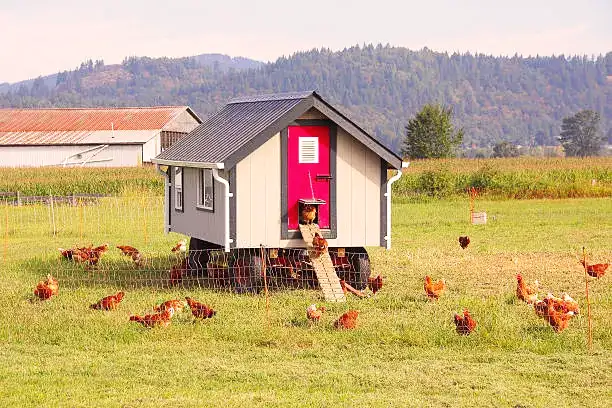
How to Build a Chicken Coop
- October 20, 2023
- 2 comment
Raising chickens in your backyard can be a rewarding and sustainable endeavor. Not only do you get a fresh supply of eggs, but you also have the pleasure of knowing where your food comes from. To embark on this journey, you need a well-constructed chicken coop to keep your feathered friends safe and comfortable. In this comprehensive guide, we’ll walk you through the process of building your very own chicken coop. Let’s Begin!
Selecting the Right Location for Your Coop
Sunlight is Key
Chickens are creatures of habit, and one habit they adore is basking in the sun. When searching for a coop location, prioritize an area that receives ample sunlight throughout the day. Sunlight is not only essential for your chickens’ mental and physical health but also plays a significant role in keeping the coop dry and free of moisture, which is critical for preventing diseases.
Adequate Drainage
Proper drainage is another vital factor in determining the location of your coop. No one likes a soggy, muddy mess, and chickens are no exception. If your coop is situated in a low-lying area or where water tends to accumulate, it can quickly turn into a quagmire. Poor drainage can lead to unhealthy living conditions and potentially harm your birds. So, select a location with good natural drainage or consider adding drainage systems.
Accessibility
Think about your convenience as well. Choose a location that is easily accessible for you. You’ll need to feed your chickens, collect eggs, and clean the coop regularly. Convenience will make these tasks more manageable and enjoyable. It’s also beneficial if you’re planning to expand the coop or make modifications in the future.
Protection from Elements
While chickens enjoy the sun, they must also have a place to seek shelter from adverse weather conditions. When selecting the coop’s location, think about wind direction, potential snow accumulation, and other climatic factors. Your coop should be designed to protect your chickens from extreme weather, and the right location will help with this.
Zoning and Regulations
Always check local zoning and regulations to ensure you are compliant. Some areas may have specific rules governing the construction and location of chicken coops. Compliance is crucial to avoid any future legal complications.
Proximity to Your Home
Having the coop close to your home has its advantages. It makes it easier to keep an eye on your chickens, access them quickly in emergencies, and save time when it’s feeding or egg-collecting time. However, make sure it doesn’t violate local regulations or disturb neighbors.
Predators and Security
Consider security when choosing the location. Coops should be positioned where they can be fortified against predators, such as raccoons, foxes, or birds of prey. Think about fencing and other protective measures when deciding on the spot.
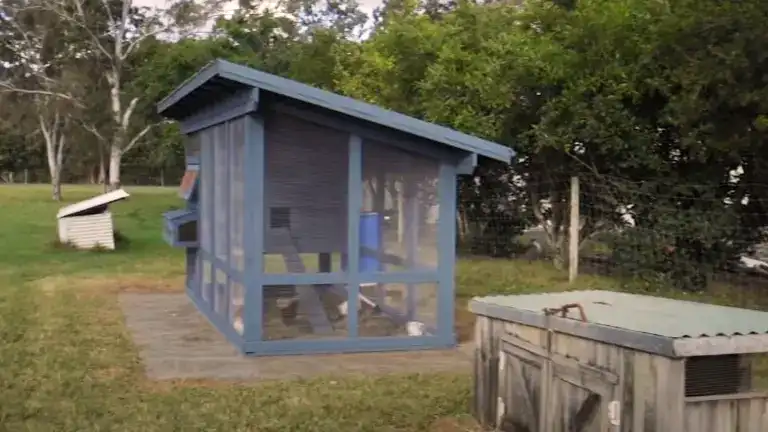
Designing Your Chicken Coop: Size and Layout
When it comes to designing your chicken coop, striking the right balance between size and layout is key to creating a comfortable and functional home for your feathered companions. In this section, we’ll explore the important considerations for determining the size and layout of your coop.
Chicken Numbers vs. Space Allocation
Before diving into the design process, carefully consider how many chickens you plan to keep. Each chicken should ideally have 2-3 square feet of space inside the coop. If you overcrowd your coop, it can lead to stress, disease, and pecking issues among your birds.
Outdoor Space
Remember that chickens need outdoor space as well. Provide at least 8-10 square feet of outdoor space per chicken to allow for foraging, dust-bathing, and exercise. Ensuring your chickens have access to the outdoors not only contributes to their well-being but also helps keep the coop cleaner.
Coop Layout and Practicality
A well-thought-out coop layout makes daily care, feeding, and egg collection much easier. Consider the following practical aspects:
- Nesting Boxes: Incorporate nesting boxes for egg-laying, ideally one box for every 3-4 hens. Place them in a secluded and quiet area to encourage your hens to lay eggs there.
- Roosting Bars: Install roosting bars, ensuring there are at least 8 inches of roost space per chicken. These bars should be higher than the nesting boxes to prevent your chickens from soiling their eggs.
- Feeding and Watering Areas: Dedicate a space for food and water inside the coop. To keep things tidy, consider hanging waterers and feeders, which will also prevent spillage.
- Ventilation: Adequate ventilation is crucial for maintaining good air quality inside the coop and preventing moisture buildup. Place vents near the top of the coop to allow warm, moist air to escape.
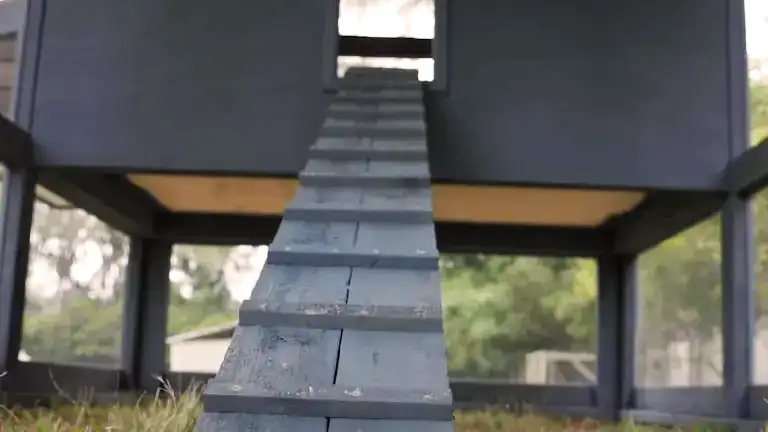
- Easy Access: Make sure your coop design allows for easy human access for cleaning, feeding, and egg collection. This will save you time and effort in the long run.
Future Expansion
Consider whether you might want to expand your flock in the future. Building a slightly larger coop than you currently need can save you the trouble of having to build another coop later on.
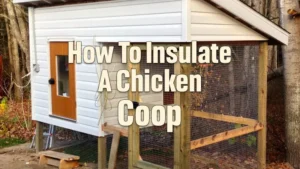
Climate and Weather
Think about your local climate. In colder regions, insulate the coop to keep your chickens warm. In hot areas, ensure you have enough ventilation to keep the coop cool.
Aesthetics and Materials
While functionality is a top priority, it doesn’t hurt to think about aesthetics and materials. A well-designed coop can enhance the overall look of your property. Choose materials that are easy to clean and maintain, such as treated wood.
Designing Your Chicken Coop: Materials and Safety Features
In the design and construction of your chicken coop, the choice of materials and incorporation of safety features are paramount. Let’s explore these elements to create a coop that is both sturdy and secure.
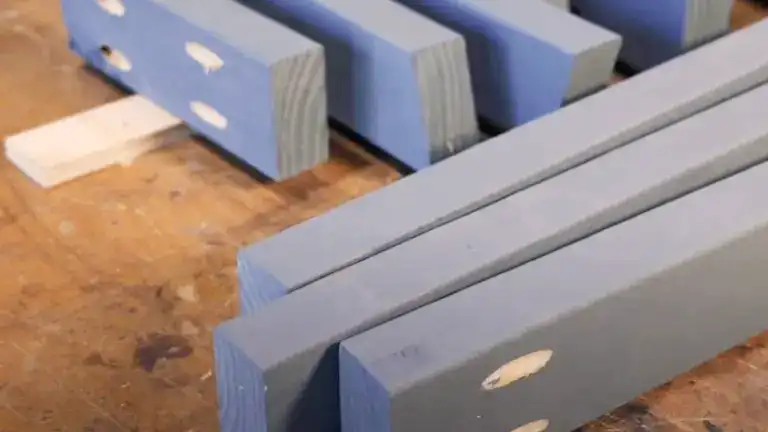
Selecting the Right Materials
- Treated Pine Studs: For the frame of your chicken coop, treated pine studs are an excellent choice. Treated wood is durable and resistant to rot and pests. It ensures the longevity of your coop, providing a solid structure to protect your chickens.
- Protective Paint: Applying a coat of paint to the exterior of your coop is more than just a cosmetic choice. It serves as a protective shield against the elements. Weather, moisture, and sunlight can take a toll on untreated wood. The paint not only enhances the coop’s appearance but also extends its lifespan by preventing wood from deteriorating over time.
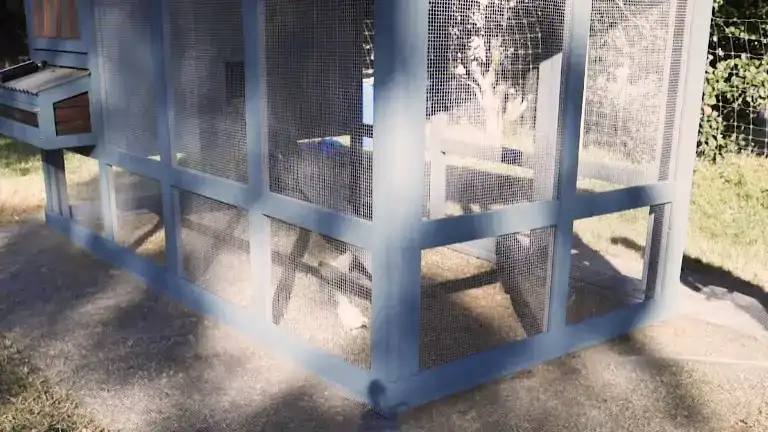
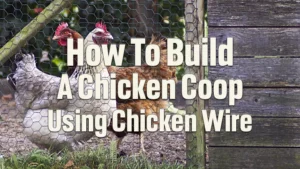
- Predator-Proof Mesh: Your chickens’ safety is a top priority. Use predator-proof mesh to safeguard your coop. Ensure that it’s securely attached to windows, doors, and any openings to keep out raccoons, foxes, and other potential threats. This mesh should be durable and resistant to tearing.
Safety Features
- Well-Ventilated Coop: Adequate ventilation is vital for your chickens’ health. Proper airflow regulates temperature, humidity, and air quality inside the coop. Place vents near the top of the coop to allow warm, moist air to escape, preventing issues like mold and respiratory problems.
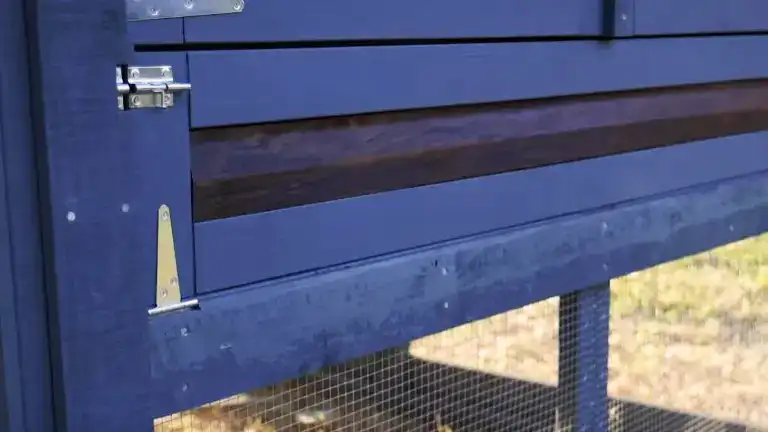
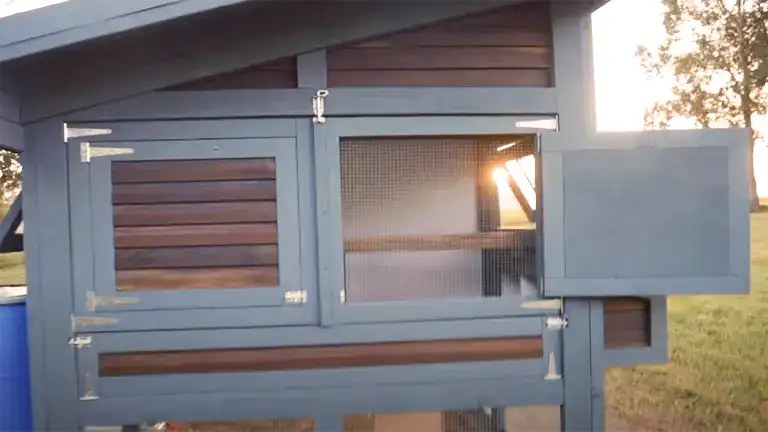
- Secure Latching Systems: Be thorough in selecting latching systems for doors and windows. Raccoons and other predators are surprisingly adept at opening simple latches. Consider locks or sliding bolts to reinforce security. Double-check all latches regularly to ensure they remain functional.
- Underground Predator Deterrence: To deter diggers like foxes and weasels, extend the wire mesh below the coop, creating an underground barrier. This simple precaution can save your chickens from tunneling intruders.
- Nesting Box Security: The nesting boxes should be lockable from the outside. This allows you to collect eggs without disturbing your hens and prevents potential egg thieves, such as snakes and rodents, from accessing the nesting area.
- Fire Safety: Install fire-resistant materials wherever possible. Chicken coops often contain heat lamps, electrical components, or combustible materials like straw bedding. Safeguard against potential fire hazards by using fire-resistant materials and being cautious with heat sources.
- Roost Protection: Ensure that your roosting bars are designed to provide a safe resting place for your chickens at night. Make them higher than the nesting boxes to keep your chickens from soiling their eggs.
- Easy Cleaning Access: Consider incorporating features that make cleaning the coop a breeze. Sliding floors or removable panels can simplify maintenance, ensuring that you keep the coop clean and hygienic.
Gathering Necessary Tools and Materials
Before you dive into constructing your chicken coop, it’s crucial to gather all the necessary tools and materials. This step will ensure you have everything you need at your fingertips for a smooth building process. Here’s a checklist to help you get organized:
Materials
- Treated Pine Studs: As you start planning your coop, treated pine studs are the go-to choice for the frame. They are hardy and resistant to weather, which means your coop will stand the test of time.
- Plywood: You’ll need plywood for various parts of your coop, including the flooring, walls, and nesting box construction. Plywood adds durability and helps maintain a comfortable environment for your feathered friends.
- Roofing Material: Invest in quality roofing materials, such as roofing sheets or tin, to protect your coop from the elements. Make sure you securely fasten the roofing material to prevent leaks.
- Paint: To keep your wood in prime condition, consider using weather-resistant paint. A good coat of paint not only enhances the aesthetics but also provides an extra layer of protection against moisture and sunlight.
- Construction Adhesive: This adhesive plays a vital role in binding materials together, reinforcing structural integrity, and offering additional stability when used with screws or nails.
- Brad Nails: These thin nails are essential for attaching trim, molding, or weatherboards. They create a secure bond without causing the wood to split.
- Screws: Having an assortment of screws in different lengths and sizes is essential for various construction phases. You’ll use them to attach the frame to the base and secure the roof rafters, among other tasks.
- Mesh: The safety of your chickens is paramount. Predator-proof mesh is indispensable to keep unwelcome visitors at bay. Make sure it’s durable and capable of withstanding tearing. You’ll need enough to cover openings like windows and vents.
Tools
- Circular Saw: This versatile tool is your best friend for making straight and angled cuts in a range of materials. It’s particularly useful when cutting structural components like studs and plywood.
- Miter Saw: While not a must-have, if you have one, it’s excellent for precision cross-cuts and mitered angles, enhancing the accuracy and efficiency of your work.
- Hammer and Nails: These timeless tools are indispensable for securing different components together, especially during the framing and assembly stages.
- Drill and Bits: A drill is a must for creating holes and driving screws. Don’t forget to select the right bits for the screws you’ll be using.
- Construction Level: Ensure your coop is constructed level and plumb, as this is crucial for structural integrity.
- Tape Measure: An accurate tape measure is your trusty companion for taking precise measurements throughout your construction journey.
- Construction Adhesive Gun: If you’re using construction adhesive for bonding, a caulking gun makes application easy and consistent.
- Screwdriver or Screw Gun: For securely driving screws into your coop’s frame and other components.
- Spokeshave or Plane: These tools come in handy for shaping and chamfering wood edges, providing a polished finish, especially when creating roosts and trim.
- Staple Gun: An essential tool for attaching mesh to wooden frames, such as windows or ventilation openings.
Step-by-Step Construction Guide: Foundation and Flooring
Now that you’ve gathered all the necessary tools and materials, it’s time to dive into constructing your chicken coop. One of the first steps is laying the foundation and flooring. A solid and level base is crucial to ensure your coop stands strong and provides a comfortable home for your feathered companions. Here’s how to proceed:
Foundation Preparation
- Select Your Location: Begin by choosing the right spot for your chicken coop. Make sure it’s well-drained and receives adequate sunlight. This dry, sunny location will promote the health and happiness of your chickens.
- Clear the Area: Remove any debris, rocks, or weeds from the chosen spot. You want a clean, even surface to work with.
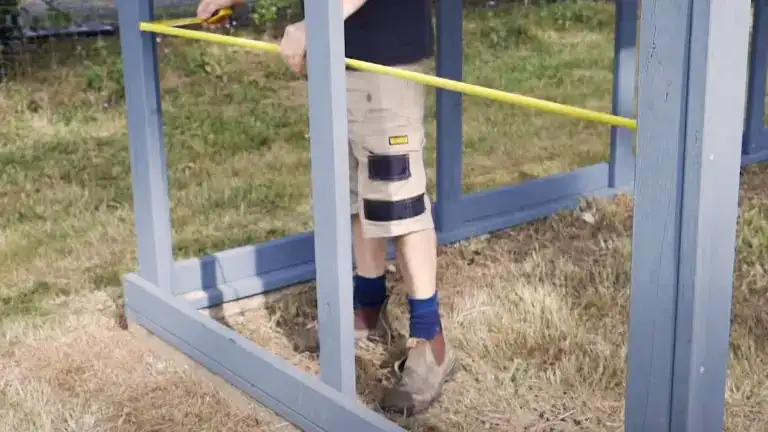
- Measure and Mark: Measure and mark the dimensions of your coop’s foundation using stakes and string lines. This layout will guide you in building the foundation to the correct size.
- Dig the Foundation: Start digging the foundation trench. The depth should be sufficient to ensure stability, but this can vary depending on your specific site and local building codes. Typically, a depth of about 4-6 inches should work. Remember that you want it deep enough to provide support but not so deep that it affects drainage.
Floor Construction
- Install the Frame: To create the base for your coop, you’ll need to construct a sturdy frame. Treated pine studs are an excellent choice for this purpose, as they offer durability and resistance to moisture. Place the studs along the edges of the foundation trench. These studs will form the frame of the coop’s floor.
- Level the Frame: Use a construction level to ensure the frame is perfectly level. This step is crucial because any discrepancies in the frame’s level will lead to an uneven coop, which can affect its structural integrity.
- Fill the Frame: Once the frame is level, you can proceed to fill it. Cut and fit plywood sheets to the dimensions of the frame. Make sure the plywood is flush with the front of the frame. The smooth surface will serve as the flooring for your coop.
- Seal the Edges: To protect the plywood from moisture and provide added durability, seal the edges of the flooring with a suitable sealer or paint. This extra layer of protection will extend the life of the floor.
- Check for Stability: Walk across the floor to ensure it’s solid and free of any wobbles. A stable floor is essential, as it provides a comfortable surface for your chickens and aids in the overall structural strength of the coop.
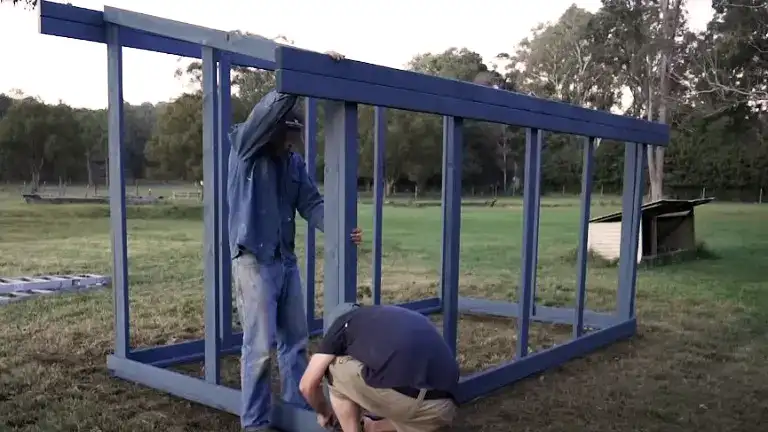
Step-by-Step Construction Guide: Framing the Coop
Welcome to the next stage of building your chicken coop! With the foundation and flooring in place, it’s time to focus on framing your coop. The frame provides the structural integrity and shape for your chicken haven. Here’s how to proceed:
Frame Construction
- Materials and Preparation: You’ll need treated pine studs for this phase. Ensure you have all your materials ready to go, including the studs, a construction level, a measuring tape, and a selection of screws and nails.
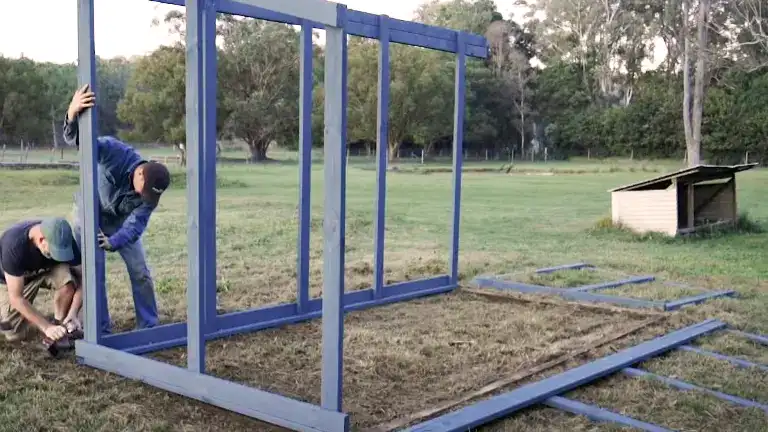
- Workshop Setup: Building the frame is a precision task. To ensure accuracy, construct the walls in your workshop. This controlled environment allows for precise measurements and cuts. It’s much easier to make adjustments before the walls are in place.
- Wall Building: Begin by creating the four walls of your chicken coop. Remember to follow your previously laid out plans or blueprints for precise measurements. Make sure each wall is perfectly square, as this is crucial to the overall stability of the coop.
- Stud Placement: To add structural support to the frame, attach upright studs and top diagonals. These pieces prevent the frame from swaying and provide the necessary rigidity. The uprights will help maintain the walls’ alignment and prevent them from bowing.
- Securing the Frame: While assembling the walls, you can use nails and screws to hold everything together securely. It’s best to use a combination of fasteners to ensure the frame remains stable and squared.
- Level and Square: Check each wall for level and square. Using a construction level is crucial at this stage. If any of the walls are off-kilter, it can lead to issues when you assemble the coop, such as uneven doors and windows.
- Nailing Technique: Because the lumber is typically around 35mm thick, while the nails are 75mm long, you can angle the nails to prevent them from penetrating through the other side of the studs. This technique provides extra stability.
- Checking for Strength: Finally, confirm the structural integrity of your walls. Applying a bit of pressure should not result in any noticeable wobbling or instability. A solid frame is essential for the coop’s durability.
Once you’ve successfully completed the framing phase, you’ll have the basic skeleton of your chicken coop. The structure’s stability is vital, and ensuring each wall is level and square is key to the coop’s overall success.
Step-by-Step Construction Guide: Roofing and Ventilation
As you progress in the construction of your chicken coop, you’ll reach the important stages of roofing and ventilation. These steps are critical for creating a safe, comfortable, and weather-resistant environment for your chickens. Here’s a step-by-step guide based on my experience.

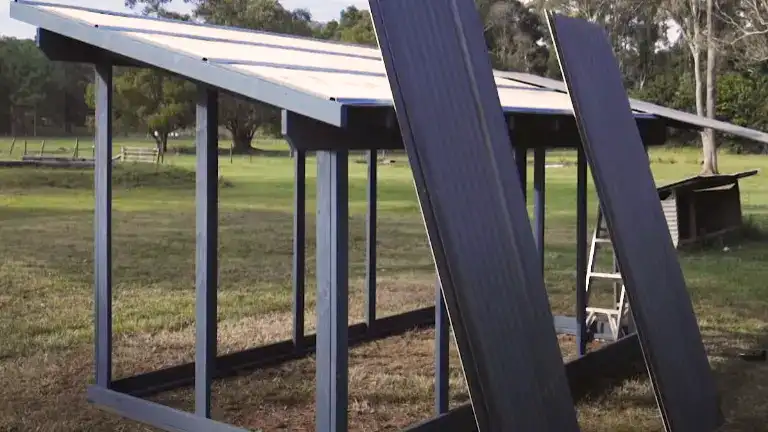
Roofing
- Choose Your Roofing Material: Select a roofing material that offers excellent protection from the elements. Common choices include asphalt shingles, metal roofing, or corrugated plastic. Each has its advantages, so choose the one that best suits your climate and personal preferences.
- Measure and Cut: Measure the dimensions of your coop’s roof, allowing for overhangs to provide extra coverage. Cut the roofing material to fit your measurements accurately.
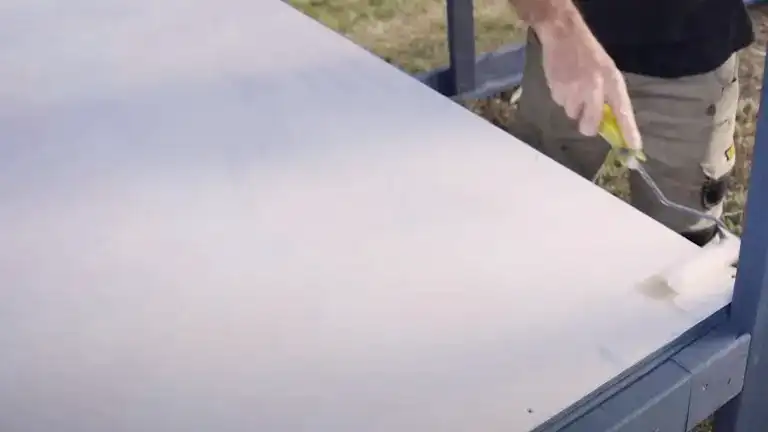
- Lay Roofing Felt: Before attaching the roofing material, it’s a good idea to lay roofing felt over the roof’s plywood sheathing. Roofing felt acts as a moisture barrier and adds an extra layer of protection.
- Attach the Roofing Material: Start at the lower edge of one side of the roof and gradually work your way up. Use roofing nails or screws to secure the roofing material in place. Be sure to overlap the material to ensure proper waterproofing. Trim any excess material along the edges.
- Install Flashing: If your coop design includes roof penetrations for vents or chimneys, you may need to install flashing to prevent water from seeping in around these areas.
Ventilation
- Design Ventilation Openings: Adequate ventilation is crucial to prevent moisture buildup and maintain a comfortable environment for your chickens. Plan the location of your ventilation openings, typically near the roof or eaves. You can use vents, louvers, or even adjustable windows for this purpose.
- Cut Ventilation Holes: Carefully cut holes in the coop’s walls or roof to accommodate the chosen ventilation system. Be precise with your measurements to ensure a secure fit.
- Install Ventilation Features: Attach your chosen ventilation components securely. Ensure that they can be opened or closed as needed to regulate airflow. Ventilation features can be especially useful in extreme weather conditions, allowing you to keep your chickens warm in the winter and cool in the summer.
- Predator-Proof Vents: To safeguard against predators, cover your ventilation openings with hardware cloth or a similar sturdy mesh. This will allow airflow while keeping your chickens safe.
- Test and Adjust: Once your ventilation system is in place, test it to make sure it’s functioning as intended. Make any necessary adjustments to ensure proper airflow and moisture control.
By following these steps, you’ll successfully roof your coop, providing weather-resistant protection, and implementing proper ventilation to maintain a comfortable environment for your chickens. A well-roofed and well-ventilated coop not only keeps your chickens safe but also ensures their health and well-being in a variety of weather conditions.
Step-by-Step Construction Guide: Doors, Windows, and Nesting Boxes
The time has come to add the functional elements to your chicken coop: doors, windows, and nesting boxes. Here’s how to tackle this crucial phase:
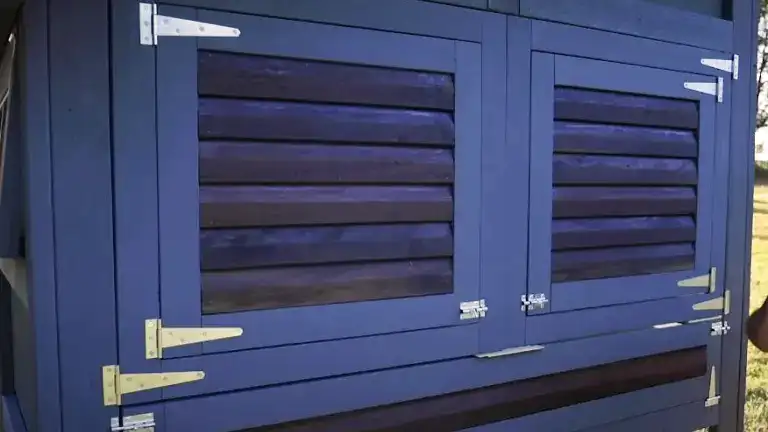
Design Considerations
- Doors and Windows Design: Start by planning the design and dimensions of your doors and windows. These elements should provide access, ventilation, and natural light to your coop. Make sure they align with your coop’s layout and your chickens’ needs.
- Strength and Durability: For doors and windows, consider using half-lap joints. These joints are strong and reliable, ensuring your coop’s security and longevity. You can create them using a table saw or a router.
- Nesting Box Placement: When planning the nesting boxes, think about accessibility for egg collection. Nesting boxes should be easily reached from outside the coop to minimize disturbance to your hens.
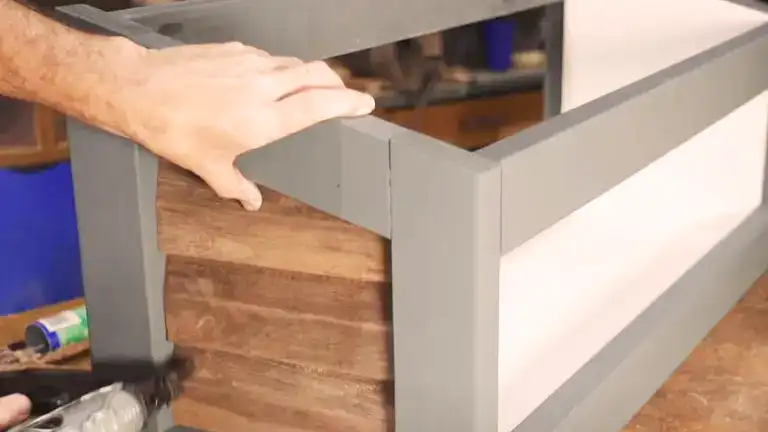
Building Doors
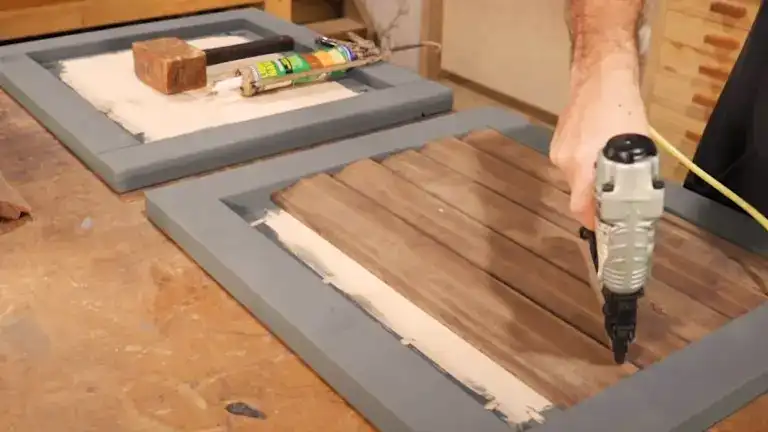
- Measure and Cut: Based on your design, measure and cut the door components. Pay attention to the dimensions, ensuring a snug fit within the door frame.
- Half-Lap Joints: Create half-lap joints in the door components. This involves removing a portion of the wood to create a complementary joint. These joints make the doors strong and rigid.
- Assembly: Assemble your doors, ensuring that they open and close smoothly. Use screws or nails to secure the components, and double-check that they are square and fit correctly in the door frame.
Constructing Windows
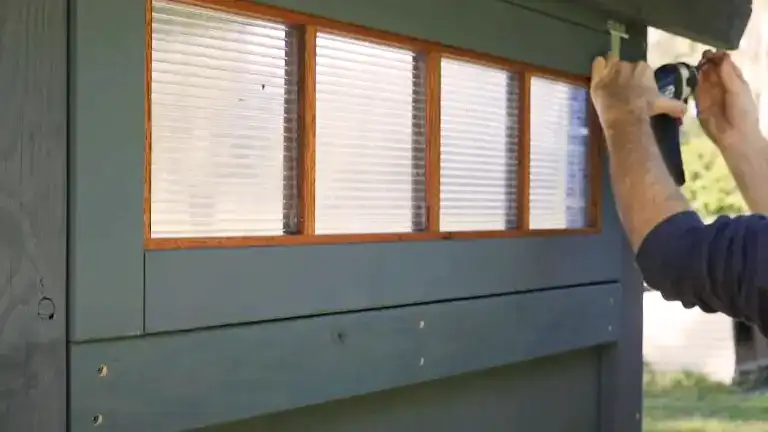
- Dimension and Cut: Follow your design to cut window components. Ensure that the dimensions match the openings you’ve prepared in your coop’s walls.
- Half-Lap Joints: Apply the half-lap joint technique to your window frame. This provides stability and ensures the frame holds up against environmental elements.
- Glass or Material: Install your chosen material for the window. Many chicken coops use clear or frosted plastic, as it provides adequate light and can withstand pecking or impact.
- Secure in Place: Attach the window frame with screws or nails, ensuring it’s well-sealed to prevent drafts. Make sure the window can be opened for ventilation as needed.
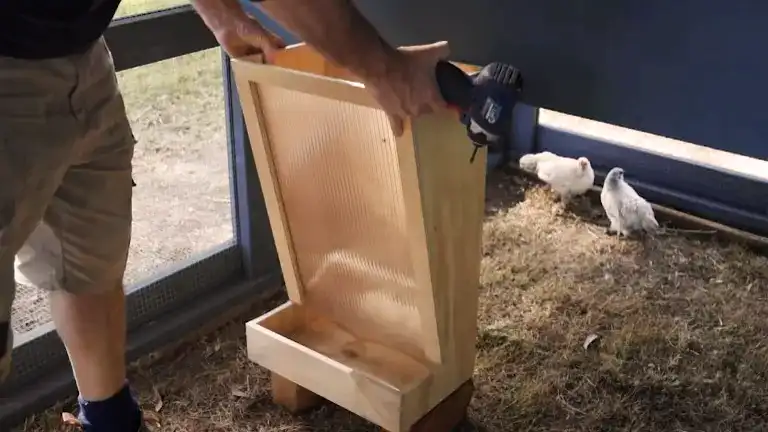
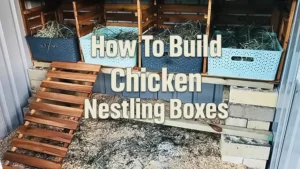
Nesting Boxes Installation
- Location: Based on your coop’s design, decide where to place the nesting boxes. Keep them easily accessible and make sure they are protected from direct drafts.
- Construction: Build nesting boxes from plywood or other suitable materials. These boxes should be snug, providing a comfortable space for your hens to lay eggs.
- Accessibility: Make sure the nesting boxes are accessible from outside the coop. This simplifies egg collection and reduces the disruption to your chickens.
Remember that strong and functional doors, windows, and nesting boxes are essential for the convenience of daily care and egg collection. Proper planning and precise construction will ensure these elements serve their purpose effectively. Stay tuned for the next steps in bringing your chicken coop to life!
Coop Interior: Ensuring Comfort for Your Chickens
Your chicken coop’s interior is where your feathered friends will spend most of their time, so it’s crucial to prioritize their comfort. Here’s how to create a cozy and chicken-friendly interior:
1. Roosts: Chickens love to roost at night, so be sure to install roosts inside the coop. Use hardwood boards with rounded edges to give them a comfortable place to perch. Make sure the roosts are at least a foot off the ground and about 2-3 feet in length, with enough space for all your chickens to roost comfortably.
2. Bedding Space: Chickens need a clean and cozy space for nesting and resting. Bedding such as straw, pine shavings, or hay is excellent. Ensure there’s ample space for your chickens to nest comfortably. The bedding should be regularly replaced to maintain a clean environment.
3. Deep Litter Method: Consider using the deep litter method. This involves adding layers of bedding material (like straw, leaves, and wood shavings) to the floor of the coop. Over time, the chickens’ scratching and droppings mix with the bedding and create compost, which helps control odors and enhances the overall health of your chickens.
4. Cleaning Access: To make cleaning and maintenance more manageable, install a full-length access door in your coop. This door allows easy access for cleaning out old bedding and applying fresh material. It’s essential to keep the coop clean to prevent the buildup of ammonia and pathogens that could harm your chickens.
5. Nesting Boxes: Nesting boxes are where your hens will lay their eggs. Make sure the boxes are comfortable, dry, and private, so your chickens feel safe while laying. Provide enough boxes based on your flock size; typically, one box for every 3-4 hens works well.
6. Proper Ventilation: Good ventilation is key to maintaining a comfortable coop. It helps control moisture levels, reduce condensation, and remove ammonia odors. Ensure proper airflow while keeping drafts at bay.
7. Natural Light: Whenever possible, design your coop to allow natural light to enter. This not only provides a healthier environment but can also improve your chickens’ mood and egg-laying.
8. Adequate Space: Chickens need space to move around comfortably. Overcrowding can lead to stress and unhealthy behaviors. Follow the guidelines you established during the size and layout planning to ensure your coop is spacious enough.
Remember, a comfortable and well-maintained interior is essential for the health and happiness of your chickens. Creating a cozy environment ensures they have a safe and enjoyable place to roost, lay eggs, and spend their days. The next steps will focus on additional elements to enhance your coop’s functionality and security.
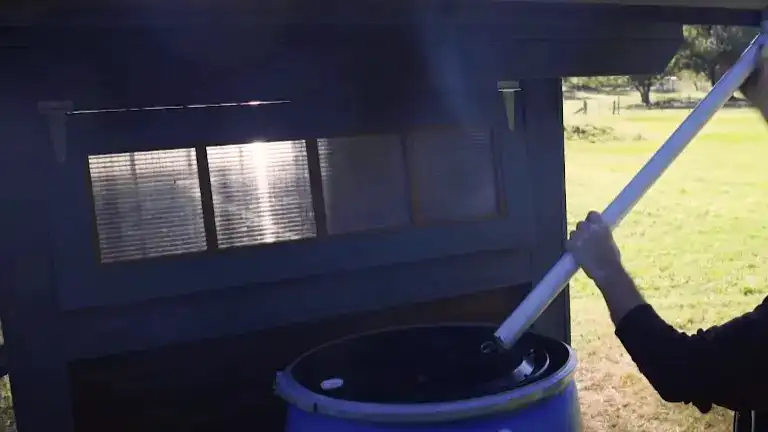
Feeding and Watering Systems
When setting up feeding and watering systems for your chickens, you’ll want to ensure their well-being and health. Let’s walk through how you can establish efficient systems in your coop.
1. Feeding System
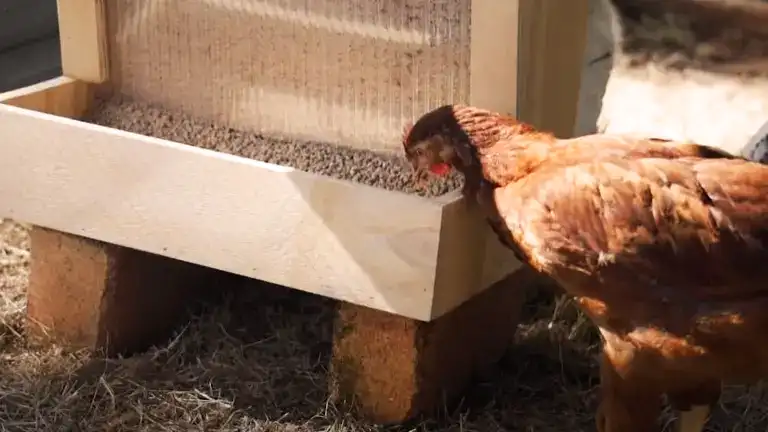
- Choose a Practical Feeder Design: You’ll find various feeder options on the market, from hanging feeders to trough feeders and automatic feeders. Pick the one that best suits your coop layout and flock size.
- Elevate the Feeder: To keep the feed clean and minimize waste, consider elevating the feeder slightly above the ground. Ensure it’s at a convenient height for your chickens.
- Regular Refilling: Maintaining a steady supply of fresh feed is crucial. Understand your chicken breed’s nutritional requirements and make necessary adjustments to ensure they get the right nutrition.
2. Watering System
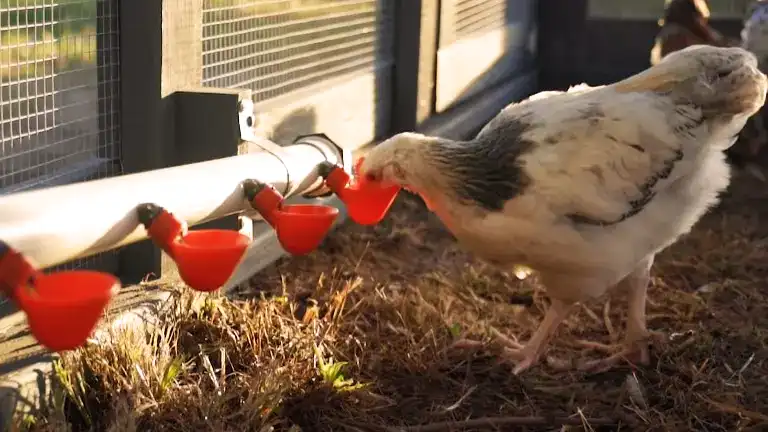
- Automatic Drinking Cups: These cups are a smart choice for hassle-free hydration. They’re designed to release water when chickens peck at them, preventing spills and keeping the water source clean.
- Keep the Water Clean: Regularly check and clean the water to guarantee clean and uncontaminated water. Chickens can be quite particular about the quality of their water, so ensuring it stays pristine is vital.
- Winter Considerations: In cold climates, take precautions to prevent water from freezing. Use heated waterers or implement a system to maintain a constant water supply, as chickens can become dehydrated even in winter.
3. Proper Placement
- Strategic Placement: Position the feeder and waterer inside the coop to protect them from the elements. Slightly elevating them off the ground helps maintain cleanliness and reduce waste.
- Accessible Locations: Ensure easy access for all chickens within the coop. Avoid overcrowding around the feeding and watering systems to prevent competition and bullying.
4. Monitoring
- Routine Inspections: Make it a habit to check the feeding and watering systems daily. This practice allows you to promptly address any issues like clogs, empty feeders, or water malfunctions.
- Maintain Cleanliness: To prevent mold, bacteria, and pest problems, regular cleaning and upkeep of these systems are vital.
By implementing efficient feeding and watering systems, you can guarantee that your chickens always have access to fresh, uncontaminated food and water. This not only promotes their overall health and productivity but also simplifies your daily chicken care routine. Ultimately, this leads to happier and healthier chickens.
Predator Protection and Security
Safeguarding my chickens from potential predators is a top priority for me as a coop owner. Here’s how I install effective predator protection and enhance the security of my coop:
1. Choosing the Right Mesh
- Wire Mesh Selection: I opt for a sturdy wire mesh that’s specifically designed to withstand potential threats. I find that a hardware cloth with a small mesh size (around 1/2 inch) is highly effective in keeping out predators.
- Material Considerations: I prefer galvanized steel or welded wire mesh for its durability and rust resistance.
2. Proper Installation
- Covering All Openings: I make sure that all openings, including windows, vents, and gaps around the coop, are covered with mesh. Predators can be remarkably resourceful when seeking access.
- Overlap and Secure Edges: I overlap the edges of the mesh and fasten them securely to the coop frame. I use screws, staples, or heavy-duty zip ties for a reliable connection.
3. Ground-Level Security
- Bury the Mesh: To prevent digging predators like foxes and weasels, I dig a trench around the perimeter of my coop and bury the mesh at least 12-18 inches deep.
- Slope Away from the Coop: I angle the buried mesh outward to create an underground barrier that discourages burrowing.
4. Reinforce Weak Points
- Latch and Locks: I install robust latches and locks on doors to prevent raccoons and other intelligent predators from figuring out how to open them.
- Secure Nesting Boxes: I ensure that my nesting boxes are inaccessible to curious critters. I use locks or additional mesh to seal them off.
5. Regular Inspection
- Frequent Checks: I routinely inspect my coop for wear and tear in the mesh or any potential weak points. I repair or replace damaged sections immediately.
- Detect Signs of Predation: I’m vigilant about checking for signs of attempted break-ins or predation. Any suspicious activity or signs of digging should be addressed promptly.
6. Additional Considerations
- Nighttime Security: I’ve learned that most predator threats occur during the night. I lock my chickens in the coop at night to provide an extra layer of protection.
- Guard Dogs or Alarms: Some coop owners, including me, employ guard dogs or alarms to deter predators. This can be especially effective in rural areas.
By meticulously installing and maintaining proper predator protection, I can create a secure environment for my chickens. This not only ensures their safety but also grants me peace of mind, knowing that my feathered friends are well-protected from any unwanted guests.
Maintaining Your Chicken Coop
Maintaining your chicken coop is an essential part of keeping your feathered friends healthy and happy. Here’s a routine you can follow to ensure your coop remains in top shape:
1. Daily Checkups
- Feeding and Watering: Start each day by checking the feed and water levels. Chickens need access to fresh water and a balanced diet, so refill feeders and water as necessary.
- Egg Collection: Collect eggs daily to prevent them from piling up and cracking. This also helps maintain cleanliness in the nesting boxes.
- Health Assessment: While you’re with the chickens, take a moment to observe their behavior. Any signs of illness, injury, or stress are noted for further investigation.
2. Weekly Tasks
- Cleaning Routine: Every week, set aside time for a thorough cleaning. This involves removing old bedding, sweeping the floor, and replacing it with fresh bedding material. Cleanliness is vital to prevent diseases and mites.
- Inspecting for Damage: Check for any wear and tear in the coop structure, such as loose boards, nails, or exposed wires. Repair these promptly to maintain structural integrity.
- Ventilation Assessment: Ensure that ventilation areas are clear of debris and functioning correctly. Proper airflow is crucial for keeping the coop dry and preventing respiratory issues in the chickens.
3. Monthly Maintenance:
- Nesting Box Cleaning: Once a month, remove all the bedding from the nesting boxes and replace it with fresh material. Clean nesting boxes make for happier hens and cleaner eggs.
- Dusting for Mites: Mites can be a nuisance, so perform monthly checks. If you notice any signs of mites or lice, apply appropriate treatments.
- Coop Grounds: Outside the coop, manage the vegetation and ensure there’s no overgrowth near the coop. This prevents predators from having cover and access to the chickens.
4. Seasonal Considerations:
- Weatherproofing: Before winter arrives, inspect the coop for drafts, and seal any gaps to keep the coop warmer. During the summer, ensure there’s proper shade to keep the chickens cool.
- Deep Litter Method: In the fall, assess the deep litter bedding and consider removing any excess compost. This keeps the bedding fresh and efficient.
- Spring Cleaning: Spring is an excellent time to do a deep clean of the coop. Take out all the bedding, clean all surfaces, and disinfect if necessary. This helps prepare for the active laying season.
5. Annually:
- Coop Inspection: Once a year, perform a comprehensive inspection of the coop’s structure. Check the roof, walls, and foundation for any signs of significant wear. Repainting or resealing may be necessary to protect the wood.
- Predator Deterrents: Assess the predator protection measures to ensure they’re in good condition. This includes checking the mesh for any damage.
- Coop Safety: Make sure all hardware, such as latches and locks, is in working order to maintain security.
By adhering to this maintenance routine, you can provide your chickens with a clean, safe, and comfortable environment. It’s not only beneficial for their well-being but also for the quality of eggs they produce. Plus, the peace of mind that comes with knowing your coop is well-maintained is invaluable to you as a chicken owner.
Health and Care Tips for Your Chickens
Let me share some essential health and care tips from my experience in raising chickens. As a chicken enthusiast, I’ve learned that the key to happy chickens is ensuring their well-being.
1. Nutrition Matters
- Balanced Diet: Provide a balanced diet that includes a mix of grains, seeds, vegetables, and commercial chicken feed. Balanced nutrition ensures healthy egg production and overall well-being.
- Fresh Water: Ensure a continuous supply of fresh, clean water. Hydration is key to egg production and overall health.
- Supplements: Depending on the specifics of your chicken flock, consider adding calcium supplements, such as crushed oyster shells, to support strong eggshells.
2. Disease Prevention
- Vaccination: Consult with a poultry veterinarian to develop a vaccination plan. Vaccinating against common poultry diseases is a proactive approach to disease prevention.
- Biosecurity: Maintain strict biosecurity measures to prevent the introduction of diseases into your flock. Quarantine new birds before integrating them with your existing chickens.
- Regular Health Checks: Routinely check your chickens for signs of illness or distress. This includes observing their behavior, checking for unusual discharges, and assessing their overall condition.
3. Clean Living Environment
- Coop Hygiene: Keep the chicken coop clean and dry. Regularly remove soiled bedding, droppings, and food scraps. Clean nesting boxes to prevent egg contamination.
- Deep Litter Method: Consider using the deep litter method, where bedding is regularly topped up rather than completely replaced. This method promotes composting, provides warmth, and reduces waste.
- Ventilation: Ensure proper ventilation in the coop to prevent moisture buildup. Good airflow minimizes the risk of respiratory issues.
4. Handling and Socialization
- Gentle Handling: Handle your chickens gently to minimize stress. This makes them easier to manage and reduces the risk of injuries.
- Socialization: Spend time with your chickens to help them become more accustomed to your presence. This reduces skittish behavior and can make feeding, egg collection, and health checks easier.
5. Egg Collection
- Frequent Collection: Collect eggs daily to prevent broodiness, which can disrupt egg production. The early collection also ensures clean and uncracked eggs.
- Proper Storage: Store eggs in a cool, dry place. Egg quality remains best when they’re refrigerated as soon as possible.
6. Pest Control
- Parasite Management: Implement a regular parasite control program. External parasites like mites and lice can be harmful, while internal parasites can affect overall health.
- Predator Protection: Ensure your coop is predator-proof. Common predators include foxes, raccoons, and birds of prey. Secure the coop with sturdy locks and mesh to keep your chickens safe.
7. Stress Reduction
- Minimal Stress: Avoid overcrowding, provide hiding spots in the coop for nervous chickens, and limit disturbances. High-stress environments can lead to illness and reduced egg production.
8. Poultry Veterinarian
- Regular Consultations: Establish a relationship with a poultry veterinarian. They can provide professional guidance and medical care for your chickens.
Conclusion: Enjoying the Fruits of Your Labor
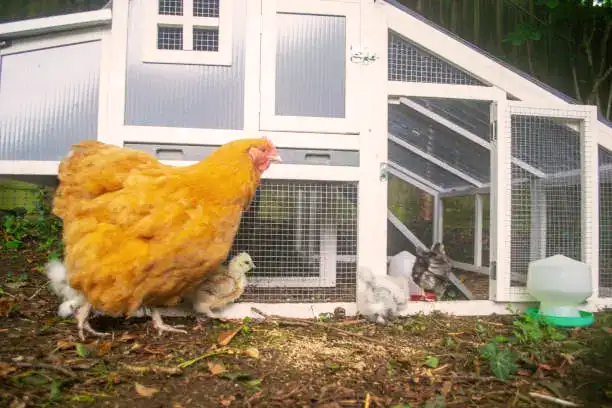
Congratulations on completing your chicken coop! By building this safe and comfortable home for your feathered friends, you’ve not only secured a source of fresh eggs but also created a space where your chickens can thrive. Your dedication to this project is undoubtedly something your family and your chickens will appreciate.
As you’ve followed this journey, from the first steps of construction to the finishing touches, you’ll soon witness the joy of your chickens in their new habitat. Subscribe for more updates on the coop, and continue to enjoy the satisfaction of providing your chickens with the perfect place to call home. Embrace the journey and relish the well-earned rewards of your labor.
FAQs
- How much does it cost to build a chicken coop?
The cost varies depending on size and materials but can range from a few hundred to a few thousand dollars. - How long does it take to build a chicken coop?
With the right planning and help, you can build a chicken coop in a weekend or two. - Do I need special tools to build a chicken coop?
Basic carpentry tools like a saw, hammer, and drill are usually sufficient. - Can I customize my chicken coop design?
Absolutely! You can personalize the coop to suit your needs and style. - What are common chicken coop predators, and how do I protect against them?
Common predators include raccoons, foxes, and hawks. Use locks, fencing, and hardware cloth to safeguard your coop. - Is it cheaper to buy or build a chicken coop?
The cost-effectiveness of buying or building a chicken coop depends on your budget and DIY skills. Building it yourself is often cheaper if you’re handy. Buying a pre-made coop is convenient but may cost more. - How much should you pay for a chicken coop?
Chicken coop prices vary by size and features. Smaller coops can cost $200 to $500, while larger ones range from $500 to $2,000 or more. Your budget and your chickens’ needs should guide your purchase. - How big of a coop do I need for 30 chickens?
For 30 chickens, aim for a coop with 60 to 90 square feet of interior space and an outdoor run area of 240 to 300 square feet for exercise and foraging. - How big of a coop do I need for 12 chickens?
For 12 chickens, provide a coop with 24 to 36 square feet of interior space and an outdoor run area of 48 to 60 square feet. - Is owning chickens cheaper than buying eggs?
Owning chickens can be cost-effective in the long run. Initial setup costs are offset by savings on eggs, but it depends on your resources and proper care for your flock.

Reagan Key
Forestry Author2 comments
Wow love the Chicken Coop.


Very educative
Godfred Blay Gibbah
March 6, 2024 7:01 am