How to Clean a Lawn Mower Carburetor: Easy Maintenance Tips
- March 1, 2024
- 5 comment
A clean carburetor is crucial for the smooth operation of your lawn mower, ensuring it starts easily, runs smoothly, and delivers optimal performance. Over time, carburetors can become clogged with debris and residue, leading to a range of issues that can hinder your mower’s functionality. This guide will walk you through the process of identifying when your carburetor needs cleaning, preparing for the task, and executing it step by step.
Signs Your Carburetor Needs Cleaning
Difficulty Starting

One of the first signs that your carburetor may need cleaning is difficulty in starting the lawn mower. A dirty carburetor can obstruct the flow of fuel and air to the engine, making it hard to start. If you find yourself repeatedly pulling the start cord or turning the key without the engine firing up, it might be time to check the carburetor. The accumulation of old fuel residue, dirt, and debris can clog the carburetor’s jets and ports, preventing the proper mixture of fuel and air from being delivered to the engine.
Irregular Idling
After starting, a healthy lawn mower should idle smoothly at a consistent speed. However, if the carburetor is dirty, you may notice that the mower idles irregularly, with the engine speed fluctuating or the mower even stalling. This irregular idling can occur because the clogged carburetor cannot maintain a steady flow of fuel to the engine, leading to inconsistent engine speeds. Cleaning the carburetor can help restore smooth idling and prevent the engine from stalling during operation.
Poor Performance
A lawn mower’s performance can be significantly affected by carburetor issues. If your mower is cutting unevenly, lacks power, or seems to struggle more than usual, a dirty carburetor might be to blame. When the carburetor is clogged, it can’t deliver the correct fuel-to-air ratio needed for optimal combustion, resulting in poor engine performance. This can make your mowing tasks more challenging and time-consuming. Ensuring the carburetor is clean can help improve the mower’s performance, making your lawn care routine more efficient.
Preparing for Carburetor Cleaning
- Carburetor Cleaner: This specialized cleaning solution is designed to dissolve and remove fuel residues and deposits from carburetor components.
- Screwdrivers: A set of screwdrivers (both flat-head and Phillips) will be necessary for disassembling the carburetor.
- Wrench Set: Wrenches may be required to remove the carburetor from the lawn mower engine.
- Pliers: Useful for removing clamps or hoses connected to the carburetor.
- Brushes: Small wire brushes or old toothbrushes are perfect for scrubbing away stubborn grime.
- Compressed Air: A can of compressed air can blow out debris from small passages and jets within the carburetor.
- Clean Rags: Soft, clean rags or towels are essential for wiping down parts and cleaning up spills.
- Gloves: Rubber or nitrile gloves to protect your hands from chemicals and grime.
- Safety Glasses: To protect your eyes from splashing chemicals or debris.
- Container: A small container or tray can be useful for keeping small parts organized so you don’t lose anything during the cleaning process.
- Work in a Well-Ventilated Area: Carburetor cleaner fumes can be harmful, so always work in an open or well-ventilated space.
- Wear Protective Gear: Gloves will protect your hands from chemicals and sharp edges, while safety glasses shield your eyes from splashes and debris.
- Disconnect the Spark Plug: Before starting, ensure the lawn mower is off and disconnect the spark plug to prevent accidental engine starts.
- Avoid Open Flames: Carburetor cleaner is flammable, so work away from open flames or sources of sparks.
- Read Instructions: Always read and follow the instructions on the carburetor cleaner and any other chemicals you use.
Step Guide to Cleaning Your Carburetor
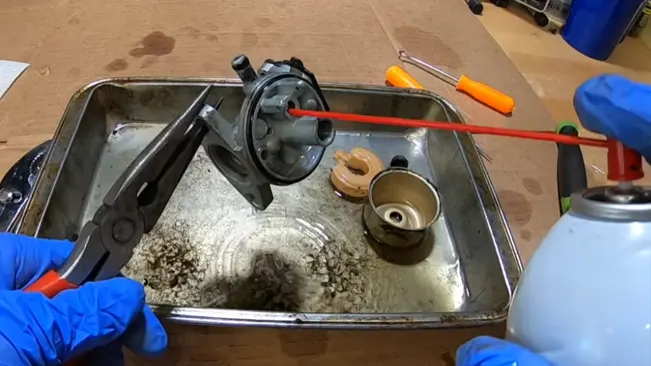
Removing the Carburetor
Before you begin the process of removing the carburetor from your lawn mower, it’s crucial to ensure safety by making sure the mower is turned off and has had time to cool down. Additionally, disconnecting the spark plug is a vital step to prevent the mower from accidentally starting during the process. Depending on the specific model of your lawn mower, gaining access to the carburetor might require the removal of the air filter cover or other surrounding components. Once you have clear access, the next step involves carefully disconnecting the fuel lines connected to the carburetor. It’s a good idea to drain the fuel from these lines into a container to avoid any spills that could create a hazard or mess.
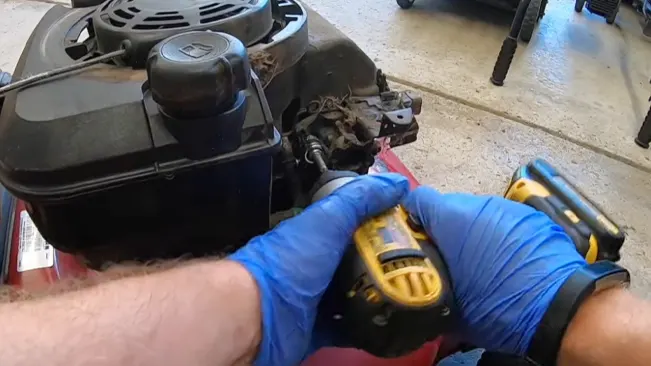
With the prep work done, the next task is to unscrew the carburetor from its position. This is usually achieved with the help of a screwdriver or wrench, depending on the type of fasteners used. As you remove these screws or bolts, it’s important to keep them in a safe place for reassembly later. Finally, you can gently remove the carburetor from the engine. During this step, be mindful of any gaskets or O-rings that might come loose with the carburetor, as these are crucial for ensuring a tight seal when you reassemble the unit.
Disassembling the Carburetor
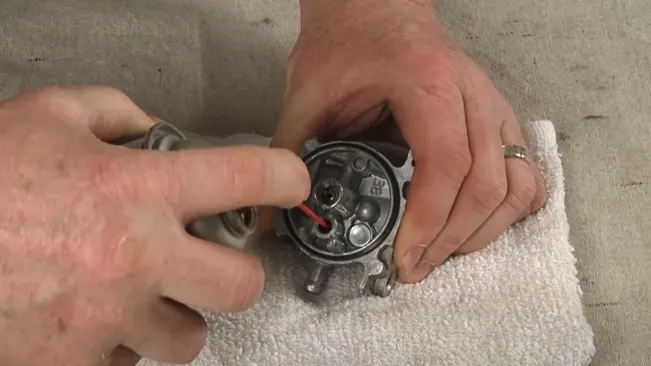
When disassembling the carburetor, the first step is to create an organized workspace. Spread out a clean cloth or towel where you can lay out all the parts of the carburetor as you take them apart. This setup helps in preventing the loss of any small components that are crucial for the proper functioning of the carburetor. For those who might not be entirely confident about putting everything back together correctly, taking photos of the carburetor before and during the disassembly process can provide a useful reference. These images can serve as a guide to ensure each part is returned to its correct position during reassembly.
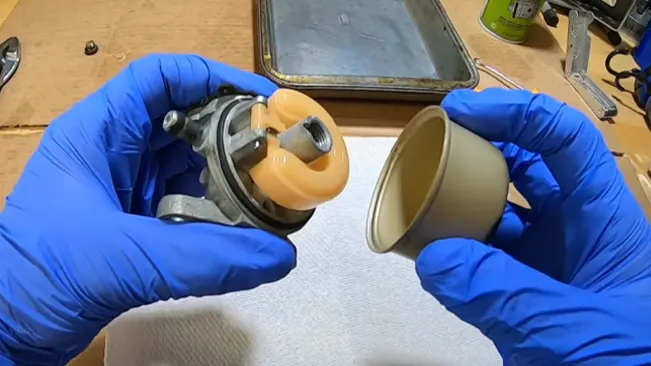
Begin the disassembly by removing any external components attached to the carburetor, such as the throttle linkage, springs, and adjustment screws. As you remove each piece, make a mental note or even jot down their original positions to facilitate a hassle-free reassembly. The next step involves opening up the carburetor itself, which usually means separating the carburetor bowl from the main body. This separation might require the removal of a few screws or bolts, so handle this step with care to avoid damaging any parts. As you proceed with taking apart the carburetor, it’s essential to keep track of all the components you remove, including the jets, needles, and gaskets. Losing even a single small piece can lead to problems when you attempt to reassemble the carburetor, potentially hindering the lawn mower’s performance. Keeping all parts organized and accounted for will ensure a smooth reassembly process and help get your lawn mower back in optimal working condition.
Cleaning the Components
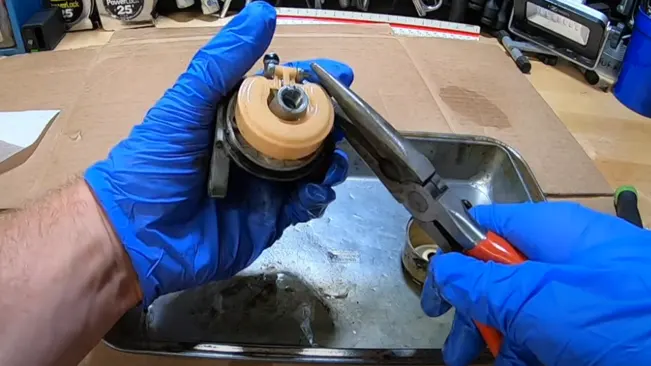
Cleaning the components of the carburetor is a detailed process that begins with the bowl and body of the carburetor. Start by spraying carburetor cleaner inside these parts, making sure to cover all surfaces. Then, using a brush, scrub away any deposits, residue, or buildup that may have accumulated over time. This step is crucial for ensuring that the carburetor can function efficiently, as even small amounts of debris can significantly impact performance. Next, focus on the smaller components of the carburetor, such as the jets, needles, and other intricate parts. Apply carburetor cleaner to these pieces and use a small brush or toothpick to meticulously clean each one. It’s important to be thorough in this step to ensure that all debris is removed, but also gentle to prevent any damage to these delicate parts.
Once the individual components have been cleaned, use compressed air to blow through the carburetor’s passages and jets. This step helps to dislodge and remove any debris that may have been loosened during the cleaning process but not completely eliminated. Compressed air is effective in clearing out even the smallest passages, ensuring that the carburetor is thoroughly cleaned. Finally, after all the components have been cleaned and blown out with compressed air, it’s essential to wipe everything down with clean rags. This final wipe down removes any remaining cleaner residue or loose debris, leaving the parts clean and dry. Ensuring that no cleaner residue or debris is left behind is vital for the proper reassembly and functioning of the carburetor, helping to restore your lawn mower’s performance to its optimal level.
Reassembling the Carburetor
When reassembling the carburetor, having the photos you took during disassembly can be incredibly helpful. They serve as a visual guide to ensure every part is returned to its correct location, which is crucial for the carburetor to function properly. If your carburetor cleaning kit came with new gaskets and O-rings, make sure to use these replacements as you put the parts back together. These new components can provide a better seal and prevent future leaks, contributing to the overall efficiency of the carburetor.
Begin the reassembly process by attaching the main components first, such as fitting the bowl back onto the body. This foundational step is key to a smooth reassembly process. Following this, you can start adding the smaller parts, like the jets and linkages, back into their respective places. As you work, pay close attention to the tightness of screws and bolts. They should be secure to ensure the carburetor components stay in place, but be cautious not to overtighten them, as this could strip the threads and cause damage. The final step is to carefully reattach the carburetor to the engine. This involves reconnecting any fuel lines and making sure every part is securely fastened. This attention to detail during the reassembly ensures that the carburetor is correctly installed and ready to function effectively, helping your lawn mower run smoothly once again.
Testing the Lawn Mower Post-Cleaning
After reassembling the carburetor, testing the lawn mower is vital to confirm proper function. Ensure all carburetor components and fuel lines are secure, then reconnect the spark plug and add fresh fuel. Starting the mower might require a few attempts as the clean carburetor adjusts to the fresh fuel flow. Let the mower idle initially, observing for smooth operation without stalling or irregularities, indicating a successful cleaning.

During the test, monitor the mower’s performance closely, including its ease of starting, smooth running, and overall efficiency. This step is crucial to verify the effectiveness of the carburetor cleaning and to ensure the mower’s readiness for regular use. Any issues like difficulty starting or subpar performance may suggest the need for further adjustments or a more detailed inspection of the carburetor and related engine parts.
Maintenance Tips to Keep Your Carburetor Clean
- Use Fresh Fuel: Always use fresh, high-quality fuel in your lawn mower. Stale fuel can lead to residue buildup inside the carburetor. It’s also wise to empty the fuel tank at the end of the mowing season to prevent old fuel from sitting in the carburetor during the off-season.
- Regularly Check and Replace the Air Filter: A clean air filter ensures that your lawn mower’s engine receives clean air. A dirty or clogged air filter can cause dirt and debris to enter the carburetor, leading to blockages. Check the air filter regularly and replace it as needed.
- Use Fuel Additives: Consider using a fuel additive designed to clean and maintain the carburetor and fuel system. These additives can help dissolve deposits and prevent the buildup of gunk inside the carburetor.
- Clean the Carburetor Periodically: Even with preventative measures, it’s a good idea to clean the carburetor periodically to remove any deposits that have formed. This can be part of your regular lawn mower maintenance routine.
- Store Your Lawn Mower Properly: When not in use, especially during the winter months, store your lawn mower in a clean, dry place. This helps prevent rust and corrosion, which can lead to carburetor problems.
- Check for Leaks Regularly: Fuel lines and connections can become loose or damaged, leading to leaks that can affect carburetor performance. Regularly inspect these components and replace them if necessary.
- Handle Repairs Promptly: If you notice any issues with your lawn mower’s performance, don’t delay in addressing them. Small problems can quickly become bigger issues if left unresolved, potentially leading to more extensive carburetor damage.
Conclusion
In conclusion, maintaining a clean carburetor is essential for the optimal performance and longevity of your lawn mower. Regular cleaning, along with diligent maintenance, can prevent common issues like difficulty starting, irregular idling, and poor performance. By following the step-by-step guide to cleaning your carburetor, ensuring all components are correctly reassembled, and conducting a thorough post-cleaning test, you can keep your lawn mower running smoothly. Additionally, adhering to preventive maintenance tips such as using fresh fuel, regularly replacing the air filter, and proper storage can help avoid carburetor problems before they start. Remember, a well-maintained carburetor not only ensures your lawn mower’s efficiency but also saves time and money on potential repairs, making your lawn care routine more enjoyable and less of a chore.
FAQs
- How often should I clean my lawn mower’s carburetor?
The frequency can vary based on usage and conditions, but a good rule of thumb is to clean the carburetor once per mowing season or whenever performance issues arise. - Can I clean my lawn mower’s carburetor without removing it?
While it’s possible to do a basic cleaning without removal, for a thorough cleaning, it’s best to remove the carburetor to access all parts, especially internal components. - What signs indicate my carburetor needs cleaning?
Difficulty starting, irregular idling, reduced performance, and increased fuel consumption are common signs that your carburetor may need cleaning. - Do I need special tools to clean my lawn mower’s carburetor?
Basic tools like screwdrivers, pliers, and a wrench are typically needed. Additionally, carburetor cleaner spray and a soft brush are essential for cleaning. - Can a dirty carburetor damage my lawn mower’s engine?
Over time, a dirty carburetor can lead to engine problems due to improper fuel mixture, potentially causing damage or reducing the lifespan of your engine.

Joel Cunningham
Forestry AuthorI'm Joel Cunningham, an expert in pruning and weed management with over a decade of experience. My skills are rooted in formal training and extensive practice, focusing on advanced pruning techniques and efficient weed control. I'm known for my quality work, precision, and deep understanding of plant health and soil dynamics. My contributions extend to educational initiatives where I share sustainable practices and advice, establishing myself as a reliable and authoritative figure in the gardening community.
5 comments
Thanks for the help! Never used compressed air before...
BabbleMan
March 3, 2024 7:55 pmI always put mid-grade fuel and not the 86. It's hugely beneficial in keeping the carb. clean, imo......
Ross Dieckman
March 4, 2024 9:48 pmUsing alcohol free fuel will greatly increase the time between carburetor cleaning. I may even result in not having to clean it at all.


How can I test my coil on twin cylinder 16hp Briggs and Stratton
Rendog
March 6, 2024 10:40 amTo test the coil on a 16hp Briggs & Stratton, disconnect the spark plug for safety, then use a multimeter to measure resistance between the kill wire terminal and the coil casing for the primary winding, and between the spark plug output and the casing or primary terminal for the secondary winding. Check your engine's manual for correct resistance values; outside this range suggests a faulty coil. Always ensure safety and consult a professional if unsure.
Edward Smith
March 11, 2024 7:00 am