5 Crucial Mistakes to Avoid When Building Chicken Roosts
- June 17, 2024
- 0 comment
Imagine this: you go outside and see your chickens slipping off their perch, unable to get comfortable for the night. This isn’t just a small problem; it shows how important it is to build the right kind of roost for them. Making a chicken roost seems easy, but small mistakes can make a big difference to your chickens’ comfort and safety.
From choosing the right materials to getting the design just right, every detail counts. In this guide, I’ll share the top five mistakes people make when building roosts and how you can avoid them, using tips from my own experiences and advice from other chicken owners.
Mistake #1: Choosing the Wrong Materials
When building roosts for your chickens, choosing the right materials is crucial. Many opt for readily available options like plastic or metal, but these materials can cause more harm than good. Plastic, for instance, is often used in the form of PVC pipes. While inexpensive and easy to find, PVC creates a slippery surface that can cause chickens to struggle to maintain their grip, leading to stress and discomfort. Metal, though durable, poses significant risks in colder climates, such as Utah. Its high conductivity can chill the roosts to dangerously low temperatures, risking frostbite on your chickens’ feet during freezing weather.
Wood stands out as the superior choice for chicken roosts. It offers better insulation against the cold and provides a natural and comfortable grip for chickens, mimicking their natural environment in the wild where they perch on tree branches. However, using tree branches requires careful preparation. After a recent windstorm brought down numerous branches in my yard, I found they could be ideal for roosts if prepared correctly. It’s essential to smooth out the branches to remove any splinters or rough spots that could hurt the chickens’ feet. The branches should be thick enough for the chickens to grip comfortably without their toes wrapping completely around, which could expose their feet to cold and potential frostbite. By choosing the right materials and preparing them properly, you can significantly enhance the comfort and safety of your chickens’ roosting environment.
Mistake #2: Incorrect Roost Design
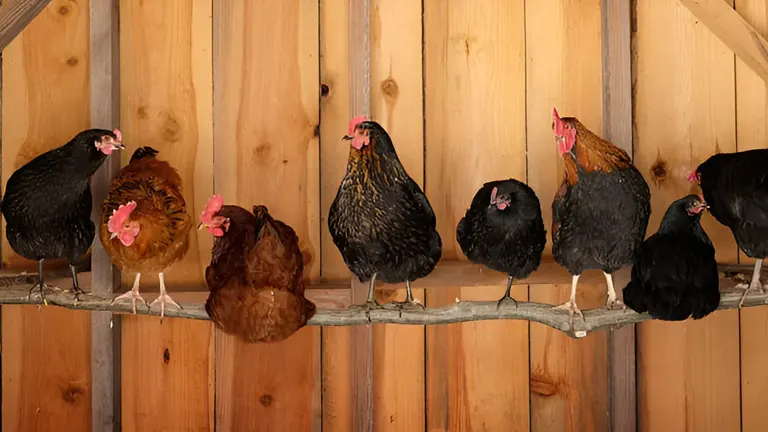
When building chicken roosts, it’s crucial to avoid designs that could cause discomfort or injury to your chickens. Many beginners are tempted by angular or triangular roost shapes which, although visually appealing, are not the most practical or comfortable for chickens. These shapes can create sharp angles that strain the chickens’ feet and legs, as they spend significant time perched and sleeping on these roosts. To avoid these issues, it’s better to opt for roost designs that are either rounded or squared with all edges smoothly sanded. This provides a more natural and comfortable perching surface, ensuring chickens can balance easily and rest comfortably throughout the night.
However, using flat, wide surfaces such as 2x2s or 2x4s for roosts, though stable, can pose other maintenance challenges. These surfaces tend to collect droppings easily, which can complicate coop cleaning and increase the risk of mite and pathogen build-up. To minimize these issues, consider implementing a slight incline in the roost design to help droppings roll off, or ensure regular cleaning to maintain a hygienic environment. Proper design and maintenance of chicken roosts not only contribute to the health of your chickens but also ease the cleaning process, making your poultry-keeping experience more enjoyable and less labor-intensive.
Mistake #3: Inadequate Roost Height
One crucial aspect often overlooked when building chicken roosts is the height. Ensuring your roost is elevated properly is key to protecting your chickens from ground-level predators and pests, and to keeping them away from the mites and critters that might inhabit the coop floor. Roosts should be positioned significantly above the ground, ideally higher than the nesting boxes to prevent chickens from confusing the two and potentially creating unsanitary conditions for both sleeping and egg-laying.
Ideally, the roost should be the highest accessible point within the coop. This high placement not only provides chickens with a sense of security but also leverages the warmer air that rises during colder nights, enhancing their comfort. Moreover, a higher roost helps maintain a clear hierarchy within the flock, reducing the squabbles that occur when chickens compete for the best sleeping spots. Ensuring easy access to this elevated space, such as incorporating a gently sloped ladder, can prevent injuries from jumping or flying up to the roost, thus keeping your chickens safe and healthy.
Mistake #4: Underestimating Space Needs
Many chicken coop guides recommend only eight inches of roosting space per chicken, but this is often not enough. Such cramped conditions can lead to overcrowding, particularly affecting lower-ranking chickens in the pecking order. These chickens may end up being pushed off the roost and forced to sleep on the ground, where they’re more vulnerable and less comfortable.
To promote a healthy and stress-free environment, it’s crucial to provide more space than the minimum recommended. Ample space on the roost allows chickens to exhibit their natural behaviors, adjust their positions freely, and settle comfortably, which is especially important during long winter nights. By ensuring there’s plenty of roosting space, you’ll help maintain peace within the flock and boost the overall well-being of each chicken.
Mistake #5: Permanent Roost Installations
Incorporating flexibility into your chicken coop’s design is crucial, especially when it comes to the roosts. Installing permanent roosts can create significant challenges for thorough cleaning and effective pest control. Over time, fixed roosts can lead to hygiene issues, as they provide stable breeding grounds for mites and other pests in areas that are difficult to access and clean.

To combat this, it’s advisable to use installation methods that allow for easy removal and cleaning. An effective strategy is to position the roost on a stable ledge and secure it with cinder blocks. This setup not only offers the necessary stability but also simplifies the process of removing the roost for deep cleaning or pest treatment. Such an approach not only ensures a cleaner living environment for the chickens but also simplifies maintenance tasks, keeping your coop in optimal condition and promoting the health of your flock.
Preparing Branches for Roosts
- Choose the Right Branches: Look for branches that are roughly 2 to 3 inches in diameter. Hardwoods like oak or maple are durable and less likely to splinter.
- Cutting to Length: Measure the needed length based on your coop size and cut the branches using a saw. Ensure the cuts are clean and even.
- Sanding the Branches: Start with a coarse sandpaper to remove any rough patches and bark. Gradually move to finer grit sandpaper to smooth the surface thoroughly. Pay special attention to removing any sharp edges or splinters that could harm the chickens.
- Finishing: Although not always necessary, applying a non-toxic sealant can help preserve the wood and make cleaning easier. Ensure any finish used is safe for animals and fully dried before installation.
Securing Roosts Safely
- Using Removable Brackets: Install sturdy brackets that can hold the weight of the branches and your chickens. These brackets should allow you to easily lift the roost out for cleaning or adjustments.
- Non-Permanent Fixing: Place the roost on the brackets without permanently affixing it. You can use gravity and balance to keep it in place or secure it with ties that can be easily untied when you need to remove the roost.
- Stability Checks: Regularly check the stability of the roost to ensure it hasn’t shifted or loosened. This is crucial to prevent accidents or injuries to your chickens.
- Adjustability for Cleaning: Make sure the design allows you to easily access all parts of the roost. This will be important for regular maintenance and cleaning, ensuring a hygienic environment for your chickens.
Maintenance Advice: Routine Checks and Cleaning
Maintaining your chicken roosts not only keeps your chickens healthy but also extends the life of the roost itself. Here are some essential tips to keep in mind:
- Weekly Inspections: Each week, take a moment to inspect the roosts for any signs of wear and tear. Look for loose fittings, splinters, or damage that may have occurred during the week. This is also a good time to check for pests like mites, which can often take up residence in the nooks and crannies of wood.
- Monthly Cleaning: At least once a month, give the roosts a thorough cleaning. Remove all bedding and droppings from underneath the roosts. If the roost is removable, take it out of the coop to clean it underneath and around it. Use a brush to scrub the roost with a mild disinfectant solution that is safe for chickens. Rinse well to ensure no residues remain.
- Sanding and Minor Repairs: If you find any rough patches or potential splinters during your inspections, sand these areas down immediately to prevent injury to your chickens. If any part of the roost has become excessively worn or damaged, consider replacing it or repairing it to maintain safety and comfort.
- Seasonal Adjustments: As seasons change, so do the needs of your chickens and the conditions of your coop. In winter, ensure that the roosts are free from drafts and possibly add additional insulation around the coop. In summer, check that the roosts are in a well-ventilated area to keep the chickens cool.
- Annual Overhaul: Once a year, take everything out of the coop and do a deep clean. This includes taking down the roosts, washing them thoroughly, and letting them dry in the sun, which helps kill any lingering pests. This is also an excellent time to make any larger repairs or adjustments to the roost configuration based on your observations throughout the year.
Conclusion
Building an effective chicken roost goes beyond simple construction; it requires thoughtful consideration of materials, design, placement, space, and maintenance. By avoiding these five common mistakes, you can ensure a safe, comfortable, and hygienic environment for your chickens, enhancing their wellbeing and productivity.
FAQs
- What is the best material for chicken roosts?
Wood is the best material for chicken roosts because it provides a natural grip and doesn’t get too cold. Avoid materials like plastic and metal, which can be slippery and cold, making them uncomfortable for chickens. - How high should the roost be off the ground?
The roost should be high enough to make chickens feel safe, usually higher than the nesting boxes. At least a foot off the ground is good, but adjust based on the height of your coop and the presence of predators. - Can I use branches from my backyard for the roost?
Yes, tree branches can work well as they mimic the natural perching environment for chickens. Just make sure to remove any sharp edges or splinters to prevent injuries. - How do I keep the roost clean?
Use a design that allows easy access for cleaning. Avoid permanent installations. Roosts should be easy to remove or access so you can clean or replace the bedding underneath and manage droppings effectively. - How much space should each chicken have on the roost?
While the common recommendation is eight inches per chicken, providing more space can prevent pecking and overcrowding. If possible, give your chickens more room to ensure they are comfortable, especially during colder months. - What shape should the roost have?
Rounded or squared shapes with smoothed edges are ideal. Avoid angular or sharp shapes that can be uncomfortable for chickens to stand on for long periods. - What are common mistakes in roost placement?
A common mistake is placing the roost too close to the ground or below nesting boxes, which can lead to security issues and hygiene problems with droppings. - How do I prevent the roost from getting too cold?
Using wood helps as it doesn’t conduct cold as metal does. Positioning the roost in a spot shielded from drafts and using proper insulation techniques around the coop also help. - Should the roost be mobile or fixed?
A mobile or easily removable roost is recommended. It simplifies cleaning and allows you to adjust the setup as needed, such as during infestations or when updating the coop. - What considerations should be taken for different climates?
In colder climates, ensure the roost materials and placement protect chickens from low temperatures. In warmer areas, focus on ventilation and ease of cleaning to prevent parasites and diseases.
We hope this guide helps you build the perfect roost for your chickens, keeping them comfy and safe. Got more tips or a roost success story? We’d love to hear about it! Drop a comment below or share this article with fellow chicken enthusiasts to spread the word on building better roosts. Happy building!

David Murray
Forestry AuthorI'm David Murry, a forestry equipment specialist with a focus on chainsaw operation. With over 13 years of experience, I've honed my skills in operating and maintaining a wide range of machinery, from chainsaws to log splitters. My passion for the outdoors and commitment to sustainable forestry drive my work, which emphasizes safety, efficiency, and staying updated with industry advancements. Additionally, I'm dedicated to sharing my expertise and promoting environmental awareness within the forestry community.


Leave your comment