How to Grow Daffodils: Master Techniques for Spectacular Flowers
- June 11, 2024
- 0 comment
Learn how to grow daffodils with expert techniques that promise spectacular blooms. Perfect your gardening skills and enjoy vibrant flowers every spring. Daffodils, with their vivid and lively blossoms, herald the arrival of spring uniquely.
If you aspire to adorn your garden with these radiant flowers, this guide is for you. We’ll explore expert techniques that ensure a dazzling display of blooms. From choosing the best bulbs to providing optimal care, discover how to cultivate your daffodils for awe-inspiring results each season.
Table of Contents
- Understanding Daffodils
- Choosing the Right Daffodil Bulbs
- Preparing to Plant
- Planting Techniques
- Caring for Daffodils Throughout the Seasons
- Advanced Pruning Techniques
- Troubleshooting Common Issues
- Fertilization and Soil Health
- Propagation Techniques
- Conclusion
- FAQs
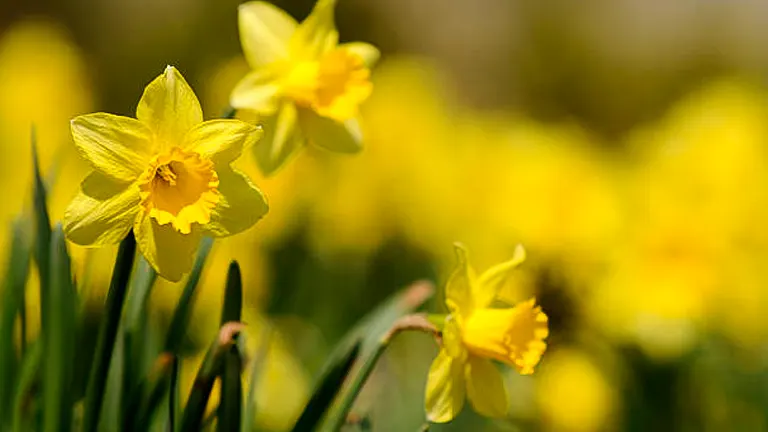
Understanding Daffodils
Daffodils, scientifically known as Narcissus, are perennial plants belonging to the Amaryllidaceae family. These hardy plants are native to Europe, North Africa, and Asia, thriving in a range of climates from temperate to subtropical regions. Known for their distinctive trumpet-shaped flowers, daffodils come in a variety of colors including yellow, white, orange, and pink, with over 50 species and thousands of hybrids.
Growth Cycle of Daffodils
Understanding the growth cycle of daffodils—from bulb dormancy to flowering—is crucial for providing the care these plants need to thrive. The growth cycle can be divided into several stages:
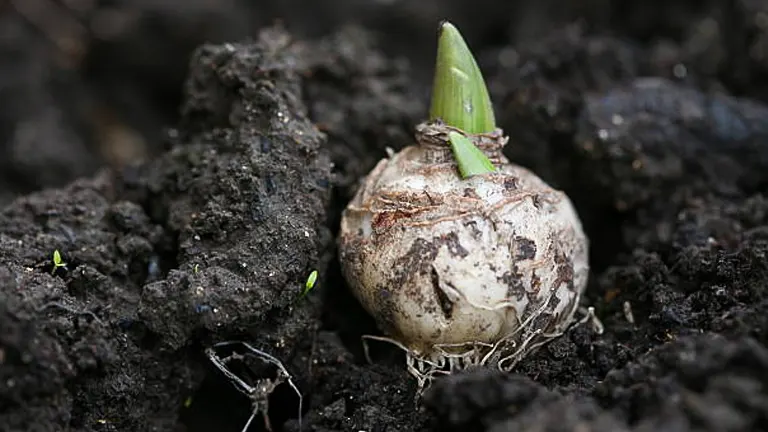
- Dormancy: During late summer and early fall, daffodil bulbs enter a dormant phase. This is a critical period for energy conservation and preparation for the next growth cycle.
- Root Development: In fall, as soil temperatures cool, roots begin to develop from the bulb base, anchoring the plant and absorbing nutrients and water.
- Shoot Emergence: Early spring marks the emergence of green shoots from the soil, driven by rising temperatures and increasing daylight.
- Flowering: Typically occurring in early to mid-spring, daffodils bloom, showcasing their vibrant colors. The flowering period can last several weeks, depending on the species and environmental conditions.
- Post-Flowering: After blooming, the flowers fade and the plant directs energy towards bulb development. Leaves remain green and continue photosynthesis, replenishing the bulb’s energy reserves.
- Senescence: By early summer, leaves yellow and die back as the plant enters dormancy again, completing the annual cycle.
Unique Information and Scientific Analysis
Daffodils exhibit a range of fascinating traits and adaptations. Their alkaloid compounds, particularly lycorine, serve as a natural deterrent to pests and herbivores. Additionally, daffodils play a significant ecological role, providing early nectar sources for pollinators such as bees.
A study published in the Journal of Plant Physiology found that daffodils’ optimal growth occurs in soils with a pH range of 6.0 to 7.0, and they benefit from a chilling period of at least 12 weeks at temperatures between 40-45°F (4-7°C) to break dormancy and ensure vigorous flowering.
Key Characteristics of Daffodils
| Characteristic | Description |
|---|---|
| Scientific Name | Narcissus |
| Family | Amaryllidaceae |
| Native Range | Europe, North Africa, Asia |
| Flower Colors | Yellow, white, orange, pink |
| Optimal Soil pH | 6.0 – 7.0 |
| Chilling Requirement | At least 12 weeks at 40-45°F (4-7°C) |
| Key Compounds | Lycorine (alkaloid) |
| Growth Cycle Stages | Dormancy, Root Development, Shoot Emergence, Flowering, Post-Flowering, Senescence |
Understanding these details about daffodils allows gardeners to create optimal conditions for their growth and enjoy their stunning blooms year after year. By paying attention to their natural cycles and specific needs, you can ensure a vibrant and healthy daffodil display.
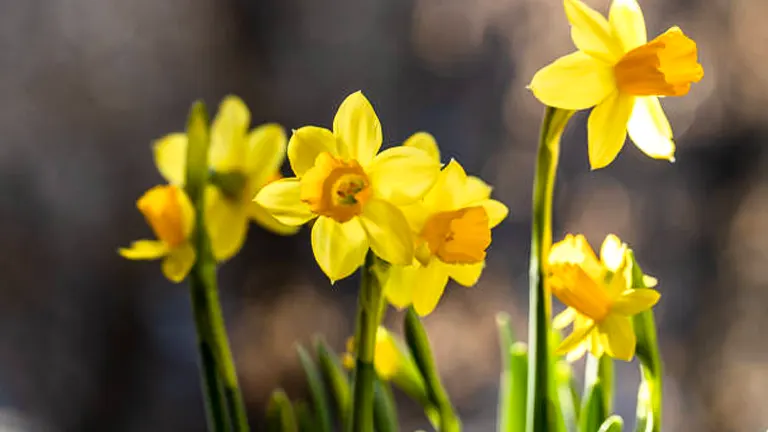
Choosing the Right Daffodil Bulbs
Daffodils, with their diverse range of forms and hues, offer a myriad of options for gardeners aiming to create dynamic landscapes. Understanding the different types available and the nuances of selecting quality bulbs can significantly impact the success and vibrancy of your spring display.
Types of Daffodil Bulbs
Daffodils are categorized into 13 different divisions based on their flower shapes, colors, and heritage. Here are some of the most commonly planted:
- Trumpet Daffodils: Characterized by a single large trumpet, these are the traditional yellow daffodils most are familiar with.
- Large-Cupped Daffodils: Featuring a large central cup that is more than one-third the length of the petals but less than equal to their length.
- Small-Cupped Daffodils: These have a smaller cup and are known for their elegant appearance.
- Double Daffodils: These flowers have double rows of petals or a double trumpet, offering a fuller look.
- Jonquilla Daffodils: Typically fragrant, with smaller flowers and multiple blooms per stem.
- Poeticus Daffodils: Known for their white petals and small, flat cups edged in red.
Each variety brings its unique aesthetic to gardens and landscapes, suiting different design needs from formal borders to naturalized woodland areas.
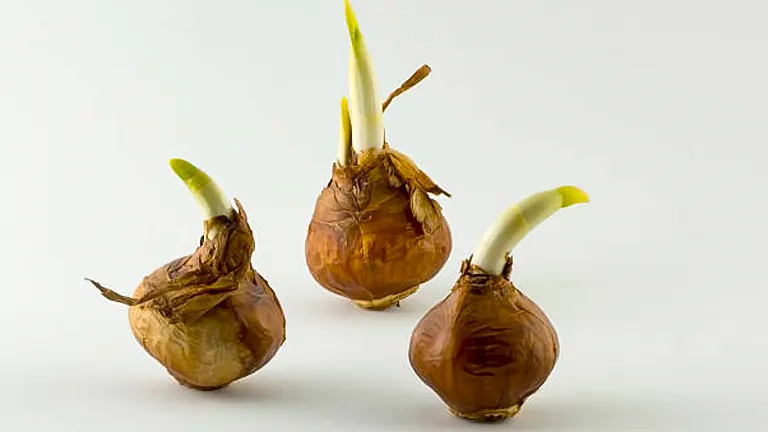
Selection Criteria
Selecting high-quality bulbs is crucial for cultivating spectacular daffodils. Here are key considerations:
- Firmness: Bulbs should be firm to the touch, indicating health and vigor.
- Size: Larger bulbs often produce more robust blooms. However, the optimal bulb size can vary depending on the daffodil variety.
- Appearance: Avoid bulbs that show any signs of mold, softness, or mechanical damage as these factors can affect their performance.
- Root Health: Look for bulbs with intact roots, which are critical for establishing quickly in the garden.
Recent studies suggest that bulb size and initial root development are significant predictors of bloom size and health, with larger, well-rooted bulbs often outperforming smaller counterparts.
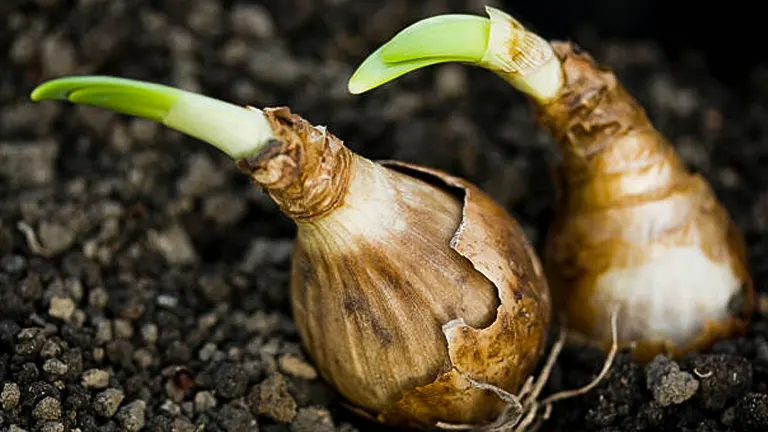
Best Time to Buy and Plant Bulbs
To ensure the best results, timing your purchase and planting is essential:
- Purchase Timing: Buy bulbs in late summer to early fall when selections are best and bulbs are fresh.
- Planting Timing: Plant in the fall, ideally six weeks before the ground freezes. This timing allows the bulbs to establish roots without sprouting foliage, which could be damaged by frost.
Optimal Planting Conditions
Research indicates that daffodil bulbs perform best when planted in soil temperatures between 50°F to 60°F (10°C to 15°C). These temperatures encourage strong root development without premature top growth.
Daffodil Varieties and Characteristics
| Variety | Flower Type | Notable Characteristics |
|---|---|---|
| Trumpet | Single, large | Traditional yellow, prominent in landscapes |
| Large-Cupped | One bloom per stem | Large central cup, diverse colors |
| Small-Cupped | Delicate cup | Elegant, often vibrant colors |
| Double | Double petals | Full and lush appearance |
| Jonquilla | Multiple blooms | Fragrant, ideal for cut flowers |
| Poeticus | Contrasting cup | White petals with a distinct cup, often edged in red |
Preparing to Plant
Soil Preparation
Proper soil preparation is crucial for the successful growth of daffodils. Here’s how to ensure the soil is ideal:
- Depth and Composition: Start by loosening the soil to a depth of about 12 to 15 inches. This allows the roots ample space to develop without obstruction.
- Soil Amendments: Incorporate 2 to 4 inches of organic matter like compost or well-rotted manure. This not only enriches the soil with nutrients but also improves its structure and drainage capabilities, crucial for preventing waterlogging.
- pH Levels: Daffodils prefer a slightly acidic to neutral pH, ideally ranging from 6.0 to 7.0. Testing your soil’s pH and adjusting it with lime or sulfur based on the results can significantly affect the health of your plants.
Choosing the Right Location
Selecting the optimal location is key to the thriving of daffodils:
- Sunlight: Choose a location that receives at least six hours of direct sunlight daily. While daffodils can grow in partial shade, full sun exposure is preferred for robust growth and vibrant blooms.
- Drainage: Ensure the chosen site has excellent drainage. Raised beds or sloped areas can be ideal if natural soil drainage is poor. This is vital as daffodils are susceptible to bulb rot in stagnant, waterlogged conditions.
Planting Techniques
Planting Depth and Spacing
Proper depth and spacing are vital for daffodil health and aesthetics. Plant bulbs at a depth three times their height, generally 4 to 6 inches, with the pointed end upward. Space bulbs 4 to 6 inches apart for optimal growth. For more naturalistic planting, scatter bulbs and plant them where they fall; for structured garden designs, use a ruler to maintain uniform spacing.
High-Density Planting Strategies
In settings where a lush, dense floral display is desired, such as in orchard underplantings or large garden beds, bulbs can be planted closer together, about 3 to 4 inches apart. Maintain row spacing of 12 to 18 inches to facilitate garden maintenance and allow sufficient light and air circulation, reducing the risk of disease.
Watering After Planting
Immediately after planting, thoroughly water the bulbs to settle the soil and eliminate air pockets, which are detrimental to root growth. This initial watering also provides necessary moisture for root development. However, it is crucial to avoid overwatering, which can predispose bulbs to rot, particularly in soils with poor drainage.
Optimal Conditions for Planting Daffodils
| Factor | Optimal Condition |
|---|---|
| Soil Depth | 12 to 15 inches (30 to 38 cm) |
| Organic Material | 2 to 3 inches (5 to 7.5 cm) of compost or manure |
| Soil pH | 6.0 to 7.0 |
| Planting Depth | 4 to 6 inches (10 to 15 cm) |
| Bulb Spacing | 4 to 6 inches (10 to 15 cm) |
| Row Spacing | 12 to 18 inches (30 to 46 cm) for high density |
| Watering After Planting | Thorough initial watering, avoid saturation |
Caring for Daffodils Throughout the Seasons
Optimal care for daffodils varies seasonally, requiring specific strategies to ensure robust health and vibrant blooms. Below, we outline the key care steps for each season, supported by scientific analysis and practical advice.
Spring Care
Spring signals the active growth phase for daffodils, and attentive care during this period sets the foundation for the blooming season:
- Moisture Management: Maintain soil moisture at an optimal level. Research suggests that daffodils thrive with soil moisture content around 25-30%, which supports healthy growth without risking waterlogging.
- Mulching: Apply a 2-3 inch layer of organic mulch such as bark chips or shredded leaves. This layer conserves moisture, regulates soil temperature, and suppresses weed growth, creating a conducive environment for the emerging shoots.
- Continued Watering: Once the daffodils have bloomed, continue to water them during prolonged dry spells to support the post-bloom phase, where nutrients are being actively transported back to the bulb.
Summer Care
Post-bloom care is crucial as the plants prepare for dormancy:
- Foliage Maintenance: Do not cut back the leaves until they have yellowed and withered. The leaves are vital for photosynthesis, which helps to replenish the nutrients in the bulb for the next year’s growth cycle.
- Reduced Watering: Gradually reduce watering as the foliage dies back, as excess moisture can lead to bulb rot during the dormant period.
Fall Preparations
Fall is a critical time for setting up the next growth cycle:
- Nutrient Application: Apply a balanced, slow-release fertilizer with an NPK ratio of 10-10-10 to replenish nutrients in the soil. This helps strengthen the bulbs for the next spring.
- Bulb Division: Every 3 to 5 years, lift and divide overcrowded clumps to prevent depletion of resources and promote healthy growth. Replant the bulbs at recommended spacings to ensure adequate nutrient availability and root space.
Winter Care
Winter care depends significantly on regional climate variations:
- Mulching: In regions where temperatures fall below freezing, apply a thick layer of mulch after the first freeze to protect the bulbs from extreme cold and temperature fluctuations.
- Minimal Care in Mild Climates: In milder climates, ensure good drainage to prevent bulb rot as daffodils are less likely to need additional winter protection.
Seasonal Care for Daffodils
| Season | Key Actions | Scientific Guidelines |
|---|---|---|
| Spring | Moderate watering, apply mulch, post-bloom care | Maintain 25-30% soil moisture; mulch 2-3 inches |
| Summer | Reduce watering, allow natural leaf dieback | Cease watering once foliage begins to yellow |
| Fall | Apply balanced fertilizer, divide bulbs | Use a 10-10-10 NPK fertilizer; divide bulbs every 3-5 years |
| Winter | Apply mulch in cold regions, monitor drainage | Mulch depth 3-4 inches in freeze areas; ensure drainage |
Advanced Pruning Techniques
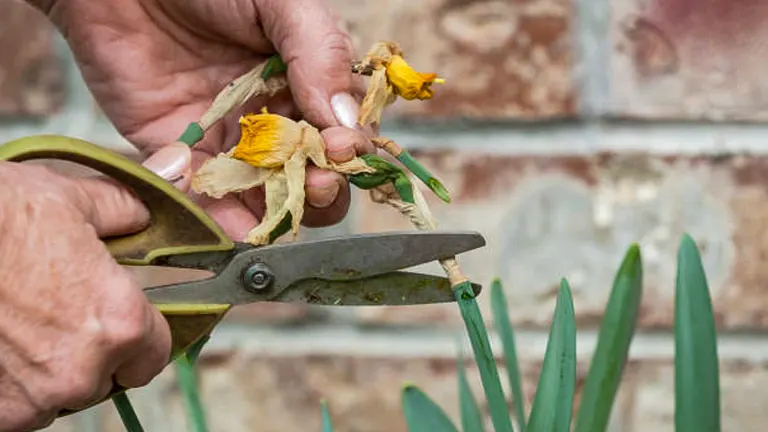
Pruning for Health and Aesthetics: Pruning is essential not just for the plant’s health but also to enhance its visual appeal. For daffodils, the main pruning task involves deadheading, or the removal of spent flowers. This prevents the plants from expending energy on seed production. Snip off the faded blooms at the base of the flower stalk, being careful not to damage the foliage.
Deadheading Spent Blooms: Deadheading should be done promptly as flowers begin to wilt. Use clean, sharp scissors or secateurs to cut the flower stem close to the base, above the first set of healthy leaves. This technique encourages the plant to focus its energy on strengthening the bulb, setting the stage for a robust display the following year.
Thinning Crowded Beds: Over time, daffodil beds can become crowded, which may diminish bloom quality and size. Every 3-5 years, thin out these beds in the late summer or fall, after the foliage has died back. Carefully lift the bulbs, separate them, and replant the healthiest ones with adequate space to grow.
Troubleshooting Common Issues
Effective problem-solving in daffodil care is essential for maintaining vibrant and healthy plants. This section delves into pest management, disease control, and best practices for soil health.
Pest Problems
Even though daffodils are known for their pest resistance, vigilance is crucial:
- Aphids: These pests can stress plants by sucking sap from leaves, potentially transmitting viral diseases. Aphids can be effectively removed using a strong jet of water or treated with neem oil, a natural pesticide that also prevents further infestations.
- Slugs: These common pests are attracted to the moisture and shelter provided by garden foliage. Slugs can be controlled using diatomaceous earth, which acts as a natural abrasive that deters them. Beer traps are another effective method, attracting and drowning slugs in a container filled with beer.
Disease Management
Daffodils can be susceptible to several fungal diseases, particularly in conditions of poor drainage:
- Bulb Rot and Basal Rot: These are often the result of fungal infections exacerbated by wet soil. To combat these, ensure excellent soil drainage and consider soil amendments to improve structure. For severe infections, fungicides may be applied, following environmentally safe practices.
- Leaf Blight: This condition appears as yellow spots that can diminish photosynthesis. Increasing air circulation around plants and reducing leaf wetness can prevent many fungal issues.
Bulb Rot Prevention
Proper cultural practices are key to preventing rot:
- Drainage: Adequate drainage is critical. Adding grit or perlite can enhance soil structure, reducing water retention around the bulbs.
- Water Management: Adjust watering schedules based on rainfall and temperature, ensuring that soil remains moist but not waterlogged.
Fertilization and Soil Health
Fertilizing Daffodils: To ensure your daffodils receive the nutrients they need for vigorous growth, apply a low-nitrogen, high-potassium fertilizer after blooms have faded. This supports the development of strong bulbs rather than excessive foliage. Sprinkle the fertilizer around the base of the plants and water it in well to help nutrients penetrate the soil.
Soil Amendments: Enhancing soil health is key to growing flourishing daffodils. Incorporate organic matter such as leaf mold or well-rotted manure into the soil annually. This not only improves soil structure and drainage but also gradually increases its fertility, creating an ideal growing environment for daffodils.
Propagation Techniques
Effective propagation is essential for maintaining the vigor and floral display of daffodils. This section delves into the techniques for dividing and replanting daffodil bulbs, including optimal timing and methods to ensure successful regeneration.
Dividing and Replanting Daffodils
Over time, daffodil clumps can become overcrowded, leading to diminished flowering. Regular division helps manage this and rejuvenates your garden’s aesthetic appeal.
- Timing for Division: The best time to divide daffodil bulbs is in the late summer to early autumn, after the foliage has died back but while the soil is still warm. This timing allows the bulbs to re-establish their roots without the stress of extreme temperatures.
- Process: Carefully dig around the clump with a spade, lifting the bulbs from the soil. Gently shake off excess dirt and separate the bulbs by hand, discarding any that are damaged or diseased.
- Replanting: Replant the bulbs immediately to prevent drying out. The ideal planting depth is three times the height of the bulb, with spacing of about 6 inches apart to give each bulb enough space to grow without competition.
Enhancing Bulb Vitality
Proper handling and immediate replanting are crucial to ensure the health of divided bulbs:
- Soil Preparation: Enhance the soil with compost or a balanced slow-release bulb fertilizer to provide the necessary nutrients for growth and flowering. This helps the newly planted bulbs to establish quickly and robustly.
- Watering: After replanting, water thoroughly to settle the soil around the bulbs and eliminate any air pockets. This initial watering is crucial for encouraging root growth.
Monitoring and Maintenance
After replanting, it’s essential to monitor the site for signs of growth or distress:
- Growth Monitoring: Look for new shoots in the following spring. If growth appears sparse, check soil conditions and consider additional fertilizer or pest control measures.
- Pest and Disease Management: Keep an eye out for signs of pests or disease. Early intervention can prevent spread and protect the health of the bulbs.
Related Post
- How to Build a Barn: A Step-by-Step Guide for Beginners
- How to Build a Sustainable Compost Bin: Easy and Eco-Friendly DIY
- How to Fertilize Bougainvillea: A Complete Guide for Stunning Blooms
- How to Fertilize Apple Trees: Essential Tips for a Bountiful Harvest
- How to Fertilize Lemon Trees: Secrets for Thriving Citrus
- How to Fertilize Avocado Tree: A Step-by-Step Guide for Lush Growth
- 10 Best Bow Saws to Buy in 2024: Top Picks for the Money
- Best Miter Saw For Beginners
- Top 10 Pruning Saws to Buy in 2024: Best for the Money
- 7 Best Pocket Chainsaw
Conclusion
Growing daffodils successfully requires a blend of careful planning, precise cultivation, and ongoing care. By following the expert techniques outlined in this guide, gardeners can ensure that their daffodil gardens are not only a celebration of spring but a triumph of horticultural skill. Remember, the beauty of daffodils in bloom is the reward for your attention to the details of their care through the year. Whether you are a novice gardener or an experienced green thumb, the joy of seeing your daffodils flourish is incomparable.
FAQs
- What is the best time of year to plant daffodil bulbs?
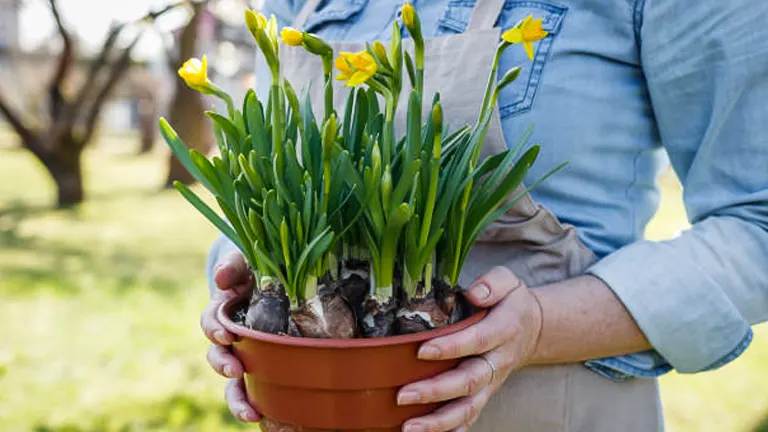
The ideal time to plant daffodil bulbs is in the fall, about 2 to 4 weeks before the ground freezes. This timing allows the bulbs to establish roots before winter. - Can daffodils be grown in containers?
Yes, daffodils can thrive in containers. Ensure the pot has adequate drainage holes, use a well-draining potting mix, and plant the bulbs at a depth three times their height. - How often should I water my daffodils?
Water newly planted bulbs thoroughly to settle the soil around them. Once established, daffodils generally require little watering unless there are extended dry periods during their growing season. - Do daffodils need full sun to flourish?
Daffodils perform best in full sunlight but can tolerate partial shade. However, too much shade may lead to weaker stems and fewer blooms. - What should I do with daffodil plants after they bloom?
After blooming, continue to care for the foliage. Do not cut the leaves until they have yellowed and withered, as they are still nourishing the bulbs for the next season. - How do I prevent my daffodils from getting too crowded?
To prevent overcrowding, which can diminish bloom quality, divide and replant daffodil clumps every 3-5 years in the late summer or fall when the foliage has died back. - Are there any common pests or diseases I should watch out for with daffodils?
While daffodils are relatively pest-resistant, they can occasionally suffer from issues like bulb rot, aphids, or slugs. Ensure good drainage to prevent rot, and consider natural remedies like insecticidal soap for aphids or diatomaceous earth for slugs. - Can daffodil bulbs be left in the ground year-round?
In most climates, daffodil bulbs can remain in the ground all year. They are cold-hardy and typically resurface each spring without needing to be dug up and stored for the winter.
With these master techniques at your fingertips, you’re well on your way to cultivating spectacular daffodils that will brighten your garden each spring. Happy gardening!
Kristine Moore
Forestry AuthorI'm Kristine Moore, a seasoned garden landscaping professional with over 30 years of experience. My extensive career has been dedicated to transforming outdoor spaces into stunning, sustainable landscapes. With a deep understanding of horticulture, design principles, and environmental stewardship, I have become a respected figure in the field, known for creating harmonious, visually appealing, and eco-friendly gardens. My commitment to excellence and continuous learning in landscaping trends and techniques has solidified my reputation as an expert in garden design and implementation.


Leave your comment