How to Grow Ptilotus: Expert Tips for Spectacular Blooms
- March 11, 2024
- 0 comment
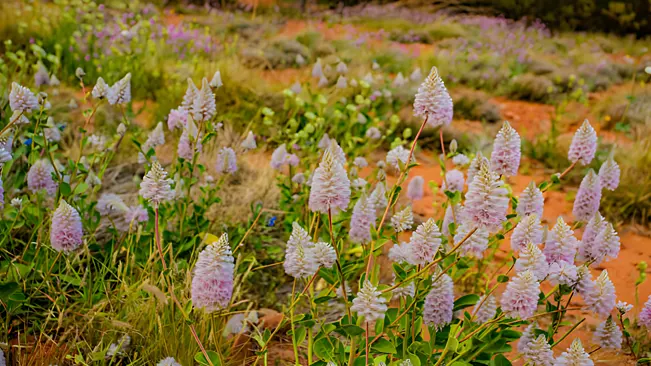
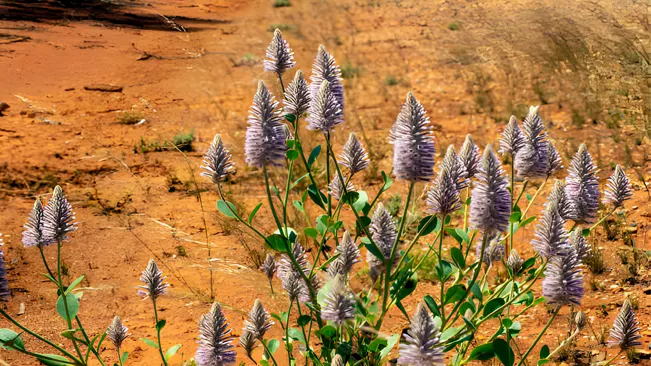
Ptilotus, often referred to as the “Joey” plant, is a striking addition to any garden or indoor plant collection. Native to Australia, this plant is renowned for its unique, feathery flower spikes that add a touch of exotic elegance. Growing Ptilotus can be a rewarding experience for both novice and experienced gardeners alike. This guide provides comprehensive instructions to ensure your Joey plants thrive.
Selecting the Right Location
Outdoor Planting

- Sunlight Needs: As mentioned, Ptilotus requires full sunlight, making it crucial to choose a spot in your garden that receives at least six hours of direct sunlight every day. This sunlight exposure is vital for the plant’s health, as it encourages robust growth and vibrant flowering.
- Consider the Microclimate: Even within your garden, microclimates can exist. Choose a spot that not only gets sufficient sunlight but also is protected from harsh winds or frost pockets, especially if you live in a region with variable weather.
- Soil Drainage: Check the drainage of the soil in the area you plan to plant. Ptilotus does not fare well in waterlogged conditions, so ensure the spot has good natural drainage. If necessary, amend the soil with sand or organic matter to improve its draining properties.
- Companion Planting: Consider what other plants will be near your Ptilotus. They should be plants that have similar sunlight and water requirements to ensure compatibility and reduce competition for resources.
Indoor Planting
- Window Direction: An east or south-facing window is ideal because these orientations provide the most consistent light throughout the day. The gentle morning sun from an east-facing window is particularly beneficial, while a south-facing window provides more intense light.
- Regulating Temperature and Light: Indoors, you have more control over the plant’s environment. Avoid placing your Ptilotus near drafty windows or heating vents, as sudden temperature changes can stress the plant. Also, consider using sheer curtains to diffuse intense direct sunlight, which can sometimes be too harsh for indoor plants.
- Artificial Lights: If you don’t have a window that provides enough natural sunlight, consider supplementing with grow lights. These can provide the spectrum of light needed for the plant’s growth and flowering.
- Rotating the Plant: To ensure even growth, rotate your Ptilotus periodically. This practice prevents the plant from leaning towards the light source and encourages even, balanced growth.
Soil and Planting
Soil Requirements
- Well-Draining Soil: The key to healthy Ptilotus plants is well-draining soil. This plant is adapted to dry, arid conditions and does not tolerate standing water. Excess moisture can lead to root rot, a common problem in poorly draining soils.
- Soil Composition: A mix of regular garden soil with added perlite, coarse sand, or gravel improves drainage. The goal is to create a soil environment that allows water to pass through easily, preventing waterlogging.
- Soil pH: Ptilotus is not particularly fussy about soil pH but generally prefers neutral to slightly alkaline conditions. If you are unsure about your soil pH, you can easily test it with a home testing kit available at most garden centers.
Planting Guidelines
- Outdoor Planting: When planting Ptilotus outdoors, choose a location that gets plenty of sunlight. Prepare the soil by loosening it and mixing in amendments if necessary to improve drainage. Avoid areas where water tends to accumulate, such as the bottom of slopes or depressions in the garden.
- Spacing Plants: Proper spacing is crucial for the health and aesthetic appeal of Ptilotus. Plants should be spaced about 10-12 inches apart. This spacing allows each plant enough room to grow to its full size and ensures adequate air circulation, reducing the risk of fungal diseases.
- Potting: If you’re planting Ptilotus in containers, select pots with drainage holes. Use a high-quality potting mix designed for container gardening. These mixes typically contain a combination of peat, pine bark, and either perlite or vermiculite, providing the necessary drainage and aeration for healthy root growth.
- Planting Depth: When planting Ptilotus, whether in the ground or a container, ensure the root ball is placed at the same depth as it was in its previous pot or nursery container. Burying the stem too deeply can stress the plant and hinder growth.
Watering Requirements
Adaptation to Drought Conditions
- Ptilotus is native to Australia, a region known for its dry and arid conditions. This natural habitat has conditioned the plant to survive with minimal water, making it highly drought-tolerant.
- The plant’s drought tolerance is attributed to its ability to store water in its leaves and stems, allowing it to withstand periods of low moisture.
Optimal Watering Practices
- Frequency: Watering frequency for Ptilotus should be moderate to low. The key is to water deeply but infrequently. This approach encourages the roots to grow deeper, seeking moisture and thereby strengthening the plant.
- Check Soil Moisture: Before watering, check the soil moisture. A simple method is to stick your finger about an inch into the soil. If it feels dry at that depth, it’s time to water. If the soil still feels moist, delay watering for a few days.
- Amount of Water: When you water, do so thoroughly, allowing the water to penetrate deep into the soil. This ensures that the water reaches the root zone. However, avoid waterlogging the soil.
Seasonal Adjustments
- Summer: During the hotter months, Ptilotus may require more frequent watering, especially if it’s planted in a container or if the weather is exceptionally hot and dry.
- Winter: In winter, the plant’s water requirement significantly decreases. This is because Ptilotus enters a dormant phase during colder months. Overwatering during this period can be particularly harmful, leading to root rot.
Fertilizing and Care
Fertilizing Ptilotus
- Type of Fertilizer: Ptilotus benefits from a low-nitrogen, slow-release fertilizer. This type of fertilizer ensures that the plant receives nutrients at a steady, controlled rate, which is ideal for its growth and flowering. High nitrogen levels can lead to more foliage growth at the expense of flowers, which is why low-nitrogen formulas are recommended.
- Timing: The best time to fertilize Ptilotus is in early spring. This timing coincides with the onset of the growing season, providing the plant with essential nutrients as it begins to grow and prepare for flowering.
- Application: Follow the instructions on the fertilizer packaging for application rates. It’s important to avoid over-fertilizing, as this can damage the plant. If you’re growing Ptilotus in a container, ensure that the fertilizer is suitable for potted plants.
- Monitoring Plant Response: After fertilizing, observe your Ptilotus for signs of healthy growth. You should see robust foliage and, eventually, flower development. If the plant seems to be struggling or shows signs of nutrient burn (like yellowing or browning of the leaves), it might indicate over-fertilization.
Deadheading Ptilotus
- Purpose of Deadheading: Deadheading involves removing spent (old and faded) flowers from the plant. This practice is essential for several reasons. It helps to improve the plant’s appearance, prevents the plant from expending energy on seed production, and encourages the growth of new flowers.
- When to Deadhead: You should deadhead the flowers as they begin to fade and wilt. Regular inspection of your Ptilotus will help you identify when the flowers are past their prime.
- How to Deadhead: Use a pair of clean, sharp scissors or pruning shears to snip off the spent flower heads. Make the cut just above the first set of healthy leaves below the spent flower. Be careful not to damage the healthy parts of the plant.
- Continuous Care: Deadheading should be a continuous process throughout the flowering season. By keeping up with this task, you can help your Ptilotus maintain a neat appearance and potentially extend its blooming period.
Managing Pests and Diseases
Common Pests
- Aphids: These small, sap-sucking insects can be a nuisance. They typically gather on the undersides of leaves and on new growth. Aphids can cause distorted leaves and may produce a sticky residue known as honeydew, which can lead to sooty mold.
- Spider Mites: These tiny spiders thrive in hot, dry conditions. They are less common but can cause discoloration and speckling on leaves.
Common Diseases
- Root Rot: Overwatering is a primary cause of root rot in Ptilotus. This fungal disease attacks the roots, leading to a decline in the plant’s health.
- Fungal Leaf Spot: This occurs in overly moist conditions, causing spots on the leaves.
Preventive Measures and Treatments
- Aphids: Regularly check the underside of leaves. If aphids are spotted, you can remove them by spraying water or applying insecticidal soap or neem oil, which are eco-friendly options.
- Spider Mites: Increase humidity around the plant and spray with water. If the infestation is severe, use miticides or neem oil.
- Root Rot: Prevention is key. Ensure the plant is in well-draining soil and avoid overwatering. If root rot is suspected, remove the affected parts of the root and repot the plant in fresh, dry soil.
- Fungal Leaf Spot: Improve air circulation around the plant and reduce leaf wetness. Fungicides can be used, but often adjusting watering practices and ensuring good air circulation can prevent and control this issue.
Propagation
Selecting Cuttings
- Choose a healthy Ptilotus plant from which to take your cuttings. Look for stems that are robust and free from any signs of disease or pest damage.
- A good cutting should be about 4-6 inches in length. This size ensures that the cutting has enough leaf nodes, which are crucial for root development.
Preparing the Cutting
- Use a sharp, clean pair of scissors or pruning shears to make a clean cut. A diagonal cut increases the surface area for rooting.
- Remove the lower leaves from the cutting, leaving a few leaves at the top. This helps to reduce moisture loss while ensuring enough leaf area for photosynthesis.
Rooting the Cutting
- Before planting the cutting, you can dip the cut end into rooting hormone powder or gel. This step is optional but can help stimulate root growth.
- Plant the cutting in well-draining soil. A mix of potting soil with perlite or sand improves drainage and aeration, crucial for root development.
- Insert the cutting about 1-2 inches deep into the soil. Ensure it stands upright and the soil is lightly firmed around the base.
Winter Care
Indoor Relocation
- Choosing the Right Pot: If you anticipate moving your Ptilotus indoors for winter, plant it in a pot from the start. Ensure the pot has good drainage holes.
- Timing the Move: Monitor the weather forecasts. Before the first frost, it’s time to bring your Ptilotus inside. Sudden temperature drops can be harmful.
Creating an Ideal Indoor Environment
- Lighting: Ptilotus still requires plenty of light even in winter. Place it near a window that receives ample sunlight. If natural light is insufficient, consider using grow lights.
- Temperature: Keep the plant in a cool room, but away from freezing temperatures. Ideally, a room that stays around 50-60°F (10-15°C) is suitable.
- Humidity: Being a desert plant, Ptilotus does not require high humidity. However, ensure it’s not placed near heating vents which can dry out the air excessively.
Watering and Feeding Adjustments
- Watering: Watering needs decrease significantly in winter. Allow the soil to dry out completely between waterings. Overwatering during this dormant period can lead to root rot.
- Fertilizing: Ptilotus does not require fertilization in winter. Cease any fertilizing routines until spring when the growing season resumes.
Monitoring and Care
- Regularly check your Ptilotus for signs of stress or pests. Indoor environments can sometimes lead to pest issues, such as spider mites or aphids.
- Dust the leaves occasionally to ensure the plant can photosynthesize efficiently.
Transitioning Back Outdoors
- As winter ends and temperatures begin to rise, it’s important to gradually acclimate your Ptilotus back to outdoor conditions.
- Start by placing the plant outside for a few hours each day in a sheltered area, gradually increasing the time over a week or two.
- Once the danger of frost has passed, and the plant has acclimated, it can remain outdoors.
Conclusion
With its stunning, feather-like blooms and ease of care, Ptilotus is a superb choice for gardeners looking to add a touch of the Australian outback to their collection. By following these simple guidelines, you can enjoy the vibrant beauty of the Joey plant in your garden or home. Happy gardening!
FAQs (Frequently Asked Questions)
1. What is Ptilotus and where does it originate from?
Ptilotus, also known as the Joey plant, is a native Australian plant known for its unique, fluffy flower spikes. It belongs to the Amaranthaceae family and is well-suited to dry, warm climates.
2. What kind of sunlight does Ptilotus need?
Ptilotus thrives in full sun. It should receive at least six hours of direct sunlight each day, whether planted indoors near a sunny window or outdoors in a bright, open area.
3. What type of soil is best for Ptilotus?
Well-draining soil is essential for Ptilotus. It prefers soil that is not too rich and can tolerate a range of soil types as long as they drain well.
4. How often should I water Ptilotus?
Water Ptilotus sparingly. The plant is drought-tolerant, and overwatering can cause issues like root rot. Let the soil dry out between waterings.
5. Does Ptilotus need regular fertilizing?
Fertilizing is not a frequent necessity for Ptilotus. A light application of a low-nitrogen, slow-release fertilizer in early spring is sufficient to support its growth and flowering.
6. How do I propagate Ptilotus?
Ptilotus can be propagated either by seed or cuttings. For cuttings, take a healthy stem, plant it in well-draining soil, and ensure it has adequate moisture and light.
7. Are Ptilotus plants prone to any pests or diseases?
Ptilotus is relatively hardy and not commonly troubled by pests or diseases. However, watch out for aphids and fungal issues in overly damp conditions.
8. Can Ptilotus survive in cold weather?
Ptilotus is not frost-tolerant. In regions with cold winters, it’s best to grow Ptilotus in pots that can be moved indoors or provide adequate protection outdoors.
9. How should I prune Ptilotus?
Pruning is minimal for Ptilotus. You can deadhead spent flowers to encourage new blooms and maintain the plant’s shape.
10. How tall does Ptilotus grow?
The height of Ptilotus varies depending on the species, but many varieties grow to about 12-18 inches tall. The plant spreads out as it grows, so adequate space is essential for its development.

Kristine Moore
Forestry AuthorI'm Kristine Moore, a seasoned garden landscaping professional with over 30 years of experience. My extensive career has been dedicated to transforming outdoor spaces into stunning, sustainable landscapes. With a deep understanding of horticulture, design principles, and environmental stewardship, I have become a respected figure in the field, known for creating harmonious, visually appealing, and eco-friendly gardens. My commitment to excellence and continuous learning in landscaping trends and techniques has solidified my reputation as an expert in garden design and implementation.


Leave your comment