How to Make Clean Cuts with a Circular Saw
- December 4, 2023
- 0 comment
Embarking on a woodworking endeavor brings a mix of excitement and challenge, with the hallmark of craftsmanship often resting on the ability to achieve clean, precise cuts. If you’ve ever approached a circular saw with a blend of anticipation and uncertainty, you’ve landed in the right spot. This guide seeks to unravel the intricacies of crafting immaculate cuts with a circular saw, transforming what might appear as a daunting task into a satisfying and precise venture. Covering everything from selecting the appropriate blade to mastering key techniques, this comprehensive exploration aims to provide both novices and seasoned DIY enthusiasts with the knowledge and confidence necessary to enhance their woodworking skills. Whether you’re delving into furniture making or tackling home improvement projects, come along as we navigate the nuances of the circular saw, demystifying its operation and empowering you to achieve impeccably clean cuts on every occasion.
1. Select the Appropriate Blade
Initiate the process by replacing the default 24-tooth blade that accompanies the circular saw. Upgrade to a 50- to 60-tooth blade for achieving pristine crosscuts in solid wood and veneered plywood. If your project demands versatility without a critical focus on cut quality, opt for a 40-tooth blade. Furthermore, when engaging in tasks like ripping solid wood, seamlessly switch back to the 24-tooth blade.

- Tip 1: Regularly inspect the sharpness of your chosen blade. A sharp blade not only ensures cleaner cuts but also contributes to overall safety and efficiency. If signs of dullness appear, consider sharpening or replacing the blade for optimal performance.
- Tip 2: When selecting a blade, consider the specific requirements of your project. Different materials may benefit from specialized blades, so tailor your choice to the task at hand for the best results.
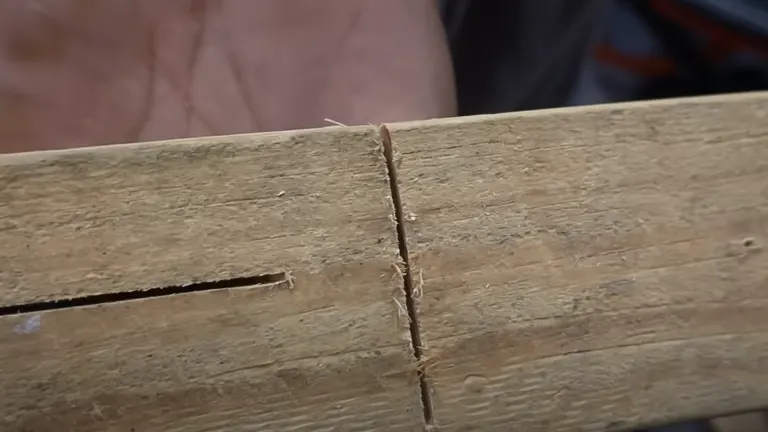
2. Tackle Tear-Out
Confronting the issue of tear-out becomes essential when working with a circular saw, given its upward blade rotation. To effectively tackle this challenge, adopt a two-step strategy. Firstly, execute a shallow scoring pass before the actual cut. This deliberate initial cut cleanly shears the surface fibers, especially on the top face of the material. This method minimizes tear-out, enhancing the overall quality of the cut and reducing the need for additional finishing work.
- Tip 1: When executing the shallow scoring pass, maintain a steady and controlled pace. Rushing this initial cut may compromise its effectiveness in preventing tear-out, so strike a balance between precision and efficiency.
- Tip 2: Consider using a marking knife or fine pencil to create the scoring line. This helps create a precise guide for your shallow pass, ensuring accuracy in the subsequent cut and minimizing the risk of tear-out.
3. Set Clearance to Zero
Elevate your cutting precision by incorporating a crucial step: attaching an auxiliary subplate to the circular saw’s footplate. This additional layer effectively creates a zero-clearance opening around the blade’s exit point, offering solid support to wood fibers, especially in delicate materials like thin veneers found in plywood. This meticulous approach not only reduces the chances of tear-out but also ensures a clean and precise cut by eliminating any potential blade shifting during the operation.

- Tip 1: When crafting or selecting an auxiliary subplate, prioritize materials that provide stability without compromising the overall weight of the circular saw. A balance between sturdiness and manageability is key to achieving optimal results.
- Tip 2: During usage, remain vigilant about the blade guard’s coverage, as it may not fully shield the blade below the auxiliary footplate. Exercise extra caution to prevent accidental contact with the exposed blade, emphasizing the importance of adhering to safety guidelines throughout the cutting process.
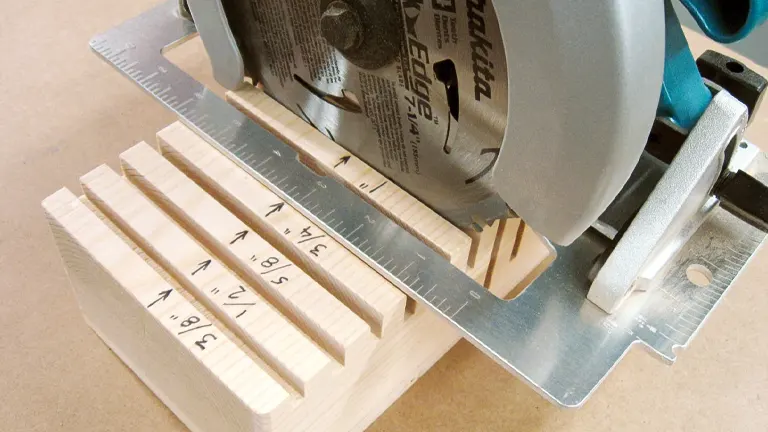
4. Create a Custom Guide
Take your precision a step further by fashioning a customized edge guide to complement your circular saw. Utilize the provided drawing as a blueprint, adjusting the guide’s width to align seamlessly with the specifications of your specific saw model. This personalized guide serves as an indispensable tool, not only in mitigating tear-out concerns but also in streamlining the alignment process for accurate cuts across a spectrum of woodworking projects.
- Tip 1: When constructing the custom edge guide, invest time in ensuring its straightness and rigidity. A guide with minimal flex ensures consistent and straight cuts, contributing to the overall quality of your woodworking endeavors.
- Tip 2: Periodically assess and fine-tune the edge guide’s dimensions to accommodate any changes in your saw’s configuration. Regular adjustments maintain the guide’s effectiveness and adaptability, ensuring it remains a reliable ally in achieving clean and precise cuts over the long term.
5. Prevent Splintered Cutoffs
When you’re cutting solid wood or plywood across, the risk of splintering along the far edge is a concern. To prevent this, use a straightforward method. Place supports on both the piece you want to keep and the part you’re cutting off. This helps create a stable setup that reduces the chance of splintering, ensuring your woodworking project ends with a smooth and professional look.
- Tip 1: Opt for sacrificial supports that are slightly wider than the material being cut. This extra width provides an added buffer zone, minimizing the chances of unintended tear-out and preserving the aesthetic quality of your work.
- Tip 2: Securely clamp the sacrificial supports in place during the cutting process. This prevents any movement or shifting, guaranteeing a stable and controlled environment that significantly contributes to achieving splinter-free and precise crosscuts.
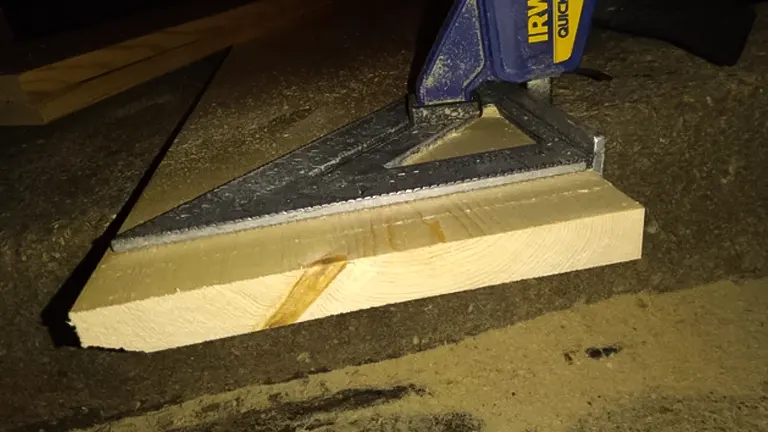
6. Utilize Tools for Accuracy
Elevate the accuracy of your crosscuts by incorporating essential guiding tools into your circular saw technique. For a meticulous approach, enlist the assistance of a rafter square as a dependable guide. Optimal results are achieved by positioning the square with the triangle’s point facing you, offering enhanced guidance precisely where it is most needed—at the beginning of the cut. This technique not only ensures a steady start but also sets the foundation for a consistently accurate crosscut throughout the entire length of the material.

- Tip 1: When utilizing a rafter square, take a moment to confirm its alignment with the marked cutline. A slight deviation can impact the accuracy of the cut, so double-checking ensures a seamless and precise outcome.
- Tip 2: For longer cuts where visibility of the cutline may be compromised, introduce a straightedge into your arsenal. This tool acts as a surrogate for a track saw, providing results that mirror the precision associated with more specialized equipment. Remember to secure the straightedge firmly in place to maintain a steady and uninterrupted cut.
7. Watch the Depth of Cut
Exercise caution and vigilance in managing the depth of the cut, especially when working with circular saws featuring thin bases or low-sitting motors. Adjust the saw’s depth to ensure adequate clearance, preventing the blade from shifting during the cutting process. If the motor encounters the T-shaped end of your rafter square while the blade is still in the cut, consider trimming off some plastic along the square’s top edge for seamless clearance.
To further enhance your cutting precision, it’s advisable to choose a blade with the appropriate thickness for your intended application. A blade that aligns well with the thickness of the material reduces the risk of excess friction and heat, promoting cleaner cuts and prolonging the life of your saw blades.
- Tip 1: Regularly inspect and maintain the saw’s depth adjustment mechanism. Over time, dust and debris can accumulate, affecting the smooth operation of the depth adjustment. Keep it clean to ensure accurate and hassle-free adjustments during your projects.
- Tip 2: When adjusting the depth of cut, start with a shallow setting and gradually increase it until the desired depth is achieved. This incremental approach allows for greater control and helps you avoid cutting too deep, particularly when working with delicate materials.
- Tip 3: Familiarize yourself with the specific requirements of the materials you’re cutting. Thicker materials may necessitate a deeper cut, while thinner materials may benefit from a more conservative depth setting. Adapting the depth to suit the material enhances both the efficiency and precision of your circular saw cuts.
Factors to Consider When Making Clean Cuts with Circular Saw
- Blade Selection: Choose the right blade for the task at hand. Different blades are designed for specific materials and types of cuts. A higher tooth count generally results in smoother cuts for finer materials.
- Blade Sharpness: Ensure the blade is sharp and in good condition. Dull blades can lead to tear-out and rough cuts. Regularly sharpen or replace blades as needed.
- Material Type: Understand the type of material you are cutting. Different materials may require specific blades or cutting techniques to achieve clean results.
- Cutting Speed: Control the speed of your cut. Moving too quickly can cause tear-out, while cutting too slowly may result in burn marks. Find the right balance for the material you are working with.
- Cutting Depth: Adjust the cutting depth of the saw blade according to the thickness of the material. This prevents the blade from extending too far below the material, reducing the risk of tear-out.
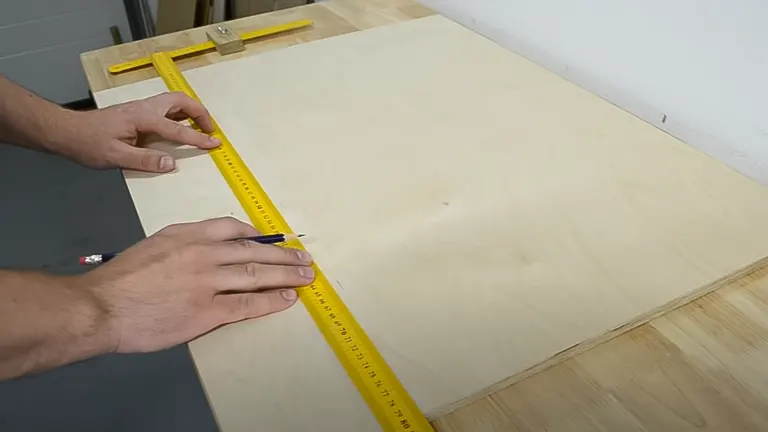
- Guide Systems: Use guides or straightedges to ensure straight and accurate cuts. This helps maintain a consistent cutting line and minimizes the chance of veering off course.
- Marking and Scoring: Mark your cut lines using a straightedge or pencil. Consider making a shallow scoring cut before the full cut to minimize tear-out, especially on the top surface of the material.
- Zero-Clearance Inserts: Employ zero-clearance inserts or subplates to support the material, particularly when working with thin veneers. This helps eliminate tear-out by providing solid support where the blade exits the material.
- Safety Precautions: Prioritize safety by wearing appropriate personal protective equipment (PPE) such as safety glasses and hearing protection. Follow all safety guidelines outlined in the tool’s manual.
- Stability and Support: Ensure the material is properly supported and stable during the cut. Use sawhorses or a stable work surface to prevent vibrations and potential inaccuracies.
- Cutting Against the Grain: Be mindful of the direction of the wood grain. Cutting against the grain can lead to splintering and tear-out, so adjust your approach accordingly.
- Environmental Conditions: Consider the environment in which you are working. Extreme temperatures or humidity can affect the material and the performance of the saw.
By taking these factors into account, you can enhance your ability to make clean and precise cuts with a circular saw, resulting in professional-quality woodworking projects.
Final Verdict
In summary, delving into the intricacies of achieving clean cuts with a circular saw unravels a world where precision and artistry intersect in woodworking. Each facet of the process, from blade selection to the finesse of scoring and embracing zero-clearance methods, contributes indispensably to the pursuit of flawlessness. The addition of personalized elements, such as crafting a bespoke guide and employing sacrificial supports, injects character into the cutting journey. Tools like the rafter square and straightedge emerge not merely as accessories but as steadfast companions in the pursuit of accuracy. Attention to nuances like depth adjustment, blade thickness, and material considerations elevates this practice beyond technicality to a harmonious blend of informed decisions and honed techniques. In essence, making clean cuts with a circular saw evolves from a routine into a symphony, resonating with deliberate choices and a dedication to achieving superlative woodworking results. Armed with these insights and practical tips, the circular saw transcends its utility, becoming an instrument of precision that empowers you to soar to new heights in your woodworking endeavors.
FAQs
- What type of blade is best for clean cuts with a circular saw?
Optimal blade selection depends on the material and the desired cut quality. For clean crosscuts in solid wood and veneered plywood, a 50- to 60-tooth blade is recommended. A 40-tooth blade is suitable for general use, while a 24-tooth blade is ideal for ripping solid wood. - How do I prevent tear-out when using a circular saw?
To counter tear-out, make a shallow scoring pass before the actual cut. This technique cleanly shears surface fibers, particularly on the top face of the material, ensuring a smoother finish. - What is the significance of a zero-clearance opening in making clean cuts?
Attaching an auxiliary subplate to create a zero-clearance opening supports wood fibers during the cut, especially in thin veneers like plywood. This minimizes tear-out and enhances the precision of the cut. - Can crafting a custom guide improve cut accuracy?
Crafting a personalized edge guide based on your circular saw’s specifications can significantly improve cut accuracy. It not only minimizes tear-out but also ensures precise cut alignment for various woodworking projects. - How do sacrificial supports prevent splintered cutoffs?
When crosscutting solid wood or plywood, using sacrificial supports for both the keeper piece and the cutoff helps maintain a stable and controlled environment, reducing the risk of splintering along the far edge. - What role do tools like the rafter square play in achieving accurate cuts?
Tools like the rafter square serve as dependable guides for accurate crosscuts. Positioning it with the triangle’s point facing you enhances guidance at the cut’s initiation, ensuring a steady start for consistent accuracy. - Why is monitoring the depth of cut crucial for clean cuts?
Controlling the depth of cut is essential, especially with circular saws featuring thin bases or low-sitting motors. Adjusting the depth prevents blade shifting during the cut, ensuring clean and precise results. - How can I choose the right blade thickness for my circular saw?
Choosing a blade with the appropriate thickness for your intended application is crucial. Align the blade thickness with the material’s thickness to reduce friction and heat, promoting cleaner cuts and prolonging blade life.
As we wrap up this exploration into the realm of making clean cuts with a circular saw, remember that precision in woodworking is an art, and your circular saw is the brush that can bring your vision to life. From selecting the right blade and mastering strategic techniques to crafting custom guides and utilizing supporting tools, each step contributes to the symphony of achieving flawless results. Whether you’re a seasoned woodworker or just starting, the journey of clean cuts extends beyond technicality—it’s a commitment to thoughtful choices and practiced techniques. Armed with the insights and tips gleaned here, your circular saw transforms into an instrument of precision, empowering you to elevate your woodworking projects to new heights. As you embark on your next woodworking venture, may each cut be a testament to your skill, dedication, and the artistry inherent in creating clean and precise pieces. Happy crafting!

Benjamin Brooks
Forestry AuthorGreetings! I'm Benjamin Brooks, and my journey over the past 15 years has revolved around the fascinating realms of content creation, expertise in snow clearing, and the intricate world of lumberjacking and landscaping. What began as a simple curiosity about the natural world and heavy machinery has evolved into a passionate profession where my love for crafting words intertwines seamlessly with my lumberjacking and garden skills.


Leave your comment