Hidden Maintenance Tip for Trimmer Longevity: Greasing the Secret Spot
- February 20, 2024
- 0 comment
For anyone who prides themselves on maintaining their garden equipment to ensure longevity and optimal performance, here’s a tip that might surprise you: your trimmer has a secret greasing spot that many owners are unaware of. This overlooked maintenance step is crucial for extending the life of your trimmer, and today, we’re diving into the details of where this hidden spot is and how you can properly grease it.
Discovering the Hidden Grease Hole
The focus of our attention is not on the straight shaft trimmers, but rather on the curved shaft models, such as the FS40, though this advice applies equally to FS38s and FS45s you might have in your shed. These models harbor a little-known maintenance point that could significantly impact their durability and functionality.
Step-by-Step Guide to Greasing Your Trimmer
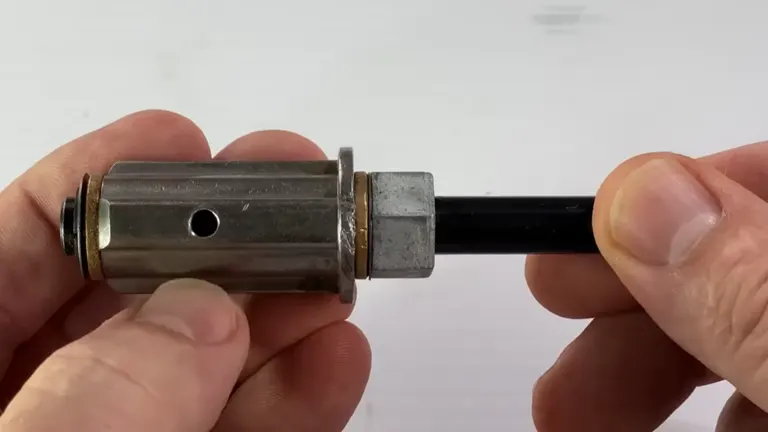
Step 1: Prepare Your Trimmer
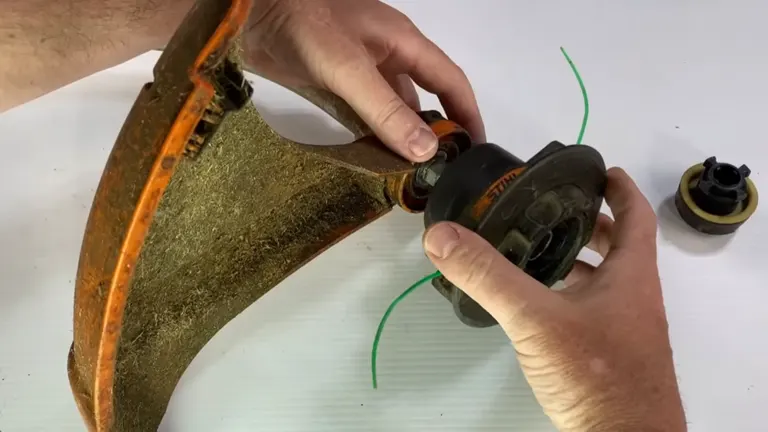
Begin by removing the line head, which should come off easily, and set it aside. Next, remove the guard by unscrewing the single bolt that holds it in place. With these parts removed, your trimmer is ready for greasing.
Step 2: Locate the Grease Point
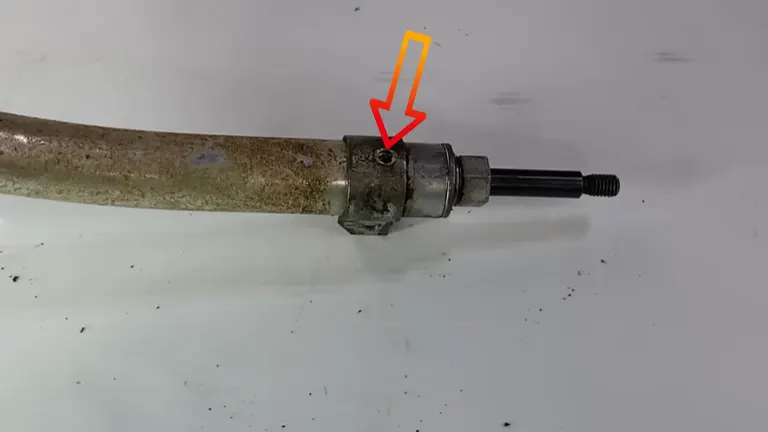
Look for a small bolt near the end of the shaft; this bolt acts as a locator for the bearing inside. Unscrew this bolt to access the hidden greasing point. It’s shorter than you might expect, so handle it carefully.
Step 3: Apply the Grease
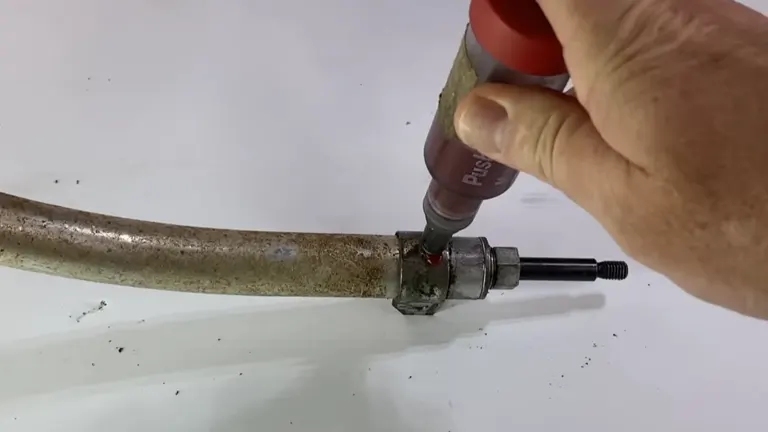
Using a grease gun (an inexpensive yet invaluable tool for this task), inject grease into the hole left by the removed bolt. This hole leads directly to the bushing bearing inside the shaft. It’s not a ball bearing but still requires regular lubrication to function smoothly.
Step 4: Reassemble Your Trimmer
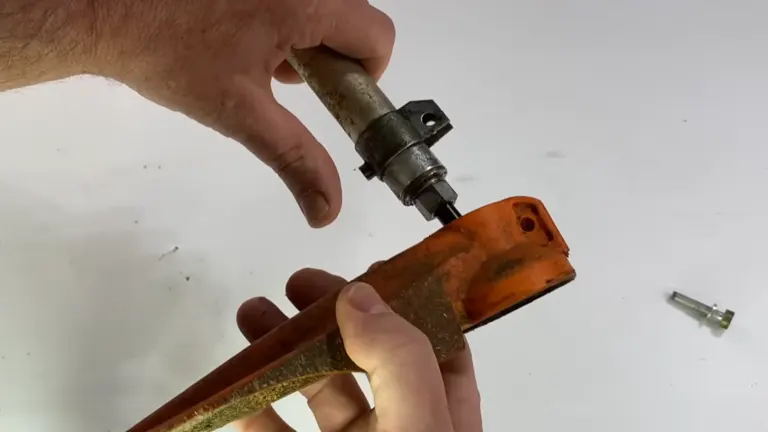
Once the greasing is complete, reattach the guard and the line head in reverse order. This process is as straightforward as the disassembly, ensuring a hassle-free maintenance routine.
The Importance of Regular Greasing
To illustrate the significance of this maintenance step, consider the internal mechanics of the trimmer. Inside, there’s a bushing bearing that, when properly lubricated, reduces friction and wear, leading to a smoother operation and prolonged lifespan of the equipment.
A demonstration with a bearing pulled from another trimmer showcases the difference greasing can make: from a grindy, resistant movement to a smooth operation with just a couple of pumps of grease.
Troubleshooting Common Issues During the Greasing Process
- Over-Greasing: Excessive greasing can lead to pressure build-up within the trimmer’s components, potentially causing seals to fail and grease to seep out. This not only makes a mess but also attracts dirt and debris, which can impair the trimmer’s function. If you find yourself in this situation, take a clean, lint-free cloth and gently remove any excess grease from the area. It’s crucial to apply grease with moderation, aiming to adequately lubricate without overfilling. A good practice is to add grease incrementally and stop when you see a small amount of grease beginning to exit the lubrication point.
- Bolt Too Tight to Remove: Encountering a bolt that’s too tight to remove can be frustrating and poses a risk of damaging the bolt head or the tool itself. A practical approach is to apply a penetrating oil around the bolt, allowing it to soak in and loosen the tightness. Use a tool that precisely fits the bolt to avoid slippage. If the bolt doesn’t budge, a light tap with a hammer on the tool can help break the seal. Should these efforts fail, it may be wise to consult a professional to prevent causing damage to the trimmer.
- Grease Gun Issues: Sometimes, the challenge lies in using the grease gun itself, whether it’s a fitting issue or operational trouble. Make sure the nozzle of the grease gun matches the size of the trimmer’s grease fitting. If the grease gun seems to be blocked, disassembling it to check for and clear any obstructions can help. It’s important to be familiar with the process of loading and operating your grease gun, as per the manufacturer’s instructions, to avoid such issues.
Safety Tips for Trimmer Maintenance
When performing maintenance on your trimmer, safety should always be your top priority. Ensure that the trimmer is completely powered off and disconnected from any power sources. For battery-operated models, remove the battery to prevent accidental start-up. If you’re working with a gas-powered trimmer, empty the fuel tank and disconnect the spark plug. Wearing protective gloves is essential to safeguard your hands from sharp blades and other hazardous components. Eye protection, such as safety glasses, is also advisable to shield your eyes from potential grease splatters or debris. Conducting maintenance in a well-ventilated area is crucial, especially if you’re using volatile substances like penetrating oils. The right tools can make a significant difference; using tools that fit properly and are in good condition can prevent damage to your trimmer and injury to yourself. Lastly, always refer to your trimmer’s manual for any specific maintenance guidelines and safety precautions recommended by the manufacturer. This tailored advice can be invaluable in maintaining your trimmer’s performance and ensuring your safety during maintenance tasks.
Final Thoughts
Regularly greasing this hidden spot, ideally at the start of each gardening season, can dramatically extend your trimmer’s life. This simple yet often overlooked step ensures that your garden equipment remains in top condition, saving you time and money in the long run.
By incorporating this greasing routine into your seasonal maintenance schedule, you not only enhance the performance of your trimmer but also invest in its longevity. It’s a small effort with significant benefits, underscoring the importance of understanding and caring for the intricacies of your gardening tools. So, before you kick off your next gardening project, remember to give your trimmer the attention it deserves.
FAQs
- Can I use any type of grease for my trimmer, or is there a specific kind recommended?
While multi-purpose grease can work for most trimmers, it’s advisable to use a grease type recommended by your trimmer’s manufacturer. Lithium-based grease is often recommended for its high resistance to temperature changes and its effectiveness in reducing friction. - How often should I grease my trimmer to ensure optimal performance and longevity?
The frequency depends on how often you use your trimmer. For regular use, greasing at the start of each gardening season is recommended. However, if you use your trimmer heavily throughout the year, consider greasing it every few months. - I’ve lost the manual for my trimmer. How can I find out if it has a hidden greasing spot?
Many manufacturers provide digital versions of their manuals online. Search for your trimmer model on the manufacturer’s website. If that fails, a general rule is to look for a small bolt or cap near the end of the shaft, which often conceals the greasing point. - Is there a way to tell if I’ve over-greased my trimmer?
Yes, over-greasing can lead to grease leaking from the greasing point or other parts of the trimmer. If you notice excessive grease after operating your trimmer, you might have applied too much. Use less grease next time and clean off any excess to prevent attracting dirt. - Does greasing apply to electric trimmers as well, or is it just for gas-powered models?
While greasing is more commonly discussed in the context of gas-powered trimmers, some electric trimmers also have parts that can benefit from lubrication. Check your trimmer’s manual to see if greasing is recommended and where the greasing points are located. - What should I do if the bolt covering the greasing spot is stuck or difficult to remove?
If the bolt is stuck, apply a penetrating oil and let it sit for a few hours or overnight to loosen it. Use a wrench or pliers that fit the bolt size closely to avoid stripping it. If it remains stuck, consider seeking professional help to avoid damaging your trimmer. - Can improper or infrequent greasing void my trimmer’s warranty?
It’s possible. Many manufacturers specify regular maintenance requirements that include lubrication. Failing to follow these guidelines can lead to issues not covered by warranty. Always review your warranty information and follow the recommended maintenance schedule. - Are there any environmental considerations I should keep in mind when disposing of old grease or cleaning my trimmer?
Yes, used grease and cleaning solvents should be disposed of responsibly to avoid environmental harm. Contact your local waste management facilities to find out how to dispose of hazardous materials properly. Opt for eco-friendly cleaners when possible.
We hope this guide illuminates the path to enhancing your trimmer’s longevity and ensures your gardening tools are always in prime condition. But the conversation doesn’t end here—we’d love to hear from you! Do you have any secret maintenance tips or tricks up your sleeve? Perhaps a story about how a little TLC saved your trusty trimmer from the brink? Share your thoughts and experiences in the comments below. Your insights could be the beacon for fellow garden enthusiasts navigating their own maintenance journeys. Let’s cultivate a community of care and expertise, one comment at a time. Happy trimming!

David Murray
Forestry AuthorI'm David Murry, a forestry equipment specialist with a focus on chainsaw operation. With over 13 years of experience, I've honed my skills in operating and maintaining a wide range of machinery, from chainsaws to log splitters. My passion for the outdoors and commitment to sustainable forestry drive my work, which emphasizes safety, efficiency, and staying updated with industry advancements. Additionally, I'm dedicated to sharing my expertise and promoting environmental awareness within the forestry community.


Leave your comment