Mastering Bandsaw Blade Adjustment for Precision Cutting
- April 1, 2024
- 0 comment
Unlock the secrets of bandsaw blade maintenance and adjustment for precision cutting with our expert guide. Learn essential techniques to master bandsaw blade setup, ensuring optimal performance and longevity of your equipment.
Bandsaw maintenance and adjustment are crucial for achieving precise and efficient cuts. One of the key steps in preparing a bandsaw for use involves correctly setting the blade. This article provides a comprehensive guide on how to adjust a bandsaw blade, ensuring optimal performance and extending the lifespan of your equipment.
Optimizing Bandsaw Blade Placement and Tension for Bandsaw Efficiency
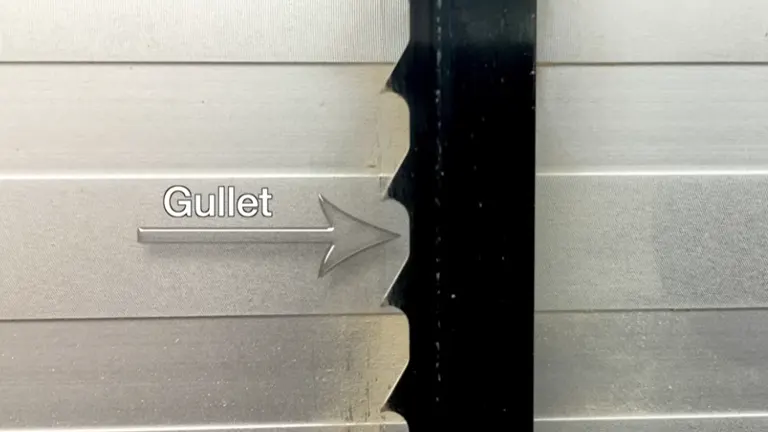
Initiating your bandsaw’s setup starts with disengaging the guides to precisely align the blade. Focus on positioning the gullet’s deepest part at the wheel’s center, not just the top, to counteract the crowned nature of the wheel. Proper alignment prevents the blade from becoming a pivot point, which can cause instability. By adjusting the blade forward, you ensure its tension and stability are optimized, easing the side guides’ job to merely prevent fishtailing at the back edge.
For tensioning, bypass the less reliable gauges in favor of a hands-on approach. Open the saw’s access door and manually press the blade, targeting a quarter-inch deflection. This manual method yields a more consistent and accurate assessment of the blade’s tension, essential for smooth and precise cuts. Through these steps, you set the stage for a well-tuned bandsaw capable of delivering exceptional performance.
Fine-Tuning Guides and Bearings for Optimal Bandsaw Performance
Post-tensioning, the fine-tuning of side guides and thrust bearings is pivotal. Adjust the side guides to sit just behind the blade’s deepest gullet portion, approximately 1/16 inch away. This critical spacing prevents the guides from touching the blade’s teeth, averting potential blade warping and ensuring precise cuts.
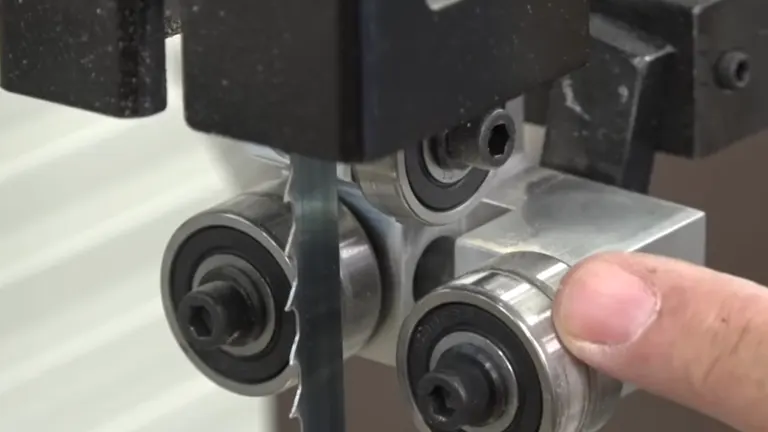
Thrust bearings positioned both above and below the blade, require careful adjustment to nearly touch the blade without actual contact. This proximity allows the blade to move freely, minimizing friction and wear, thus promoting a smoother cutting action. The aim is to establish a bandsaw setup where the blade and bearings barely interact, touching only when needed to preserve the blade’s stability during cutting tasks. Through these adjustments, your bandsaw will operate at its best, combining precision with longevity.
Leveling the Table and Fence Alignment
For bandsaw operators, achieving accurate cuts starts with a perfectly level table. Test the table’s levelness by making a cut in a standard piece of lumber, such as a two-by-four, and then flip and reinsert the piece to see if it aligns perfectly with the previous cut. This simple yet effective test confirms that the table is uniformly flat and level, which is essential for consistent and precise cutting results.
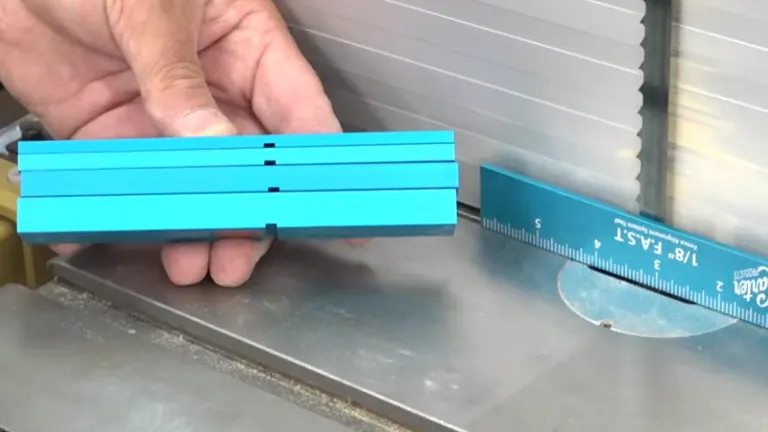
When it comes to fence alignment, precision is key. Utilize a Fence Alignment System Tool (F.A.S.T.) to streamline this process. The F.A.S.T. offers a reliable way to align the fence with the blade accurately, considering the offset of the teeth. This tool ensures that the fence is perfectly parallel to the blade’s cutting path, eliminating any inaccuracies that could affect the quality of your cuts. By incorporating these steps into your bandsaw setup routine, you’ll enhance the machine’s cutting accuracy and overall performance, leading to better results in your woodworking projects.
Benefits of Not Adjusting Your Bandsaw Blade Regularly
- Skipping the adjustment process saves time, allowing immediate commencement of cutting tasks without the preliminary setup.
- Users without in-depth knowledge of bandsaw mechanics can operate the machine without delving into the complex details of blade adjustment.
- For those who use the bandsaw sporadically or for less precision-critical tasks, not adjusting the blade frequently may seem more convenient.
Drawbacks of Not Adjusting Your Bandsaw Blade Regularly
- Without regular adjustments, the blade may drift, leading to inaccurate cuts that deviate from the intended line or shape.
- An improperly tensioned or aligned blade can wear out faster, leading to more frequent replacements and higher costs.
- A blade that is not correctly adjusted can lead to increased risks of kickback, potential injury, and damage to the workpiece or bandsaw itself.
- Operating with an unadjusted blade can strain the bandsaw’s motor and mechanical components, potentially reducing the machine’s lifespan and efficiency.
- Inaccurate cuts can result in higher material waste, impacting project costs and efficiency.
- The inability to make precise cuts can lead to frustration, requiring additional time to correct mistakes or redo work.
Advanced Tips for Fine-Tuning Bandsaw Blade Adjustments
- For ultimate precision, employ a dial indicator to measure the blade’s drift and ensure it runs perfectly parallel to the bandsaw table. This tool can help detect even the slightest misalignment that might not be noticeable by the eye alone.
- Upgrade from manual tensioning to using a tension meter to get an exact measurement of blade tension. This ensures the blade is neither too tight nor too loose, optimizing its performance and lifespan.
- Every bandsaw blade has a ‘sweet spot’ where it performs best, often found through trial and error. Record the tension and tracking settings when optimal performance is achieved, and use these as a baseline for future adjustments.
- Adjust the bandsaw’s speed according to the material being cut. Harder materials typically require slower speeds, while softer materials can be cut faster. Balancing speed and feed rate can significantly improve cut quality and blade life.
- For materials like metals or hard plastics, use appropriate cutting fluids to reduce heat and friction. This not only improves the cut quality but also prolongs blade life.
- As blades wear down, their cutting characteristics change. Experienced users should regularly inspect blades for wear and adjust tension and tracking accordingly to compensate for these changes.
- Ensure the blade guides are not too tight against the blade, which can cause premature wear. They should barely touch the blade, allowing it to move freely without deflecting.
- Periodically check and balance the bandsaw wheels. Unbalanced wheels can cause vibration and uneven wear on the blade and affect the quality of cuts.
- Higher-quality blades with the correct tooth pattern and pitch for the material being cut can significantly improve performance and results.
- Keep a log of adjustments and outcomes for different types of cuts and materials. This record can serve as a valuable reference for achieving consistent results and troubleshooting future issues.
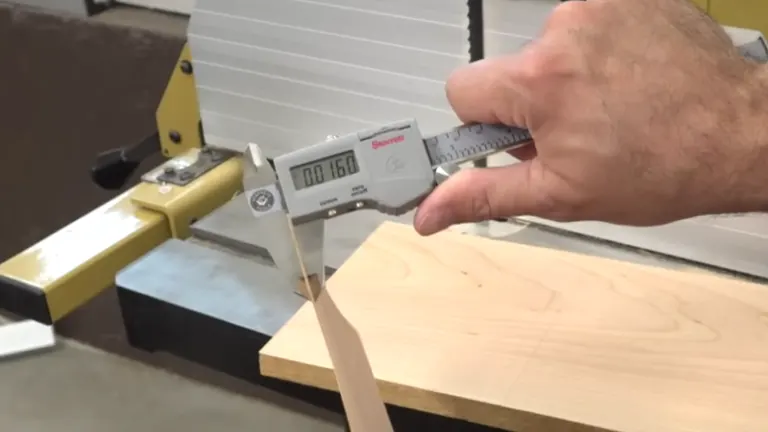
Final Adjustments and Cutting
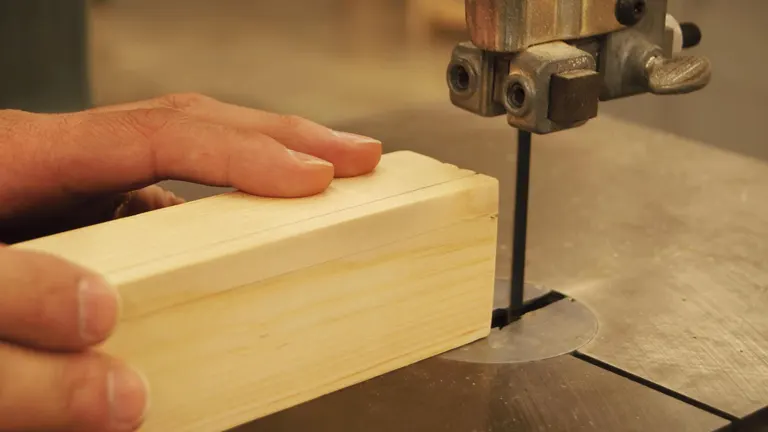
After diligently setting the blade, guides, and table, your bandsaw stands primed for operation. To validate the precision of your setup, conduct a test cut, favoring a slender slice to assess the saw’s accuracy and the effective tuning of its components. The cut’s quality not only signifies the setup’s exactness but also indicates the blade’s current state.
To wrap up, fine-tuning your bandsaw is an intricate task that significantly betters its cutting accuracy and extends its service life. Concentrating on the correct positioning and tensioning of the blade, along with meticulous guide and bearing alignment, empowers woodworkers to produce superior work, irrespective of the bandsaw’s dimensions or strength. Though this comprehensive adjustment process demands time and attention, it is an invaluable investment for optimizing your bandsaw’s functionality, ensuring peak performance in all woodworking endeavors.
More Articles You Might Enjoy:
FAQs
- How often should I perform a test cut to check my bandsaw’s alignment? Regular test cuts are advisable after any major adjustment or change in the type of material being cut. A test cut after each tuning session helps verify the precision of your setup and should be part of your routine maintenance schedule.
- What thickness should the test cut be to effectively gauge the bandsaw’s setup accuracy?
Aiming for the thinnest cut possible, such as a veneer-thin slice, can be a stringent test of the bandsaw’s setup. Thin cuts reveal slight misalignments or tension issues that might not be apparent in thicker cuts. - Can the type of wood affect the bandsaw’s cutting accuracy?
Yes, different woods have varying densities and grain patterns, which can influence the blade’s behavior. Hardwoods require a well-tuned bandsaw to achieve clean cuts, while softer woods might be more forgiving but still reveal setup inaccuracies. - How does blade wear affect the need for bandsaw adjustments?
As blades wear, their cutting efficiency decreases, and they might start to drift or produce rougher cuts. Regularly checking and adjusting the bandsaw compensates for blade wear and maintains cut quality. - What are the signs that the bandsaw’s table is not level?
Inaccurate cuts, difficulty following a straight line, and uneven wear on the blade are signs the table might not be level. Consistently checking the table’s levelness with a known straight edge or by the flip test can prevent these issues. - How does fence alignment interact with blade and table adjustments?
ence alignment is critical to making straight cuts. If the fence is not parallel to the blade’s cutting direction, even a perfectly leveled table and well-tensioned blade can result in inaccurate cuts. Proper fence alignment ensures that the workpiece is guided straight through the blade. - What should I do if I notice the blade drifting during a cut, even after adjustments?
Blade drift can be caused by several factors including blade tension, guide alignment, or a dull blade. Recheck these elements and consider replacing the blade if it’s worn. Sometimes, fine-tuning the fence angle to compensate for the drift can temporarily improve the situation.
We hope this guide has shed light on the intricacies of bandsaw blade adjustment and set you on the path to achieving flawless cuts every time. Your bandsaw is more than just a tool; it’s your partner in the art of woodworking. As we wrap up this journey into the world of precise blade tuning, we’d love to hear from you! Share your experiences, tips, or any questions you have in the comments below. Let’s cultivate a community where knowledge flows freely and every woodworker, from hobbyists to professionals, can thrive. Don’t forget to share this guide with your fellow craftsmen to spread the wisdom. Happy cutting, and here’s to the countless perfect projects ahead!

David Murray
Forestry AuthorI'm David Murry, a forestry equipment specialist with a focus on chainsaw operation. With over 13 years of experience, I've honed my skills in operating and maintaining a wide range of machinery, from chainsaws to log splitters. My passion for the outdoors and commitment to sustainable forestry drive my work, which emphasizes safety, efficiency, and staying updated with industry advancements. Additionally, I'm dedicated to sharing my expertise and promoting environmental awareness within the forestry community.


Leave your comment