5 Miter Saw Tips to Make Accurate Cuts
- December 8, 2023
- 0 comment
In the intricate world of woodworking, the miter saw stands as an indispensable ally, offering the promise of precision and finesse in every cut. Whether you’re a seasoned craftsman or just stepping into the realm of DIY projects, the key to unlocking the full potential of this versatile tool lies in mastering a few essential tips. In this guide, we’ll explore five miter saw tips designed to elevate your cutting game, ensuring accuracy and efficiency at every turn of the blade.
From aligning the saw to operational insights that make a tangible difference, these tips are tailored to empower woodworkers of all levels. So, let’s delve into the details and unravel the secrets that transform a miter saw into a precision instrument for crafting flawless projects.
What You Need To Use When Making Accurate Cuts with Your Miter Saw
Achieving accurate cuts with your miter saw requires the right tools and equipment to ensure precision and efficiency. Here’s a checklist of essential items you’ll need:
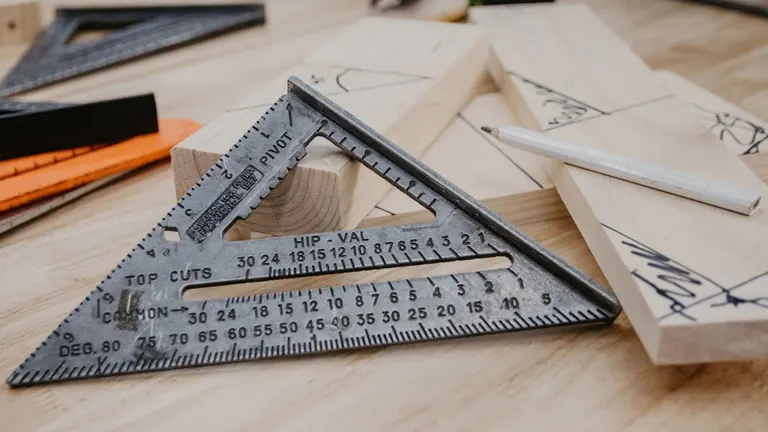
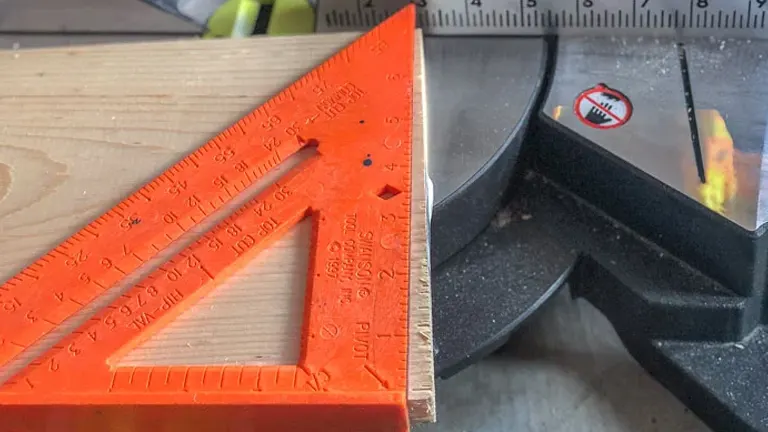
1. Speed Square
A speed square is a versatile tool that aids in measuring and marking 45 and 90-degree angles. It’s indispensable for ensuring your cuts are aligned and accurate.
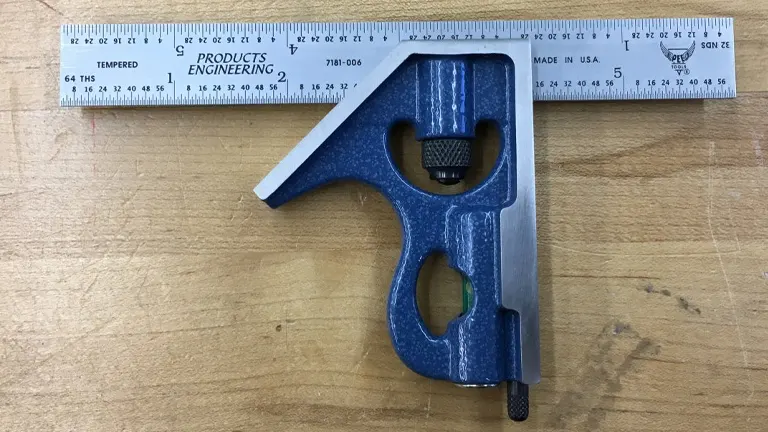
2. Combination Square
This tool is crucial for checking and marking both 45 and 90-degree angles. It helps verify the squareness of your miter saw setup, ensuring your cuts are precise.
3. Sharp Pencil
A sharp pencil is your go-to tool for marking cut lines on your workpieces. Accuracy starts with clear and precise markings, so a sharp pencil is a must-have.

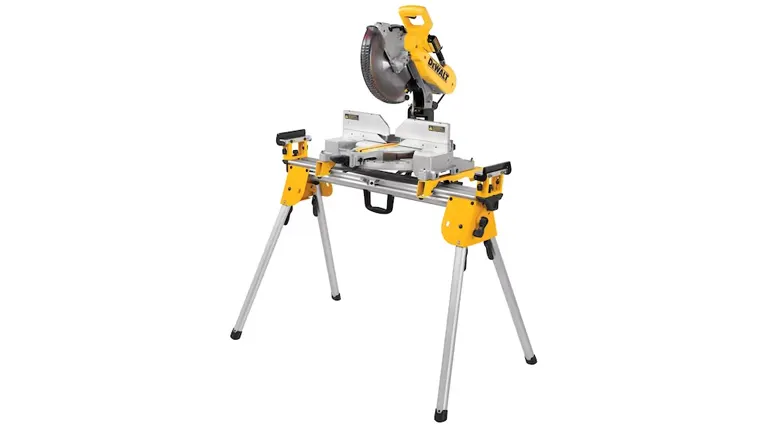
4. Miter Saw Stand
A stable and well-designed miter saw stand provides a secure base for your saw. It enhances safety and convenience, allowing you to focus on making accurate cuts without worrying about stability.
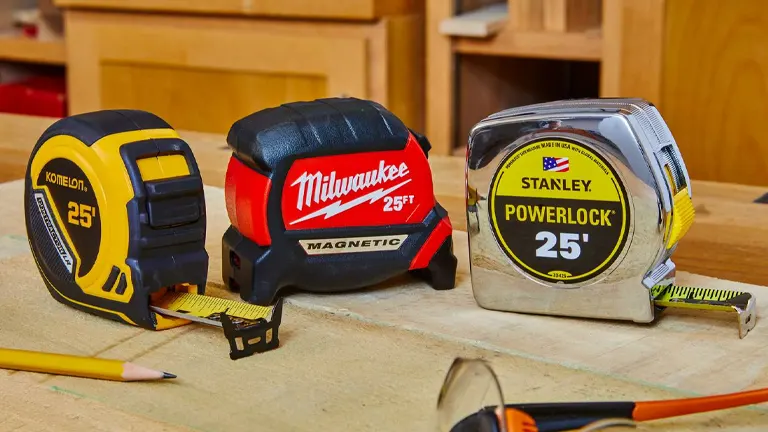
5. Quality Tape Measure
A reliable tape measure with quick-read markings is essential for measuring and marking your workpieces accurately. It’s a fundamental tool for achieving the right dimensions in your woodworking projects.
Having these tools at your disposal sets the foundation for accurate and reliable cuts with your miter saw. Remember, the precision of your cuts begins with the accuracy of your measurements and markings, so investing in quality tools is a key step toward achieving woodworking excellence.
How To Make Accurate Cuts Using The Miter Saw
Woodworking success hinges on the precision of your cuts, and mastering the intricacies of your miter saw is key. To ensure the utmost accuracy, the process can be distilled into two major components: Alignment and Operation.
Alignment
- Immediate Calibration: Despite factory settings, a miter saw can lose its squareness due to transportation and handling. To combat this, initiate immediate calibration when unboxing your saw. Take the time to check and adjust the saw’s alignment to ensure it is perfectly square. This proactive step lays the foundation for accurate cuts in your woodworking projects.
- Guard Against Kickback: Recognize that kickback during usage can compromise the squareness of your blade. It’s crucial to be aware of this potential issue and take preventive measures. Regularly inspect and adjust the saw’s alignment, especially after prolonged use, to counteract any deviations caused by kickback. This proactive approach minimizes the risk of inaccuracies during operation.
Operation
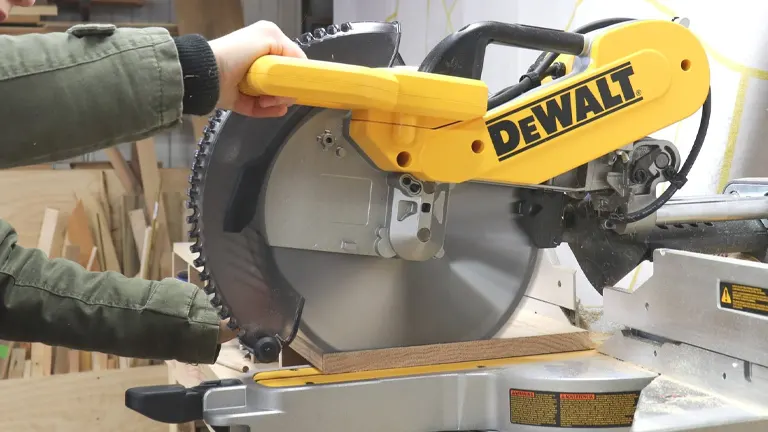
1. Align the Table
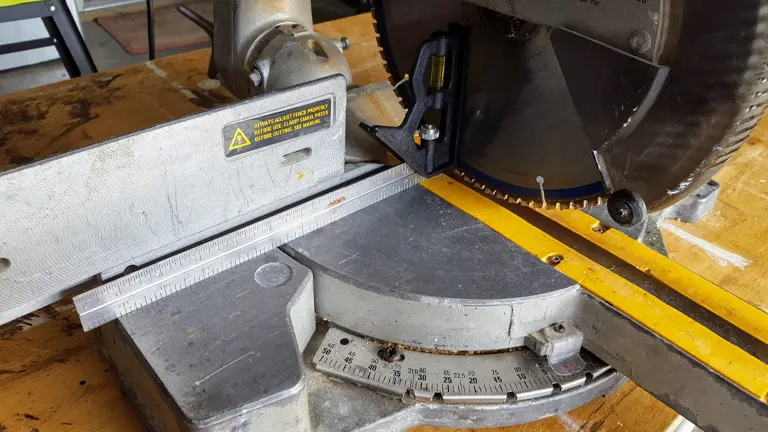
Before each cut, ensure the table is aligned for optimal accuracy. Unplug the power cord, set the bevel gauge to 0 degrees, and slowly move the blade guard aside.
Use a combination square to confirm that the blade is perpendicular to the table. Any visible space between the table or saw blade and the combination square indicates misalignment, requiring immediate adjustment.
2. Align the Fence
Before you start cutting, make sure the miter saw table is properly aligned for accurate results. First, unplug the power cord to be safe. Set the bevel gauge to 0 degrees, and slowly move the blade guard out of the way.
Now, use a combination square to double-check that the blade is perpendicular to the table. If you see any space between the table or saw blade and the combination square, it means there’s a misalignment that needs fixing right away. This simple step ensures your miter saw is set up correctly, so you get precise cuts every time.
3. Cut off Factory Ends
To tackle the common issue of factory ends not being perfectly square, just cut off a small section (around 1/2″ to 1″) from both ends before you start your project. This simple move helps lay the groundwork for accurate and straight cuts as you work on your woodworking tasks. It’s a straightforward step that ensures your materials are in good shape from the beginning, setting you up for precise results in your final product.
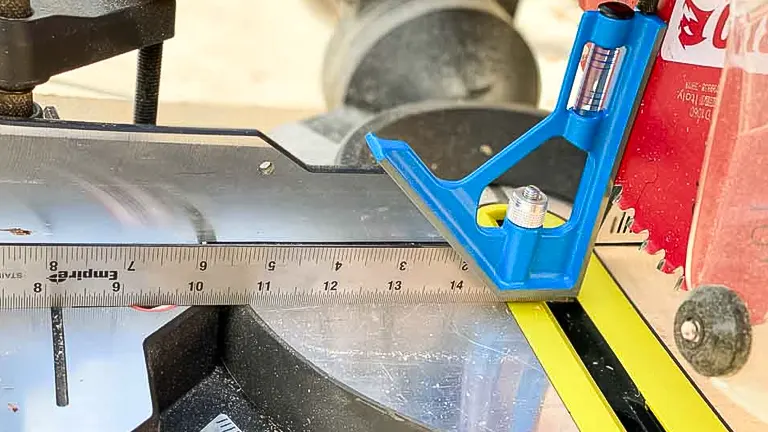
4. Using Speed Square for Cut Lines
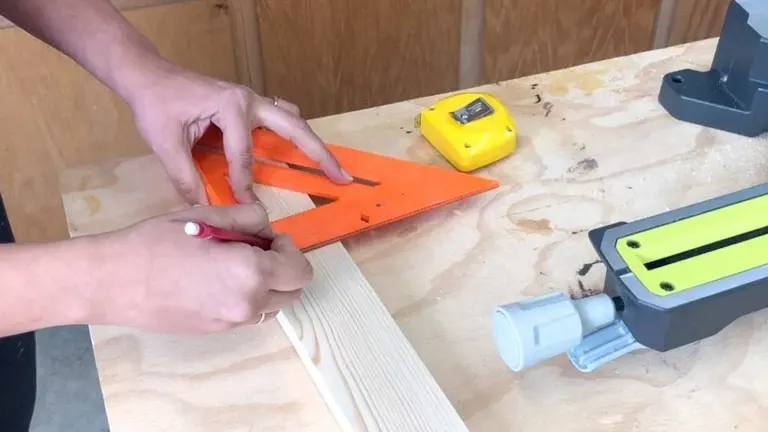
After measuring and marking your material, use a speed square to draw an accurate cut line on the board with a sharp pencil. This method not only guides your saw blade but also helps quickly check if the board is perfectly square. It ensures that your measurements are accurate for your woodworking project, giving you confidence that everything aligns well. This simple yet effective technique improves the precision of your cuts and contributes to the overall accuracy of your final product.
5. Account for the Kerf
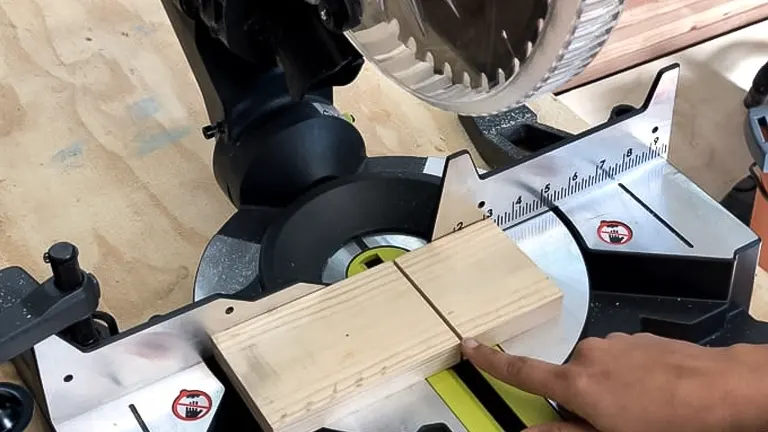
It’s essential to grasp the concept of kerf, which represents the width of the blade in woodworking. Before initiating a cut, place the saw blade on the workpiece with the machine turned off. Align the blade so that it touches the intended cut line, ensuring that the teeth fall just beside the line. This straightforward technique serves as a practical compensation method for the kerf, enabling you to attain precise measurements without the need for intricate calculations.
By adopting this approach, you not only streamline the cutting process but also guarantee accuracy in achieving the desired dimensions in your woodworking projects, making the entire procedure more accessible and efficient.
What is Kerf?
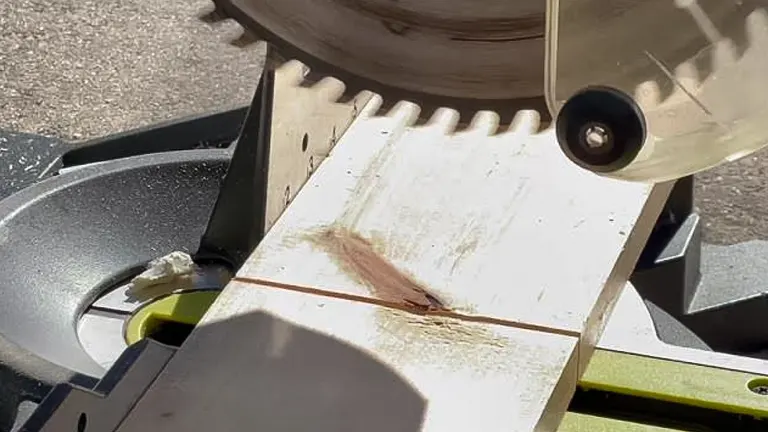
The term “kerf” in woodworking refers to the width of the material that is removed by a cutting tool, typically a saw blade, as it passes through the workpiece. It essentially represents the groove or gap created by the cutting action. Understanding the concept of kerf is crucial for woodworkers as it directly influences the dimensions of the final cut. The width of the kerf is determined by the thickness of the cutting tool, such as the blade on a miter saw or a circular saw. As a woodworker, accounting for the kerf is essential when making precise measurements and cuts, especially when aiming for specific dimensions in a project. Being mindful of the kerf allows craftsmen to adjust their measurements accordingly, ensuring that the final workpiece matches the intended design. Whether it’s a fine woodworking project or a simple DIY task, a clear understanding of kerf is fundamental for achieving accuracy and precision in every cut.
Things to Consider When Making Accurate Cuts with Your Miter Saw
- Tool Calibration: Regularly calibrate your miter saw. Despite factory settings, the tool may lose alignment during shipping or usage. Ensure the saw is square and the blade is perpendicular to the table for precise cuts.
- Material Selection: Choose high-quality materials for your projects. Inconsistent or warped wood can lead to inaccuracies in your cuts. Inspect the wood for defects before making any cuts.
- Blade Quality and Sharpness: Use a high-quality and sharp blade. Dull blades can cause tear-out and uneven cuts. Regularly check and replace blades to maintain cutting precision.
- Proper Blade Size: Ensure the blade size is appropriate for the task at hand. Different blades are designed for specific materials and types of cuts. Using the right blade minimizes errors and enhances accuracy.
- Secure Workpiece Placement: Securely clamp or fasten the workpiece to the miter saw table. Unstable or loose materials can result in inaccurate cuts and compromise safety.
- Mind the Kerf: Account for the width of the blade (kerf) when measuring and marking your cuts. Adjust your measurements accordingly to achieve the desired final dimensions in your project.
- Consistent Technique: Maintain a consistent cutting technique. Smooth, controlled movements prevent blade deflection and contribute to cleaner, more accurate cuts.
- Clear Sight Lines: Ensure a clear line of sight to your cut line. Dust and debris can accumulate, obstructing your view and leading to imprecise cuts. Regularly clean the work area for optimal visibility.
- Utilize Stop Blocks: Incorporate stop blocks for repetitive cuts. These can be clamped to the saw fence, allowing you to achieve consistent lengths without the need for repeated measurements.
- Mindful Measurement: Double-check your measurements before making any cuts. Accuracy begins with precise measurements, and a small mistake in measurement can lead to significant errors in the final product.
- Safety Precautions: Prioritize safety. Wear appropriate personal protective equipment, follow manufacturer guidelines, and adhere to safety protocols to minimize the risk of accidents and injuries.
- Test Cuts: Before making final cuts on valuable material, perform test cuts on scrap pieces. This allows you to fine-tune your setup and ensures that the miter saw is configured correctly for the desired results.
By integrating these considerations into your woodworking routine, you’ll enhance your ability to make accurate cuts with your miter saw, resulting in high-quality and precise projects.
Safety Tips on Using Miter Saw
- Read the Manual: Familiarize yourself with the manufacturer’s manual for your specific miter saw model. Understand the tool’s features, limitations, and safety guidelines provided by the manufacturer.
- Wear Personal Protective Equipment (PPE): Always wear appropriate PPE, including safety glasses to protect your eyes from debris, ear protection to minimize noise exposure, and dust masks to reduce inhalation of sawdust.
- Secure Workpiece Properly: Ensure the workpiece is securely clamped or fastened to the miter saw table. This prevents movement during cuts, enhancing both safety and accuracy.
- Maintain Clear Workspace: Keep the work area clean and well-lit. Remove any debris, sawdust, or obstacles that might interfere with the operation of the miter saw or obstruct your view of the cut line.
- Position Yourself Correctly: Stand to the side of the blade, not directly in front of it, to avoid potential kickback. Maintain a stable stance with your feet firmly planted on the ground.
- Use a Blade Guard: Keep the blade guard in place. It helps protect your hands and fingers from accidental contact with the spinning blade and also contains sawdust for a clearer view of the cut.
- Wait for the Blade to Reach Full Speed: Allow the miter saw blade to reach its full speed before cutting. Premature cutting can lead to inaccurate results and increase the risk of kickback.
- Utilize the Hold-Down Clamp: If your miter saw is equipped with a hold-down clamp, use it to secure the workpiece firmly against the fence. This minimizes movement and enhances both safety and precision.
- Keep Hands Clear of the Blade: Never place your hands in the path of the blade while it is spinning or in motion. Use push sticks or other appropriate tools to guide the material through the cut.
- Wait for the Blade to Stop: Allow the blade to come to a complete stop before raising it or moving the workpiece. This reduces the risk of accidental contact with the blade.
- Be Mindful of Cords: Keep power cords and extension cords away from the cutting path to avoid accidental entanglement or tripping hazards.
- Secure the Miter Saw: Ensure the miter saw is securely mounted or placed on a stable surface. Any wobbling or instability can lead to inaccurate cuts and compromise safety.
- Limit Excessive Cutting Speed: Avoid rushing through cuts. Maintain a controlled and steady pace to ensure precision and reduce the risk of accidents.
- Disconnect Power When Adjusting or Changing Blades: Before making any adjustments or changing the blade, disconnect the power source to prevent accidental starts.
By adhering to these safety tips, you’ll create a safer work environment, reducing the likelihood of accidents and ensuring that you can achieve accurate cuts with your miter saw confidently.
Related Post
- Miter Saw Guide: Single VS Dual Bevel
- How to Adjust a Miter Saw for Accurate Cuts
- How To Build A Miter Saw Station
- 7 DIY Miter Saw Station Plans For Your Workshop
Final Verdict
In conclusion, this guide offers essential knowledge for woodworkers, both beginners and experts alike. Covering crucial aspects like alignment, factory discrepancies, and practical operational insights, it establishes a strong foundation for precision. Actionable steps, such as aligning the table and fence, trimming factory ends, and using a speed square, provide clear solutions for consistently accurate woodworking. The guide’s attention to the kerf concept underscores the importance of meticulous details in achieving precision. The bonus tip to upgrade the saw blade stresses the role of quality tools in enhancing the overall cutting experience. Overall, this guide is a valuable resource, providing expertise and techniques to elevate miter saw usage for refined and accurate woodworking projects.
FAQs
- Why is aligning the miter saw table important for accurate cuts?
Aligning the miter saw table is crucial because it ensures that the blade is perpendicular to the table, laying the groundwork for precise cuts. Any misalignment can result in inaccuracies and compromise the quality of your woodworking projects. - How does addressing factory discrepancies improve cutting accuracy?
Trimming off factory ends eliminates off-square cuts, providing a clean and level starting point for your projects. This initial step is essential to avoid inaccuracies caused by irregularities in the factory-cut ends of the material. - Why is the kerf concept significant in woodworking?
Understanding the kerf, or the width of the blade, is vital because it allows woodworkers to compensate for material removed during cutting. This knowledge ensures that measurements are adjusted accurately, leading to precise and intended dimensions in the final product. - What role does a speed square play in making accurate cuts?
A speed square is a versatile tool that not only helps draw precise cut lines but also serves as a quick check for board squareness. It guides the blade and ensures that measurements are accurately translated into your woodwork, contributing to overall cutting accuracy. - How does upgrading the saw blade enhance cutting accuracy?
Upgrading the saw blade to one with a higher teeth count, such as 60 teeth, improves cutting quality. A sharper blade with more teeth results in smoother, cleaner cuts, enhancing the overall accuracy and finish of your woodworking projects. - What precautions can minimize the risk of kickback during miter saw usage?
Regularly inspecting and aligning the miter saw, especially after extended use, helps prevent kickback. Ensuring the blade is square to the table and using appropriate safety measures significantly reduces the risk of kickback incidents. - Can these tips be applied to different miter saw models?
Yes, the fundamental tips for accurate cuts apply to various miter saw models. Regardless of the specific make or model, aligning the saw, addressing factory discrepancies, and employing operational insights contribute to achieving precise cuts. - How often should I check and adjust my miter saw for optimal accuracy?
Regular checks and adjustments are recommended, especially before starting a new project or after prolonged use. This ensures that the miter saw maintains optimal alignment and accuracy, preventing potential deviations that may occur over time.
As we wrap up this guide on 5 Miter Saw Tips for Accuracy, we hope these insights empower your woodworking endeavors. Whether you’re a seasoned pro or just starting, these tips provide a valuable toolkit for precision cuts, emphasizing attention to detail and the importance of quality tools. Best of luck with your projects, and happy crafting!

Benjamin Brooks
Forestry AuthorGreetings! I'm Benjamin Brooks, and my journey over the past 15 years has revolved around the fascinating realms of content creation, expertise in snow clearing, and the intricate world of lumberjacking and landscaping. What began as a simple curiosity about the natural world and heavy machinery has evolved into a passionate profession where my love for crafting words intertwines seamlessly with my lumberjacking and garden skills.


Leave your comment