8×8 Chicken Coop Plans
- January 24, 2024
- 1 comment
As a dedicated backyard poultry enthusiast, I’ve always been passionate about providing the best possible environment for my chickens. After noticing that my flock was outgrowing their current space, I knew it was time to upgrade their living quarters. This led me to conduct extensive research into various chicken coop designs and sizes.
My primary considerations were space, comfort, and safety for my chickens, as well as ensuring the coop would integrate well into my backyard landscape. After comparing numerous plans, I finally settled on an 8×8 chicken coop design. This size seemed ideal for my needs, offering ample space for my growing flock without overwhelming my yard. The plan boasted several key features that caught my attention: a large, predator-proof run, elevated sleeping quarters, and easy access for cleaning and egg collection.
Diving into this project, I was driven by a blend of excitement and a keen awareness of the challenge ahead. The 8×8 plan I chose came with detailed instructions, complete with materials lists, measurements, and step-by-step building guides. I appreciated the thoroughness of the plan, which seemed to anticipate every potential hurdle, from selecting the right type of wood to ensuring proper ventilation and insulation for the coop.
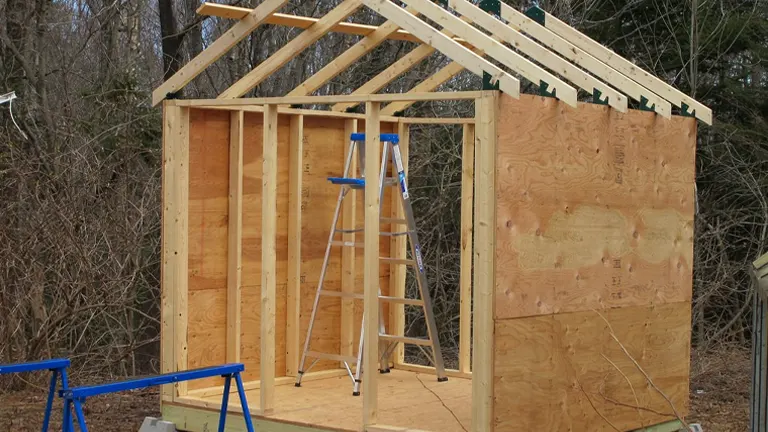
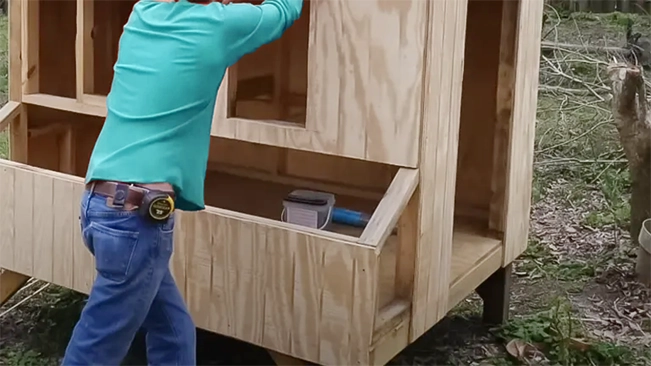
The design also included several thoughtful features such as windows for natural light, a pitched roof to prevent water accumulation, and removable trays for easy cleaning. As I gathered materials and began the construction process, I felt a deep sense of connection to the project. Every board cut and nail driven was a step towards creating a healthier, happier home for my chickens.
The complexity of the project required patience and a fair amount of problem-solving, especially when adapting the plans to fit the specific contours of my backyard. However, the challenge was part of the joy, offering a tangible way to express my commitment to my feathered friends.
Table of Contents for 8×8 Chicken Coop Plans List:
- Chicken Coop Material List (Excluding Door & Window Materials)
- Building the Floor Foundation and Joists
- Installing the Floor Deck
- Constructing Right & Left Wall Frames
- Construction of Front and Back Wall Frames
- Constructing the Top Roof Ridge
- Installing Rafters
- Applying T1-11 Exterior Siding
- Roof Deck Construction
Understanding Knowledge About the 8×8 Chicken Coop Plans
The 8×8 chicken coop, a design beloved by poultry enthusiasts, stands out for its spacious and practical layout. This dimension, measuring 8 feet by 8 feet, is meticulously crafted to house up to 25 chickens, offering them a generous amount of space to roam, nest, and roost comfortably. What distinguishes these plans is their attention to detail – they come with comprehensive instructions and vivid illustrations that guide you through each step of the construction process.
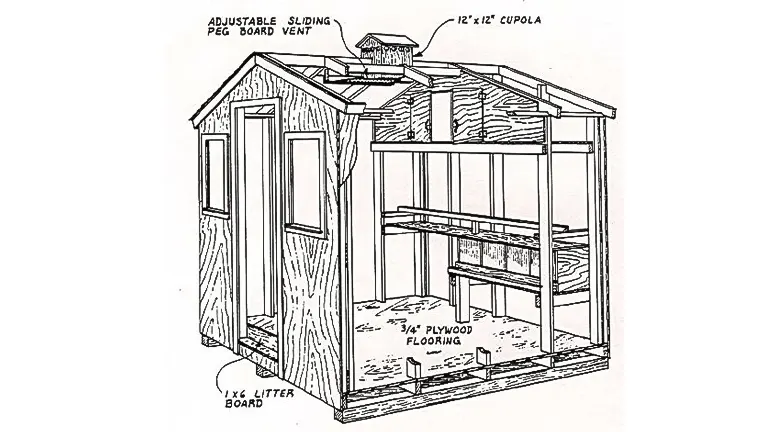
These instructions cover everything from the foundational framework to the roofing, ensuring structural integrity and protection for the flock. The design includes essential features such as multiple nesting boxes, perches at varied heights to accommodate the natural roosting instincts of chickens, and adequate ventilation to maintain a healthy living environment.
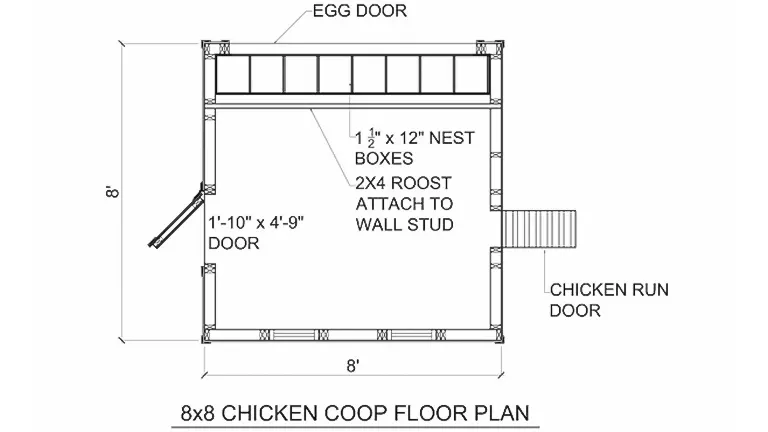
Additionally, the plans are thoughtfully created keeping in mind the ease of access for egg collection and routine maintenance. With these features, the 8×8 coop plans cater not only to the well-being of the chickens but also to the convenience of the caretaker. This balance of functionality and user-friendliness makes the 8×8 chicken coop an ideal choice for those with intermediate DIY skills looking to embark on a sustainable and fulfilling backyard poultry project.
Chicken Coop Material List (Excluding Door & Window Materials)
- Floor Construction
- 9 pieces of 2×6 pressure-treated lumber, each 8 feet in length.
- Floor Decking
- 2 sheets of 3/4″ tongue and groove plywood, measuring 4×8 feet each.
- Walls (Right & Left Side Frames)
- 14 pieces of 2×4 lumber, each 8 feet in length.
- Walls (Front & Back Frames)
- Another set of 14 pieces of 2×4 lumber, each also 8 feet in length.
- Roofing Components
- Top Roof Ridge: 1 piece of 2×4 lumber, 8 feet in length.
- Rafters: 5 pieces of 2×4 lumber, each 10 feet in length.
- Roof Deck: 3 sheets of 1/2″ plywood, each measuring 4×8 feet.
- Exterior Siding
- 8 sheets of T1-11 exterior siding, each sheet 4×8 feet.
- Trim Elements
- 2 pieces of 2×6 lumber, each 10 feet in length.
- 2 pieces of 1×6 lumber, each 10 feet in length.
- 8 pieces of 1×4 lumber, each 8 feet in length.
- Hardware and Roofing Materials
- 3 1/2″ galvanized nails.
- 2″ deck screws.
- 2″ galvanized nails.
- 1 1/4″ galvanized finishing nails.
- Roofing shingles.
- Roof tacks.
- Roofing felt.
- Staples for securing felt.
- Drip edge for water runoff.
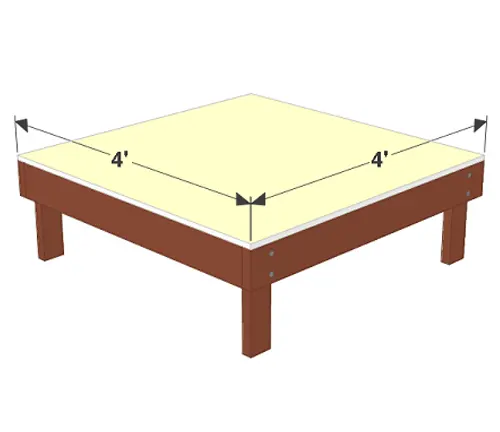
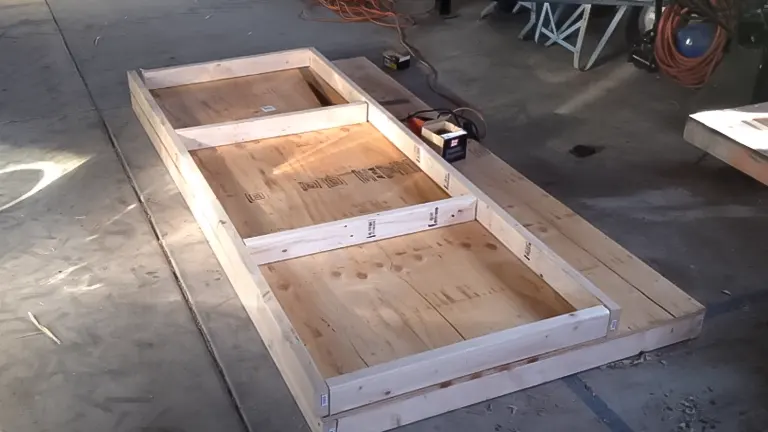
1. Building the Floor Foundation and Joists
- Begin by constructing the floor using pressure-treated lumber, known for its durability and resistance to moisture and decay.
- Start with cutting two pieces of 2×6 lumber to a length of 8 feet each. These will serve as the floor bands, forming the perimeter of the floor frame.
- Next, cut seven more 2x6s to a length of 7 feet 9 inches for the floor joists. These joists will be placed within the frame, providing structural support.
- Secure the joists to the floor bands using 3 1/2″ nails, ensuring they are evenly spaced at 16 inches on center (O.C.) for optimal support and stability.

Attaching Skids
- Attach four 8-foot long 4×4 pressure-treated skids to the underside of the floor frame. These skids will elevate the coop off the ground, enhancing its durability by preventing direct contact with soil and moisture.
- To ensure the floor frame is perfectly square, measure diagonally across the frame. Adjust until both diagonal measurements are equal.
- Nail the frame to the skids using 3 1/2″ nails, securing them firmly in place.
2. Installing the Floor Deck
- Cover the floor frame with 3/4″ tongue and groove plywood. This type of plywood interlocks at the edges, creating a seamless and sturdy floor surface.
- Secure the plywood to the frame using 2″ deck screws, ensuring a snug and immovable fit.
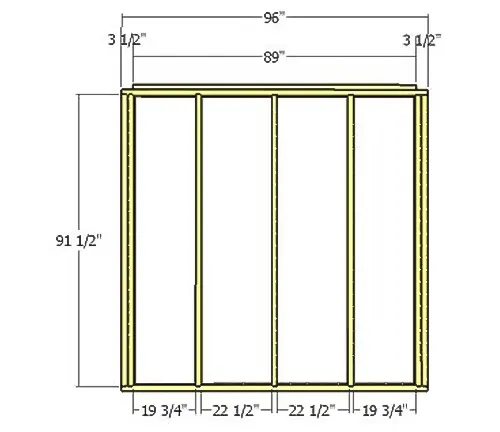
3. Constructing Right & Left Wall Frames
Wall Framing:
- For the wall frames, use 2×4 lumber. Begin by cutting four 2x4s to 8 feet in length for the top and bottom plates of each wall frame.
- Then, cut ten 2x4s to 6 feet 5/8 inches for the wall studs. These studs will be vertically placed between the top and bottom plates.
- For specific instructions on incorporating a door or window into the wall frame, refer to the provided ‘Shed Door Plans’ and ‘Wall Framing – Adding a Shed Window’ sections.
Assembly:
- Assemble the right and left walls as shown in the provided illustrations. The wall studs should be spaced 24 inches on center (2 feet O.C.).
- Secure the studs to the top and bottom plates using 3 1/2″ nails, ensuring the structure is robust and aligned.
4. Construction of Front and Back Wall Frames

Preparing the Plates and Studs
- Begin by cutting four pieces of 2×4 lumber to a length of 7 feet 5 inches each. These will serve as the top and bottom plates for both the front and back wall frames.
- Then, proceed to cut ten 2x4s, each measuring 6 feet 5/8 inches in length. These will be used as the vertical wall studs, providing structural support to the frames.
Additional Framing Details
- For integrating a door or window into these walls, detailed instructions can be found in the ‘Shed Door Plans’ and ‘Wall Framing – Adding a Shed Window’ sections. These guides will assist you in modifying the wall frames to accommodate these features.

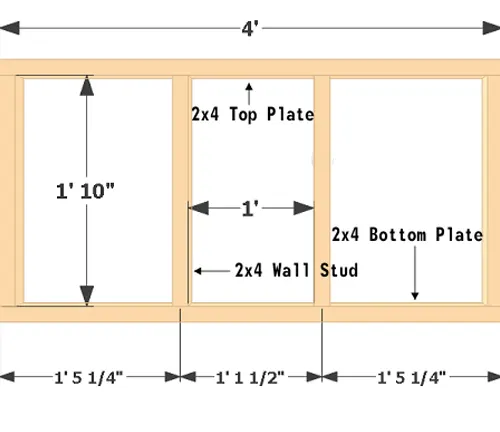
Assembling the Frames
- Secure the wall studs to the previously prepared top and bottom plates. This is done by driving 3 1/2 inch nails through the plates and into each end of the wall studs. Ensure that the studs are evenly spaced and properly aligned to maintain the structural integrity of the wall frames.
5. Constructing the Top Roof Ridge
Cutting and Assembling:
- Begin by cutting two pieces of 2×4 lumber to a length of 1 foot 2 3/8 inches each. These will form the end supports of the ridge.
- Also, cut one 2×4 to a length of 8 feet, which will serve as the main ridge board, spanning the length of the roof.
- Assemble these pieces as depicted in the provided illustration, using 3 1/2 inch nails to secure them in place. The shorter 2x4s should be attached to each end of the 8-foot ridge board, creating a sturdy and well-supported roof ridge structure.
6. Installing Rafters

Rafter Preparation:
- Use 2×4 lumber for crafting the rafters.
- Cut ten 2x4s according to the dimensions and angles shown in the illustration. These cuts are essential for the rafters to fit properly against the ridge board and wall frames.
Installation:
- Position and install the roof rafters, ensuring they are spaced 2 feet on center (O.C.) across the length of the ridge.
- Secure the rafters by nailing them with 3 1/2 inch nails through their ends into both the wall frame and the ridge board. This creates a stable framework for the roof.
7. Applying T1-11 Exterior Siding
Installation and Trimming:
- Attach the 4×8 foot sheets of T1-11 exterior siding to the coop’s walls using 1 1/4 inch finishing nails. This siding not only adds to the aesthetic but also provides additional structural stability and weather resistance.
- After the siding is installed, trim along the front and back edges following the line of the rafters. This step ensures that the siding fits neatly with the shape of the roof.
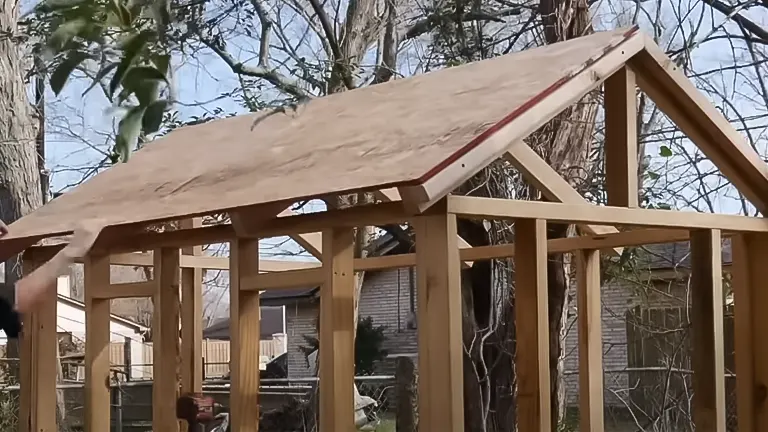
8. Roof Deck Construction
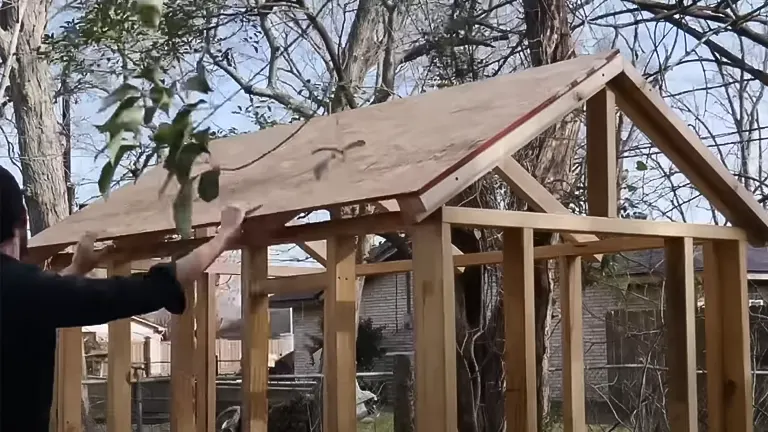
Preparing and Securing the Deck:
- Cut the 1/2 inch plywood sheets as required for the roof deck. These cuts should be made to ensure the plywood covers the entire roof area adequately.
- Install the plywood on the roof, attaching it with 2 inch nails. Make sure the plywood is laid flat and evenly across the rafters for a smooth, uniform roof surface.
Final Touches
- Install the 2×6 roof trim and 1×4 corner trim as illustrated. These trims not only enhance the roof’s appearance but also provide additional weatherproofing.
- Finally, apply the roofing felt, followed by shingles, and finish with a drip edge. This multi-layered approach ensures a weather-resistant and durable roof, protecting the coop from various elements.
Pros and Cons of the 8×8 Chicken Coop Plans
Pros:
- Spacious: The 8×8 dimensions provide ample space, comfortably accommodating a large flock of up to 25 chickens. This space allows for healthy chicken behavior and easy movement.
- Durability: Designed to endure harsh weather, the coop’s structure remains sturdy and resilient, ensuring long-term use and safety for the chickens.
- User-Friendly: The coop’s design facilitates easy cleaning and maintenance, which is a significant advantage for the keeper’s convenience.
- Detailed Plans: The instructions are clear and comprehensive, making them suitable for someone with intermediate DIY skills. They guide builders effectively through each construction step.
Cons:
- Cost: Building this chicken coop requires a higher initial investment, mainly due to the need for quality, weather-resistant materials.
- Complexity: For those new to DIY projects, some steps in the construction process might be challenging, requiring either a learning curve or assistance from someone more experienced.
Related Articles:
- How To Insulate a Chicken Coop
- How To Heat a Chicken Coop
- How To Keep Water from Freezing in Chicken Coop
- How To Build Chicken Nesting Boxes
- Best Bedding For Chickens
My Recommendations
Based on my experience, I highly recommend the 8×8 chicken coop plans for anyone with a medium to a large flock. Its space, durability, and ease of maintenance make it an excellent choice for both novice and experienced poultry keepers. However, it’s important to assess your individual needs and capabilities before diving into the construction process.
Final Conclusion
Building the 8×8 chicken coop was a rewarding experience. It met all my expectations in terms of space, durability, and maintenance. This coop has become a haven for my chickens, contributing significantly to their health and happiness. For anyone considering a similar venture, I wholeheartedly endorse these plans as a reliable, practical, and fulfilling choice.
Frequently Asked Questions
- How many chickens can comfortably fit in an 8×8 chicken coop?
The 8×8 chicken coop can comfortably house up to 25 chickens, providing ample space for them to roam, nest, and roost. - Are the plans suitable for beginners in DIY projects?
While the plans are detailed and include clear instructions and illustrations, they are best suited for someone with intermediate DIY skills due to some of the construction complexities. - What materials are recommended for building the coop?
High-quality, weather-resistant materials such as pressure-treated lumber, T1-11 exterior siding, and durable roofing materials are recommended for longevity and protection against the elements. - Is there provision for ventilation in the design?
Yes, the design includes strategically placed windows and vents to ensure adequate airflow, which is vital for the health of the chickens. - Can the design be modified to accommodate more chickens?
Modifying the design is possible, but it’s important to maintain adequate space per chicken. Consult a poultry expert or an experienced builder for modifications. - What type of foundation is required for the coop?
The coop can be built on various foundations, but a level surface is essential. Options include a concrete slab, paving stones, or directly on the ground with pressure-treated skids. - Does the plan include a predator-proof design?
The plans provide a sturdy structure, but additional predator-proofing measures such as hardware cloth, secure locks, and reinforced entry points are recommended. - How much time does it take to build the coop?
The time can vary based on skill level and available time, but on average, it can take several weekends to complete. - Are the plans adaptable for different climates?
Yes, the plans can be adapted. For colder climates, additional insulation and heating sources may be needed, whereas for warmer climates, ensuring ample ventilation and shade is crucial. - Is there room for customization in the interior layout?
The interior layout can be customized to some extent, such as altering the number or arrangement of nesting boxes and roosts, as long as the overall structural integrity is maintained.
We’re eager to hear your stories and opinions! If you’ve built or used an 8×8 Chicken Coop, please share your experiences and insights in the comments section below. Your personal journey and tips could greatly assist fellow enthusiasts in making well-informed decisions about their own chicken coop projects. Let’s build a community of shared knowledge and passion for poultry care!

Edward Smith
Forestry AuthorWoodworking is about more than crafting; it's a harmonious connection with nature, mastering tools, and preserving our environment. I'm here to share my knowledge and experiences with you, forging a future where we can embrace wood's beauty and utility while safeguarding our forests' health and diversity.


Hi, are you also available in South Africa?
Rethabile
February 27, 2024 8:13 pm