RV Wood Stove Kit: Roof-Ready Flue Kits for Complete Van & RV Installations
- November 17, 2023
- 1 comment
Tiny Wood Stove offers a range of RV Wood Stove Kits designed to tackle the unique challenges of staying warm in small, mobile spaces like RVs and buses during colder months. With three distinct options available, the 3″ RV/BUS Install Kit, the 4″ RV/BUS Install Kit, and the 5″ RV/BUS Install Kit, you can choose the perfect solution tailored to your specific needs and space requirements. Discover a comprehensive, safe, and efficient heating solution that ensures comfort, regardless of your RV or bus size.
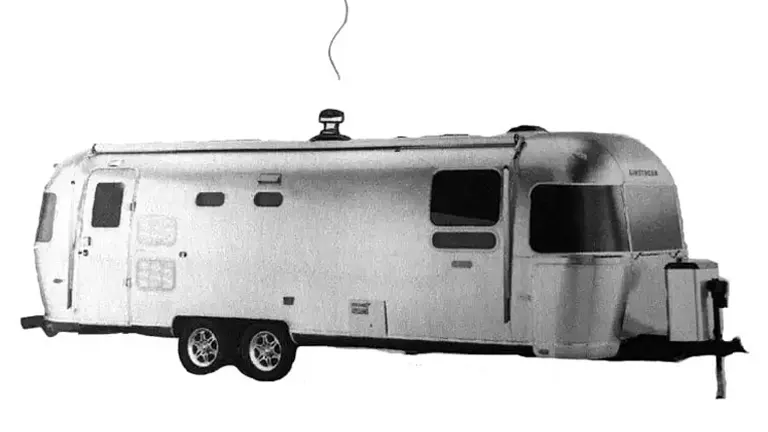
In this review, we’ll take a closer look at the RV Wood Stove Kit, exploring the components and their seamless integration, which come together to create an effective and reliable heating installation. From its innovative roof vent down to the locking bands and safety features, every element of the kit has been designed with the unique needs of RV and bus users in mind, reflecting Tiny Wood Stove’s commitment to quality and user-centric design.
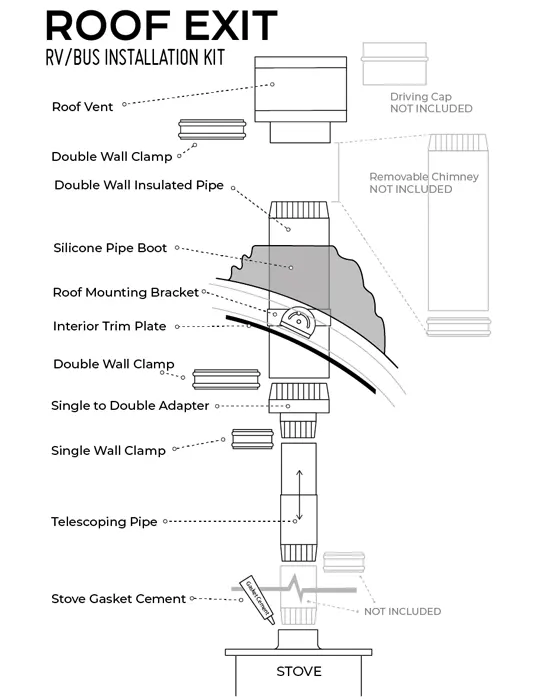
RV & Bus Roof Installation Kit Wood Stove Pipe Kits Through the Roof
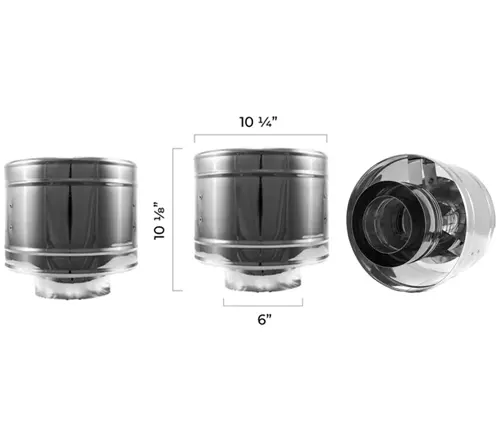
Roof Vent
At the top of the system lies the roof vent, a crucial component designed to protect against wind and rain. Its new design includes a full shield to prevent driving rain infiltration and a top cap coupled with a built-in spark arrestor, enhancing safety and durability.
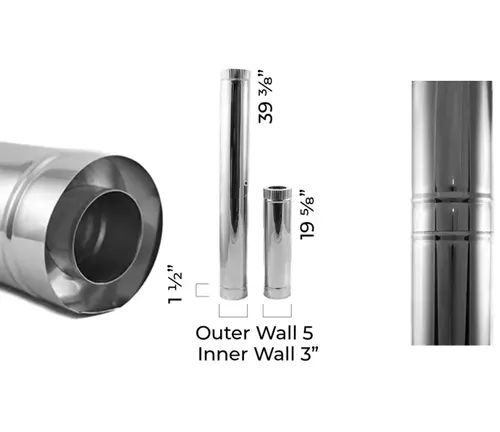
Double Wall Insulated Pipe
At the core of our wood stove pipe kits, designed for roof installation, is the double-wall insulated pipe. This crucial component ensures the safe routing of the chimney through any part of the structure, whether it’s a wall or the roof. Notably, the double-wall insulated pipe demands only a 2-inch clearance from combustible materials, which is substantially less than the clearance required for single-wall pipes. This key design feature in our roof-installing wood stove pipe kits underscores our commitment to safety, guaranteeing a secure and dependable setup in a variety of environments.
Transitioning with the Single to Double Adapter
To step down from the chimney to the stovepipe, the kit includes a single to double adapter. This component ensures a secure transition, which is further reinforced by clamps that cinch down for a tight seal.

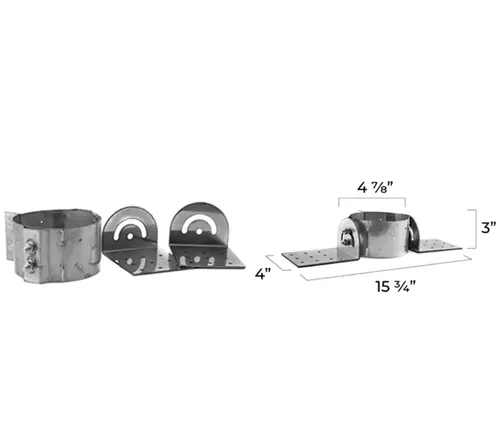
Roof Support Bracket
The roof support bracket is ingeniously designed to secure the chimney both vertically and laterally. Its adaptable design allows for installation on either the top or underside of the roof, ensuring stability in various setups.
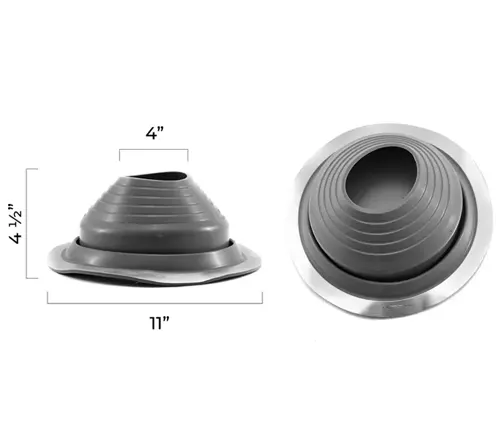
Silicone Pipe Boot
A silicone pipe boot is provided to create a watertight seal at the roof penetration point. Compatible with various roof pitches, it snugly fits over the pipe and is secured with silicone and fasteners, preventing any water ingress.
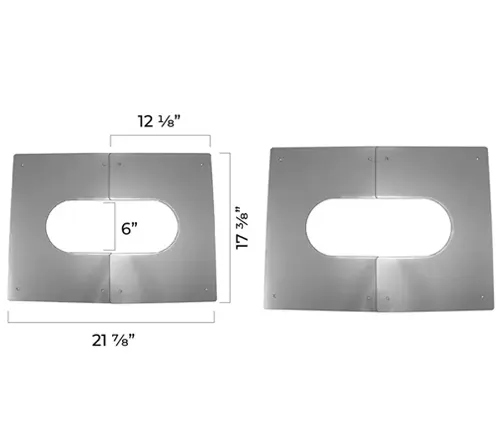
Adjustable Trim Plate
The stainless steel adjustable trim plate is a thoughtful addition, allowing for a clean, finished look inside the structure. It’s designed to accommodate different roof angles, ensuring a seamless integration regardless of roof pitch.
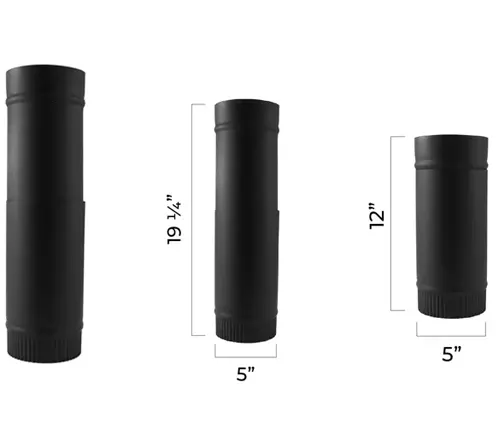
Telescoping Stovepipe
The telescoping stovepipe is a highlight for its ease of installation. It eliminates the need for precise cutting, allowing for straightforward adjustments to fit between different pipe sections.
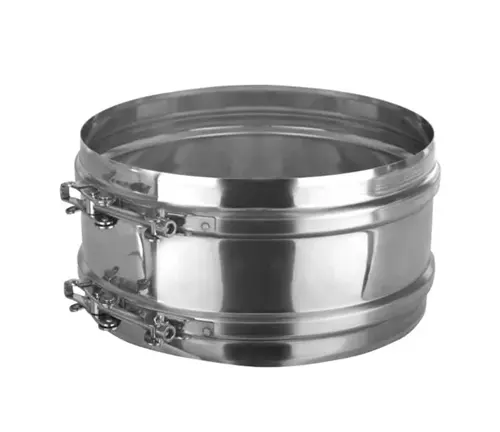
Locking Bands and Safety Features
Finally, the kit includes locking bands for securing both insulated and single-wall pipe sections. While the use of heat-safe self-tapping screws is an option, the locking bands are recommended for their superior seal and cohesive aesthetic.
Installing Guide of RV Wood Stove Kit
Installing a wood stove in your RV or bus can be a rewarding project that adds warmth and comfort to your mobile living space. The RV Wood Stove Kit by Tiny Wood Stove is designed to make this process easier, but it’s important to follow the right steps to ensure safety and effectiveness. Here’s a step-by-step guide:
- Choosing the Right Kit Size: The first step in installing a wood stove in your RV or bus is to determine the size of the area you want to heat. Tiny Wood Stove offers 3″, 4″, and 5″ RV/BUS Install Kits, each designed for different space sizes and heating requirements. Assess the area to be heated and select the kit that best fits your needs, keeping in mind that larger spaces typically require larger stove kits.
- Planning Your Stove Location: Finding the right spot for your wood stove is crucial. You need to choose a location in your RV or bus that not only provides enough clearance from combustibles, as per the stove’s instructions but also allows for proper ventilation and meets the requirements for chimney placement. This step is vital for both safety and efficiency.
- Stove Installation: Once you have selected the perfect spot, place your wood stove in the predetermined location. Follow the manufacturer’s instructions carefully to securely anchor the stove to the floor. This ensures stability and safety while the stove is in use.
- Chimney Installation: Begin by attaching the single-to-double adapter to your stove’s outlet, and securing it with the provided clamps. Next, install the telescoping stovepipe to connect the stove to the chimney system. For any section of the chimney that passes through combustible materials, use the double-wall insulated pipe.
- Creating a Roof Penetration: Carefully cut a hole in the roof where the chimney will exit, ensuring it aligns with the stovepipe below. Install the roof support bracket, which can be secured either on the top or underside of the roof, depending on your setup. Then, fit the silicone pipe boot around the chimney pipe on the roof to create a watertight seal, securing it with silicone and fasteners.
- Finalizing the Chimney Installation: Add the roof vent at the top of the chimney, ensuring it’s properly attached and sealed. Use the locking bands to secure all joints in the chimney, including both insulated and single-wall sections. This step is crucial for the overall stability and safety of the chimney.
- Adding Finishing Touches: Install the adjustable trim plate inside your RV or bus for a neat finish around the stovepipe’s interior exit point. Ensure everything is correctly aligned and securely fitted for a professional and aesthetically pleasing look.
- Safety Check and First Burn: After installation, it’s important to thoroughly inspect all connections, supports, and seals. Conduct a small test fire in the stove to ensure everything is working correctly, checking for any issues like smoke leaks or inadequate ventilation.
- Regular Maintenance: To maintain the efficiency and safety of your wood stove, clean the stove and chimney regularly to prevent soot buildup. Also, periodically inspect all components for signs of wear or damage.
- Enjoying Your Stove: Once everything is set up and checked, you can enjoy the cozy warmth and ambiance your new wood stove brings to your RV or bus!
Remember, while this guide provides an overview, always refer to the specific instructions provided with your Tiny Wood Stove Kit and consult a professional if you’re unsure about any part of the installation process.
Troubleshooting Tips for the RV Wood Stove Kit by Tiny Wood Stove
Common Installation Issues and Solutions
- Difficulty in Aligning Stovepipe Sections: Ensure that you are aligning the male and female ends of the stovepipe sections correctly. Sometimes, slightly twisting the pipes can help them fit together more smoothly.
- Chimney Not Drawing Well: Verify that all components are correctly installed with no blockages. Ensure the roof vent is clear of obstructions. Inadequate draw can also be due to insufficient chimney height; consider extending the chimney above the highest point of your RV or bus.
- Leaks Around the Roof Penetration: Double-check the installation of the silicone pipe boot. Ensure it’s properly sealed with silicone and that all fasteners are tight. It’s crucial to create a watertight seal to prevent leaks.
- Stove Not Securing Properly to the Floor: Confirm that you are using the appropriate hardware for your floor type. You may need different screws or anchors depending on whether your floor is wood, metal, or another material.
- Too Much Heat Close to Combustibles: Ensure that all clearance requirements are met as per the kit’s instructions. If necessary, install heat shields or use non-combustible wall coverings to protect nearby surfaces.
Maintenance Tips for the RV Wood Stove Kit
- Regular Cleaning: Clean the stove and chimney regularly to prevent soot and creosote buildup. This not only maintains efficiency but also reduces the risk of chimney fires.
- Inspecting Seals and Joints: Periodically check all seals and joints for signs of wear or leakage. Replace any degraded seals and tighten loose joints as needed.
- Monitoring for Corrosion: Inspect the stovepipe and chimney for any signs of rust or corrosion. Regularly check the roof vent and pipe boot for damage, especially after extreme weather conditions.
- Checking the Spark Arrestor: Ensure the spark arrestor in the roof vent is clear of debris to maintain proper airflow and prevent fire hazards.
- Firewood Quality: Use only dry, seasoned hardwood to minimize creosote buildup. Avoid burning treated wood, trash, or other materials that can release harmful chemicals.
- Seasonal Preparations: Before the heating season begins, do a thorough check of the entire system to ensure everything is in good working order.
By following these troubleshooting tips and maintaining your RV Wood Stove Kit regularly, you can ensure a safe and enjoyable heating experience in your mobile living space. Remember, if you encounter an issue that you’re not confident in handling, seeking professional assistance is always the best course of action.
Comparing the RV Wood Stove Kit with Alternative RV Heating Solutions
When considering heating options for your RV or bus, it’s helpful to compare the RV Wood Stove Kit by Tiny Wood Stove with other available solutions. Here’s a brief overview of the pros and cons of some common alternatives:
1. Electric Heaters:
- Pros: Electric heaters are easy to use, require no installation, and are clean with no emissions. They are a good option in RV parks with electric hookups.
- Cons: They can be costly in terms of energy consumption, especially if you’re not connected to an external power source. They also don’t offer the same cozy ambiance as a wood stove.
2. Propane Heaters:
- Pros: Propane heaters are powerful and efficient. They work well in various environments and are typically easy to install.
- Cons: They require a steady supply of propane, which can add to travel costs and planning. There’s also the risk of carbon monoxide poisoning if not ventilated properly.
3. Diesel Heaters:
- Pros: Diesel heaters are very efficient and can be connected to your vehicle’s diesel tank. They are a good choice for colder climates.
- Cons: They tend to be more expensive and can be noisier than other options. Diesel fuel can also produce a distinct smell.
4. Solar Heating Solutions:
- Pros: Solar solutions are eco-friendly and can be cost-effective in the long run. They’re ideal for travelers who prefer staying off-grid.
- Cons: The initial setup can be costly and complex. Their efficiency depends heavily on weather conditions and geographic location.
RV Wood Stove Kit:
- Pros: Offers a cozy and traditional ambiance, efficient heating, and can double as a cooking surface. It’s a sustainable option if you have access to free or inexpensive wood.
- Cons: Requires installation and regular maintenance. It demands careful usage to prevent fire hazards and requires ventilation.
Each heating option has its advantages and disadvantages, depending on your lifestyle, travel habits, and personal preferences. The RV Wood Stove Kit stands out for its cozy ambiance and sustainable heating, making it ideal for those who enjoy traditional fire warmth and have access to wood. However, for those seeking convenience and minimal maintenance, electric or propane heaters might be more suitable. Diesel heaters offer efficiency in colder climates, while solar solutions appeal to those committed to eco-friendly living. Ultimately, the best choice depends on your specific needs, budget, and the environment in which you’ll be traveling.
Conclusion
The RV Wood Stove Kit by Tiny Wood Stove emerges as an exceptionally well-thought-out solution for heating needs in mobile living environments. Its components are designed not only for efficient heat distribution but also with a keen eye on safety, ease of installation, and aesthetic appeal. This kit represents a significant step forward in making RV and bus living comfortable and cozy, regardless of the outside temperatures.
For those seeking to maintain warmth and comfort on the road, the RV Wood Stove Kit by Tiny Wood Stove stands out as a reliable, safe, and effective choice.
If you’re interested in exploring these versatile heating solutions for your RV or bus, you can view and purchase the Tiny Wood Stove Kits right here.
FAQs
- Can I install the RV Wood Stove Kit in any size of RV or bus?
Absolutely! The beauty of the RV Wood Stove Kit is its versatility. With three different kit sizes (3″, 4″, and 5″), it’s designed to accommodate a wide range of RV and bus sizes. Just choose the kit that best matches your space and heating needs. - How does the telescoping stovepipe make installation easier?
The telescoping stovepipe is a game-changer for DIY installers. It’s designed to adjust in length, which means you don’t need to cut pipes to fit precisely. This feature significantly simplifies the installation process, making it more accessible for those who might not have specialized tools or extensive experience. - Is it safe to use a wood stove in a small, confined space like an RV?
Safety is a top priority in the design of the RV Wood Stove Kit. When installed correctly, following all guidelines and clearance requirements, it is indeed safe. The kit includes safety features like a double-wall insulated pipe for protection against heat and a spark arrestor in the roof vent. - How do I maintain and clean the stove and chimney in my RV?
Regular maintenance is key. For the stove, regular ash removal and periodic checks of seals and joints are recommended. The chimney should be inspected and cleaned periodically to prevent soot and creosote buildup, which can be a fire hazard. - Can the stove be used for cooking as well as heating?
Yes, many RV owners use their wood stoves for both heating and cooking. The stove’s top surface can be used to boil water, simmer soups, or even fry eggs, making it a versatile addition to your RV or bus. - How does the adjustable trim plate enhance the installation?
The adjustable trim plate adds a clean, finished look where the stovepipe exits inside your RV or bus. It’s designed to fit different roof pitches, ensuring a seamless look regardless of your specific setup. This not only improves the aesthetic but also ensures a more secure installation. - What should I do if I’m not confident in installing the kit myself?
If you’re unsure about the installation process, it’s always best to consult with or hire a professional. Proper installation is crucial for both the efficiency and safety of the stove. - 8. Are there any special considerations for using the wood stove at high altitudes?
At higher altitudes, stoves can behave differently due to lower air pressure and oxygen levels. It might be necessary to adjust your burning practices, such as using more kindling to start the fire and ensuring more airflow to maintain it. - 9. How does the silicone pipe boot contribute to the kit’s functionality?
The silicone pipe boot is essential for creating a watertight seal around the chimney where it exits through the roof. This prevents water leakage, protecting both your stove and the interior of your RV or bus from water damage. - 10. What kind of wood is best to use in the RV Wood Stove?
It’s recommended to use dry, seasoned hardwood for burning in your RV wood stove. Hardwoods, such as oak or maple, burn longer and produce more heat compared to softer woods, making them more efficient for small spaces like RVs and buses.

David Murray
Forestry AuthorI'm David Murry, a forestry equipment specialist with a focus on chainsaw operation. With over 13 years of experience, I've honed my skills in operating and maintaining a wide range of machinery, from chainsaws to log splitters. My passion for the outdoors and commitment to sustainable forestry drive my work, which emphasizes safety, efficiency, and staying updated with industry advancements. Additionally, I'm dedicated to sharing my expertise and promoting environmental awareness within the forestry community.


What about insurance/instability?
Pix
November 25, 2023 6:02 am