How to Build a Wood Shed
- January 30, 2024
- 0 comment
Building a wood shed can be a simple and rewarding DIY project, perfect for creating a durable and practical storage solution for your firewood or tools. Whether you’re looking for a DIY firewood shed or exploring cheap wood shed ideas, this guide will walk you through the process with easy-to-follow steps. With a focus on simple wood shed design, you’ll have a sturdy structure that meets your needs in no time.
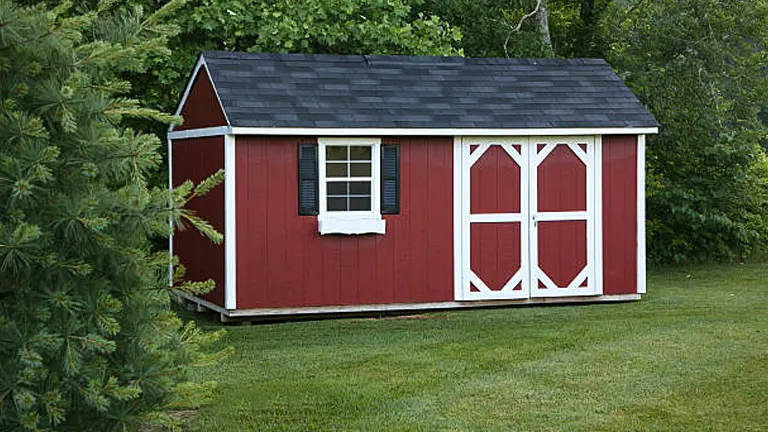
This guide is perfect for anyone seeking a functional and efficient storage solution. From selecting the right materials to adding the final touches, we’ll walk you through the entire process. Whether you’re building a DIY firewood shed, storing garden tools, or simply need extra outdoor storage, our steps focus on creating a practical and durable structure. With tips for a wood shed foundation and simple wood shed design, this project is both achievable and rewarding.
List of Guides on How to Build a Wood Shed
- Site Preparation
- Foundation
- Floor Frame
- Floor Installation
- Wall Frames
- Roof Framing
- Roof Sheathing and Shingles
- Wall Siding
- Doors and Windows
- Trimming and Finishing
- Painting or Sealing
- Final Inspection
Tools Required
- Air Compressor and Air Hose
- Brad Nail Gun
- Caulk Gun
- Chalk Line
- Circular Saw
- Clamps
- Cordless Drill and Drill Bit Set
- Hammer
- Hearing and Eye Protection
- Jigsaw
- Level
- Pocket Hole Jig
- Router
- Sawhorses
- Speed Square
- Stepladder
- Tape Measure
- Tin Snips
Materials Required
- 1-1/2-in. Trim Piece
- 1/4-in. Acrylic Sheet
- 16d Nails and 6d Galvanized Box Nails
- 1×6, 2×10, 2×4, 2×6, 4×6, 6×6 Boards
- 3-in. Screws
- 4×8 ft. Grooved Plywood
- Caulk
- Composite Trim
- Fiberglass Shingles
- Gravel
- Hinges
- Metal Z-flashing
- OSB Siding
- Soffits
- Treated 3/4-in. Plywood
- Two Layers of 3/4-in. Boards
Step-by-step Guides
1. Site Preparation

Preparing your site is a critical first step in building a durable and functional wood shed. Start by clearing the area of debris, rocks, and vegetation to create a stable base, which is essential for avoiding structural issues down the line. Level the ground thoroughly using a builder’s level or laser level, adjusting the soil as needed to ensure a flat, even surface. This step is vital for the wood shed foundation and ensures the shed’s longevity. Additionally, consider the shed’s placement take into account prevailing winds and water flow to position it effectively. For added safety, always check for underground utilities before digging or altering the landscape. Proper site preparation is key to achieving a simple wood shed design and sets the stage for a successful construction process.
Pro Tips:
- Check Local Regulations: Before starting, ensure you’re aware of any local building codes or permits required for constructing a shed.
- Consider Accessibility: Position your shed in a location that allows easy access for both construction and future use.
- Plan for Drainage: Ensure the site slopes slightly away from the shed to avoid water pooling.
- Use Stakes and String: Mark out the exact dimensions of your shed with stakes and string to visualize the space and confirm your plans.
- Consult a Professional for Uncertain Terrain: If your property has uneven or challenging terrain, consulting with a professional landscaper or contractor can provide valuable insights.
2. Foundation
Selecting the right foundation is a crucial step to ensure your wood shed’s stability and longevity. Depending on the shed’s size and the ground conditions, you can choose between a gravel bed, concrete blocks, or a concrete slab. For most DIY wood shed plans, a gravel foundation over compacted soil is a cost-effective and reliable option. To build a gravel foundation, start by creating a perimeter frame using 6×6 boards to outline the shed’s base. Fill the frame with gravel, spreading it evenly and compacting it well to provide proper drainage and a stable platform. This method works particularly well for simple wood shed designs, helping maintain the shed’s structural integrity over time while keeping costs manageable.
Pro Tips:
- Assess Soil Type: Different soils have varying support capabilities. Clay-heavy soil may require a more robust foundation compared to sandy or loamy soil.
- Waterproofing: Consider adding a layer of landscape fabric under the gravel to prevent weed growth and further enhance drainage.
- Level Twice, Build Once: Double-check the levelness of the foundation frame before and after adding gravel to avoid future issues.
- Consider Frost Heave: In colder climates, make sure the foundation depth is below the frost line to prevent shifting during freeze-thaw cycles.
- Drainage Planning: Ensure the area around your shed slopes away from the foundation to avoid water pooling.
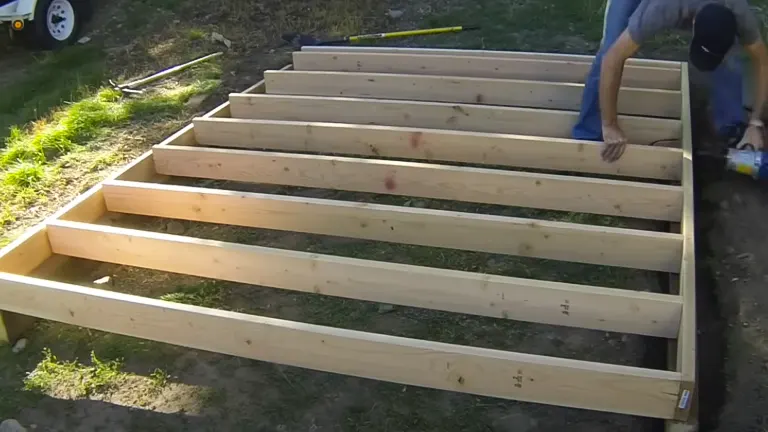
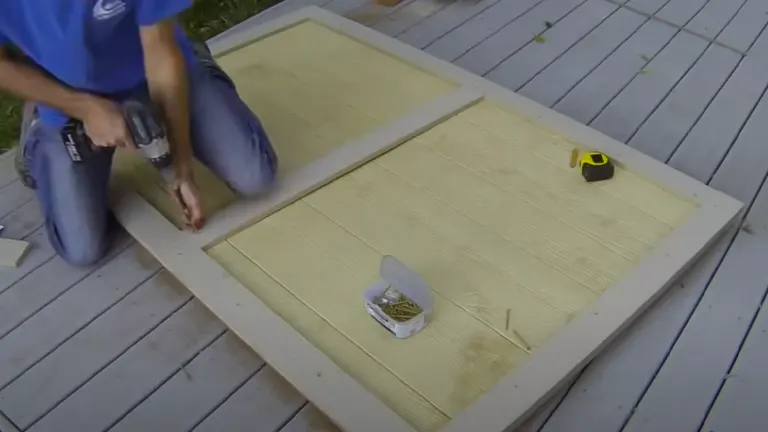
3. Floor Frame
The floor frame is the backbone of your wood shed, providing a sturdy base for the entire structure. Use 2×6 boards to build a rectangular frame that defines the shed’s floor area. Secure the corners and joints with 3-inch screws to create strong and durable connections. To ensure the frame is perfectly square, apply the 3-4-5 triangulation method at each corner. This technique involves forming a triangle with sides measuring 3, 4, and 5 feet (or their multiples), guaranteeing right angles. Achieving a square and balanced frame is crucial for maintaining the structural integrity of your shed, ensuring the walls and roof align properly. A well-built floor frame sets the foundation for any DIY firewood shed or simple wood shed design.
Pro Tips:
- Wood Quality Check: Inspect each 2×6 board for warping or damage before use to ensure the frame’s integrity.
- Pre-Drilling: To prevent wood splitting, pre-drill holes before inserting 3-inch screws, especially near the ends of the boards.
- Cross-Bracing for Extra Stability: Consider adding cross-bracing between the joists for additional support, particularly if the shed will hold heavy items.
- Ground Clearance: Keep the frame slightly elevated from the ground to prevent moisture damage. This can be done using concrete blocks or treated lumber as a base.
- Use Galvanized Screws: Opt for galvanized or stainless steel screws to prevent rusting and corrosion over time.
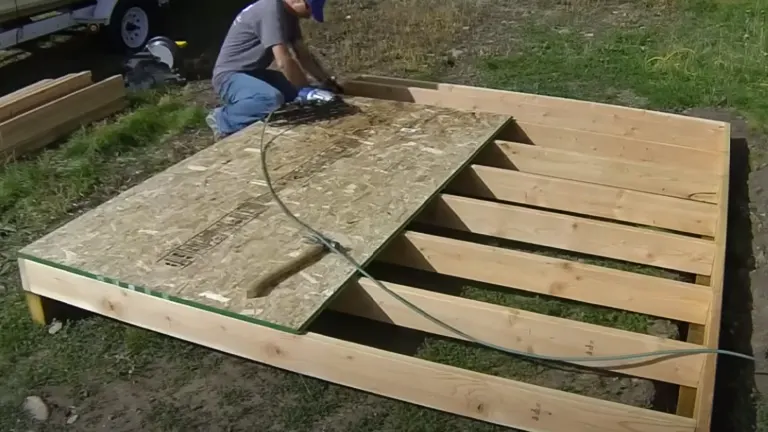
4. Floor Installation
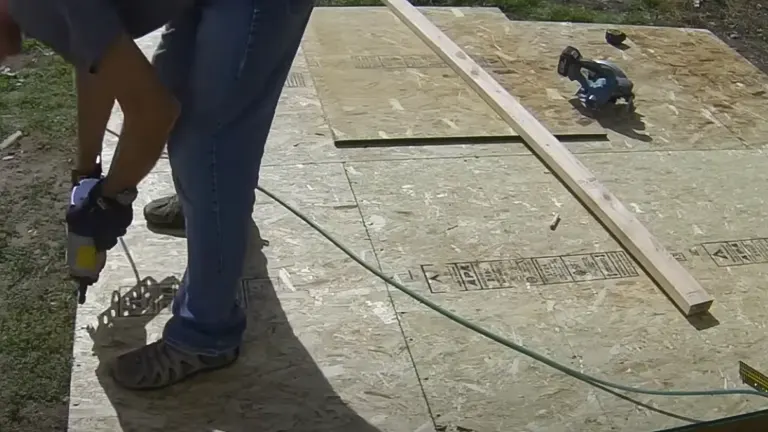
To create a long-lasting and stable base for your wood shed, cover the 2×6 floor frame with treated 3/4-inch plywood sheets. Using treated plywood is essential as it resists moisture, ensuring the floor remains durable over time. Align the plywood sheets carefully with the edges of the frame for a precise fit. Secure the plywood by nailing it down at 6-inch intervals along the edges, maintaining consistent spacing for even weight distribution and enhanced stability. This method helps prevent the wood from warping or buckling over time, making it ideal for DIY wood shed plans or simple wood shed designs. A well-installed floor ensures a solid foundation for the rest of the shed construction process.
Pro Tips:
- Seal the Plywood Edges: Apply a waterproof sealant to the edges of the plywood for extra protection against moisture.
- Stagger the Seams: When laying multiple plywood sheets, stagger the seams to enhance floor strength and stability.
- Use the Right Nails: Opt for galvanized or stainless steel nails to prevent rust and ensure long-term durability.
- Check for Level: After installing the plywood, use a level to check for any uneven areas and correct them if necessary.
- Leave Expansion Gaps: Allow for slight gaps between plywood sheets to accommodate wood expansion during different weather conditions.
5. Wall Frames
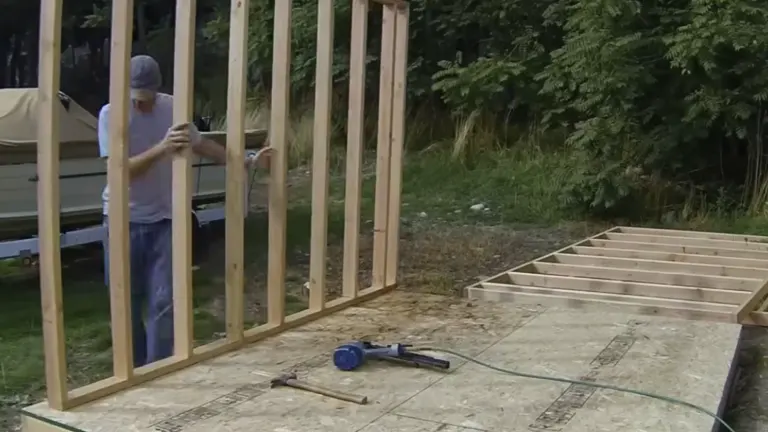
Begin by sketching out the wall designs on paper, paying special attention to the placement of doors and windows. This pre-planning ensures a clear blueprint to follow during construction. Use 2×4 boards to construct each wall. Lay the boards flat on the ground to assemble the frames, making the process more manageable and accurate. A framing square is essential here to verify that each corner forms a right angle, which is crucial for the structural integrity and proper alignment of the shed. Once each wall frame is assembled, carefully raise them into their designated positions. It’s important to ensure that each wall is level and aligns flush with the edges of the floor frame. This step requires precision as it sets the basis for a well-structured and balanced shed.
Pro Tips:
- Double-Check Measurements: Before cutting, confirm all measurements twice to avoid errors.
- Use Temporary Bracing: While raising the walls, use temporary bracing to hold them upright and stable.
- Anchor Securely: Ensure each wall is securely anchored to the floor frame for added stability.
- Consider Door and Window Headers: Install headers above doors and windows for additional structural support.
- Align Carefully: When positioning the walls, take extra care to align them with the edges of the floor frame for a seamless fit.
6. Roof Framing
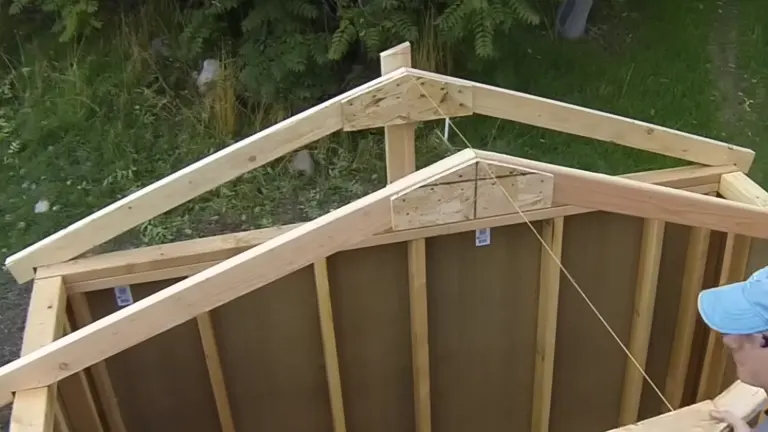
Roof framing is a crucial step in constructing a durable and weather-resistant wood shed. Start by cutting 2×10 boards to create the rafters, ensuring the angles match your chosen roof pitch. Precise angle cuts are essential for a proper fit and a structurally sound roof. The ridge beam, positioned at the apex of the rafters, serves as the roof’s highest point and provides critical support for its weight and shape. Secure the rafters and ridge beam with metal connectors, which add strength and stability. These connectors attach the rafters to both the ridge beam and the top plates of the wall frames, ensuring a reliable connection. Careful alignment and secure fastening of these components are vital for constructing a roof that withstands the elements, making it ideal for DIY wood shed plans and simple wood shed designs.
Pro Tips:
- Check Roof Pitch Requirements: Different sheds may require different roof pitches, especially if you’re in an area with heavy snow or rain. Make sure your roof pitch matches local building requirements and environmental needs.
- Use Temporary Supports: When assembling the roof, use temporary supports to hold the ridge beam in place until all rafters are securely attached.
- Pre-Drill Holes for Connectors: To ease the installation of metal connectors and prevent wood splitting, pre-drill holes in the rafters and ridge beam.
- Reinforce Roof Corners: Consider reinforcing the corners where rafters meet the ridge beam for extra stability, especially in windy areas.
- Align Ridge Beam Precisely: Ensure the ridge beam is perfectly horizontal before securing the rafters. This alignment is crucial for a symmetrical and well-balanced roof.
7. Roof Sheathing and Shingles
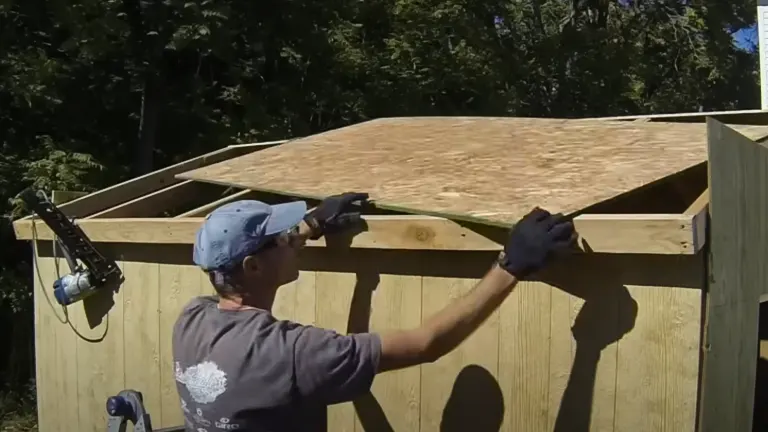
Once the roof framing is complete, the next step is to install the roof sheathing and shingles to ensure a durable, weatherproof structure. Begin by covering the rafters with OSB (Oriented Strand Board) sheathing, which provides a solid and stable base for the shingles. Secure the OSB firmly with nails to prevent movement. For the shingles, start at the bottom edge of the roof and work your way up toward the ridge. Lay the shingles in overlapping rows, a critical step for effective waterproofing. Use a brad nail gun to attach the shingles securely and efficiently, ensuring the rows remain straight and evenly spaced. A well-installed roof not only protects the shed from the elements but also complements the simple wood shed design, making it a practical and visually appealing addition to your property.
Pro Tips:
- Overhang the Siding: Allow a slight overhang of the OSB siding at the roof edges to ensure proper water runoff.
- Seal the Seams: Use roofing felt or a similar material to cover the OSB siding seams before laying shingles, for added moisture protection.
- Stagger the Shingles: When installing shingles, make sure to stagger the seams between rows. This prevents water infiltration.
- Nail Placement: When using the brad nail gun, place nails in the designated spots on the shingles to ensure they hold firmly and remain weatherproof.
- Ridge Cap Shingles: At the peak of the roof, use specially designed ridge cap shingles for a clean finish and better protection.
8. Wall Siding
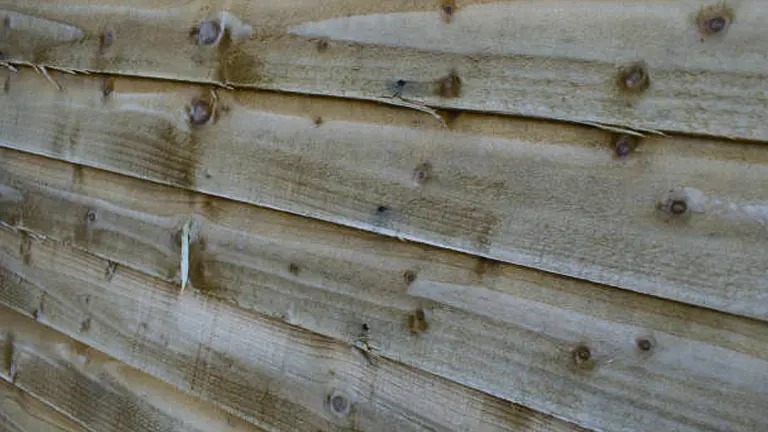
Covering the wall frames with OSB siding is an important step in enhancing your wood shed’s durability and weather resistance. Start by aligning the bottom edge of the siding with the bottom of the floor frame. This alignment ensures a uniform and stable base for the siding. Secure the siding to the wall frames using nails or screws, spacing them evenly to provide a firm hold and prevent warping over time.
Pay close attention to alignment, making sure the siding is flush against the frame to avoid gaps or unevenness. Properly installed siding not only strengthens the shed’s structure but also enhances its aesthetic appeal, making it an excellent choice for DIY wood shed plans or cheap wood shed ideas. With careful installation, your siding will provide lasting protection from the elements.
Pro Tips:
- Trim Around Openings: Trim the siding accurately around doors and windows for a tight fit and better weatherproofing.
- Use a Carpenter’s Square: Check the corners with a carpenter’s square to ensure the siding is perfectly vertical and square.
- Flash Above Windows and Doors: Install flashing over the tops of windows and doors before adding the siding to prevent water leakage.
- Pre-Paint or Treat Siding: If possible, paint or treat the siding before installation for easier application and comprehensive coverage.
- Allow for Expansion: Leave a small gap at the joints of the siding panels to allow for wood expansion and contraction.
9. Doors and Windows
Adding doors and windows to your wood shed is the final step to enhance its functionality and appeal. Begin by using a jigsaw to cut out the pre-marked openings, taking care to make clean, straight cuts for a precise fit. Once the openings are prepared, install the doors and windows. Secure the doors with durable hinges, ensuring smooth operation when opening and closing. For both doors and windows, apply a bead of caulk around the edges to seal any gaps. This step is essential for keeping out water and drafts, enhancing the shed’s weather resistance and security. Properly installed doors and windows not only improve the practicality of your DIY wood shed but also contribute to its overall durability and aesthetic appeal.
Pro Tips:
- Support the Frame During Cutting: Use clamps to hold the frame steady while cutting openings with the jigsaw to prevent accidental damage.
- Pre-Install Fixtures on Doors: Attach handles, locks, and other fixtures to the door before hanging it to make the installation easier.
- Use Shims for Leveling: If the door or window doesn’t sit level, use shims to adjust and align them properly before final fastening.
- Sealant Choice Matters: Choose a high-quality, flexible caulk for sealing, as it will better accommodate the wood’s natural expansion and contraction.
- Inspect and Adjust: After installation, inspect the doors and windows for any gaps or sticking points and adjust as necessary for a perfect fit.
10. Trimming and Finishing
Adding composite trim around the doors, windows, and corners is the perfect way to enhance your shed’s appearance while protecting the edges of the siding. This trim not only gives the shed a polished and professional look but also adds a layer of durability by safeguarding vulnerable areas. Next, apply a high-quality sealant to all joints and seams using careful and even strokes. Proper caulking is essential for making the shed water-tight, preventing moisture infiltration that could lead to structural damage over time. Both trimming and caulking play a key role in the DIY wood shed plans process, ensuring your shed is not only visually appealing but also long-lasting and resistant to weather exposure.
Pro Tips:
- Precise Trim Cutting: Measure and cut the trim precisely for a clean, professional finish.
- Smooth Caulking: Use a caulking gun for a smoother application and wipe any excess immediately for a neat finish.
- Ventilation Gaps: Ensure small gaps are left under the trim of the soffits for proper ventilation.
- Corner Trim First: Install the corner trims before the side trims for a more seamless appearance.
- Paint Before Installation: If painting the trim, do it before installation for easier handling and a more uniform coat.
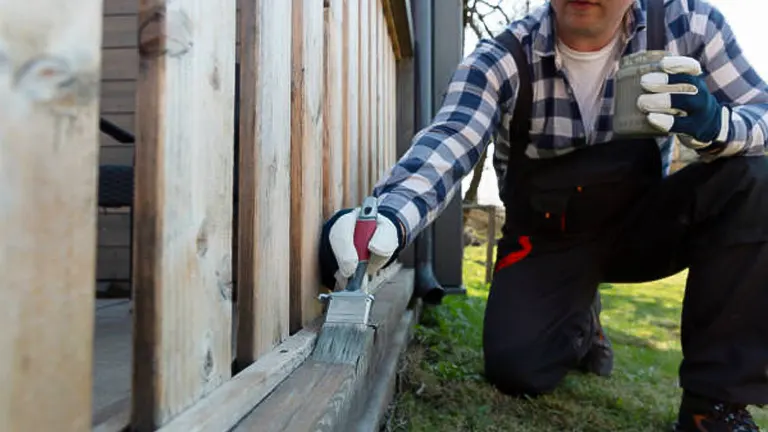
11. Painting or Sealing
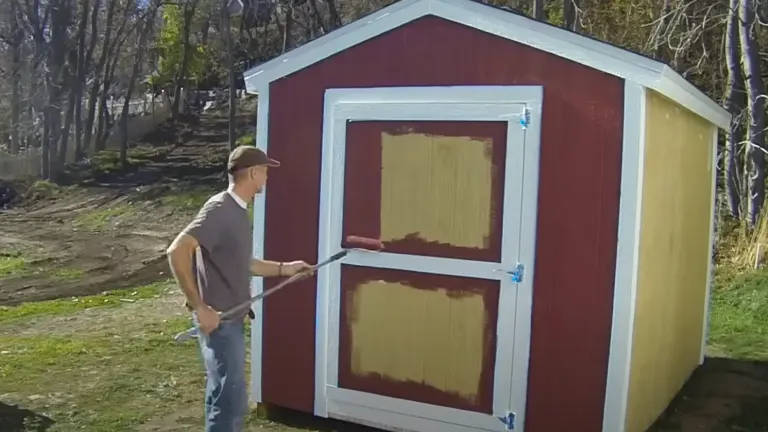
Before painting or sealing your wood shed, make sure all surfaces are clean and dry. Any dirt or moisture can stop the paint or sealant from sticking properly. Choose a paint or sealant that is made for outdoor use to protect the shed from weather. Apply it in even, thin layers. This way, you get good coverage and the paint or sealant lasts longer. Doing this helps your shed stand up to different weather and keeps it looking good.
Pro Tips:
- Sand Rough Spots: Before painting or sealing, sand down any rough areas for a smoother finish.
- Avoid Direct Sunlight: Paint or seal in the shade or on an overcast day to prevent quick drying and uneven coats.
- Use Tape for Clean Edges: Apply painter’s tape around doors and windows for clean, sharp edges.
- Proper Ventilation: If using oil-based products, ensure good ventilation to avoid inhaling fumes.
- Regular Maintenance: Check annually and touch up any areas where the paint or sealant is wearing away to maintain protection.
12. Final Inspection
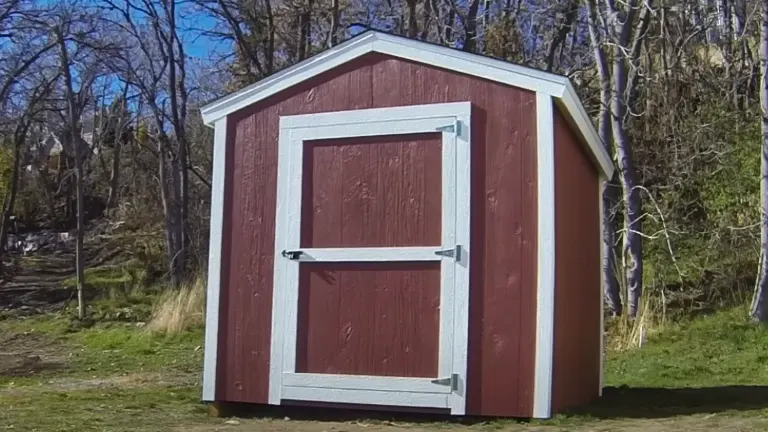
The last step in building your wood shed is a final inspection. This is to make sure everything is safe and well-built. Look over the whole shed. Check for any gaps where water or pests could get in. Also, look for any loose nails or parts that don’t seem strong. If you find any issues, fix them right away. This could be filling gaps, tightening nails, or adding more support where needed. Doing a thorough final check helps make sure your shed lasts a long time and stays safe to use.
Pro Tips:
- Use a Checklist: Create a checklist of all construction steps and review each one during the inspection.
- Inspect Roof Alignment: Make sure the roof is properly aligned and there are no irregularities in the shingle pattern.
- Test Doors and Windows: Open and close all doors and windows to ensure smooth operation and proper sealing.
- Check for Proper Drainage: After a rain, check around the shed to ensure water is draining away properly and not pooling.
- Consult with a Second Pair of Eyes: Sometimes a fresh perspective can spot issues you might have missed, so consider having someone else look over your work.
Factors to Consider when Building a Wood Shed
- Location Choosing the right location for your wood shed is crucial. It should be easily accessible and located in an area with good drainage to avoid water pooling. Consider the path of the sun and prevailing winds, as these can affect the internal temperature and stability of the shed. Additionally, ensure the shed doesn’t obstruct any views or violate property lines.
- Foundation The foundation is fundamental to the shed’s longevity. Options include a concrete slab, gravel bed, or concrete piers, depending on your budget, the ground conditions, and the shed’s purpose. Ensure the foundation is level and sturdy to support the weight of the shed and its contents.
- Size and Design The size of the shed should align with its intended use. Whether it’s for storage, a workspace, or both, ample space is necessary. Design aspects, like the type of roof and whether to include windows or skylights, should reflect the shed’s function and the local climate.
- Materials Choose materials that are durable and suited to your climate. Treated lumber is essential for framing to resist moisture and decay. The siding material should be robust against local weather conditions, and roofing should provide adequate protection from rain and snow.
- Ventilation Proper ventilation is key to prevent moisture buildup, especially if you plan to store garden tools or firewood. This can be achieved through vents or by installing soffits under the eaves.
- Insulation If you plan to use the shed year-round or for temperature-sensitive storage, consider insulating it. Proper insulation can make the shed more comfortable in extreme temperatures and protect its contents.
- Utility Access If you need electricity, water, or internet in your shed, plan for how you’ll get these utilities to the structure. This might involve running underground cables or pipes, which should be done in compliance with local codes and safety standards.
- Security Depending on what you store in the shed, security might be a concern. Consider locks, sturdy doors, and possibly even a small alarm system or motion-sensor lights to deter theft.
- Building Regulations Before starting your project, check local building codes and regulations. You may need a permit, and there will likely be guidelines on the shed’s size, location, and construction standards.
- Maintenance Plan for regular maintenance to ensure the shed’s longevity. This includes checking for and repairing leaks, repainting or resealing wood, and inspecting the structural integrity.
These factors provide a comprehensive view of what to consider when planning and building a wood shed, ensuring a functional, durable, and compliant structure.
How to Take Care of Your Wood Shed
- Regular Inspection Periodically inspect your wood shed, ideally at the change of each season. Look for signs of wear and tear such as loose boards or shingles, cracks, and rot. Check the roof for leaks, the doors and windows for proper closure, and the foundation for any signs of sinking or damage. Early detection of these issues allows for timely repairs, preventing more significant problems later.
- Cleaning and Clearing Keep the shed clean both inside and out. Clear debris, leaves, and twigs from the roof and gutters, as these can trap moisture and lead to rot. Inside, organize the contents regularly to avoid clutter, which can attract pests. Sweep and dust the interior periodically to keep it tidy and inspect for any internal damage.
- Pest Control Protect your shed from pests like termites, rodents, and insects. Check for holes or gaps that might allow pests entry and seal them. Use natural or chemical repellents as needed, and consider professional pest control services if you notice signs of infestation.
- Treating and Sealing Wood Treat the wood of your shed with a suitable sealant or paint every few years. This protects the wood from moisture, UV rays, and weathering, thereby extending the life of the shed. Choose a product appropriate for your climate and the type of wood your shed is made from.
- Maintaining Doors and Windows Ensure that doors and windows are functioning correctly. Lubricate hinges and locks to prevent rusting and ensure smooth operation. Repair or replace any broken parts promptly. Properly maintained doors and windows not only improve security but also prevent drafts and moisture ingress.
- Roof Maintenance The roof should be checked regularly for loose, damaged, or missing shingles and repaired as necessary. Clear any accumulated snow to prevent excessive weight and potential damage. In regions with heavy rain, ensure the gutters and downspouts are clear to facilitate proper drainage.
- Addressing Moisture Address any moisture issues promptly. Ensure there’s adequate ventilation to prevent condensation inside the shed. Use a dehumidifier if necessary, especially in damp climates or during rainy seasons.
- Foundation Care Monitor the foundation for cracks or shifts. A stable foundation is crucial for the overall integrity of the shed. If you notice any issues, it may require professional assessment and repair.
- Landscaping Around the Shed Keep plants and shrubs around the shed trimmed back to prevent moisture accumulation and to discourage pests. Avoid direct contact between the shed and any vegetation, which can lead to wood rot and provide a pathway for pests.
- Weatherproofing In areas with harsh weather conditions, take extra steps to weatherproof your shed. This may include adding storm shutters, reinforcing the structure against high winds, or installing additional insulation for extreme temperatures.
These steps provide a comprehensive guide to maintaining and caring for your wood shed, ensuring it remains functional and in good condition for many years.
Conclusion
In summary, building a wood shed is a rewarding project that enhances your outdoor space and provides valuable storage. By carefully selecting the location, ensuring a solid foundation, and using quality materials, you can construct a durable and functional shed. Regular maintenance, including inspections and weatherproofing, will extend its longevity. Whether for storing garden tools or as a workshop, your new wood shed will serve as a testament to your DIY skills and planning.
FAQs
- What is the best location to build a wood shed in my yard?
Choose a spot with good drainage and access to sunlight. Avoid low-lying areas where water pools. Also, consider ease of access and distance from your house. - Do I need a permit to build a wood shed?
This varies by location. Check with your local building authority. Generally, smaller sheds may not need a permit, but it’s always best to verify. - How do I choose the right size for my wood shed?
Consider the intended use and available space in your yard. Ensure there’s enough room for your storage needs while maintaining a balance with your outdoor space. - What type of foundation is best for a wood shed?
A gravel foundation is often sufficient for most sheds. However, for larger or more permanent structures, a concrete slab or pier foundation might be more suitable. - Can I build a wood shed on uneven ground?
It’s possible, but the ground needs to be leveled first. For significantly uneven terrain, a raised foundation or retaining walls might be necessary. - What are the best materials for weatherproofing a wood shed?
Use treated lumber for framing and consider weather-resistant options like cedar for siding. Use a high-quality exterior paint or sealant for added protection. - How can I ensure proper ventilation in my wood shed?
Install vents or soffits under the eaves and consider adding a window that can be opened to regulate air flow and reduce moisture buildup. - What’s the best way to maintain my wood shed?
Regular inspections, cleaning gutters, resealing or repainting wood, checking for pest infestations, and ensuring good ventilation are key to maintaining your shed.
As we wrap up this guide, we hope you feel equipped and inspired to embark on your wood shed building journey. It’s a project that not only enhances your outdoor space but also brings the satisfaction of crafting something with your own hands. Happy building, and may your new wood shed be a source of pride and utility for many years to come!

Benjamin Brooks
Forestry AuthorGreetings! I'm Benjamin Brooks, and my journey over the past 15 years has revolved around the fascinating realms of content creation, expertise in snow clearing, and the intricate world of lumberjacking and landscaping. What began as a simple curiosity about the natural world and heavy machinery has evolved into a passionate profession where my love for crafting words intertwines seamlessly with my lumberjacking and garden skills.


Leave your comment