7 DIY Miter Saw Station Plans For Your Workshop
- November 29, 2023
- 0 comment
In the ever-evolving realm of woodworking, a well-equipped workshop is the craftsman’s sanctuary. Among the arsenal of tools that occupy this sacred space, the miter saw stands out as a versatile workhorse, capable of crafting precise angled cuts with finesse. Yet, to truly harness its potential, a dedicated miter saw station becomes the artisan’s secret weapon. In this guide, we unveil seven DIY miter saw station plans designed to transform your workshop into an organized haven of efficiency. From compact foldable designs tailored for modest spaces to elaborate, feature-rich behemoths, these plans cater to various needs and skill levels. Whether you seek mobility, storage solutions, or a multifunctional workspace, these carefully crafted blueprints offer a roadmap to elevate your woodworking sanctuary to new heights. Embark on a journey of craftsmanship and practicality as we explore the art of constructing the perfect miter saw station for your workshop.
List of 7 DIY Miter Saw Station Plans For Your Workshop
- Compact Miter Saw Station
- Mobile Miter Saw Station
- Ultimate Miter Saw Station
- Foldable Miter Saw Station
- Modular Miter Saw Station
- Storage-Focused Miter Saw Station
- Miter Saw Station with Built-in Router Table
What You Need To Know About Miter Saw Station Plans For Your Workshop
Miter saw station plans for your workshop offer a comprehensive roadmap to construct a dedicated and efficient workspace tailored specifically for your miter saw. These plans typically provide detailed measurements, a thorough list of required materials and tools, and step-by-step assembly instructions. The goal is to guide woodworking enthusiasts through the process of creating a customized station that not only accommodates their miter saw but also enhances overall workflow. From precise cut lists to safety considerations, these plans ensure that every aspect of the construction is well thought out. Whether you’re aiming for a compact and mobile setup or a spacious, storage-rich station, these plans serve as invaluable guides to transform your workshop into a functional and organized space.
1. Compact Miter Saw Station
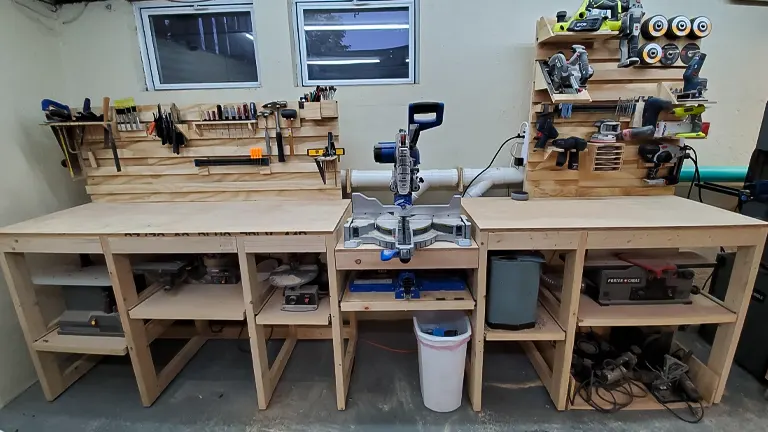
A Compact Miter Saw Station is a space-efficient and versatile woodworking setup designed for precision and efficiency in handling miter saw tasks. Typically crafted to fit neatly into smaller workshops or tight spaces, this station prioritizes functionality without sacrificing performance. The design often includes a sturdy bench or table with integrated features such as a built-in fence system, adjustable stops, and convenient material support extensions.
The compact nature of the station ensures that it can be easily maneuvered and stored when not in use, making it an ideal solution for hobbyists or DIY enthusiasts with limited workshop space. Despite its smaller footprint, a well-designed Compact Miter Saw Station can offer enhanced accuracy and organization, serving as a reliable workstation for various cutting and woodworking projects.
Materials Needed For Building Compact Miter Saw Station
Materials:
- Plywood: For the main structure and surfaces.
- 2×4 Lumber: Provides structural support for the frame.
- MDF or Plywood for Shelves and Supports: Adds stability and storage space.
- 14″ Folding Brackets: For collapsibility and easy storage.
- 3″ Locking Casters: Enhances mobility for easy relocation.
- Wood Glue: For secure bonding of wood components.
- Wood Screws (2 ½” and 1 ¼”): Various sizes for assembling components.
- 1/4-inch Dowels (Optional): For additional reinforcement.
- Toggle Clamps: Used to secure workpieces during cutting.
- T-Track or Miter Track: For easy adjustment of stops and supports.
- Screws and Bolts: For attaching components and securing the station.
- Wood Filler: To fill any gaps or imperfections.
- Sandpaper: For smoothing surfaces before finishing.
- Finish or Paint: Optional, for a polished appearance and protection.
Tools:
- Miter Saw: Essential for making precise cuts.
- Circular Saw or Table Saw: Used for cutting plywood and lumber.
- Drill/Driver: For creating pilot holes and driving screws.
- 6″ Drill Bit: For creating larger holes if needed.
- Router (Optional): For creating dados or grooves for T-track.
- Measuring Tape and Square: Essential for accurate measurements and alignment.
- Clamps: To hold pieces together during assembly.
- Level: Ensures the station is set up correctly.
- Speed Square: Handy for maintaining precise angles.
- Pencil: For marking and layout.
How To Build Compact Miter Saw Station
- Step 1: Design and Measurement
Start by designing your Compact Miter Saw Station. Consider the dimensions based on your workshop space and the size of your miter saw. Measure and mark the plywood and lumber according to your design. - Step 2: Cutting Materials
Using a circular saw or table saw, cut the plywood and 2×4 lumber pieces to the measured dimensions. This includes the main structure, shelves, and supports. Ensure precision in your cuts for a snug fit during assembly. - Step 3: Assembling the Base
Assemble the base frame using the cut 2×4 lumber. Attach the shelves and supports using wood glue and screws. Incorporate the 14″ folding brackets for collapsibility and the 3″ locking casters for mobility. - Step 4: Adding Stability and Storage
Attach MDF or plywood pieces for added stability and to create storage spaces. This can include shelves for tools or storage bins, enhancing the functionality of your compact station. - Step 5: Incorporating the Miter Saw
Install the miter saw onto the designated platform, ensuring it’s securely fastened. Create a dedicated area for the saw, allowing for easy adjustments and precise cuts. - Step 6: Adding Additional Features
Consider adding features like T-track or miter tracks for adjustable stops and supports. These enhance the versatility of your miter saw station, allowing for accurate and repeatable cuts. - Step 7: Finishing Touches
Sand the surfaces to smooth out any rough spots. Apply wood filler to cover screws and imperfections. Finish your Compact Miter Saw Station with paint or a protective finish for a polished appearance. - Step 8: Optional Accessories
If desired, attach toggle clamps to secure workpieces during cutting. These can improve safety and accuracy in your woodworking projects. - Step 9: Mobility Check
Ensure that the locking casters are functioning properly, allowing you to easily move and secure the station as needed in your workshop.
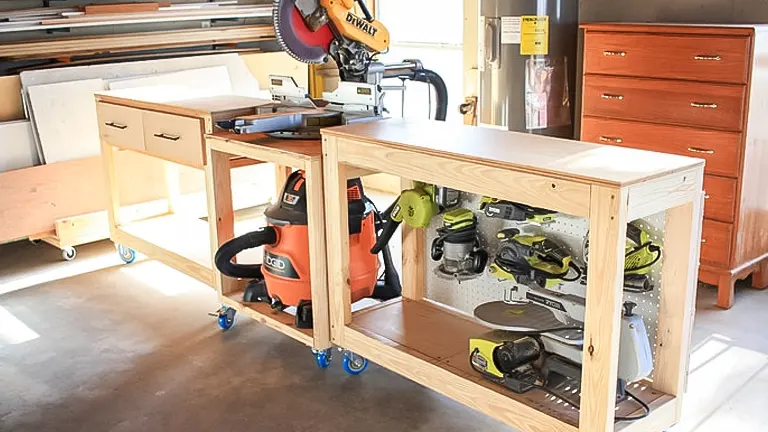
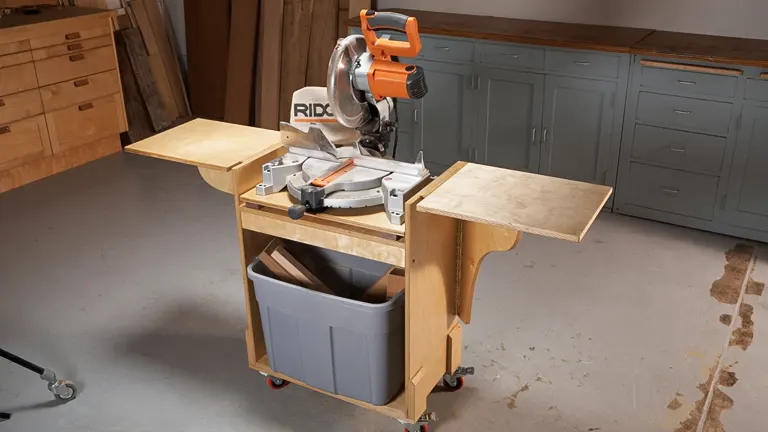
2. Mobile Miter Saw Station
A Mobile Miter Saw Station is a portable and versatile woodworking tool setup designed to enhance the functionality and convenience of using a miter saw. This station typically consists of a sturdy, mobile cart or table that accommodates a miter saw, providing a stable and dedicated workspace for precise cutting of wood, plastic, or other materials. The key feature of this setup is its mobility, allowing woodworkers and DIY enthusiasts to move the entire workstation to different locations in a workshop or job site.
Mobile Miter Saw Stations often come equipped with additional features such as built-in storage for tools, material supports, and extensions to handle longer workpieces. This not only facilitates efficient cutting but also enhances safety and organization by keeping essential tools within easy reach. Overall, a Mobile Miter Saw Station is a practical solution for those seeking a portable and organized work environment while utilizing a miter saw for various woodworking projects.
Materials Needed For Building Mobile Miter Saw Station
Tools:
- 12″ Dual Bevel Miter Saw
- 18v 5pc Toolkit
- Compact Router
- Hyperdrive 18v Brad Nailer
- 12 Gal Shop Vacuum
- Pro-grade Hose Kit
Materials/Supplies:
- (2) 4’x8′ 3/4″ Plywood
- 1-1/4″ pocket hole screws
- 1-1/4″ wood screws
- 5/8″ wood screws
- 72″ long 1-1/2″ piano hinge
- (2) 1/4″-20 20mm threaded inserts
- (10) 2-1/2″ 1/4″-20 bolts
- (8) fender washers
- (8) 1/4″ flat washers
- (2) 1/4″ wingnuts
- (8) 1/4″ lock washers
- (8) 1/4″-20 threaded knobs
How To Build Mobile Miter Saw Station
- Step 1: Base Assembly
Cut the plywood into pieces for the base, shelves, and compartments. Drill pocket holes on the edges and assemble the base by securing the top shelf and the sides. Ensure the base is square, and attach casters to the bottom corners for mobility. - Step 2: Support Risers and Casters
Construct support risers for leveling, and install hex head bolts and wing nuts. Attach the risers to the base and mount the casters. This ensures stability and mobility for the miter saw station. - Step 3: Side Wing Supports
Attach side wing supports using a piano hinge. Position them 2-¾” down from the top, ensuring they are flush with the front when fully open. Install cleats to support the side wings and maintain proper alignment. - Step 4: Side Wing Construction
Build the side wings using a top piece and frame support pieces. Add doubled-up support underneath for durability. Attach the side wings to the support cleats with hinges, allowing them to fold into place over the folded support wings. - Step 5: Fence Construction
Cut four pieces of plywood for the fences. If desired, create adjustable/removable fences with slots. Assemble the fences using 1-¼” screws, ensuring they are straight and aligned with the miter saw. - Step 6: Mounting the Miter Saw
Place the miter saw on the base, aligning it with the back. Extend the side wings and level them using a long level. Measure the distance from the bottom of the level to the miter saw and create hardwood spacers to raise the saw to the required height. Mount the saw securely with bolts, lock washers, fender washers, and threaded knobs. - Step 7: Fence Alignment
Align the side wing fences with the miter saw fence using a straight edge. For adjustable fences, mark hole positions, drill 5/16” holes through the side wings, and secure the fences using bolts, washers, and locking knobs. - Step 8: Optional Upgrades
Consider adding upgrades such as a dust collection system with a shop vacuum, an automated vacuum switch, and an aftermarket fence stop system. Install additional features like a 4′ top track, adhesive measure tapes, a swing stop, stop block, and other accessories for enhanced functionality.
By following these steps, you’ll create a functional and mobile miter saw station, providing stability, customization options, and the convenience of easy mobility for your woodworking projects.
3. Ultimate Miter Saw Station
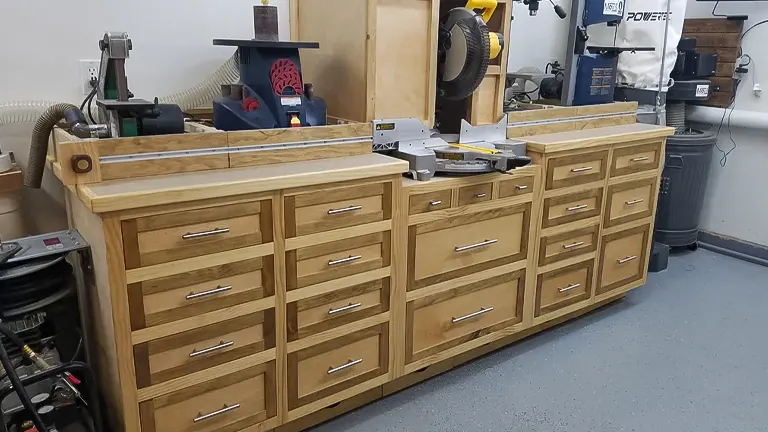
The Ultimate Miter Saw Station is a meticulously designed and highly functional workspace tailored for woodworking enthusiasts and professionals who rely on a miter saw for precision cutting. This station typically features a sturdy workbench with integrated storage, a dedicated space for the miter saw, and strategically placed supports to accommodate long pieces of lumber. The design prioritizes efficiency by incorporating features such as built-in dust collection systems, power outlets for tools, and ample storage for accessories and materials.
The goal is to create a centralized, organized hub that enhances workflow, minimizes clutter, and ensures accuracy in every cut. With customizable elements like fence extensions, flip-up wings, and stop blocks, the Ultimate Miter Saw Station offers versatility to adapt to various projects, making it an indispensable asset for woodworking professionals seeking a streamlined and optimized workspace for their craft.
Materials Needed For Building Ultimate Miter Saw Station
Materials:
- 15 sheets of plywood.
- 23 pairs of 24″ full extension drawer slides.
- One pair of 26″ full extension drawer slides.
- Dust collection port.
- 23 drawer pulls.
- 8 feet of T-track.
- A substantial amount of 1-1/4″ pocket hole screws.
- Miscellaneous hardware for the stop block and leveling feet.
Tools:
- Drill.
- Table saw or a circular saw with a guide track.
- Miter saw.
- Pocket hole jig (alternative: butt joints can be used, but the builder prefers pocket holes for cabinetry).
How To Build Ultimate Miter Saw Station
- Step 1: Plan and Gather Materials
Begin by thoroughly reviewing the provided plans or blueprints for the miter saw station. Gather all necessary materials, including 15 sheets of plywood, 23 pairs of 24″ full extension drawer slides, one pair of 26″ full extension drawer slides, a dust collection port, 23 drawer pulls, 8 feet of T-track, 1-1/4″ pocket hole screws, and miscellaneous hardware for stop blocks and leveling feet. - Step 2: Prepare the Plywood
Using a table saw or a circular saw with a guide track, carefully cut the plywood sheets according to the dimensions specified in the plans. This will form the structural components of the miter saw station. - Step 3: Assemble the Drawers
Install the 24″ full extension drawer slides on each of the 20 drawers. Additionally, assemble two extra-large drawers capable of supporting double the weight and a 26-inch pull-out tray for the planer. Attach drawer pulls to complete the drawer units. - Step 4: Build the Frame
Construct the frame of the miter saw station using the prepared plywood components. This will include the main work surface, supports for the miter saw, and the structure for the drawers. Ensure accurate alignment and use pocket hole screws for secure joints. - Step 5: Incorporate Special Features
Integrate specific features like the dust collection port, openings below for a trash can and an air compressor, and a 12-inch sliding miter saw with integrated dust collection. Customize the design to accommodate quick-access bins above the drawers for frequently used tools. - Step 6: Install the T-Track
Attach the 8 feet of T-track to the designated areas on the miter saw station. This feature enhances versatility, allowing for additional fixtures and accessories to be easily added or adjusted. - Step 7: Construct the Top Shelf
Build and install the top shelf, providing an additional storage area for miscellaneous items. - Step 8: Add Personalized Touch
Attach the custom CNC Detroit Redwings drawer pulls to infuse a personalized and aesthetic element into the miter saw station. - Step 9: Final Assembly and Adjustments
Assemble all the components, ensuring that the drawers slide smoothly and the miter saw is securely mounted. Make any necessary adjustments to achieve a level and stable work surface. - Step 10: Test and Refine
Test the functionality of the miter saw station, ensuring that all features work as intended. Make any final refinements or adjustments needed for optimal performance.
By following these steps, you can successfully build the Ultimate Miter Saw Station, combining functionality, organization, and efficiency in your woodworking space.
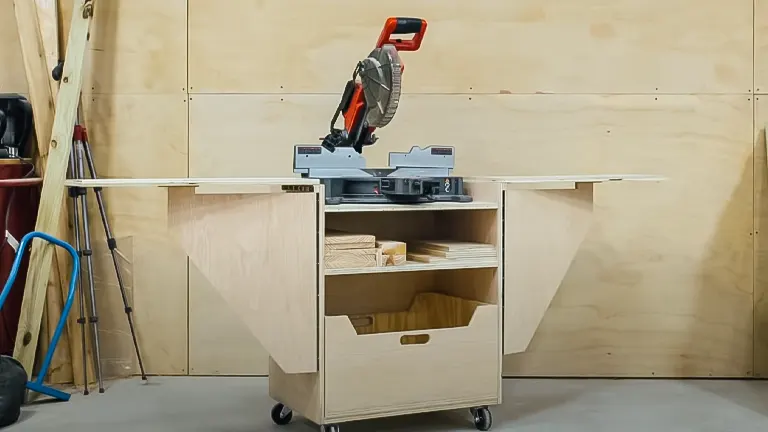
4. Foldable Miter Saw Station

A Foldable Miter Saw Station is a versatile and space-saving woodworking solution designed to enhance the efficiency and convenience of using a miter saw. This innovative station typically consists of a sturdy frame with wings or extensions that can be folded down when not in use, making it compact and easy to store in limited workshop spaces. The primary feature is a dedicated space for securely mounting a miter saw, providing a stable and safe work surface for accurate cutting.
The foldable design allows for quick setup and breakdown, making it ideal for those with limited space or those who need to transport their tools to different locations. Many foldable miter saw stations also come with additional features such as integrated storage compartments for tools and accessories, creating an organized and efficient workspace. Whether for professional woodworkers or DIY enthusiasts, a Foldable Miter Saw Station combines functionality with space-saving design, offering a practical solution for those seeking a versatile and compact work area for their miter saw.
Materials Needed For Building Foldable Miter Saw Station
Materials:
- Lumber: 50x70mm lumber, 80x70mm lumber, Squared board (Chipboard or plywood) and Pared pine 30x44mm for bracing.
- Top Material: Chipboard or plywood for the benchtop
- Additional Hardware: Coach screws/lag bolts, Galvanized 90-degree corner brackets, Hinges for the folding countertop, 19mm stainless steel pipe for the pivot and Toggle latches for securing the folding platform
- Fasteners: Bolts for securing the miter saw to the platform, Screws for assembling the frame and attaching the benchtop and Lockable latches for securing the folding mechanism
Tools:
- Measuring and Marking Tools: Tape measure and Pencil
- Cutting Tools: Saw (circular saw, miter saw, or hand saw) for cutting lumber and boards to size
- Fastening Tools: Drill with drill bits for pilot holes, Screwdriver or screw gun and Wrench for tightening bolts
- Assembly Tools: Clamps for holding pieces in place during assembly, Square for ensuring accurate angles and Level for ensuring the benchtop is flat and level
- Safety Gear: Safety glasses, Hearing protection and Dust mask
- Optional: Power sander or sandpaper for smoothing rough edges and Paint or wood finish for aesthetic purposes and protection
Ensure that you adjust the dimensions and quantities of materials based on the specific requirements of your miter saw and the available space in your workshop. Following the provided tutorial and considering the specifics of your tools will help in tailoring the Foldable Miter Saw Station to your needs.
How To Build Foldable Miter Saw Station
- Step 1: Planning and Gathering Materials
Begin by planning the dimensions of your Foldable Miter Saw Station based on your workshop space and the specifications of your miter saw. Gather the necessary materials, including 50x70mm and 80x70mm lumber for the frame, squared board (chipboard or plywood) for the benchtop, and Pared pine measuring 30x44mm for bracing. - Step 2: Cutting the Lumber
Using a tape measure, mark the appropriate lengths on the lumber according to your plans. Carefully cut the pieces using a saw, ensuring precision for a sturdy frame. - Step 3: Assembling the Frame
Join the cut pieces to form the frame. Utilize coach screws or lag bolts to securely connect the components. Pay special attention to the width of the center space designed to house the miter saw. If possible, fix the back of the frame to a wall for added stability. - Step 4: Preparing the Benchtop
Cut the squared board for the benchtop into three components. Attach two boards to the frame using store-bought galvanized 90-degree corner brackets—one on the left (1080x700mm) and the other on the right (1780x700mm) of the gap. The third board (640x700mm) will serve as the folding countertop over the gap, and it should be attached to the wall using hinges. - Step 5: Adding Bracing to the Benchtop
To enhance stability, especially if using chipboard, add bracing to the underside of the benchtop. Adjust the bracing based on the chosen top material; more robust materials may require less aggressive bracing. - Step 6: Installing the Folding Mechanism
Consider the bed height of the miter saw and install the folding platform accordingly. Ensure that the platform matches this height when locked in its upper position. For sliding miter saws, use a 19mm stainless steel pipe to facilitate proper folding. - Step 7: Securing the Folding Platform
Install toggle latches on stopper blocks to secure the folding platform in its working position. Place these blocks on either side of the gap, aligning the bottom with the miter saw bed height. - Step 8: Double-Checking Security
Thoroughly check the security of all components, especially the toggle latches, ensuring they can support the weight of the miter saw during operation. - Step 9: Attaching the Miter Saw
Fix the miter saw to the platform, ensuring proper spacing to prevent collisions with other components. Use bolts for a secure attachment.
By following these steps, you can create a practical and space-saving Foldable Miter Saw Station tailored to your workshop and miter saw specifications.
5. Modular Miter Saw Station
A Modular Miter Saw Station is a versatile and organized workstation designed to enhance the functionality and efficiency of using a miter saw. This woodworking setup typically consists of a sturdy workbench equipped with specialized features tailored for miter saw use. The station often includes dedicated spaces for the miter saw itself, as well as integrated storage for tools, accessories, and materials. What sets it apart is its modular design, allowing users to customize and rearrange components to suit their specific needs.
This adaptability enables woodworkers to optimize their workspace for different projects, ensuring seamless transitions between cutting tasks. The station often incorporates features such as built-in dust collection systems, workpiece support extensions, and precise measurement guides, providing a comprehensive solution for those working with miter saws. Overall, a Modular Miter Saw Station is a practical and ergonomic solution for woodworkers seeking a streamlined and organized workspace for their miter saw activities.
Materials Needed For Building Modular Miter Saw Station
Materials:
- Plywood: 4 sheets of 1/4-inch plywood, 7 sheets of 3/4-inch plywood
- Hardwood: For stop block slider
- Clear Plexi-Glass Sheet: For stop block
- Carriage Bolt & Nut: For stop block (1 set)
- Drawer Pulls: 1 per drawer, plus 1 for stop block
- Hinge: For work station drawer (1)
- Hook and Eye: For work station drawer (1)
- Measuring Tools: Left-to-right read ruler, Right-to-left read ruler and T-tracks (3)
- Screws: For assembly and stop block
- Kaizen Foam: For tool organization
Tools:
- Table Saw: For ripping plywood sheets and other cuts
- Circular Saw: For cutting long pieces of plywood
- Drill & Driver: For making holes and driving screws
- Miter Saw: For cutting precise angles and lengths
- Palm Router: For creating rabbets, dados, and other details
- Stapler: For attaching plywood and other materials
- Jig Saw: For cutting curves and other intricate shapes
- Bandsaw: For cutting curves and various shapes
- Router Table: For additional routing tasks
- F-Clamps: For securing pieces during assembly
- Chisels: For fine woodworking details
- Propane Torch: For cutting through kaizen foam
This comprehensive list covers the materials and tools needed for constructing the Modular Miter Saw Station, ensuring you have everything required for a successful build. Adjust quantities based on your specific design and customization needs.
How To Build Modular Miter Saw Station
- Step 1: Initial Planning and Material Acquisition
Start by planning the layout of your Modular Miter Saw Station, considering the available space. Gather the required materials, including 4 sheets of 1/4-inch plywood, 7 sheets of 3/4-inch plywood, hardwood for the stop block slider, a clear plexi-glass sheet for the stop block, a carriage bolt and nut for the stop block, drawer pulls, hinges, hook and eye, rulers, T-tracks, screws, kaizen foam, and various tools such as a table saw, circular saw, drill, miter saw, palm router, stapler, jig saw, bandsaw, and F-clamps. - Step 2: Cutting Plywood Sheets
Using the table saw, carefully cut the plywood sheets into the required dimensions. Utilize a drywall T-square for accurate markings and a circular saw to cut the long pieces of plywood to their intended lengths. - Step 3: Assembling Lower Boxes
Begin the assembly by creating the bottom boxes using a simple butt joint, glue, and screws. Craft three tall boxes and one shorter box, adjusting dimensions to match the height of your miter saw table. Attach these boxes to each other and secure them to the existing workbench. - Step 4: Constructing Upper Cabinet Boxes
Assemble the upper boxes similarly, incorporating back panels for added stability. Use a palm router with a rabbeting bit to create a rabbet for the back panels. Attach these upper boxes securely to the lower ones, forming a cohesive upper cabinet unit. - Step 5: Integrating Miter Saw
Place the miter saw within the designated area of the lower boxes. Modify the box to accommodate the miter saw by cutting out sections where the feet rest. Ensure the miter saw sits flush with the lower box. - Step 6: Creating Drawer Slides
Opt for a simple wood slide system for the drawers. Install strips of 3/4-inch plywood on each side of the boxes, leaving a gap for the drawers to slide in. Secure the strips with screws. - Step 7: Building Storage Drawers
Construct the storage drawers from reclaimed pine or specified material using simple butt joints, glue, and screws. Attach 1/4-inch plywood for the drawer bottoms, extending slightly beyond the ends to act as drawer slides. - Step 8: Adding Drawer Fronts
Cut plywood pieces for drawer fronts and install them, serving as both drawer stops and aesthetic elements. Create unique drawer pulls by branding plywood and carving them for easy grabbing. - Step 9: Implementing Stop Block & Ruler System
Design and build a stop block with a clear plexi-glass sheet for precise measurements. Incorporate rulers, adhesive-backed metal rulers, and T-tracks for fence adjustments. Ensure the stop block slides smoothly and locks securely. - Step 10: Tool Organization with Kaizen Foam
Customize kaizen foam for tool organization within the drawers. Arrange tools in their designated spaces based on your preferences. - Step 11: Dust Collection Wings and Final Details
Attach wings on either side of the miter saw to aid dust collection. Install blocks with holes for pencils and screws for tape measures. Consider additional details such as a grinder/sharpener storage drawer with a collapsible front. - Step 12: Final Touches
Review the entire Modular Miter Saw Station for any adjustments or refinements. Ensure all components are securely in place and that the station meets your functional and organizational requirements. This step-by-step process will guide you through building a well-organized and functional woodworking workstation.
Completing these steps methodically will result in a well-organized and functional Modular Miter Saw Station tailored to your woodworking needs.
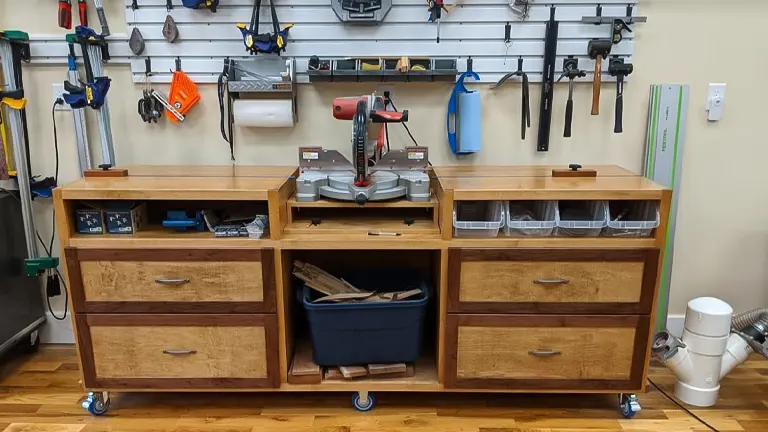
6. Storage-Focused Miter Saw Station
A Storage-Focused Miter Saw Station is a customized and efficient workspace designed for woodworking enthusiasts and professionals who frequently use a miter saw. This specialized station not only provides a dedicated and stable platform for the miter saw but also incorporates strategic storage solutions. Typically, it features built-in shelves, drawers, and compartments designed to organize and store various tools, accessories, and materials essential to the woodworking process.
The emphasis on storage is aimed at creating a tidy and clutter-free workspace, enhancing productivity by ensuring that everything is easily accessible and neatly arranged. This thoughtful design allows woodworkers to optimize their workflow, as they can focus on their craft without the distractions of a disorganized workspace. The Storage-Focused Miter Saw Station thus combines functionality and organization, catering to the specific needs of individuals who value both precision in their woodworking projects and a well-organized workshop environment.
Materials Needed For Building Storage-Focused Miter Saw Station
Materials:
- Plywood: Several sheets of 4×8 plywood (3/4 inch thickness) for the cabinet carcass panels and other structural elements.
- 1×2 Pine Boards: For constructing the face frames and drawer fronts.
- Screws: 1 1/4-inch and 1-inch screws for assembling the cabinet carcass and attaching various components.
- Pocket Hole Screws: For creating strong and hidden joints using a pocket hole jig.
- Biscuits: For joining the trim to the edge of the desk tops.
- Drawer Slides: For smooth operation of the drawers.
- Levelers: To ensure the cabinet is level and stable on uneven surfaces.
- HDPE Cutting Board: For making custom levelers.
- Bolts and T-Nuts: For making custom leveling feet.
- Blast Gate Materials: Plywood, 4″ PVC, and a 4″ coupler for creating dust collection blast gates.
- Countertop Material: Old desk tops or other suitable material for the work surface.
- ArmR Seal Finish: For finishing and protecting the surfaces.
- Stain: If you choose to stain the frames for color contrast.
- Mineral Spirits: To mix with the stain for color adjustment.
- Wood Trim: For adding a finishing touch to the desk tops.
- Aluminum T-Tracks (optional): For creating a stop block system.
- Self-Adhesive Measuring Strip: For accurate measurements in the stop block system.
- Acrylic: For micro-adjusting the stop block system.
- PVC Pipe (Triple Wall): For creating a curved dust collection pipe.
Tools:
- Circular Saw: For cutting plywood panels.
- Miter Saw: For cutting 1×2 pine boards and other wood components.
- Table Saw: For precision cuts on smaller pieces.
- Biscuit Joiner: For cutting slots for biscuits.
- Pocket Hole Jig: For creating pocket holes for screws.
- Clamps: Including corner clamps for assembling the cabinet carcass.
- Sander: For smoothing surfaces before finishing.
- Router: For cutting dados for t-tracks and other routing tasks.
- Belt Sander: For rounding corners of inserts.
- Drill: For making holes and assembling blast gates.
- Heat Gun: For shaping the PVC pipe for dust collection.
- Measuring Tools: Tape measure, ruler, etc.
- Level: For ensuring level surfaces.
- Templates: For creating layout templates.
- Router: For cutting a rabbet for the insert in the drawer fronts.
How To Build Storage-Focused Miter Saw Station
- Step 1: Planning and Design
Start by planning and designing your Miter Saw Station. Consider your space constraints and the specific features you want, such as storage drawers, dust collection, and a work surface for benchtop tools. - Step 2: Materials and Tools Acquisition
Gather all the necessary materials and tools. This includes plywood, 1×2 pine boards, screws, pocket hole screws, biscuits, drawer slides, levelers, HDPE cutting board, bolts, T-nuts, blast gate materials, countertop material, ArmR Seal finish, stain, and various tools like a circular saw, miter saw, table saw, biscuit joiner, clamps, sander, router, and safety gear. - Step 3: Cutting and Shaping
Use the circular saw, miter saw, and table saw to cut the plywood and 1×2 pine boards to the required dimensions. Create slots for biscuits using the biscuit joiner where needed. - Step 4: Joinery and Assembly
Utilize the pocket hole jig to create strong joints. Assemble the cabinet carcass using screws and clamps, ensuring proper alignment. Install drawer slides for smooth operation. - Step 5: Leveling and Stability
Attach levelers to ensure the cabinet is level on uneven surfaces. Create custom levelers using the HDPE cutting board, bolts, and T-nuts. - Step 6: Dust Collection
Construct dust collection blast gates using plywood and PVC. Ensure easy access and functionality for efficient dust management. - Step 7: Work Surface
Cut and prepare the countertop material to size. Install it securely, considering the dimensions of your miter saw and other benchtop tools. - Step 8: Finish and Stain
Apply ArmR Seal finish for protection and aesthetics. If desired, stain the frames for color contrast. Mix stain with mineral spirits for color adjustment. - Step 9: Wood Trim and Miscellaneous
Add wood trim for a finishing touch to the desk tops. Optionally, incorporate aluminum T-tracks, self-adhesive measuring strips, and acrylic for a stop block system. - Step 10: Drawer Construction
Measure and cut drawer pieces from half-inch plywood. Use a pocket hole jig to drill holes and assemble the drawers, ensuring a secure and durable construction. - Step 11: Drawer Installation
Install drawers using spacers for proper clearance. Attach them securely to the drawer slides, ensuring smooth operation. - Step 12: Drawer Front Construction
Use 1×2 pine boards to construct drawer fronts. Assemble the pieces, leaving room for adjustment. Cut a rabbet for the insert using a router. - Step 13: Drawer Front Installation
Apply several coats of ArmR Seal finish. Install drawer fronts using playing cards for spacing. Secure them with screws and install drawer pulls. - Step 14: Sliding Fence and Dust Hood
Optimize dust collection efficiency by creating a curved PVC pipe. Add a dust hood using 1×2 material. Design and install a sliding fence system for benchtop tools. - Step 15: Doors, Stop Block System, and Locking
Add doors to the dust hood for efficient dust collection. Integrate a stop block system using aluminum T-tracks for repeatable cuts. Implement a locking system for the sliding fence to secure tools in use. - Step 16: Final Assembly and Bolting Tools
Assemble all components and bolt down benchtop tools onto the shallow drawers. Fine-tune the alignment and ensure everything is securely in place. - Step 17: Completion and Testing
Once everything is assembled and aligned, add finishing touches. Test the Miter Saw Station for functionality, including sliding fences, dust collection, and storage accessibility.
Building a Storage-Focused Miter Saw Station involves careful planning, precise construction, and attention to detail to ensure a functional and efficient workshop addition.
7. Miter Saw Station with Built-in Router Table
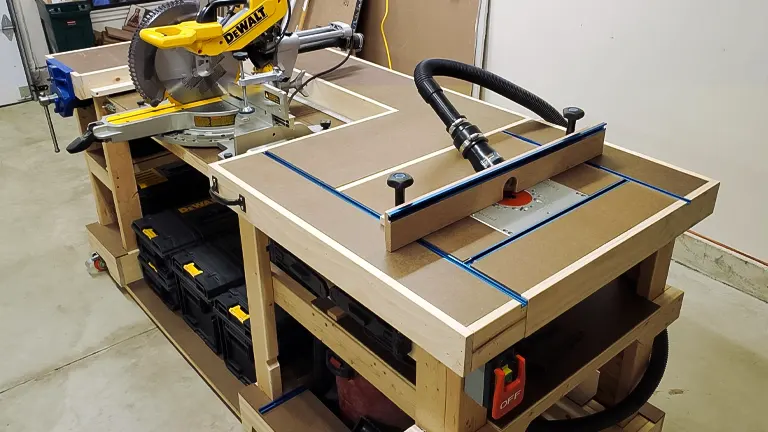
A Miter Saw Station with a Built-in Router Table is a smart and space-saving solution for woodworking enthusiasts. Crafted primarily from plywood, this workstation is designed for precision and efficiency. The sturdy carcass, assembled with pocket holes and wood glue, provides a stable foundation. Mobility is enhanced with swivel casters, allowing easy movement within the workshop. The station’s thoughtful design includes pull-out shelves for organized tool storage and side mount drawer glides for smooth operation. A strategically aligned table top accommodates a miter saw, with corners cut to enable smooth angled cuts.
The addition of a plywood fence and a double T-track fence cap ensures accuracy and versatility. The built-in router table expands the station’s functionality, offering a comprehensive solution for various woodworking tasks. Clever features like threaded insert nuts simplify saw attachment, while optional accessories, such as a tape measure insert, add convenience. In essence, the Miter Saw Station with Built-in Router Table seamlessly combines practicality, mobility, and versatility for a well-equipped woodworking space.
Materials Needed For Building Miter Saw Station with Built-in Router Table
- Plywood: 3/4-inch plywood for the main carcass and structural components and 1/4-inch plywood for back panels or other thin elements.
- Wood Glue: High-quality wood glue for strong and durable joints.
- Pocket Screws: Various lengths of pocket screws for assembling the carcass and attaching components.
- Wood Screws: Assorted wood screws for additional structural support and attaching various parts.
- Swivel Casters: 3-inch swivel casters for mobility, and optionally, locking swivel casters for stability.
- Drawer Glides: Side mount drawer glides with an appropriate weight capacity for pull-out shelves.
- Euro Hinges: Hinges for cabinet doors if your design includes them.
- Threaded Insert Nuts: If needed for securing the miter saw to the bench.
- T-track Fence Cap: Double T-track fence cap for the miter saw station’s fence.
- Optional Accessories: Tape measure insert for the T-track fence cap. Flip stops for added convenience.
- Optional Frame Materials: Additional 3-inch strips of plywood for building a frame for bottom support.
- Finishing Materials: Sandpaper or a sander for smoothing surfaces, Wood filler for covering screws and imperfections. Stain, paint, or finish of your choice for a polished look.
Always refer to detailed plans for precise measurements and variations based on your preferences. Prioritize safety by wearing appropriate personal protective equipment and following safety guidelines for tools and materials.
How To Build Miter Saw Station with Built-in Router Table
- Step 1: Planning and Designing
Begin by planning the dimensions and features of your Miter Saw Station with a Built-in Router Table. Consider the available space in your workshop and the specific functionalities you need. Sketch out your design, determining the size of the built-in router table and other components. - Step 2: Cutting Plywood Components
Once you have your design, use a circular saw or table saw to cut the plywood sheets according to your measurements. Cut pieces for the main carcass, back panels, drawers, and other structural components of your station. - Step 3: Assembling the Carcass
Drill 3/4-inch pocket holes into the ends of the bench pieces. Attach these pieces to the top and bottom using wood glue and 1 1/4-inch pocket screws. Install the center dividers, using the rear stabilizing stretchers as guides for proper placement. Glue and attach the dividers in place with 1 1/4-inch pocket screws. Further enhance stability by installing rear stabilizing stretchers using glue and pocket screws. - Step 4: Adding Stability and Mobility
To provide extra support at the bottom, rip down 3-inch strips of plywood to build a frame. Attach this frame to the bottom of the bench using 1 1/4-inch wood screws and glue. Once the frame is attached, add 3-inch swivel casters for the middle of the bench and 3-inch locking swivel casters for the outside corners to ensure mobility. - Step 5: Building Drawers and Cabinet Doors
Design your cabinets to have pull-out shelves for easy tool access. Construct these pull-out shelves and install 22-inch side mount drawer glides with a 100 lb capacity. For the cabinet doors, mark and predrill the holes and then install Euro hinges. This step ensures smooth operation and accessibility. - Step 6: Constructing the Table Top and Fence
Build the frame for the table top, ensuring it aligns with the miter saw base. Measure the miter saw base height, subtract the plywood thickness, and cut frame pieces accordingly. Cut off the front corners of the table top to allow for the miter saw’s left-to-right movement during angled cuts. Attach the table tops with wood glue and 1 1/4-inch wood screws. To install the fence, line up the miter saw precisely, ensuring the saw fence is perpendicular to the ends of the bench. Use a carpenter’s square to align the saw fence with a plywood fence, then clamp and attach the fence with 1 1/4-inch pocket screws. - Step 7: Adding T-Tracks and Optional Accessories
Once the fence is in place, add the double T-track fence cap and attach it with 5/8-inch wood screws. Cut down the fence cap if necessary for aesthetic reasons. You can also include optional accessories like a tape measure insert for the T-track fence cap. Measure the distance between the miter saw blade and the edge of the T-track to determine the starting point for the tape measure. Trim the tape measure accordingly and attach it to the T-track. - Step 8: Securing the Miter Saw
Bolt the miter saw to the bench. If the holes on your saw don’t align with the bench, use threaded insert nuts for a secure attachment. - Step 9: Finishing Touches
Apply wood filler to cover screws and imperfections. Sand the surfaces to smooth out any rough spots. Finish your Miter Saw Station with a Built-in Router Table by staining, painting, or applying the finish of your choice.
Thing To Consider When Building a Miter Saw Station
- Workspace Dimensions: Determine the available space in your workshop. Measure carefully to ensure the miter saw station fits comfortably, allowing for ample room to move around and accommodate larger workpieces.
- Miter Saw Size and Type: Consider the size and type of miter saw you have or plan to purchase. Different saws may require specific dimensions or accommodations, such as a sliding mechanism or unique mounting features.
- Ergonomics and Workflow: Plan the layout with ergonomics in mind. Design the station to facilitate a smooth workflow, minimizing unnecessary movements and ensuring easy access to essential tools and materials.
- Material Selection: Choose high-quality materials for stability and durability. The station will endure frequent use and support heavy materials, so opt for sturdy lumber and a robust work surface to withstand the demands of woodworking projects.
- Customization for Needs: Tailor the miter saw station to your specific needs. Consider adding features like built-in storage, drawers, or shelves to keep tools and accessories organized and within reach. Customization enhances functionality and efficiency.
- Mobility Options: Decide if you want the miter saw station to be stationary or mobile. If mobility is a priority, consider incorporating wheels to easily move the station around your workshop. This is particularly useful for smaller spaces or multifunctional workshops.
- Dust Collection System: Integrate a dust collection system to keep the workspace clean. Miter saws generate a significant amount of sawdust, and having an effective collection system contributes to a safer and more pleasant working environment.
- Stability and Leveling: Ensure the station is stable and level. A wobbly surface can compromise the accuracy of your cuts and pose safety risks. Use leveling tools during construction to achieve a flat and stable work surface.
- Safety Features: Prioritize safety by incorporating features like a blade guard, emergency shut-off switch, and proper storage for safety gear. A well-designed miter saw station considers safety as a fundamental aspect of its construction.
- Alignment and Calibration: Pay attention to alignment and calibration during construction. Ensuring that the miter and bevel angles are accurate contributes to precise cuts. Periodically check and recalibrate as needed to maintain accuracy over time.
- Finishing Touches: Consider finishing touches such as sanding, painting, or sealing the wood. This not only enhances the appearance of the miter saw station but also provides protection against wear and tear.
Read Our Related Post
Conclusion
In summary, the range of DIY miter saw station plans offers a diverse selection to enhance workshop efficiency. Whether opting for classic designs with ample storage or compact, mobile solutions for limited spaces, these plans cater to various needs. The foldable and wall-mounted options showcase creative space optimization, while the ultimate miter saw station exemplifies a comprehensive approach to functionality. The modular design stands out for its adaptability, allowing users to customize their stations as needed. Prioritizing safety and tailoring designs to specific miter saw models, these plans serve as invaluable resources for creating well-equipped and organized woodworking spaces, empowering craftsmen to enhance precision and efficiency in their creative pursuits.
FAQs
- Why should I invest time in building a DIY miter saw station for my workshop?
Building a miter saw station offers numerous benefits, including increased efficiency, improved accuracy in cuts, and better organization of tools and materials. It provides a dedicated space for your miter saw, making woodworking projects more enjoyable and streamlined. - Can I customize these DIY miter saw station plans based on my workshop’s available space?
Absolutely. The versatility of these plans allows for customization to fit the specific dimensions of your workshop. You can adjust the size, modify storage options, or even choose a design that suits your available space and workflow preferences. - Are these miter saw stations suitable for beginners in woodworking?
Yes, many of the DIY miter saw station plans are beginner-friendly, with clear instructions and materials that are readily available. Building a miter saw station is an excellent introductory project, offering practical experience while enhancing your workshop’s functionality. - Can I adapt these plans for different miter saw models?
Certainly. While some plans may have specific measurements for particular saws, most can be easily modified to accommodate different miter saw models. Ensure you take accurate measurements of your saw and adjust the plans accordingly to achieve a proper fit. - Do I need advanced woodworking skills and tools to construct these miter saw stations?
While some designs may require more advanced skills, many DIY miter saw station plans are designed with simplicity in mind. Basic woodworking tools like a saw, drill, and screws are often sufficient. However, it’s essential to follow safety guidelines and, if needed, seek guidance from experienced woodworkers during the construction process.
As we conclude this exploration into the realm of DIY miter saw station plans for your workshop, the diverse range of options presented here offers a roadmap to elevate your woodworking space. From space-saving solutions ideal for compact workshops to comprehensive designs with integrated storage and advanced features, these plans cater to various needs and skill levels. Building your miter saw station not only enhances efficiency and precision in your projects but also provides a satisfying journey into the realm of hands-on craftsmanship. As you embark on this endeavor, remember to personalize these plans based on your specific miter saw model, workshop dimensions, and personal preferences. The journey of creating a purpose-built space for your miter saw is not just a construction project; it’s a step towards transforming your workshop into a haven of creativity and productivity. Happy crafting!

Benjamin Brooks
Forestry AuthorGreetings! I'm Benjamin Brooks, and my journey over the past 15 years has revolved around the fascinating realms of content creation, expertise in snow clearing, and the intricate world of lumberjacking and landscaping. What began as a simple curiosity about the natural world and heavy machinery has evolved into a passionate profession where my love for crafting words intertwines seamlessly with my lumberjacking and garden skills.


Leave your comment