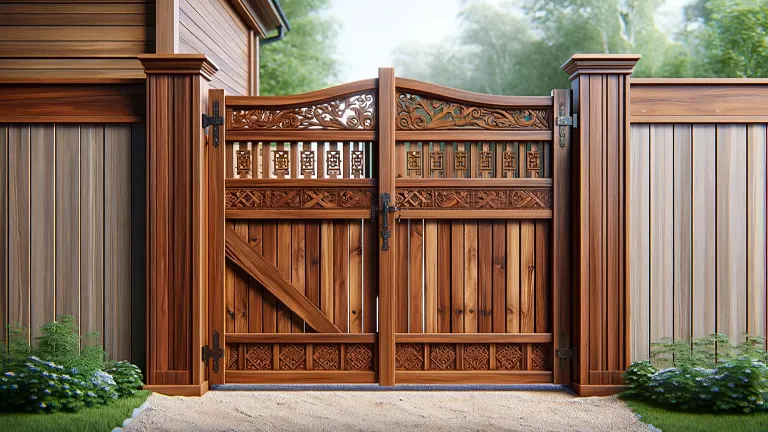
How to Build a Wooden Gate
- January 30, 2024
- 0 comment
Discover easy steps to build a wooden gate in our DIY guide. Enhance your home’s security and curb appeal with this simple project. Building a wooden gate is a rewarding DIY project that enhances both the functionality and appearance of your property. This straightforward process involves selecting the right materials, measuring, cutting, and assembling wood, followed by installing hardware and applying finishing touches. Whether you’re a beginner or an experienced DIYer, constructing a wooden gate is a practical and satisfying endeavor that adds value and charm to your outdoor space.
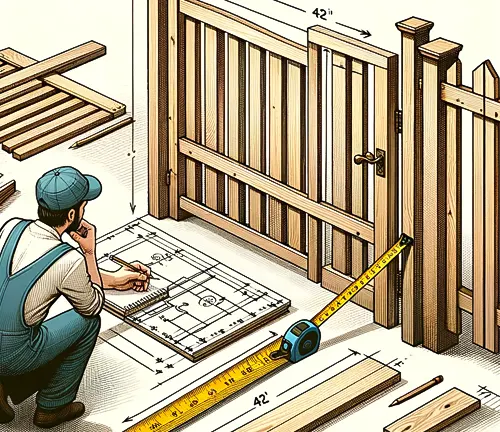
Note to Readers: In this guide, a 42-inch wide wooden gate is used as an example. This size is chosen to illustrate how you can customize the dimensions of your gate to suit your personal needs and space. Remember, the ideal width of your wooden gate is flexible and should be tailored to your specific requirements and preferences.
Step-by-Step Guide on How to Build a Wooden Gate
- Measuring and Planning
- Cutting the Wood
- Assembling the Frame
- Attaching the Panels
- Installing the Hardware
- Finishing Touches
Materials Needed:
To build a 42-inch wooden gate, you will need the following materials:
- Wooden Boards: Six 6-foot long, 1×6 inch cedar boards.
- Cross Braces: Two 42-inch long, 2×4 inch cedar boards.
- Vertical Frame Pieces: Two 36-inch long, 2×4 inch cedar boards.
- Wood Screws: 1 ½ inch and 3-inch wood screws.
- Wood Glue: High-quality outdoor wood glue.
- Latch and Hinges: One gate latch and two heavy-duty hinges.
Tools Required:
- Measuring Tape
- Circular Saw or Hand Saw
- Drill
- Screwdriver
- Level
- Carpenter’s Square
- Sandpaper or Electric Sander
Step-by-Step Guide
1. Measuring and Planning
Measure the space where your gate will be installed. Ensure the opening is slightly wider than 42 inches to accommodate the gate and its hardware. Plan the layout of your wooden boards, keeping in mind the design and functionality.
Additional Tips:
- Utilize a reliable tape measure or laser measuring tool for accuracy. Avoid using a ruler or yardstick, as they may not provide the precision needed for large spaces.
- Check the level of the ground where the gate will be installed. If there’s a slope, plan your gate design accordingly to ensure it opens and closes properly.
- Determine whether your gate will swing inward or outward and ensure there’s enough clearance in the chosen direction.
- Look for any potential obstructions (like trees, walls, or existing structures) that might hinder the gate’s installation or operation.
- Wooden gates can expand or contract due to weather changes. Leave a slight gap to accommodate these variations.
- Some areas have specific building codes or regulations regarding gate installations. It’s important to be aware of these to ensure compliance.
- Create a simple sketch of your planned gate with measurements. This visual aid can help in visualizing the final product and assist in purchasing the correct amount of materials.
- Consider how the gate will look in relation to your home and surrounding area. The style, color, and design should complement your property’s overall aesthetics.
2. Cutting the Wood

Prepare your wooden boards. Using either a circular saw or a hand saw, cut the six 1×6 inch cedar boards to a length of 42 inches each. These boards will form the primary structure of your gate’s panels. Then, focus on the frame and cross braces. Cut two 2×4 inch cedar boards to 42 inches for the cross braces and two more to 36 inches for the vertical elements of the frame. This careful cutting ensures that all parts of your gate will fit together perfectly for a sturdy and aesthetically pleasing finish.
Additional Tips:
- Always mark your cutting lines on the wood with a pencil or chalk. This helps in achieving more accurate and straight cuts.
- When using a circular saw, make sure to use a blade suitable for cutting cedar wood to ensure clean and precise cuts.
- Use clamps to secure the wooden boards to your workbench or sawhorses. This prevents the wood from moving and ensures safer cutting.
- Double-check your measurements before making any cuts. This reduces the risk of errors and wasted materials.
- Always wear protective gear like safety goggles and gloves when cutting wood to protect yourself from splinters and sawdust.
- Before cutting, inspect each board for knots, cracks, or other defects. Position your cuts to avoid these areas for better structural integrity.
- Ensure that your saw blades are sharp. Dull blades can cause rough cuts and may be more dangerous to use.
- Whenever possible, make your cuts along the grain of the wood. This enhances the strength and appearance of your cuts.
- Allow a little extra length on each board to account for any potential mistakes or adjustments.
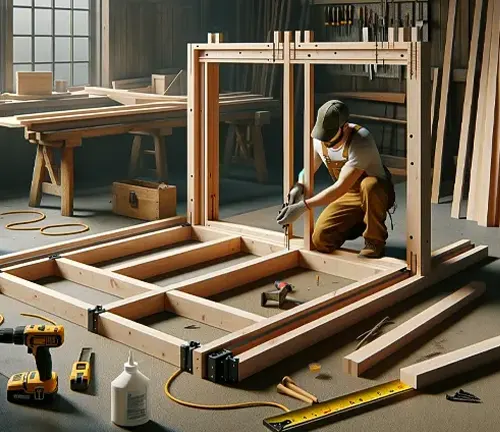
3. Assembling the Frame
Begin by laying out the two 36-inch vertical frame pieces parallel to each other on a flat surface. Place the two 42-inch cross braces between them at the top and bottom to form a rectangular frame. Ensure everything is square using the carpenter’s square. Apply wood glue at each joint for added stability. Secure the frame together using 3-inch wood screws, drilling pilot holes first to prevent the wood from splitting.
Additional Tips:
- Before applying any glue or screws, do a dry fit of the frame pieces to ensure everything aligns properly and adjustments can be made if needed.
- When applying wood glue, ensure even distribution on the joint surfaces. This prevents weak spots and ensures a stronger bond.
- Assemble the frame on a flat and stable surface, like a workbench, to maintain the frame’s alignment and squareness.
- Always drill pilot holes before inserting screws to prevent wood from splitting, especially near the ends of the boards.
- To ensure your frame is perfectly square, measure the diagonals. If they are equal, the frame is square.
- Use clamps to hold the frame in place while the glue sets and when screwing, to keep the pieces aligned.
- Immediately wipe away any excess glue with a damp cloth to prevent it from hardening on the wood surface.
- When securing with screws, stagger them to enhance the frame’s strength and prevent wood from warping.
- After assembly, allow sufficient time for the wood glue to dry completely before moving on to the next step.
- Once the glue has dried, inspect all joints to ensure they are tight and secure. If any gaps are found, consider adding additional screws for reinforcement.
4. Attaching the Panels
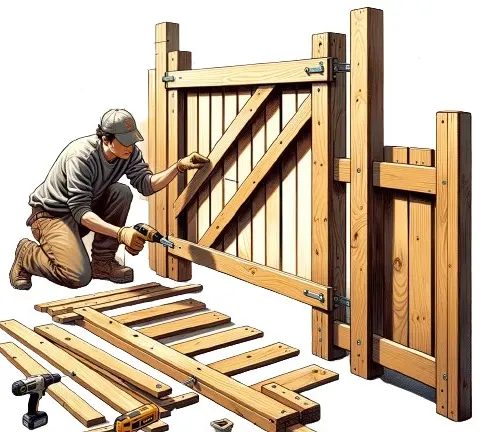
Start by placing the 1×6 inch boards across the frame. Make sure they are evenly spaced and line up with the edges of the frame. Next, attach each board to the frame using 1 ½ inch wood screws. These screws are the right length to hold the boards securely without sticking out. Before putting in the screws, it’s important to drill small holes first. This step helps to prevent the wood from splitting and keeps your project strong and looking good. As you insert the screws, ensure they are spaced out evenly along each board. This not only makes the panel stronger but also keeps it looking neat. Finally, make sure to drive the screws in straight for a stable and tidy finish.
Additional Tips:
- Use a drill guide to achieve perfect hole alignment and uniform depth, enhancing the project’s precision.
- For a polished look, countersink the screws and fill the holes with wood filler. After sanding and painting, this technique results in a smooth, seamless finish.
- Select screws with a finish that complements your project. Choose for stainless steel or coated screws for outdoor projects to prevent rust.
- Apply wood glue along with screws for additional strength, especially in load-bearing structures. This creates a more robust bond between the boards and the frame.
- Regularly check the accuracy of your tools. Even a small misalignment in saws or drills can lead to uneven cuts or holes, affecting the project’s quality.
5. Installing the Hardware
Begin by focusing on the hinges. First, place them at the chosen spots on the gate. It’s important to ensure they are level and positioned at a height that allows the gate to swing smoothly. Once you’ve determined their placement, mark the locations of the screw holes. Then, proceed to drill pilot holes at these marks. Pilot holes are smaller than the screw size and help in inserting the screws accurately and without splitting the wood. After drilling, use the screws provided to attach the hinges to the gate.
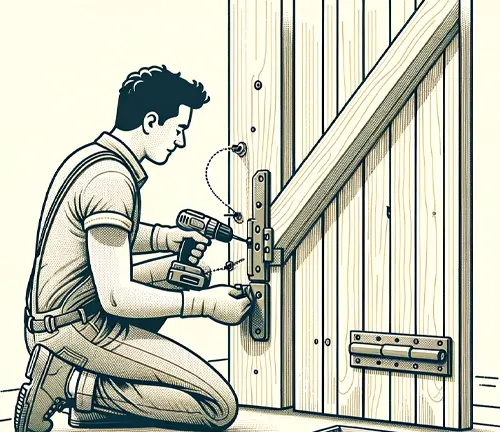
Next, you’ll attach the other side of the hinges to the gate post. Pay careful attention to align them so that the gate can swing freely and remains level. The final step involves installing the latch. Position the latch on the gate, ensuring it lines up correctly with the catch on the post. This alignment is vital for the gate to lock securely.
Additional Tips:
- Use a spirit level to check the alignment of the hinges and latch. Even a slight misalignment can affect the gate’s function.
- Consider the type of hinges suitable for your gate’s size and weight. Heavier gates require more robust hinges.
- Lubricate the hinges after installation for smoother operation. This can also prevent rusting and wear over time.
- If installing a latch that requires a lock, make sure the lock mechanism is easy to access and operates smoothly.
- Regularly inspect the hardware for any loosening or wear. Tighten screws and replace parts as necessary to maintain security and functionality.
6. Finishing Touches
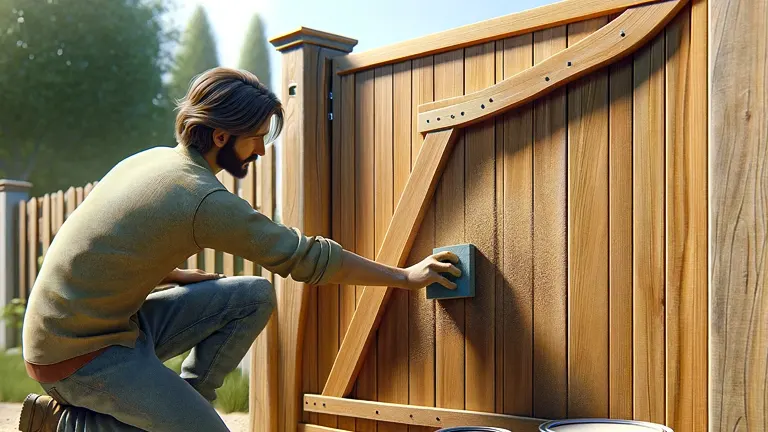
Finish your wooden gate to protect it and enhance its look. Start by sanding the gate smoothly. This step is important to prepare it for finishing. Use fine-grit sandpaper and sand carefully.
Choose your finish next. For color, pick outdoor paint that resists weather and UV rays. Apply it evenly to cover the gate. If you want to keep the wood’s natural look, use a sealant instead. It protects against moisture and keeps the wood’s natural feel. Brush on the sealant evenly.
Let the gate dry completely after painting or sealing. This is important for the finish to last and work effectively.
Additional Tips:
- Test the paint or sealant on a small, inconspicuous area first to ensure the color and finish are as expected.
- Apply multiple thin coats rather than one thick coat for a more durable and professional-looking finish.
- Consider the weather conditions when applying the finish. Avoid painting or sealing in extremely hot, cold, or humid conditions, as this can affect drying and final appearance.
- If using paint, choose a color that complements the surroundings and adds curb appeal to your property.
- Regularly check and touch up the gate’s finish as needed to maintain its protection and appearance over time.
Factors to Consider When Building a Wooden Gate
- Material Quality: The choice of wood is a primary factor in gate construction. Selecting high-quality, durable wood such as cedar, redwood, or pressure-treated pine is essential for longevity and resistance to weather elements. These materials resist rot and insect damage, crucial for outdoor structures. Additionally, consider the wood’s aesthetic qualities and how they will blend with your property’s overall look.
- Gate Size and Design: The size and design of the gate should complement both the functional needs and the aesthetic of your property. Measure the gate opening accurately to ensure a proper fit. Decide on a design that matches the style of your home and garden. Whether it’s a simple flat-top design for modern homes or an ornate, arched gate for more traditional properties, the design should enhance your home’s curb appeal.
- Hardware Selection: The hardware, including hinges and latches, plays a crucial role in the gate’s functionality and security. Choose heavy-duty hinges to support the gate’s weight and ensure smooth operation. The latch should be easy to operate and, if needed, provide adequate security. For longevity, select hardware made from corrosion-resistant materials, especially in harsh weather conditions.
- Installation Accuracy: Proper installation is key to ensuring the gate functions correctly and lasts long. This includes accurate measurements, level installation, and ensuring that the gate is properly aligned with the fence or wall. Inaccurate installation can lead to issues like sagging or difficulty in opening and closing the gate.
- Weather Considerations: Consider the local climate and weather conditions. Wood treatments and finishes must be suitable for your climate, whether it’s a humid, rainy, dry, or cold environment. Properly sealing the wood can protect against moisture, sun damage, and temperature fluctuations, preserving the gate’s appearance and structural integrity over time.
- Maintenance Requirements: Regular maintenance is necessary to keep a wooden gate in good condition. This includes periodic painting or sealing, checking for and repairing any damage or wear, and ensuring the hardware remains secure and functional. Being aware of the maintenance needs before building can help you choose materials and designs that fit your ability to maintain them.
By considering these factors, you’ll be well on your way to constructing a wooden gate that is not only functional and secure but also a visually appealing addition to your property.
How to Maintain Your Wooden Gate
- Regular Cleaning: Keep your wooden gate clean to prolong its life and appearance. Dust, dirt, and other outdoor elements can accumulate on the surface, leading to wear and potential decay. Use a soft brush or cloth to remove debris. For a deeper clean, gently wash the gate with a mild soap and water solution, but avoid harsh chemicals that can strip the wood of its protective coatings.
- Inspect and Repair Damage: Regularly inspect your gate for any signs of damage, such as cracks, splits, or loose components. Early detection of these issues allows for timely repairs, preventing minor problems from becoming major ones. Tighten any loose screws or hardware, and fill minor cracks with wood filler. If you notice significant damage, it might be necessary to replace parts of the gate.
- Apply Protective Sealant: To guard against weathering, moisture, and insect damage, apply a protective sealant to your wooden gate. This should be done every 2-3 years, or as needed based on the gate’s exposure to elements and the wear of the previous coating. Sealants like varnish, stain, or paint not only protect the wood but also enhance its appearance. Ensure the gate is clean and dry before application.
- Lubricate Hinges and Locks: The moving parts of your gate, such as hinges and locks, require regular lubrication to function smoothly. This prevents rusting and wear from friction. Use a suitable lubricant, and apply it sparingly to these parts. Check the operation of the gate afterward to ensure it swings open and closes smoothly.
- Control Moisture Exposure: While outdoor gates are designed to withstand the elements, minimizing excessive moisture exposure can extend their lifespan. Ensure proper drainage around the gate area to avoid standing water. If the gate is frequently splashed by sprinklers, adjust their positioning. Reducing constant moisture contact helps prevent rot and decay.
- Trim Surrounding Vegetation: Keep plants, shrubs, and vines trimmed back from your gate. Overgrown vegetation can trap moisture against the wood and potentially introduce harmful insects or fungi. Regular trimming not only protects the gate but also keeps the surrounding area neat.
- Check for Pest Infestations: Periodically check your gate for signs of pest infestations, such as termites or carpenter ants. These pests can cause serious damage to wooden structures. If you detect an infestation, treat it promptly with appropriate pest control methods or seek professional assistance.
By following these maintenance tips, you can ensure that your wooden gate remains in excellent condition, both functionally and aesthetically, for many years.
Conclusion
Building and maintaining a wooden gate is a fulfilling DIY project that not only adds functionality to your home but also offers an opportunity for creative expression. With proper construction, regular maintenance, and a touch of personal style, your wooden gate can become a standout feature of your property, providing security and beauty for years to come.
FAQs
- Can I build a wooden gate if I have limited carpentry skills?
Absolutely! Building a basic wooden gate is a manageable project even for beginners. There are many tutorials and kits available that provide step-by-step guidance. The key is to start with a simple design and have the basic tools ready. - What is the best wood to use for an outdoor gate?
Cedar, redwood, and pressure-treated pine are excellent choices for outdoor gates due to their natural resistance to rot, decay, and pests. Cedar and redwood also offer a natural aesthetic appeal, while pressure-treated pine is cost-effective and durable. - How do I ensure my wooden gate doesn’t sag over time?
To prevent sagging, use sturdy, well-secured hinges and a diagonal brace within the gate’s structure. The brace should run from the lower latch side to the upper hinge side, creating a strong angle that resists sagging. - What’s the ideal width for a single wooden gate?
A single wooden gate typically should not exceed 4 feet in width. Wider gates are more prone to sagging and can be harder to open and close. If you need a wider entrance, consider a double gate design. - How deep should the post holes be for a wooden gate?
Post holes should be about one-third the height of the post and at least 2 feet deep. This depth ensures stability, especially in areas with high winds or unstable soil. - Is it necessary to treat or seal the wood before assembling the gate?
Yes, it’s advisable to treat or seal the wood before assembly, especially if you’re using untreated wood. This provides an initial layer of protection against weather elements and can make the finishing process easier. - How do I choose the right hinges for my wooden gate?
Choose hinges based on the weight and size of your gate. Heavier gates require more robust hinges. T-hinges are commonly used for wooden gates, but for heavier gates, consider strap hinges for better support. - Can I add decorative elements to my wooden gate without compromising its function?
Absolutely! You can add decorative elements like iron inserts, ornate handles, or creative cutouts as long as they don’t interfere with the gate’s structure or operation. These elements can enhance the gate’s aesthetic appeal while maintaining its functionality.
In summary, building a wooden gate is a satisfying DIY project. With the right tools and care, you can create a functional and attractive addition to your property. Happy crafting!

Benjamin Brooks
Forestry AuthorGreetings! I'm Benjamin Brooks, and my journey over the past 15 years has revolved around the fascinating realms of content creation, expertise in snow clearing, and the intricate world of lumberjacking and landscaping. What began as a simple curiosity about the natural world and heavy machinery has evolved into a passionate profession where my love for crafting words intertwines seamlessly with my lumberjacking and garden skills.


Leave your comment