How to Construct a Charming Wood Garden Gate: A Beginner-Friendly Guide
- February 1, 2024
- 0 comment
Creating a wooden garden gate is a rewarding project that combines practicality with aesthetics. Aimed at beginners, this guide simplifies the construction process, enabling you to build a functional and visually appealing gate. By following the instructions, you’ll learn how to turn basic materials into a charming entrance for your garden, enhancing both its security and beauty. This hands-on project not only boosts your outdoor space’s appeal but also provides a satisfying sense of accomplishment as you craft a welcoming addition to your garden.
Why Choose Wood for Your Garden Gate?
Wooden garden gates exude a classic charm that seamlessly integrates with various garden designs, standing as a testament to their adaptability and resilience. When properly maintained, they demonstrate remarkable longevity, braving the outdoor elements with grace. The inherent versatility of wood also opens up a plethora of customization options, from intricate designs to unique finishes, catering to the imaginative whims of homeowners seeking to personalize their outdoor spaces. This blend of aesthetic appeal and functional durability makes wooden gates a favored choice for enhancing garden entrances.
Planning Your Garden Gate
Design Considerations
Before starting your garden gate project, it’s important to thoughtfully choose a design that fits the style of your garden and home. Whether you prefer a simple, rustic gate or a more complex design, make sure it’s both practical for your needs and within your woodworking abilities. This initial planning ensures your gate not only looks good but is also functional and achievable, blending seamlessly with your outdoor space and enhancing its overall aesthetic.
Selecting the Right Wood
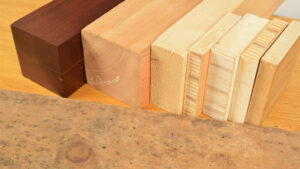
Selecting the right wood is crucial for your garden gate, as it influences both its longevity and visual appeal. Cedar is renowned for its natural oils that repel insects and resist decay, making it a durable choice with a warm, inviting hue. Redwood, on the other hand, stands out for its rich color and grain patterns, coupled with similar rot-resistant properties to cedar, offering an upscale look. Pressure-treated pine, treated with chemicals to fend off rot and insect damage, provides a cost-effective option with a robust structure, though it may require more maintenance in terms of sealing and staining to enhance its appearance. Each wood type brings its unique characteristics to the table, allowing you to choose based on your aesthetic preferences, budget, and the specific demands of your garden’s climate.
Sizing and Measurements
When measuring for your garden gate, ensure you account for the necessary clearance and swing space to guarantee smooth operation. While the typical dimensions for garden gates are 3-4 feet in width and about 6 feet in height, these can be adjusted to fit the unique constraints of your space.
Tailoring the size of your gate allows for a custom fit that meets your specific requirements, whether you’re accommodating a larger entryway or a more confined space, ensuring your gate is both functional and aesthetically pleasing within your garden’s layout.
The Building Process
Tools and Materials Needed
Building a wooden garden gate requires a carefully curated selection of materials and tools, ensuring both the functionality and aesthetic appeal of the finished product. Below, you’ll find an exhaustive inventory tailored to guide you through each step of the construction process:
Materials
- Lumber (Cedar, Redwood, or Pressure-Treated Pine recommended)
- Hinges (outdoor grade)
- Screws (weather-resistant)
- Gate latch
- Wood sealant or exterior-grade paint
- Sandpaper
Tools
- Measuring tape
- Saw (hand saw or power saw)
- Drill with drill bits
- Screwdriver or power screwdriver
- Level
- Carpenter’s square
- Sander or sanding block
- Paintbrush or sprayer (for sealant/paint application)
Cutting the Wood
When crafting your wooden garden gate, the initial step of cutting the wood to your specific design and measurements is critical. This phase demands meticulous attention to detail and accuracy, as the precise dimensions of each piece are fundamental to the structural integrity and aesthetic harmony of the gate. Utilizing your design as a blueprint, carefully measure and mark the lumber before making cuts.
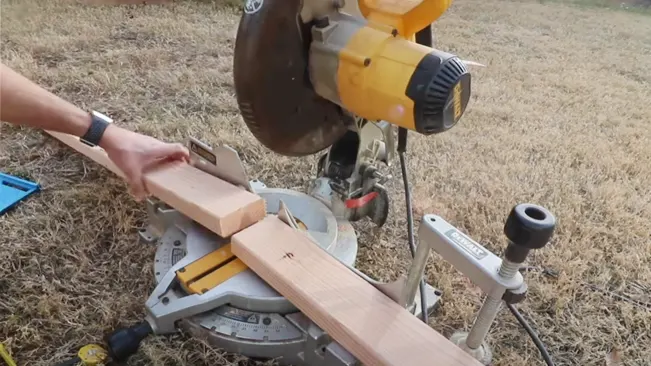
This precision ensures that each component of the gate aligns flawlessly during assembly, avoiding potential gaps or misalignments that could compromise the gate’s functionality and overall appearance. It’s this careful preparation and execution in the cutting process that lays the groundwork for a well-constructed and visually pleasing garden gate.
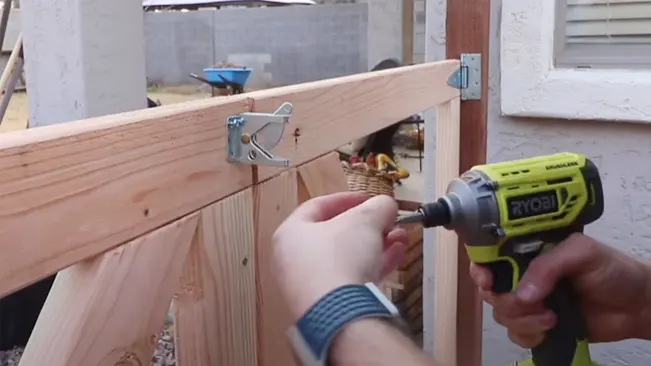
Assembling the Frame
The construction of your garden gate hinges on the assembly of its frame, which acts as the foundational backbone, offering essential structure and support to the entire build. This critical phase demands meticulous attention to detail and precision, as the frame sets the tone for the stability and durability of the gate. It’s imperative to methodically assemble the frame, ensuring each joint is tightly secured and all corners form right angles, maintaining squareness.
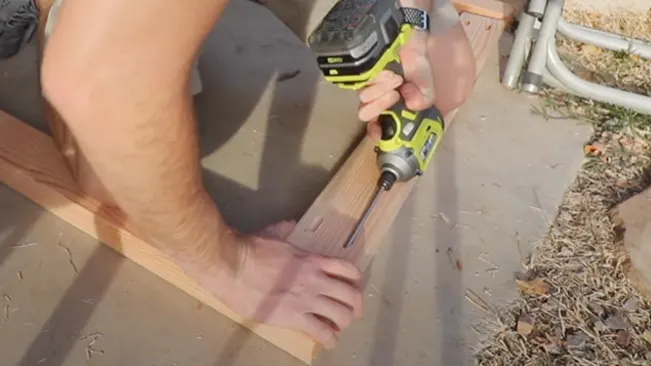
This step is not just about piecing together wooden components; it’s about crafting a robust framework that will withstand the test of time and use. Checking for squareness and stability as you go ensures that the gate will hang correctly and operate smoothly, avoiding any future issues with alignment or functionality. This foundational stage lays the groundwork for a gate that is not only structurally sound but also aesthetically pleasing, setting the stage for the remaining construction and finishing touches.
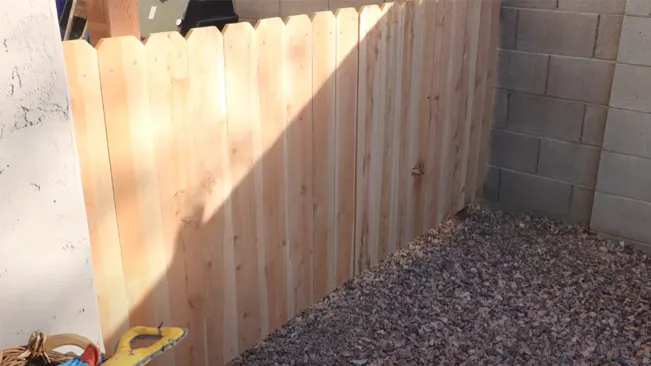
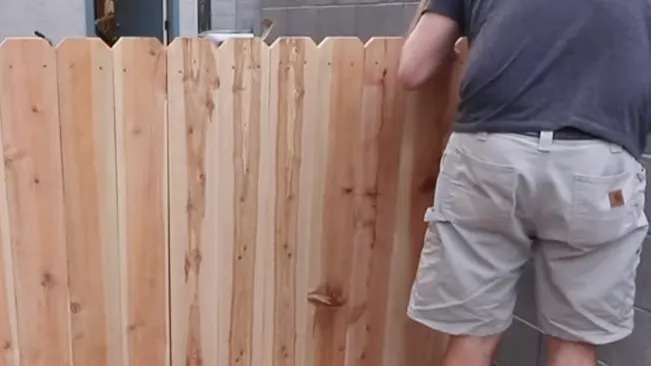
Attaching the Panels
After meticulously assembling the frame of your garden gate, the next pivotal step involves attaching the panels or slats, which not only complete the structure but also offer an opportunity for customization to suit your personal style and privacy preferences. This stage allows you to infuse creativity into your project, whether you opt for closely spaced slats for heightened privacy or choose a more open, decorative panel design that enhances the garden’s aesthetic.
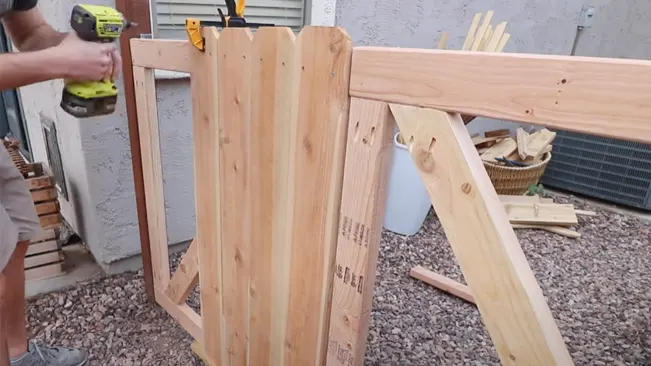
The method of attachment and the spacing between each slat or panel can dramatically alter the gate’s overall look, making this step crucial in achieving the desired balance between functionality and visual appeal. By thoughtfully selecting the panels and considering their arrangement, you create a gate that is not only a barrier or entry point but also a reflection of your unique taste and the character of your outdoor space.
Installing the Gate
After assembling your garden gate, the crucial installation phase begins, where you’ll attach the hinges to the gate and its supporting post. This step is vital for ensuring that the gate operates smoothly and locks securely. Proper alignment of the hinges is key to achieving a free swing and a firm latch, which are essential for the gate’s functionality and security.
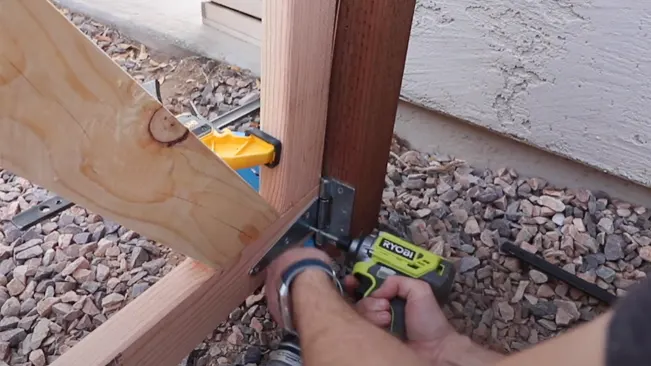
This installation not only brings your project to fruition but also enhances your garden’s accessibility and aesthetic appeal, making it a rewarding milestone in your DIY endeavor.
Finishing Touches
Sanding and Finishing
Sanding your garden gate is crucial for smoothing out imperfections and preparing the surface for finishing, which is essential for both aesthetic appeal and protection. The right finish, whether stain or paint, will not only highlight the wood’s natural beauty but also shield it from weathering elements like moisture and sunlight.
This step ensures your gate remains durable and visually striking, serving as an attractive entryway to your garden while standing up to the rigors of outdoor exposure.
Adding Hardware
Selecting the right hardware, like latches and handles, is key to enhancing your garden gate’s style and functionality. These elements should complement the gate’s design while ensuring it operates smoothly and securely. The choice of hardware can significantly influence the gate’s aesthetic appeal, adding a touch of charm and character.
By carefully choosing pieces that align with the overall theme of your gate and garden, you can elevate the visual impact of your entrance, making it both a practical and attractive feature of your outdoor space.
Maintenance Tips
To ensure your wood garden gate remains in top condition, regular maintenance is essential. This includes checking for and repairing any damage, cleaning the wood, and reapplying finish as needed. Here are some additional maintenance tips to keep your wooden garden gate looking its best:
- Periodically check your gate for signs of wear or damage, such as splintering wood, loose hardware, or rusting metal components. Early detection can prevent minor issues from becoming major problems.
- Use a soft brush or cloth to remove dirt and debris from the gate’s surface. For more stubborn grime, a mild soap and water solution can be used, but ensure the wood dries completely afterward to avoid moisture damage.
- Depending on the climate and the wood type, reapply a protective finish (like sealant, stain, or paint) every 1-2 years to shield the wood from UV rays and moisture, which can cause fading, warping, or rot.
- Keep hinges and latches well-lubricated to ensure smooth operation and prevent rust. A silicone-based lubricant is usually a good choice for outdoor applications.
- Seasonal changes can cause wood to expand or contract, which might affect how your gate fits and functions. Make adjustments as needed and tighten any hardware that may have become loose over time.
- Regularly check for signs of pest infestation, such as termites or wood-boring insects. Treat the wood as needed to deter pests and prevent damage.
- Ensure the area around the gate has proper drainage to prevent water from pooling at the base, which can lead to wood rot and decrease the gate’s lifespan.
Adding Personal Touches
Personalizing your garden gate with decorative carvings, elegant metalwork, or a custom color can elevate it from a functional piece to an eye-catching highlight of your outdoor space. These distinctive touches not only add character but also reflect your individual style, making the gate more than just an entryway—it becomes a standout feature that enhances the beauty and cohesion of your garden’s design.
Related Topics
- How to Shield Garden Bed Wood: Effective Protection Strategies
- Is Treated Wood Safe for Raised Garden Beds? An In-Depth Look
Conclusion
Crafting a wooden garden gate is a fulfilling endeavor that not only boosts your garden’s security but also its aesthetic appeal. Through thoughtful planning and selection of durable materials, you can create a gate that not only matches your personal style but also endures over time. Injecting creativity into its design allows you to achieve a perfect blend of form and function. This project offers a chance to personalize your outdoor space, resulting in a gate that serves as both a protective entryway and a charming focal point in your garden.
FAQs
- What type of wood is best for a garden gate?
The best woods for a garden gate are those that are naturally resistant to rot, decay, and insect infestations. Cedar, redwood, and pressure-treated pine are excellent choices due to their durability and aesthetic appeal. - How do I measure the space for my garden gate?
Measure the width of the opening where the gate will be installed. Add a few inches for clearance on either side to ensure the gate can swing open and close easily. For height, consider your privacy and security needs, as well as the overall design of your garden and fence. - What tools will I need to build a wooden garden gate?
Essential tools include a saw (hand saw or circular saw), drill, screwdriver, measuring tape, level, sandpaper or an electric sander, and possibly a router for more intricate designs. You’ll also need hardware such as hinges, screws, and a latch. - Can I build a garden gate without prior woodworking experience?
Yes, building a simple garden gate is a manageable project for beginners. It’s important to start with a straightforward design and carefully follow instructions. There are many resources and tutorials available for beginners to guide you through the process. - How can I ensure my garden gate is secure?
To enhance security, ensure the gate fits snugly within its frame, use sturdy hinges and a reliable latch or lock. Consider adding a deadbolt or padlock for extra security, especially if the gate is a main entry point. - What maintenance is required for a wooden garden gate?
Regular maintenance includes checking for loose hardware, signs of rot or damage, and ensuring the gate operates smoothly. It’s also important to clean the wood and reapply a protective finish (paint, stain, or sealant) every few years to protect against weathering. - How do I choose the right hardware for my garden gate?
Choose hardware that matches the style of your gate and garden, and ensure it’s rated for outdoor use. Stainless steel, galvanized, or coated hardware are good options as they resist rust and corrosion. - Can I add decorative elements to my garden gate?
Absolutely! Consider incorporating carvings, ironwork, or a unique color finish. Even simple additions like decorative hinges or a stylish handle can add character to your gate. - What is the best way to finish a wooden garden gate?
The best finish depends on your aesthetic preference and the type of wood used. Stains can enhance the natural grain of the wood, while paints can provide a bold, solid color. Always use outdoor-grade products to protect the wood from the elements. - How do I adjust my garden gate if it starts to sag or stick?
If your gate sags, you might need to reinforce the frame or adjust the hinges. For a sticking gate, check for and remove any obstructions, and ensure the wood hasn’t swollen due to moisture. Sometimes, simply tightening the hardware can fix the issue.

Charles Hayes
Forestry AuthorI'm Charles Hayes, I bring over 15 years of specialized expertise in landscaping and woodworking, blending artistic design with sustainable environmental stewardship. My career, fueled by a profound passion for the natural world, encompasses extensive education and hands-on experience in creating harmonious, eco-friendly outdoor spaces and responsibly managing forest resources. Recognized for my professional standing, I am committed to continuous learning and certification in cutting-edge practices. My expertise is not only reflected in my work but also in my contributions to community projects, educational workshops, and collaborations with industry leaders. As an authoritative voice in my field, I strive to share knowledge and promote environmentally conscious approaches, making me a trusted resource in landscaping and forestry.


Leave your comment