15 Different Types of Wood Joints
- November 28, 2023
- 1 comment
Woodworking is an art that combines skill, precision, and the right choice of joint for each project. Understanding the various types of wood joints is crucial for any woodworker, whether a beginner or a seasoned artisan. This guide delves into the world of wood joints, exploring their strengths, applications, and how to select the perfect joint for your woodworking endeavors.
Choosing the Right Joint
Selecting the right joint depends on the project’s requirements. Consider the joint’s strength, the visual appeal, and the level of skill required. For instance, a dovetail joint is excellent for a drawer due to its strength and aesthetic, but a simpler joint like a butt or pocket joint might be more appropriate for basic framing or when time is a constraint.
Tips for Perfect Joints
- Measure Twice, Cut Once: Accuracy is key in joint making.
- Choose the Right Wood: Different woods respond differently to cuts and adhesives.
- Practice Makes Perfect: Try making different joints on scrap wood before starting your main project.
- Use Quality Tools: Sharp, well-maintained tools are essential for clean cuts.
What Is a Wood Joint?
A wood joint is where two pieces of wood come together. Depending on the project, the strength, aesthetics, and complexity of the joint are key factors in your choice. From simple butt joints to intricate dovetails, each joint has its place in woodworking.
Different Types of Wood Joints:
- Butt Joint
- Mitered Butt Joint
- Dowel Joint
- Biscuit Joint
- Dado Joint
- Rabbet Joint
- Mortise-and-Tenon Joint
- Finger Joint
- Dovetail Joint
- Half-Blind Dovetail Joint
- Sliding Dovetail
- Half-Lap Joint
- Bridle Joint
- Tongue and Groove Joint
- Pocket Joint
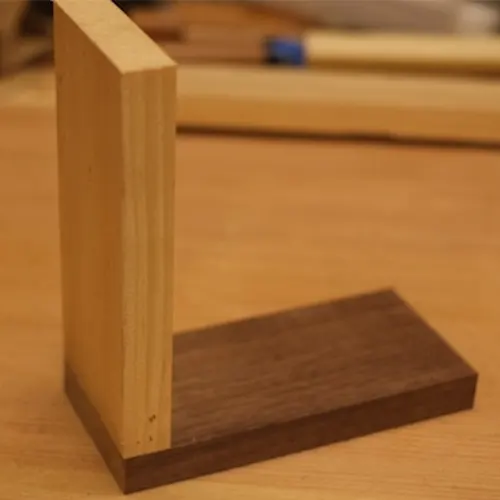
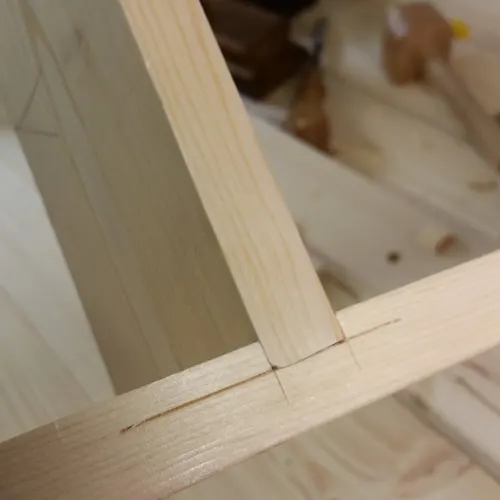
1. Butt Joint
The Butt Joint, characterized by its simplicity, involves adjoining two pieces of wood end-to-end without complex shaping. Commonly reinforced with nails, screws, or dowels, it gains enhanced strength and stability, making it a reliable choice for basic framing and structural projects. This joint is particularly favored by beginners due to its straightforward approach and ease of execution. Serving as a fundamental skill in woodworking, the Butt Joint is essential for foundational learning and practical application in various woodworking projects.
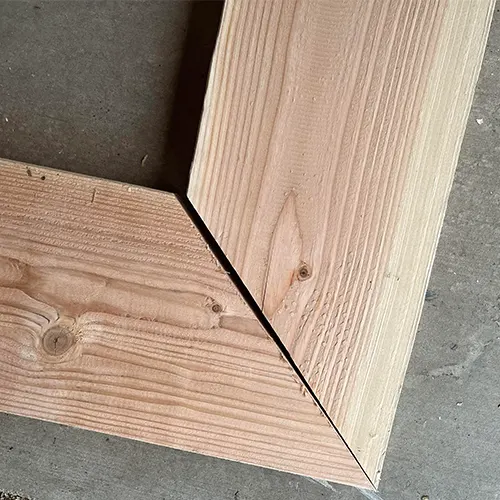
2. Mitered Butt Joint
This joint is a refined version of the classic butt joint, where the ends of the wood are precisely cut at an angle, often 45 degrees, to form a seamless and more aesthetically pleasing connection. It’s particularly favored in creating elegant picture frames and sophisticated trim work, offering a visually appealing finish without compromising the simplicity of its design.
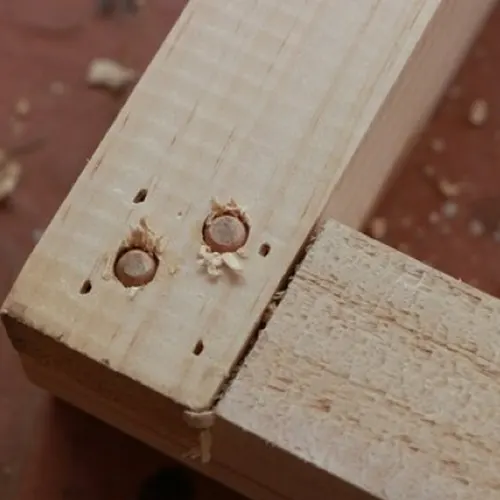
3. Dowel Joint
Elevating the strength and precision beyond the basic butt joint, the dowel joint employs cylindrical wooden pins, known as dowels, to ensure better alignment and robustness. This technique is a cornerstone in the realm of cabinet making and furniture construction, providing enhanced durability and a clean, professional appearance.
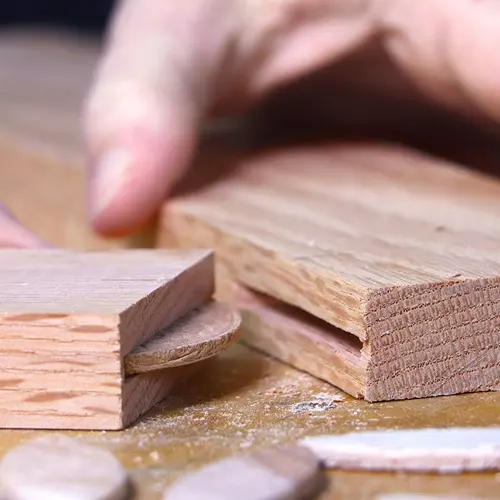
4. Biscuit Joint
Renowned for its concealed reinforcement, the biscuit joint utilizes uniquely shaped, compressed wood pieces, resembling biscuits, which are inserted into corresponding slots in each piece of wood. This joint is particularly adept at providing strong, unobtrusive connections, making it an ideal choice for crafting smooth tabletops and seamless paneling.
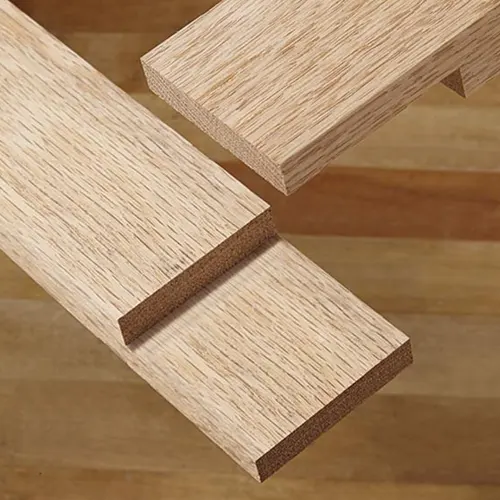
5. Dado Joint
A stalwart in the construction of shelves and cabinets, the dado joint involves creating a precise groove, or dado, in one piece of wood, into which another piece fits snugly. This method offers a high degree of stability and strength, making it a go-to choice for heavy-duty and high-quality woodworking projects.
6. Rabbet Joint
This joint is essentially a dado cut along the edge of a piece of wood, creating a ledge or step that another piece can snugly fit into. It’s a popular choice in woodworking for creating seamless back panels in cabinets and sturdy drawer construction, offering a blend of simplicity and strength.
7. Mortise and Tenon Joint
Emblematic of both strength and traditional craftsmanship, the mortise-and-tenon joint involves fitting a tenon, or a protruding piece of wood, into a mortise, a corresponding cavity. This joint is a mainstay in areas subjected to considerable stress, such as in the construction of table legs and chair arms, providing exceptional durability and stability.

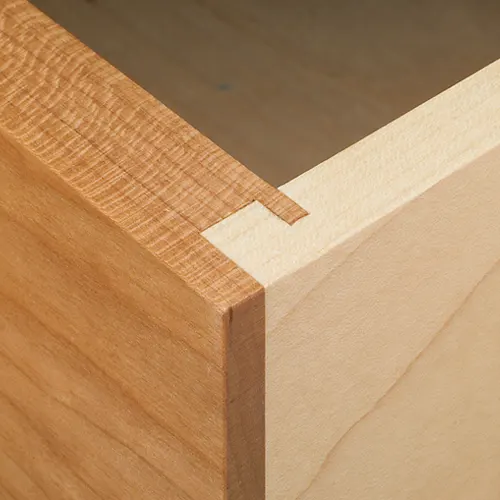
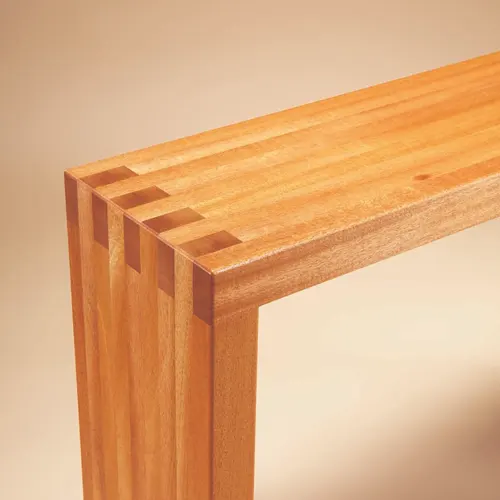
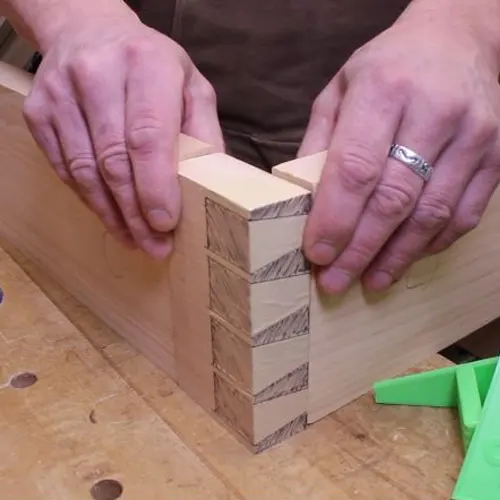
8. Finger Joint
Also known as a box joint, this joint is characterized by a series of interlocking fingers or tabs which provide a large surface area for gluing. It’s not only strong but also visually striking, making it a preferred choice for the corners of boxes and the fronts of drawers where both strength and aesthetic appeal are desired.
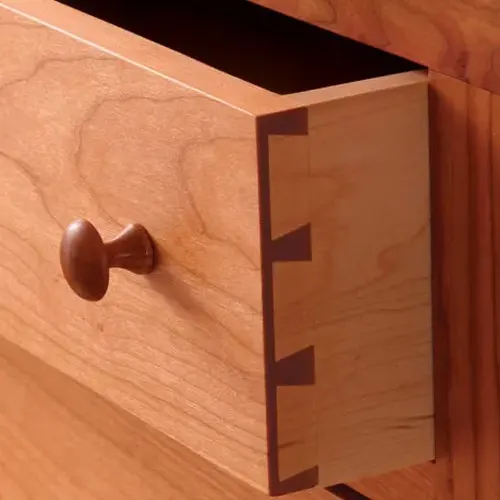
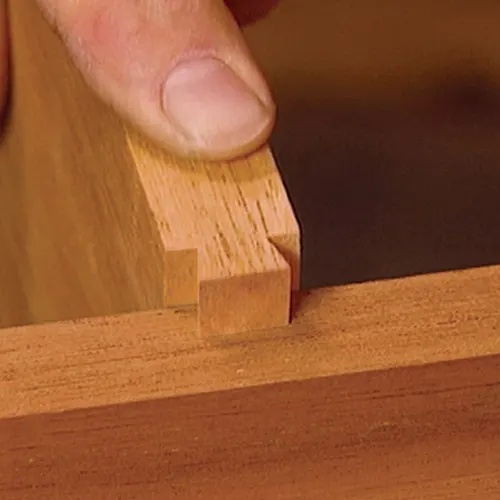
9. Dovetail Joint
Celebrated for its interlocking design that resists pulling apart, the dovetail joint is a testament to skilled craftsmanship. The joint’s unique ‘tail and pin’ structure makes it an ideal choice for high-quality drawer construction and fine cabinetry, where both strength and visual elegance are paramount.
10. Half-Blind Dovetail Joint
This joint marries the robustness of the traditional dovetail with a more refined appearance, as one side of the joint remains hidden. It’s particularly valued in instances where the strength of a dovetail is needed but a more unobtrusive look is desired, such as in the front of a drawer, where the joint is visible only when the drawer is open.
11. Sliding Dovetail
This joint is a sophisticated blend of the classic dovetail and a dado joint, offering a unique combination of strength and precision. The sliding dovetail features a tapered groove that securely locks into place, making it an excellent choice for constructing sturdy shelves and reliable drawer dividers, where both lateral strength and ease of assembly are key.
12. Half-Lap Joint
A practical and efficient joint, the half-lap involves removing half the thickness of two overlapping pieces of wood, creating a flush and stable connection. This joint is particularly effective in frame construction and for cross-sections in various woodworking projects, where simplicity and solid assembly are required.
13. Bridle Joint
Known for its robustness, the bridle joint features a tenon on one piece of wood that fits into a mortise on the other. This joint provides a large surface area for gluing, making it a strong choice for frames and larger structures where durability and load-bearing capacity are essential.
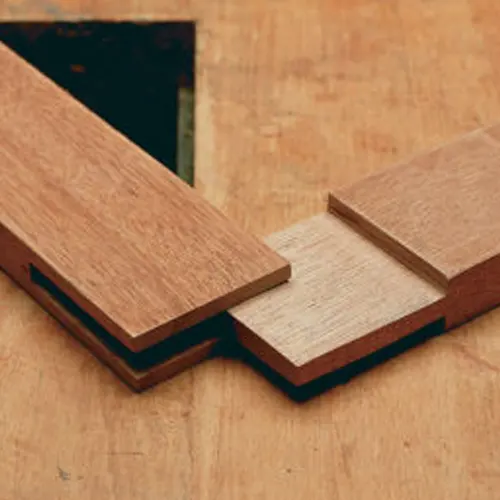
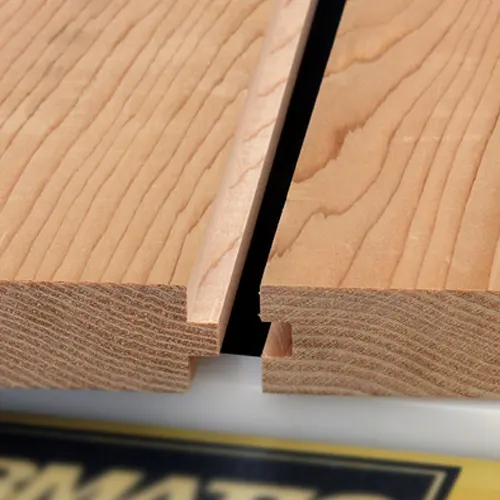
14. Tongue and Groove Joint
A classic in woodworking, the tongue-and-groove joint consists of a protruding ‘tongue’ on one piece of wood that fits snugly into a ‘groove’ on another. This joint is widely used in flooring and paneling, offering a smooth, uniform surface and a strong, interlocking connection that is both aesthetically pleasing and functional.
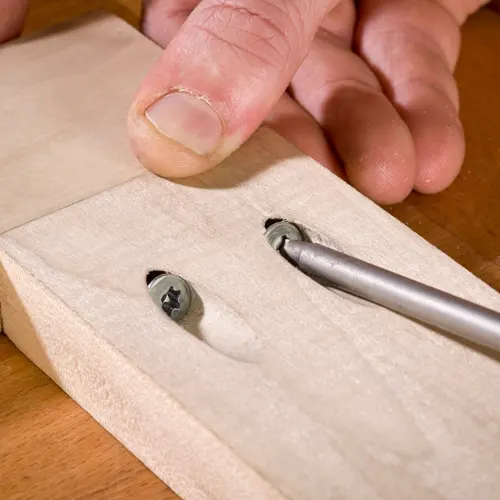
15. Pocket Joint
Ideal for beginners and lightweight constructions, the pocket joint involves creating an angled hole into which a screw is driven to connect two pieces of wood. This joint is valued for its simplicity and the neat finish it provides, as the screw head is hidden, making it a popular choice for projects where a clean look and moderate strength are desired.
General Rules for Joinery Design
Joinery, the art of connecting pieces of timber to form a larger structure, is a fundamental aspect of woodworking and construction. To ensure structural integrity and longevity, there are eight general rules in timber framing for joinery design. These guidelines help in creating joints that are not only functional but also aesthetically pleasing.
The “Golden Rule” of Joinery Design
Before delving into the specific rules, it’s essential to understand the overarching principle, often referred to as the “Golden Rule”: Design joints to perform the same structural task as the loaded timber they’re part of, without compromising the capacity of the receiving timber. This rule emphasizes the importance of maintaining the strength and integrity of the timber while designing joints.
1. Minimizing Timber Weakening
The first rule focuses on the careful cutting of joints and the strategic arrangement of fastenings. The goal is to minimize the weakening of the timber pieces they connect. It’s crucial to maintain the structural integrity of each piece of timber, ensuring that the joint does not become the weakest link.
2. Aligning Surfaces Perpendicular to Pressure
Each abutting surface in a joint should be as perpendicular as possible to the pressure it needs to transmit. This alignment ensures that the joint can effectively transfer loads without undue stress, which helps in maintaining the structure’s stability and durability.
3. Proportional Surface Area to Pressure
The third rule involves proportioning each surface area to the pressure it must bear. This proportionality ensures the timber’s safety against damage under the heaviest loads encountered in practice. Additionally, it’s vital to accurately form and fit every pair of surfaces to distribute stress uniformly.
4. Stronger Fastenings
Fastenings should be proportioned to be stronger than the anticipated loads in the pieces they connect. This rule is crucial for preventing joint failure, ensuring that the fastenings can hold up under stress without breaking or becoming dislodged.
5. Placement of Fastenings for Resistance
The placement of fastenings in each piece of timber should offer sufficient resistance against the joint giving way. This means considering the potential for the fastenings to shear or crush through the timber and positioning them to mitigate these risks.
6. Simplicity and Minimal Abutments
Selecting the simplest forms of joints and aiming for the smallest number of abutments is a key rule. Simplicity in joinery not only makes the construction process more efficient but also often results in stronger and more reliable joints.
7. Grain Parallelism in Tenons and Mortises
Lastly, both the tenon (the projecting piece of timber) and the mortise (the recess cut into the timber to receive the tenon) should be shaped to be parallel with the grain of their respective members. This orientation respects the natural strength of the wood grain, thereby enhancing the joint’s durability.
Traditional Layout and Standard Rules
Traditional layout in timber framing often involves the use of a framing square, with its two dimensions guiding most layouts. Each timber has a reference or layout face determined by the master framer or frame designer. Standard layout rules often apply, such as flush joints with external surfaces like gable ends, roof slopes, exterior walls, and floor tops.
Specific Standards for Joinery Decisions
- Tenon Size: Typically, the tenon size should be one-quarter of the timber thickness. For example, an 8×8 timber should have a 2″ thick tenon.
- Peg Size: Pegs should be half the tenon thickness. A 2″ tenon should have a 1″ peg, though sometimes a smaller peg may be necessary, provided it maintains sufficient strength.
Conclusion
Wood joints are the foundation of woodworking. By understanding the various types and their applications, you can elevate your woodworking projects from simple constructions to works of art. Remember, the best joint for your project depends on its purpose, the desired aesthetic, and your skill level. Happy woodworking!
FAQs
- What are the most essential wood joints for beginners to learn?
The most essential wood joints for beginners include the butt joint, the dovetail joint, the mortise and tenon joint, and the lap joint. These foundational joints provide a good starting point for understanding basic woodworking techniques. - Can wood joints be strong without glue or fasteners?
Yes, certain wood joints, like dovetail joints or mortise and tenon joints, can be incredibly strong even without glue or fasteners due to their interlocking nature. However, glue often adds additional strength and stability. - What is the difference between a dovetail joint and a box joint?
A dovetail joint consists of interlocking ‘tails’ and ‘pins’ which resemble a dove’s tail, while a box joint is made up of square-shaped ‘fingers’ that lock together. Dovetail joints are often considered stronger and more aesthetically pleasing but are more complex to make than box joints. - How do environmental factors affect wood joints?
Wood expands and contracts with changes in humidity and temperature. This can affect wood joints, potentially causing them to loosen or tighten. Designing joints with these factors in mind is crucial for long-term durability. - What is a Japanese wood joint and why is it special?
Japanese wood joints are known for their complexity and beauty, often requiring high precision and skill. They are unique because they often interlock in intricate ways without the need for nails or glue, showcasing exceptional craftsmanship. - Is it possible to create wood joints with a 3D printer?
Yes, with advancements in technology, it’s possible to design and create templates or even entire joints using a 3D printer. This can be particularly useful for complex joints or for educational purposes. - What are the best woods for creating durable wood joints?
Hardwoods like oak, maple, and walnut are typically best for creating durable wood joints due to their density and strength. However, the choice of wood can also depend on the specific application and desired aesthetic. - How has the art of making wood joints evolved with modern tools?
Modern tools have made the process of creating wood joints faster and more precise. Power tools like routers and CNC machines allow for intricate and consistent joints that would be very time-consuming to make by hand. - Can wood joints be repaired if they become loose or damaged?
Yes, loose or damaged wood joints can often be repaired. Techniques may include disassembling and re-gluing the joint, using wood fillers, or reinforcing the joint with dowels or screws. - What are some creative uses of wood joints in contemporary furniture design?
Contemporary furniture design often uses wood joints both for functional strength and aesthetic appeal. Designers might expose the joinery as part of the design, use contrasting woods for visual interest, or innovate with new joint types for unique looks.

David Murray
Forestry AuthorI'm David Murry, a forestry equipment specialist with a focus on chainsaw operation. With over 13 years of experience, I've honed my skills in operating and maintaining a wide range of machinery, from chainsaws to log splitters. My passion for the outdoors and commitment to sustainable forestry drive my work, which emphasizes safety, efficiency, and staying updated with industry advancements. Additionally, I'm dedicated to sharing my expertise and promoting environmental awareness within the forestry community.


That's great I'm admiring your job. Please may you put your references?
Robert wir
March 6, 2024 1:37 am