How to Grow Silver Squill: A Guide to Nurturing These Unique Plants
- March 6, 2024
- 0 comment
Silver Squill, scientifically known as Ledebouria socialis, is a charming and unusual bulbous plant that’s gaining popularity among houseplant enthusiasts. Its eye-catching, leopard-spotted leaves and hardy nature make it a favorite for both beginners and seasoned gardeners. Here’s a comprehensive guide to help you grow and care for your own Silver Squill.
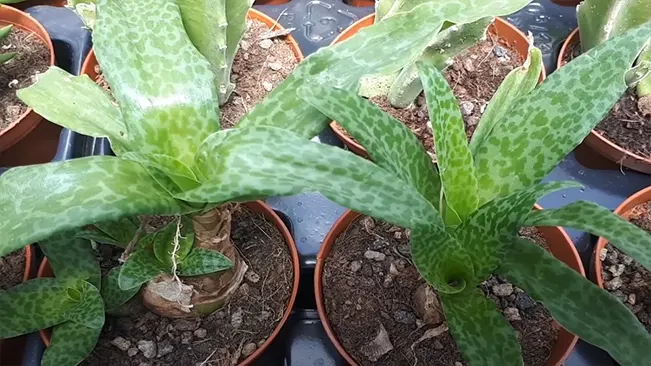
Silver Squill, also known as Wood Hyacinth or Leopard Lily, hails from the Eastern Cape Province of South Africa. It belongs to the Asparagaceae family and is a relatively small plant, with bulbs that peek above the soil and leaves that can grow up to 10cm long.
Ideal Growing Conditions
Light
- Silver Squill’s preference for bright, indirect light makes it an adaptable houseplant. The key is to mimic the light conditions of its native South African habitat. Although it can handle some direct sun, particularly in the morning or late afternoon, prolonged exposure to harsh sunlight can damage the leaves. The ideal placement would be near a north or east-facing window where it receives gentle, filtered light. If you notice the leaves losing their vibrant color or spots appearing, it might be a sign of too much direct sunlight.
Soil
- The soil mix for Silver Squill is crucial for its health. As a bulbous plant, its bulbs are prone to rot if the soil retains too much moisture. A well-draining soil mix, typically used for succulents, is ideal. You can easily create this by mixing equal parts of regular potting soil, sand, and perlite or pumice. This combination ensures that water drains quickly, preventing the roots from sitting in moisture for too long. Ensuring good drainage is key to avoiding many common problems associated with overwatering.
Watering
- Watering correctly is perhaps the most challenging aspect of caring for Silver Squill. It’s a drought-tolerant plant, which means it’s more tolerant of under-watering than over-watering. The best practice is to check the top inch of the soil; if it’s dry, it’s time to water. During the growing season (spring and summer), you may find it needs more frequent watering. However, in winter, when the plant goes dormant, reduce watering significantly. This seasonal change in watering mimics the natural dry season in its native habitat.
Temperature and Humidity
- Silver Squill is quite adaptable when it comes to temperature and humidity, making it a great indoor plant. It thrives in average room temperatures, but it’s important to protect it from sudden temperature changes or drafts. Normal indoor humidity levels are sufficient, as it doesn’t require the high humidity that tropical plants might. However, extremely dry air, like that found in heated homes during winter, may require occasional misting or a pebble tray to slightly increase humidity.
Planting and Propagation
- When planting Silver Squill, select a pot with adequate drainage to prevent water accumulation at the bottom. This is crucial as the bulbs are susceptible to rot if they sit in waterlogged soil. The pot size should be slightly larger than the bulb cluster, providing enough room for growth but not so large that the soil stays wet for long periods.
- The ideal soil mix should be loose and well-draining. A combination of regular potting soil, sand, and perlite or pumice is typically recommended. This mix ensures good drainage while retaining enough nutrients and moisture for healthy growth.
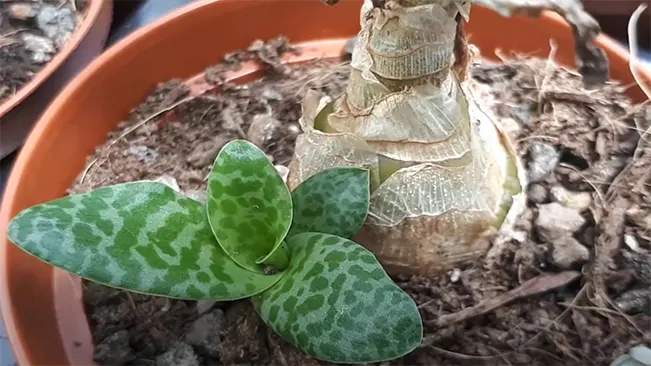
- Place the bulbs on the soil surface, spacing them a few inches apart. Silver Squill bulbs like to sit partially above the soil line. This unique planting method mimics their natural growing conditions and helps prevent rot.
Propagation through Bulb Division
Propagation of Silver Squill is relatively simple and is best done in the spring. Here’s a step-by-step guide:
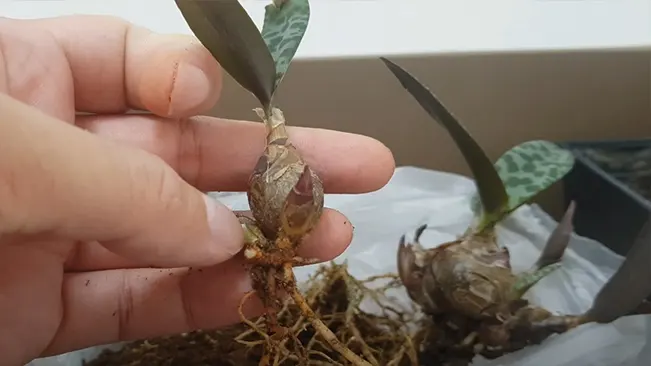
- Gently Remove the Plant: Carefully take the plant out of its pot. Be gentle to avoid damaging the bulbs and roots.
- Separate the Bulbs: Look for natural divisions in the bulb cluster. Gently tease the bulbs apart, ensuring each section has some roots attached. It’s normal for some of the outer, drier bulbs to fall away – these can be discarded unless they have healthy roots and growth points.
- Prepare New Pots: Fill new pots with the same well-draining soil mix used for adult plants. Make sure the pots have drainage holes.
- Plant the Bulbs: Place each divided bulb cluster on the soil surface of the new pots. The top of the bulbs should be slightly exposed above the soil. Gently press the soil around the bulbs for stability.
- Initial Care: Water the newly potted bulbs lightly to settle the soil. Place the pots in a location with bright, indirect light and maintain the usual care routine.
- Growth Monitoring: It may take a few weeks for new growth to appear. Continue to water sparingly, allowing the soil to dry out between waterings.
Post-Propagation Care
- After propagation, it’s important to give the new plants time to establish themselves. Avoid overwatering during this period, as the roots are still developing and are more prone to rot. With proper care, the new Silver Squill plants will gradually develop and can be treated as mature plants once they have established themselves.
Ongoing Care
Fertilizing
Silver Squill benefits from regular feeding but doesn’t require a heavy fertilization regimen. Here are some key points to remember:
- Type of Fertilizer: A balanced, water-soluble fertilizer is recommended. Look for one with equal parts nitrogen, phosphorus, and potassium (often labeled as 10-10-10 or 20-20-20).
- Frequency: Fertilize once a month during the growing season, which typically spans from spring to early fall. This provides the plant with necessary nutrients to support its growth.
- Winter Care: During winter, the Silver Squill goes into a dormant phase. It’s important not to fertilize during this period as the plant is not actively growing and excess nutrients can accumulate, potentially harming the plant.
Pruning
Pruning Silver Squill is quite straightforward and low-maintenance:
- Removing Dead Leaves: Periodically check for and gently remove any dead, yellowing, or damaged leaves. This not only keeps the plant looking tidy but also helps prevent any potential fungal or pest problems that can arise from decaying plant matter.
- Promoting Growth: Regular pruning isn’t necessary for growth promotion as Silver Squill naturally maintains a compact form. However, removing old leaves can encourage new growth and improve air circulation around the plant.
Pests and Problems
While Silver Squill is quite hardy, it’s still susceptible to a few common houseplant issues:
- Common Pests: Watch out for pests like aphids and mealybugs. These pests can be treated using insecticidal soap or neem oil. Regularly inspecting your plant and acting promptly at the first sign of pests is key to successful control.
- Overwatering: This is the most significant problem for Silver Squill. Overwatering can lead to root rot, a serious condition that can be fatal if not addressed. Ensure the pot has good drainage, and only water the plant when the topsoil feels dry.
- Signs of Stress: Yellowing leaves or a mushy base are signs of overwatering. If you notice pests, distorted or discolored leaves could indicate an infestation.
Conclusion
Growing Silver Squill is a rewarding experience for both novice and experienced gardeners, thanks to its low maintenance and unique appearance. By providing bright, indirect light, well-draining soil, and sparing watering, you can ensure its healthy growth. Regular, light fertilizing during the growing season and vigilance against overwatering and pests will help maintain its vibrant foliage. Embracing these simple care practices will allow your Silver Squill to thrive, adding an exotic touch to your indoor plant collection.
FAQs (Frequently Asked Questions)
- What type of soil is best for Silver Squill?
Silver Squill prefers well-draining soil. A mix of regular potting soil with sand and perlite or pumice is ideal. This composition helps to prevent water-logging and root rot. - How often should I water Silver Squill?
Water your Silver Squill sparingly, allowing the soil to dry out completely between waterings. Overwatering is a common issue, so it’s crucial to check the soil moisture before watering. - Does Silver Squill need direct sunlight?
Silver Squill thrives in bright, indirect light. While it can tolerate some direct sunlight, prolonged exposure can scorch its leaves. A spot near a north or east-facing window is typically ideal. - Can Silver Squill be grown outdoors?
Silver Squill can be grown outdoors in regions where temperatures do not drop below freezing. It should be placed in a spot with partial shade to prevent leaf burn. - How do I propagate Silver Squill?
Propagation is easily done through bulb division. Simply separate the bulbs during repotting and plant them in new pots. Spring is the best time for propagation. - What temperatures are ideal for Silver Squill?
It prefers average room temperatures, around 60-75°F (15-24°C). It’s not frost-tolerant and should be protected from extreme cold. - How do I fertilize Silver Squill?
Use a balanced, water-soluble fertilizer once a month during the growing season (spring and summer). Avoid fertilizing in the winter when the plant is dormant. - How do I deal with pests on Silver Squill?
Silver Squill is relatively pest-free, but if pests like aphids or mealybugs appear, you can treat the plant with insecticidal soap or neem oil. - Is Silver Squill toxic to pets?
Yes, Silver Squill is considered toxic to cats and dogs if ingested. It’s best to keep it out of reach of pets. - How big does Silver Squill get?
Silver Squill is a relatively small plant. Its bulbs can peek above the soil, and its leaves can grow up to about 4 inches (10 cm) long.

Kristine Moore
Forestry AuthorI'm Kristine Moore, a seasoned garden landscaping professional with over 30 years of experience. My extensive career has been dedicated to transforming outdoor spaces into stunning, sustainable landscapes. With a deep understanding of horticulture, design principles, and environmental stewardship, I have become a respected figure in the field, known for creating harmonious, visually appealing, and eco-friendly gardens. My commitment to excellence and continuous learning in landscaping trends and techniques has solidified my reputation as an expert in garden design and implementation.


Leave your comment