How to Plant Rhubarb Seeds: Essential Steps for Thriving Plants
- February 26, 2024
- 0 comment
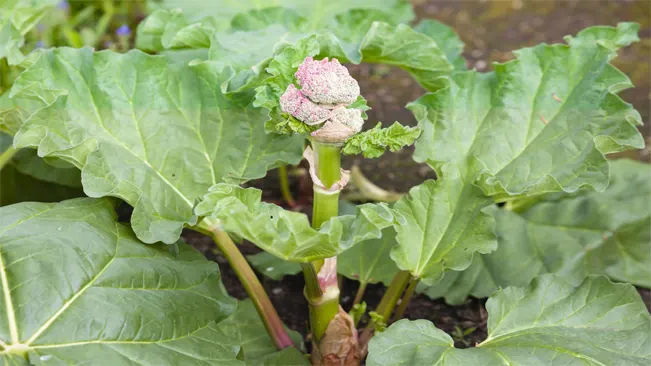
Rhubarb, a perennial vegetable known for its tangy flavor and vibrant red stalks, is a delightful addition to any garden. While many gardeners opt for planting rhubarb crowns, starting rhubarb from seeds is a rewarding process. This guide will walk you through the steps of planting rhubarb seeds for a bountiful harvest.
List on How to Plant Rhubarb
- Choosing the Right Time
- Preparing the Seeds
- Sowing the Seeds
- Germination and Growth
- Transplanting Seedlings
- Ongoing Care
- Harvesting
Nutritional Benefits of Rhubard
| Benefit | Description |
|---|---|
| Nutrient-Rich | Rhubarb is a good source of vitamins C and K, and contains minerals like calcium, potassium, and manganese. |
| Digestive Health | Its high fiber content aids in digestion and can help prevent constipation. |
| Low in Calories | Rhubarb is low in calories, making it a good choice for weight management. |
| Antioxidant Properties | Contains antioxidants like lycopene and anthocyanins, which can help fight free radicals in the body. |
| Bone Health | The vitamin K in rhubarb supports bone health by improving calcium absorption and reducing urinary excretion of calcium. |
| Anti-inflammatory Effects | Rhubarb has anti-inflammatory properties, which can help with conditions like arthritis. |
| Skin Health | Vitamin A in rhubarb can contribute to skin health and may improve skin conditions like acne. |
| Cardiovascular Health | The fiber in rhubarb can help lower cholesterol levels, contributing to heart health. |
| Cancer Prevention Potential | Early research suggests that the compounds in rhubarb may have anti-cancer properties, although more research is needed to fully understand this benefit. |
| Blood Sugar Control | Rhubarb’s low glycemic index and high fiber content may help in managing blood sugar levels, beneficial for people with diabetes. |
Materials Needed
- Rhubarb seeds
- Seed starting mix
- Seed trays or small pots
- Watering can or spray bottle
- Fertilizer (optional)
Choosing the Right Time
Timing is crucial when planting rhubarb seeds. Start the seeds indoors 8 to 10 weeks before the last expected frost date in your area. This early start allows the seedlings to grow strong enough to transplant after the danger of frost has passed.
Understanding Frost Dates
- The last expected frost date is the approximate day by which the likelihood of frost has passed in a particular area. This date varies depending on your geographic location.
- You can find the last frost date for your area through local gardening clubs, agricultural extensions, or online gardening resources.
Why Start Indoors?
- Rhubarb seeds require a controlled environment for the initial stages of growth. Starting them indoors allows you to manage temperature and moisture levels more effectively.
- Indoor germination protects the delicate seedlings from unpredictable late frosts, which can damage or kill young plants.
Timing for Seed Starting
- Starting the seeds 8 to 10 weeks before the last expected frost gives them enough time to develop into sturdy seedlings.
- This period allows the seedlings to grow a strong root system and develop several sets of leaves, which are essential for survival and growth once transplanted outdoors.
Monitoring Seedling Growth
- During these 8 to 10 weeks, keep a close eye on the seedlings. Ensure they have enough light and water, and maintain a consistent temperature, ideally between 60-70°F (15-21°C).
- If the seedlings seem leggy or weak, they may need more light. Consider using a grow light if natural light is insufficient.
Preparing the Seeds
Why Soak Rhubarb Seeds?
Rhubarb seeds are encased in a hard outer shell, which can inhibit water absorption and delay germination. Soaking the seeds before planting is a method used to soften this tough outer coating. This process mimics the natural conditions seeds would encounter in the wild, where periods of wetness help to break down the seed coat.
How to Soak Rhubarb Seeds
- Gather Materials: You’ll need the rhubarb seeds, a small bowl, and water. Room temperature water is typically best.
- Soaking Time: Place the rhubarb seeds in the bowl and cover them with water. The soaking time can vary, but generally, a few hours (up to 24 hours) is sufficient. It’s important not to soak the seeds for too long, as excessive soaking can cause the seeds to rot.
- Monitoring the Seeds: Check the seeds periodically. You might notice the seeds swelling slightly, which is a sign that they are absorbing water.
- Draining the Seeds: After soaking, drain the water and gently pat the seeds dry with a paper towel. Be careful not to damage the softened seeds.
Benefits of Soaking Seeds
- Improved Germination Rate: Soaking can lead to a higher germination rate by softening the seed coat, making it easier for the sprout to emerge.
- Faster Germination: The process can also speed up germination since the seeds have already absorbed a significant amount of water.
- Even Germination: It helps in achieving more uniform germination among all seeds.
Planting Soaked Seeds
- After soaking, plant the seeds as recommended, usually about ½ inch deep in a seed starting mix. Keep the soil moist but not waterlogged, and place in a warm, light area to encourage germination.
Sowing the Seeds
Fill your seed trays or pots with a high-quality seed starting mix. Plant the seeds ½ inch deep and cover lightly with soil. Water gently using a watering can or spray bottle, ensuring the soil is moist but not waterlogged.
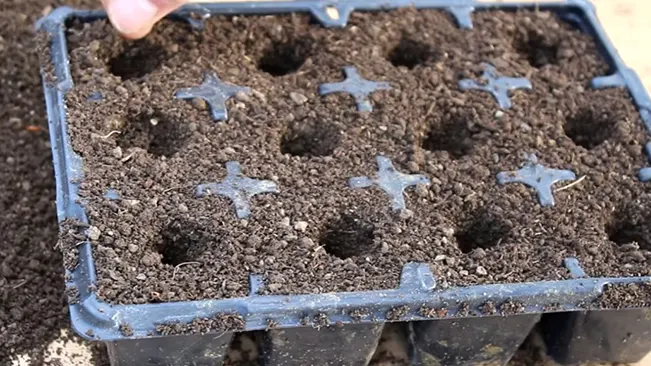
- Choosing Seed Trays or Pots:
- Select appropriate containers for starting your rhubarb seeds. These can be seed trays, which are convenient for planting multiple seeds, or small individual pots. Ensure they have drainage holes to prevent waterlogging.
- Selecting Seed Starting Mix:
- Use a high-quality seed starting mix, which is specifically formulated to promote germination and healthy early growth of seedlings. This mix typically has a fine texture and includes components like peat moss, vermiculite, or perlite to aid in moisture retention and aeration.
- Planting the Seeds:
- Plant the rhubarb seeds at a depth of about ½ inch. This depth is ideal as it provides the seeds with enough soil cover to retain moisture while still allowing the seedlings to emerge easily.
- Place the seeds in the soil and gently cover them with a thin layer of the starting mix. Avoid planting the seeds too close together to prevent overcrowding, which can lead to poor air circulation and hinder growth.
- Watering:
- After planting the seeds, the next crucial step is watering. Water gently using a watering can with a fine nozzle or a spray bottle to ensure even moisture distribution.
- The goal is to moisten the soil without making it waterlogged, as excessive water can lead to seed rot and fungal diseases. The soil should feel like a wrung-out sponge – damp but not dripping wet.
- Consistency is key in watering. Check the moisture level daily, and water as needed to maintain consistent soil moisture. Seedlings are sensitive to both overwatering and under-watering.
Germination and Growth
Place the trays in a warm, well-lit area. Rhubarb seeds typically germinate in 7 to 14 days. Keep the soil consistently moist during this period. Once the seedlings appear, ensure they receive plenty of light – a sunny windowsill or a grow light works well.
Germination
- Environment: For successful germination, rhubarb seeds require a warm environment. The ideal temperature range is between 60-70°F (15-21°C). This temperature range helps to stimulate the seeds to break dormancy and begin growth.
- Light: Rhubarb seeds do not require light to germinate, so they can be covered lightly with soil. However, after they sprout, light becomes crucial.
- Moisture: Consistent moisture is key during the germination phase. The soil should be kept moist, but not waterlogged. Overwatering can cause the seeds to rot, whereas under-watering might prevent germination.
- Time Frame: Rhubarb seeds typically take about 7 to 14 days to germinate, though this can vary depending on the environmental conditions and seed quality.
Growth After Germination
- Light Requirements: Once the seedlings emerge, they require plenty of light. A lack of sufficient light can lead to leggy, weak plants. If natural light is insufficient, especially in regions with limited winter sunlight, a grow light can be very beneficial.
- Thinning Seedlings: If you’ve sown multiple seeds per cell or pot, thin out the seedlings to avoid overcrowding. This ensures that the strongest seedlings have enough space and resources to grow robustly.
- Transplanting: Seedlings are ready for transplanting when they’re about 3-4 inches tall and have at least two sets of true leaves. Prior to transplanting outdoors, it’s important to harden off the seedlings. This involves gradually exposing them to outdoor conditions over a period of a week or so to reduce transplant shock.
- Watering Post-Germination: Continue to keep the soil moist but not soggy. Proper watering is crucial as the seedlings develop.
- Fertilizing: While rhubarb seedlings don’t require a lot of fertilization, a light application of a balanced fertilizer can be beneficial. Ensure that the fertilizer is diluted to avoid burning the young plants.
- Growth Monitoring: Keep an eye on the growth and health of the seedlings. Look out for signs of pests or diseases, and ensure they are growing in a well-ventilated area to prevent fungal diseases.
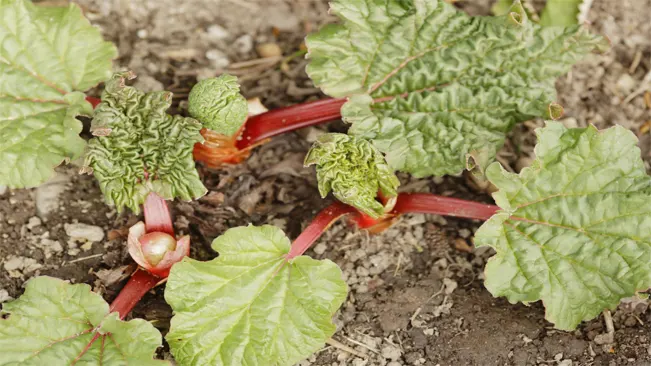
Transplanting Seedlings
When the seedlings are 3-4 inches tall and have at least two sets of true leaves, they’re ready to be transplanted. Harden off the seedlings by gradually introducing them to outdoor conditions over a week.
Harden Off the Seedlings
Before transplanting, it’s crucial to ‘harden off’ the seedlings. This process involves gradually acclimating the young plants to the conditions they will face outdoors, such as direct sunlight, wind, and temperature fluctuations.
- Start the Hardening Off Process: About a week before you plan to transplant, begin by placing the seedlings outside in a sheltered, partially shaded area for a few hours each day. Avoid direct sunlight and harsh conditions initially.
- Gradually Increase Exposure: Each day, gradually increase the amount of time the seedlings spend outside and expose them to a bit more sunlight and wind. This step-by-step adaptation helps to prevent shock from sudden changes in environment.
- Monitor the Seedlings: Pay attention to the weather and the seedlings’ responses. If they show signs of stress (like wilting or leaf burn), reduce exposure and adjust accordingly.
Transplanting Process
After a week of hardening off, your seedlings should be ready for transplanting.
- Choose the Right Location: Select a sunny spot in your garden with well-draining soil. Rhubarb plants prefer a slightly acidic to neutral pH.
- Prepare the Soil: Work the soil to a good depth, making it loose and aerated. This helps the young roots to penetrate the soil easily.
- Transplanting: Dig a hole for each seedling, ensuring it’s large enough to accommodate the root ball. Carefully remove the seedling from its current container, trying to keep the root ball intact. Place the seedling in the hole and fill in with soil. The base of the stalk should be just at the soil surface.
- Spacing: Rhubarb plants can grow quite large, so space the seedlings about 2 feet apart from each other.
- Watering After Transplanting: Water the seedlings well after transplanting to help settle the soil around the roots and to reduce transplant shock.
- Mulching: Apply a layer of organic mulch around the base of the plants to help retain moisture and suppress weeds.
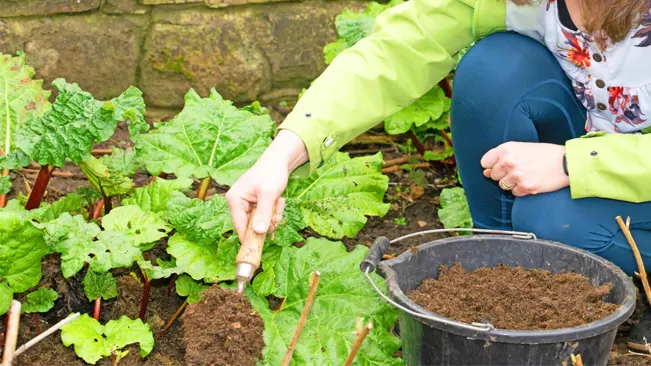
Post-Transplant Care
- After transplanting, continue to monitor the plants and water them regularly, especially during dry spells. It’s important to remember that the first year is mainly for the plant to establish itself, so avoid harvesting the stalks during this period.
Ongoing Care
Water your rhubarb plants regularly, especially during dry periods. A layer of mulch can help retain moisture and suppress weeds. Fertilize the plants with a balanced fertilizer in the spring.
Watering Rhubarb Plants

- Consistency is Key: Rhubarb plants need consistent moisture to thrive. The soil should be kept evenly moist, but not waterlogged.
- Adjusting to Weather Conditions: During dry periods, increase the frequency of watering. Rhubarb plants can be sensitive to drought, and inadequate water can lead to reduced growth and smaller stalks.
- Deep Watering: It’s better to water deeply and less frequently than to give the plants a light watering often. Deep watering encourages the roots to grow deeper into the soil, which can improve the plant’s drought tolerance.
Mulching
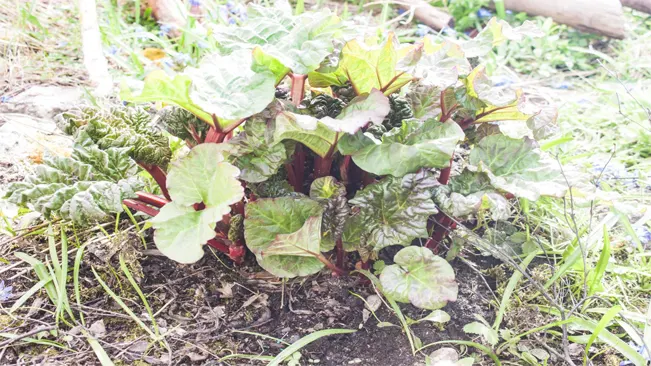
- Purpose of Mulch: Applying a layer of organic mulch around rhubarb plants helps retain soil moisture, keep the roots cool, and suppress weed growth.
- Types of Mulch: Suitable mulch materials include straw, grass clippings, compost, or shredded leaves.
- Application: Apply a 2-3 inch layer of mulch around the base of the plants, being careful to leave some space around the stems to prevent rot.
Fertilizing
- Balanced Fertilizer: Use a balanced fertilizer (like a 10-10-10 NPK) in early spring as the plants start growing. This provides a boost of nutrients to support vigorous growth.
- Composting: Alternatively, incorporating compost into the soil around rhubarb plants can provide a slow-release source of nutrients and improve soil structure.
- Avoiding Over-Fertilization: Be cautious not to over-fertilize, as this can lead to excessive leaf growth at the expense of the stalk development.
Additional Care Tips
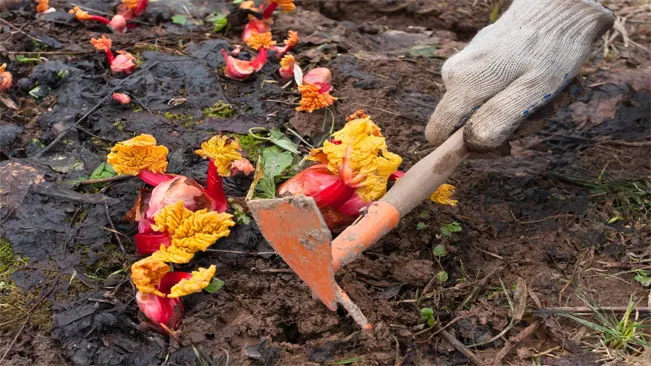
- Removing Flower Stalks: If your rhubarb plants start to produce flower stalks, remove them promptly. Flowering can reduce the vigor of the plant and the quality of the stalks.
- Weeding: Regularly weed around your rhubarb plants to prevent competition for nutrients and water.
- Winter Care: In colder climates, cover rhubarb plants with a thick layer of mulch after the ground freezes to protect them during the winter.
- Dividing Plants: Every 5-6 years, divide rhubarb crowns to rejuvenate the plant and prevent overcrowding. This is typically done in early spring or fall.
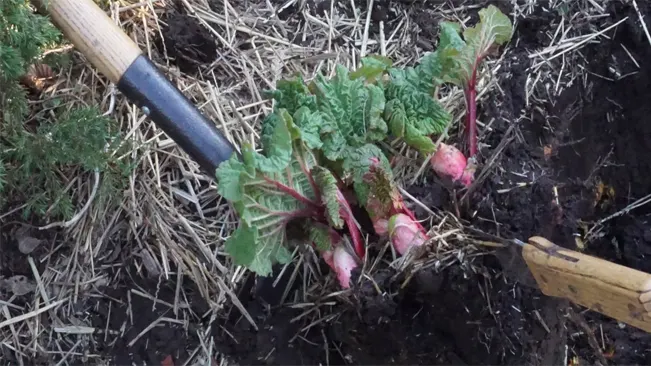
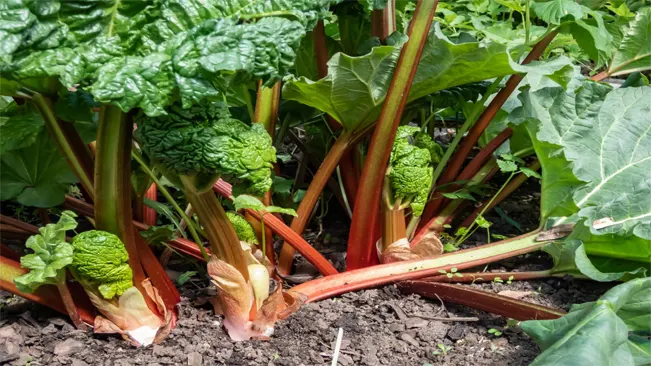
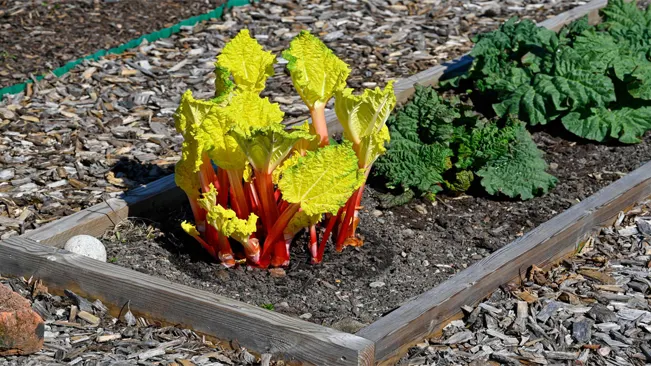
Harvesting
It’s best to wait until the second year after planting to harvest rhubarb stalks. This patience allows the plants to establish strong root systems. Harvest the stalks by twisting and pulling them from the base, and always leave a few stalks on each plant to ensure continued growth.
Understanding the Harvesting Timeline
- Initial Waiting Period: It’s crucial to wait until the second year after planting rhubarb from seeds before beginning to harvest. This patience is necessary because rhubarb plants need time to develop strong root systems, which are essential for healthy growth and abundant harvests in subsequent years.
- Yearly Harvest Season: Typically, the harvesting season for rhubarb is in the spring, with the peak period being April through June. However, the exact timing can vary depending on your local climate.
How to Harvest Rhubarb
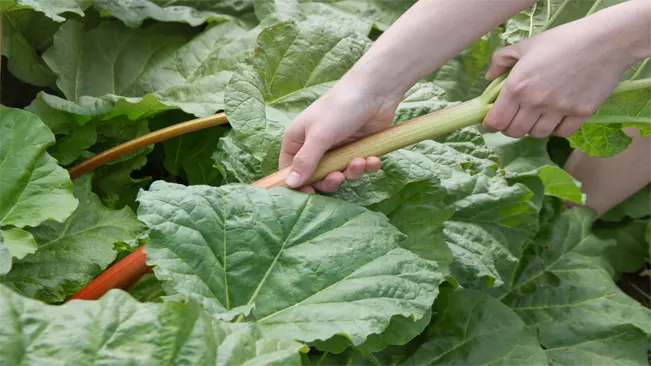
- Selecting Stalks: Choose stalks that are at least 10 inches long and have fully developed color (usually a deep red, though some varieties are more green). The stalks should be firm and crisp.
- Harvesting Technique: To harvest, grasp a stalk at its base and gently twist it while pulling sideways. This method helps to cleanly separate the stalk from the root without causing damage to the plant. Avoid cutting the stalks with a knife, as this can lead to unnecessary injury to the plant.
- Amount to Harvest: In the second year, harvest sparingly – around one-third of the total stalks. In subsequent years, you can harvest more, but always leave at least two-thirds of the stalks intact to ensure the plant remains healthy and vigorous.
Post-Harvest Care
- Leaving Some Stalks: It’s important to leave a few stalks on each plant. This allows the plant to continue photosynthesizing and gathering energy for the next growing season.
- Ceasing Harvest: Stop harvesting rhubarb in the early summer, typically by late June or early July. Harvesting later into the summer can weaken the plants.
Conclusion
Planting rhubarb seeds is a straightforward process that can bring a delightful flavor to your table for years. With patience and care, your rhubarb plants will thrive and produce plentiful harvests. Enjoy the fruits of your labor in pies, jams, and other delicious recipes!
FAQs (Frequently Asked Questions)
- When is the best time to plant rhubarb seeds?
Plant rhubarb seeds indoors 8-10 weeks before the last expected frost date. This gives the seedlings enough time to grow strong before transplanting outdoors. - Do I need to soak rhubarb seeds before planting?
Yes, soaking the seeds for a few hours before planting can help soften the outer coating and improve germination rates. - How deep should I plant rhubarb seeds?
Plant the seeds about ½ inch deep in the soil. - What type of soil is best for rhubarb?
Rhubarb prefers well-draining soil with a slightly acidic to neutral pH. - How much sunlight does rhubarb need?
Rhubarb plants need full sun, so choose a spot in your garden that receives at least 6 hours of sunlight daily. - How often should I water rhubarb seedlings?
Keep the soil consistently moist but not waterlogged. Water the seedlings when the top inch of soil feels dry. - When should I transplant rhubarb seedlings outdoors?
Transplant them when they are 3-4 inches tall and have at least two sets of true leaves, after gradually hardening them off to outdoor conditions. - How far apart should I plant rhubarb seedlings?
Space rhubarb plants about 2 feet apart to give them room to grow. - When can I harvest rhubarb after planting from seeds?
It’s best to wait until the second year after planting to harvest rhubarb stalks to allow the plants to establish strong root systems. - Is it necessary to fertilize rhubarb plants?
While not strictly necessary, applying a balanced fertilizer in the spring can promote healthier growth. Avoid over-fertilizing, as this can lead to excessive leaf growth at the expense of the stalks.

Kristine Moore
Forestry AuthorI'm Kristine Moore, a seasoned garden landscaping professional with over 30 years of experience. My extensive career has been dedicated to transforming outdoor spaces into stunning, sustainable landscapes. With a deep understanding of horticulture, design principles, and environmental stewardship, I have become a respected figure in the field, known for creating harmonious, visually appealing, and eco-friendly gardens. My commitment to excellence and continuous learning in landscaping trends and techniques has solidified my reputation as an expert in garden design and implementation.


Leave your comment