Easy DIY Garden Fence: How to Build Your Own
- February 15, 2024
- 0 comment
Discover how to build a customizable garden fence for beauty and security with our easy DIY guide, no complex tools are required. Building a garden fence is a practical project that enhances the beauty and security of your outdoor space.
Whether you’re looking to protect your plants from pets and wildlife or simply add a decorative touch to your garden, this easy DIY guide will walk you through creating a simple yet effective garden fence. We’ll focus on a design that’s customizable in size and height, ensuring it meets your specific needs without requiring complex skills or tools.
Disclaimer: The instructions and measurements provided in this article are for a specific DIY garden fence project and are intended for informational purposes only. Actual project needs may vary depending on individual preferences, site conditions, and local regulations. Readers are responsible for adjusting the project to fit their circumstances and ensuring compliance with all safety and building codes. Proceed at your own risk and consult professionals if necessary.
List of Guides on How to Build Your Garden Fence
- Setting the Posts
- Attaching Side Supports
- Installing the Fence Wire
- Building the Archway (Optional)
- Crafting and Installing the Gate
- Finishing Touches
Planning Your Garden Fence
Objective and Considerations: Before diving into the project, define what you want your fence to achieve. Is it mainly for aesthetic purposes, or do you need to keep curious pets at bay? The purpose will influence the height and length of your fence. For example, a fence meant to deter pets should be at least five feet tall to prevent them from jumping over.
Materials and Tools Needed:
- 4×4 wooden posts for the corners and gate
- Concrete mix to secure the posts
- Gravel for drainage at the bottom of the posts
- Wire fencing material (cattle wire or chicken wire, depending on preference)
- Staples or nails to secure the wire
- Essential tools include a drill, circular saw, staple gun, and level.
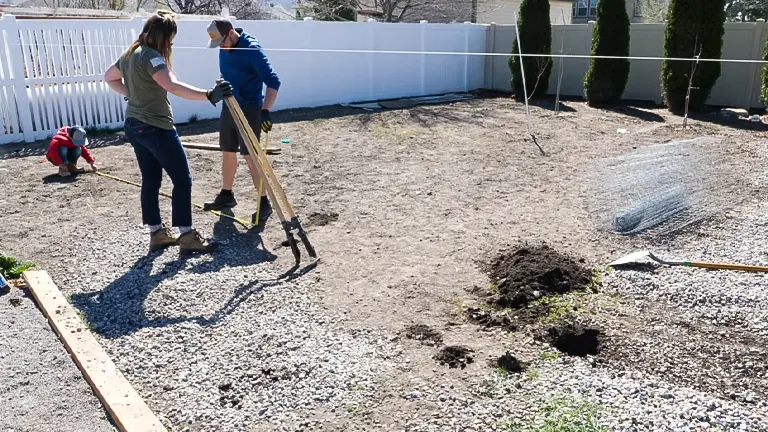
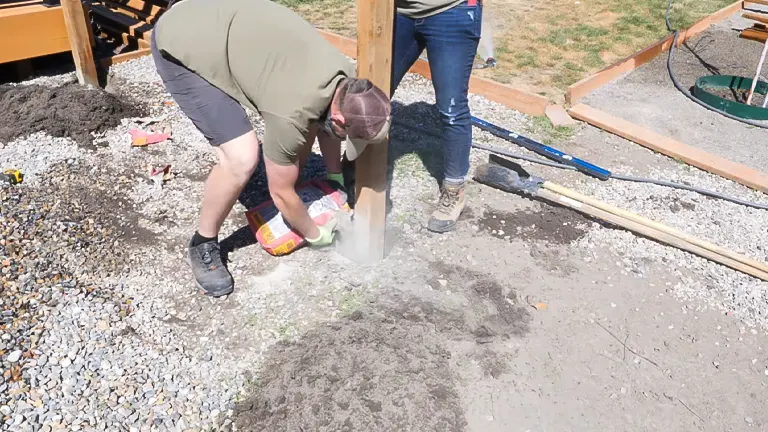
Step 1: Setting the Posts
Preparation: Begin by marking the perimeter of your fence with a string line, ensuring it’s straight and level. Decide where your gate will be and mark the locations for your posts accordingly. Typically, posts are set 6 to 8 feet apart.
Installation: Dig holes for your posts, approximately two feet deep, and place a few inches of gravel at the bottom for drainage. Set your 4×4 posts in the holes, then fill with concrete, making sure each post is plumb. Leave the concrete to cure as per the manufacturer’s instructions, ensuring the posts are securely in place.
Additional Tips:
- Use a post level to ensure each post is perfectly vertical before the concrete sets.
- Consider the frost line in your area when determining hole depth to prevent shifting during freeze-thaw cycles.
Pro Tips:
- For longer-lasting posts, coat the part of the post that will be buried in concrete with a wood preservative to prevent rot.
- Add a slight outward tilt (about 2 degrees) to the posts for better stability against wind.
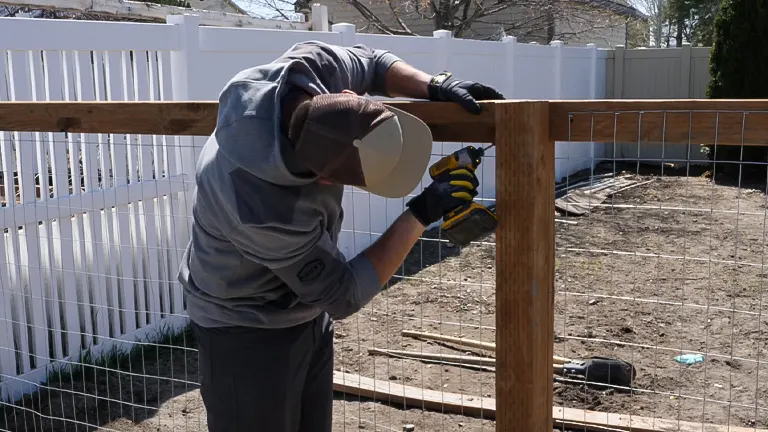
Step 2: Attaching Side Supports
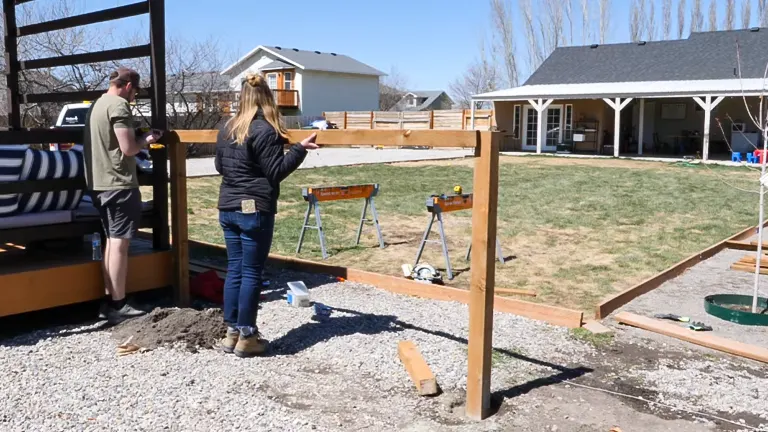
Once the posts are set, attach horizontal side supports to the interior sides of the posts. This approach hides the supports from the exterior view, maintaining the fence’s aesthetic appeal. Use a drill to secure the supports with screws, ensuring they are level and evenly spaced. These supports will provide a framework for attaching the wire fencing.
Additional Tips:
- Pre-drill holes in the supports and posts to prevent the wood from splitting when you insert the screws.
- Space the supports evenly, not just at the top and bottom, for added wire support and fence strength.
Pro Tips:
- Use galvanized or stainless steel screws to prevent rust and corrosion over time.
- Consider the weight of your chosen fencing material when spacing the supports to ensure they can bear the load without sagging.
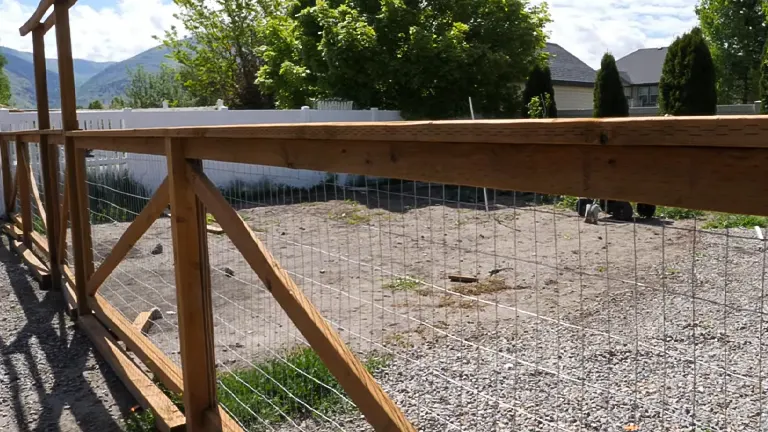
Step 3: Installing the Fence Wire
Choosing between cattle wire and chicken wire depends on your aesthetic preference and the level of security you need. Cattle wire, with its larger squares, offers a rustic look and is sturdier, while chicken wire is better for smaller pests.
Unroll your chosen wire along the side supports, cutting it to length as needed. Attach the wire to the supports with a staple gun, ensuring it’s pulled tight to avoid sagging. For added stability, install a horizontal cross beam between the posts at the midpoint of the fence. This beam prevents the wire from bowing inward or outward and provides additional attachment points for the fencing material.
Additional Tips:
- Stretch the wire as tightly as possible before securing it to prevent sagging and to keep animals from pushing through.
- When cutting wire, leave a little extra to wrap around the end posts for a cleaner, more secure finish.
Pro Tips:
- Use a come-along or fence stretcher tool for even tension when installing large sections of wire.
- For a neater appearance, install the wire on the inside of the fence when possible, so the smooth side faces out.
Step 4: Building the Archway (Optional)
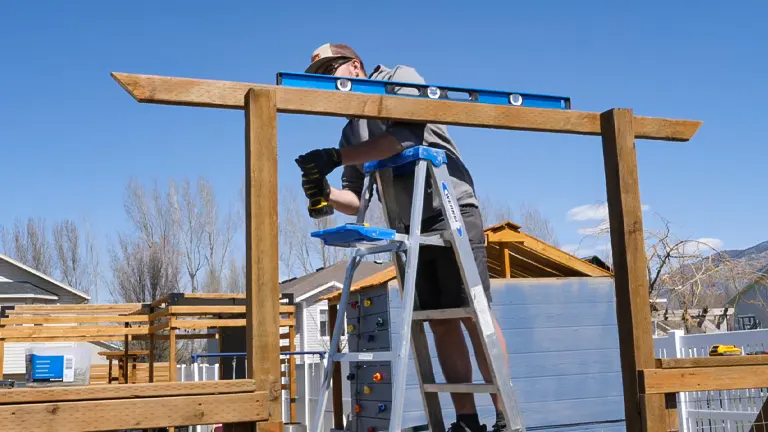
An archway adds a charming entrance to your garden and is a beautiful feature that elevates the overall look of your fence. To construct an archway, use two of the posts where your gate will be as the starting points. Attach two 2x4s or wider boards at the top of these posts to form the arch. If you’re not experienced in shaping wood for arches, a simple rectangular structure with a decorative top can also enhance the entrance’s aesthetic appeal. Ensure that any additions are securely attached and level to maintain the integrity and look of the fence.
Additional Tips:
- Use a flexible material, like a thin batten, to outline your arch shape before cutting any wood.
- Securely anchor the archway to the posts with carriage bolts for increased stability.
Pro Tips:
- Consider incorporating decorative elements into your archway, like lattice panels or hanging planters, for added visual interest.
- Treat the cut ends of any shaped wood with a wood preservative to prevent rot and extend the life of your archway.
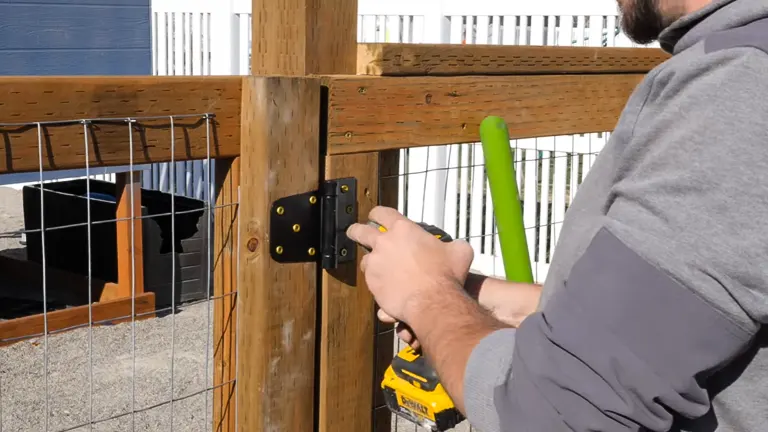
Step 5: Crafting and Installing the Gate
The gate is both a practical and aesthetic element of your garden fence. Construct a frame from 2x4s that matches the height and width needed for your entryway. The frame should mirror the fence’s design for consistency.
- Assemble the Gate Frame: Use screws to assemble a rectangular frame that fits within your designated gate area. Ensure the corners are square for a proper fit.
- Attaching the Wire: Lay the wire fencing material over the frame, trimming it to size. Secure the wire to the frame with a staple gun, pulling it tight to prevent sagging. For added durability, sandwich the wire between another layer of wood around the frame’s edge, securing everything with screws. This method traps the wire, ensuring it remains tight and secure.
- Installation: Attach hinges to one side of the gate frame, then secure the other side of the hinges to the corresponding fence post. Ensure the gate opens and closes smoothly without dragging on the ground. Install a latch mechanism on the opposite side to keep the gate closed.
Additional Tips:
- Adjust the size of the gate frame slightly smaller than the opening to allow for hardware and swelling of the wood.
- Use a diagonal brace in the gate frame to prevent sagging over time.
Pro Tips:
- Install gate springs or closers to ensure the gate closes automatically, adding convenience and security.
- Choose heavy-duty hinges and a latch that can accommodate the gate’s weight and usage level.
Step 6: Finishing Touches
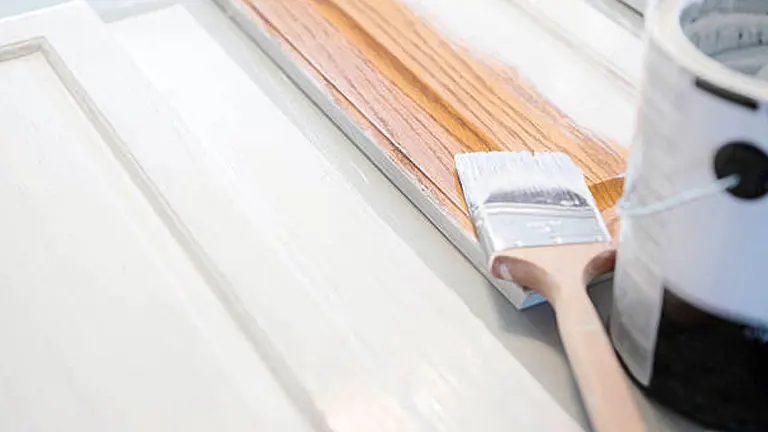
With the structure complete, it’s time to focus on durability and aesthetics. Inspect the fence to make sure all parts are securely attached and stable. If desired, apply a wood preservative or paint to protect against weathering and to blend with your garden’s style. Adding caps to the tops of the posts can prevent water from seeping into the wood, extending the life of your fence.
Additional Tips:
- Regularly check and tighten any loose hardware throughout the season to maintain fence integrity.
- Consider using solar post cap lights for added aesthetics and to illuminate pathways at night.
- Apply a clear sealant to painted or stained fences every two to three years to protect against weathering and UV damage.
- If your fence is in a high-moisture area, consider installing a concrete footer around the base of the posts to prevent direct contact with soil and reduce rot.
Safety Tips
- Wear Appropriate Protective Gear: Always wear safety glasses to protect your eyes from flying debris, especially when cutting wood or wire. Durable gloves can protect your hands from splinters, cuts, and scrapes. Consider also wearing a dust mask when sawing wood.
- Check for Underground Utilities: Before digging post holes, call your local utility companies or a designated underground utility location service to mark any underground lines. This prevents the risk of hitting electrical, gas, water, or communication lines.
- Use Tools Properly: Familiarize yourself with all tools before starting your project, following the manufacturer’s instructions carefully. Ensure tools are in good working order and use them only for their intended purposes to prevent accidents.
- Keep a Clean Work Area: Maintain a tidy workspace by clearing away debris, loose nails, and tools when not in use. This minimizes tripping hazards and makes it easier to move around safely.
- Lift Correctly: When lifting heavy items, like bags of concrete or large wood posts, use proper lifting techniques. Bend at the knees and lift with your legs, not your back, to avoid injury.
- Secure the Area: If you’re working in a front yard or an area accessible to passersby, consider setting up a temporary barrier or signage to keep others away from the work site. This is especially important if you leave holes or tools out overnight.
- Take Your Time: Rushing through a project increases the likelihood of mistakes and accidents. Plan your project so you have enough time to work carefully and attentively.
- Stay Hydrated: If working in hot weather, drink plenty of water to stay hydrated and take regular breaks in the shade to prevent heat exhaustion.
- Handle Chemicals with Care: If using wood preservatives, paint, or any other chemicals, handle them according to the manufacturer’s instructions. Work in well-ventilated areas and wear protective gear, such as gloves and masks, to avoid inhalation or skin contact.
- Power Tool Safety: Always disconnect power tools when not in use, especially if you are changing attachments or blades. Never bypass safety features on power tools, and keep cords away from cutting paths.
Maintenance Tips
- Periodic Inspections: Regularly inspect your fence for signs of wear or damage, such as loose boards, posts, or damaged wire. This is particularly important after extreme weather events, which can cause unexpected stress or damage. Catching issues early can prevent more significant problems later.
- Tightening Loose Hardware: Over time, screws and bolts that hold your fence together may loosen due to wind, temperature changes, or physical pressure. Periodically tightening these can prevent structural issues and extend the lifespan of your fence.
- Replacing Damaged Sections: Damaged wood or wire not only looks unsightly but can also compromise the security and stability of your fence. Replacing these sections promptly maintains the integrity of your fence and prevents the spread of damage, especially in wooden fences where rot can occur.
- Cleaning the Fence: Dirt, mold, and mildew can accumulate on your fence, detracting from its appearance and potentially causing damage over time. A gentle cleaning with a garden hose, soft brush, and mild detergent can remove most dirt and grime. For wooden fences, a power washer on a low setting can be used sparingly to avoid damaging the wood.
- Applying Wood Preservative or Paint: Wood fences require a protective coating to prevent rot, insect damage, and weathering. Applying a wood preservative or a fresh coat of paint every two to three years can shield the wood from moisture and UV damage, preserving its appearance and structural integrity. Choose a product appropriate for outdoor use and your specific fence material.
- Checking for Pest Infestations: Termites and other wood-boring insects can cause significant damage to wooden fences. Regularly check your fence for signs of infestation, such as holes or sawdust-like debris. Early detection and treatment can save large sections of your fence from needing replacement.
- Ensuring Proper Drainage: Water pooling at the base of fence posts can lead to rot and instability. Ensure that your garden has proper drainage away from the fence, especially in areas with heavy rainfall. Gravel or a small trench around the fence perimeter can facilitate water runoff.
- Trimming Vegetation: Overgrown vegetation can push against your fence, causing it to lean or warp. Regularly trimming bushes, trees, and climbing plants near your fence will prevent unnecessary pressure and potential damage.
- Sealing Gaps and Openings: For fences designed to keep pets in or pests out, ensure that any gaps or openings are promptly sealed. Over time, the ground may shift, or animals may dig under the fence, creating escape routes or entry points for pests.
- Lubricating Hinges and Latches: For fences with gates, squeaky or stiff hinges and latches can be a nuisance and may wear out prematurely. Applying a suitable lubricant annually ensures smooth operation and prevents rust and corrosion.
Conclusion
Building a DIY garden fence is a rewarding project that adds beauty and functionality to your outdoor space. By following these steps, you’ve created not just a barrier but a feature that enhances the charm of your garden. This fence is a testament to the fact that with a bit of planning and effort, you can achieve professional-quality results on a DIY budget.
FAQs
- What materials do I need for a simple DIY garden fence?
For a basic garden fence, you’ll need 4×4 posts for the corners and gate posts, concrete mix for setting the posts, gravel for drainage, wire fencing material (such as cattle wire or chicken wire), staples or nails for attaching the wire, and basic tools like a drill, circular saw, and staple gun. - How do I ensure my fence posts are installed straight and secure?
Use a post level to check that each post is vertically straight when installing. Dig the holes two feet deep and use concrete to secure the posts, ensuring they’re plumb. Let the concrete cure according to the manufacturer’s instructions before proceeding with the rest of the fence construction. - Can I customize the height of my DIY garden fence?
Absolutely! While a common height for a garden fence is around five feet to keep out small animals or pets, you can adjust the height to meet your specific needs. Just remember to adjust the length of your posts and the amount of fencing material accordingly. - What’s the best way to attach wire fencing to the posts and supports?
Unroll the wire fencing along the line of your posts and cut it to the required length. Use a staple gun to attach the wire to the wooden supports, ensuring it’s pulled tight to avoid any sagging. For extra stability, add a horizontal cross beam and attach the wire to it as well. - How often should I perform maintenance on my garden fence?
Inspect your fence at least once a year for any signs of damage or wear, such as loose hardware, rotting wood, or rusting wire. Perform any necessary repairs and apply a fresh coat of paint or preservative every two to three years to protect the wood from the elements. - Is it necessary to use concrete for fence post installation?
While not always necessary, using concrete to set your fence posts significantly increases the stability and longevity of your fence, especially in areas with high winds or soft soil. It’s highly recommended for ensuring your fence remains upright and secure over time. - How do I create a gate for my garden fence?
Construct a gate frame from 2x4s to match the desired height and width of your entrance. Attach the same wire fencing material to the frame, and then secure the gate to one of the posts using hinges. Add a latch mechanism on the opposite side to keep the gate closed. - What should I do if my ground is uneven?
For uneven ground, you may need to adjust the length of your posts to ensure the top of the fence remains level. Alternatively, you can install the fence to follow the contour of the ground, stepping it up or down as needed. Always make sure the bottom of the fence is secure to prevent gaps that could allow small animals to enter or exit.
Crafting your DIY garden fence is a straightforward way to add charm and protection to your yard. Gather your tools, follow safety advice, and tailor the fence to your preferences. With some work, you’ll have a sturdy and appealing fence to enjoy for years. Here’s to your successful project!

Benjamin Brooks
Forestry AuthorGreetings! I'm Benjamin Brooks, and my journey over the past 15 years has revolved around the fascinating realms of content creation, expertise in snow clearing, and the intricate world of lumberjacking and landscaping. What began as a simple curiosity about the natural world and heavy machinery has evolved into a passionate profession where my love for crafting words intertwines seamlessly with my lumberjacking and garden skills.


Leave your comment