How to Keep Wood Stove Glass from Getting Black 2024
- April 2, 2024
- 8 comment
Explore the secrets to maintaining a crystal-clear view through your wood stove glass with our comprehensive 2024 guide. Understand why stove glass blackens and uncover practical, easy-to-follow steps to prevent soot buildup, ensuring efficient combustion and a beautiful, unobstructed flame. Join us as we delve into expert techniques for keeping your wood stove clean, efficient, and environmentally friendly, enhancing both the warmth and charm of your home.
List of How to Keep Wood Stove Glass from Getting Black :
- Burn Dry Wood
- Maintain the Right Temperature
- Proper Airflow is Key
- Avoid Overloading
- Choose the Right Wood
- Regular Cleaning
- Inspect Your Chimney
- Check the Gasket
- Set Up and Use Right
Fear not! Keeping your wood stove glass clean is entirely possible. Let’s explore the secrets behind maintaining a crystal-clear view of those mesmerizing flames:
1. Burn Dry Wood
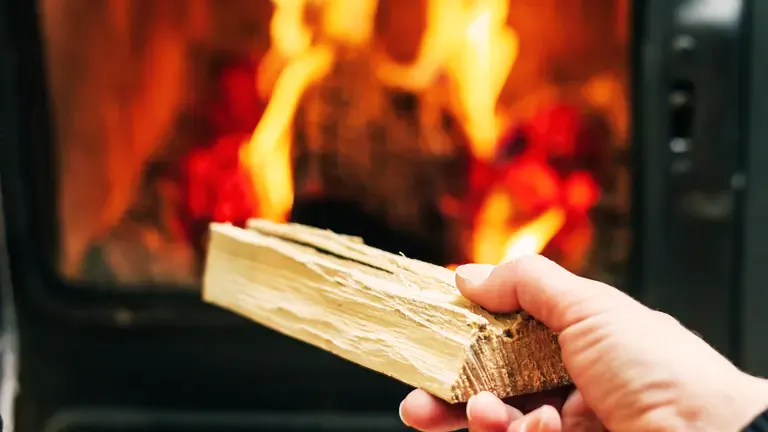
To witness the enchanting dance of flames without a veil of soot, dry wood is your best ally. Avoid the trap of using wet or “green” wood, as it’s infamous for fogging up the glass with moisture and creosote. To ensure your wood is in prime burning condition, let it season under nature’s watchful gaze for about 6-12 months. If you’re inclined towards exactness, a moisture meter can be your reliable gauge. Aim for a moisture content below 20%, ensuring your flames remain vivid and your view, unclouded. Let the pure beauty of fire captivate you!
- Understanding the Issue with Wet Wood: Burning green wood results in a cooler fire and causes incomplete combustion. The water contained within turns to steam, and coupled with the unburned resins and compounds, leads to dense smoke laden with moisture, soot, and creosote. This not only affects the clarity of your stove’s glass but can also lead to excessive creosote buildup in the chimney, increasing the risk of chimney fires.
- Seasoning is Key: Properly seasoned wood offers a hotter, cleaner burn. While allowing your logs to dry for 6-12 months is good practice, ensuring they’re stored in a well-ventilated, dry area is equally important. Proper storage helps prevent the wood from reabsorbing moisture, ensuring it remains in optimal burning condition.
- Benefits of Using a Moisture Meter: While seasoning wood based on time is effective, employing a moisture meter provides a more precise measurement. This tool is especially useful if you’re uncertain about the drying duration of your logs or if the seasoning conditions are not ideal.
- Choose the Right Storage: Stacking the wood in an area that’s both airy and shielded from elements like rain and snow is crucial. A woodshed or even a covered storage rack can protect your logs from reabsorbing moisture, ensuring they’re always ready for a clean burn.
- Enhanced Burning Benefits: Apart from a clear glass view, using dry wood translates to a more efficient fire with less creosote accumulation. This means fewer cleaning sessions, extended wood stove longevity, and enhanced safety.
Pro Tip: When sourcing wood, consider its origin and type. Trees grown in drier climates or areas with distinct seasons typically have lower inherent moisture. Additionally, certain hardwoods like oak or ash naturally contain less sap and resin than some softwoods. By being selective in your wood choices, you can give yourself a head start even before the seasoning process begins, ensuring a cleaner burn from the outset.
2. Maintain the Right Temperature

Think of fire as a performer that thrives under the right spotlight. If it’s too dim, the fire tends to underperform, producing residues like creosote. The solution? Use a stove thermometer as your backstage director. For most wood stoves, the performance peak, where heat and light combine in perfect harmony, lies between 400°F and 650°F. Maintain this temperature range, and your fire will not only burn efficiently but also put on a mesmerizing show, free from unsightly marks and residues.
- Responding to Temperature Deviations: Should you notice the temperature veering away from the optimal range, it’s vital to respond quickly. Low readings could be a sign of damp wood or insufficient air, while extremely high temperatures might indicate overloading or overly dry wood.
- Importance of Air Control: Most modern wood stoves come with adjustable air vents or dampers. Familiarize yourself with these controls, as they can be pivotal in maintaining the right temperature. If the fire is too sluggish, introducing more air can help; conversely, if it’s burning too fiercely, reducing the airflow can bring things back into balance.
- Consistent Stove Checks: Regularly check the condition of the stove itself. Over time, internal linings or firebricks can deteriorate, impacting the overall combustion process and temperature regulation.
- Additional Tools to Consider: While a stove thermometer is crucial, other tools can enhance your ability to maintain the perfect temperature. Magnetic stovepipe thermometers, for example, can provide insights into the temperature of the exhaust gases, offering another perspective on combustion efficiency.
Pro Tip: Periodically calibrate your stove thermometer to ensure its accuracy. Like any instrument, over time, it may drift from its original settings. You can place it in boiling water to check if it reads around 212°F (100°C). This simple check can ensure you’re always operating based on accurate temperature readings, allowing for the most efficient burns and a dazzling, clear view of your fire.
3. Proper Airflow is Key
Today’s wood stoves come equipped with a feature that often goes unnoticed: the air wash system. It’s like a protective barrier, directing a flow of air across the inside of the glass, preventing soot from settling. Beyond this, it’s essential to remember that fires need proper ventilation to burn efficiently. Keep the air vents adequately open, especially during the initial ignition phase. By ensuring good airflow, you allow your fire to burn brightly and cleanly, enhancing your stove’s performance.
- Understanding the Air Vents: Different wood stoves may have varied air control mechanisms, but the underlying principle remains the same. Familiarize yourself with your stove’s specific controls, as they can significantly influence the burn rate and temperature of the fire.
- Benefits of Proper Ventilation: Adequate ventilation not only ensures a cleaner glass but also maximizes fuel efficiency. A well-ventilated fire consumes wood more completely, generating more heat with less creosote and ash production.
- Monitoring and Adjustments: As the fire progresses from ignition to a steady burn, your ventilation needs might change. After the initial phase, where maximum air helps establish the fire, you can adjust the vents to achieve a balanced, efficient burn. Being responsive to the fire’s stage can optimize wood consumption and heat output.
- Potential Blockages: Periodically inspect the air vents for potential blockages, like ash or debris. Keeping them clean ensures consistent airflow and minimizes the risk of inefficient burns.
- Remember Oxygen’s Role: Fire requires oxygen to burn. A robust and efficient burn cycle means there’s ample oxygen supply, resulting in fewer unburned particles that could cloud the stove’s glass.
Pro Tip: To determine the best airflow setting for your stove, pay attention to the fire’s appearance. A bright, lively flame indicates good combustion, while a smoky, lazy flame suggests the need for more air. Over time, you’ll develop an intuitive understanding of your stove’s air needs, making adjustments second nature.
4. Avoid Overloading
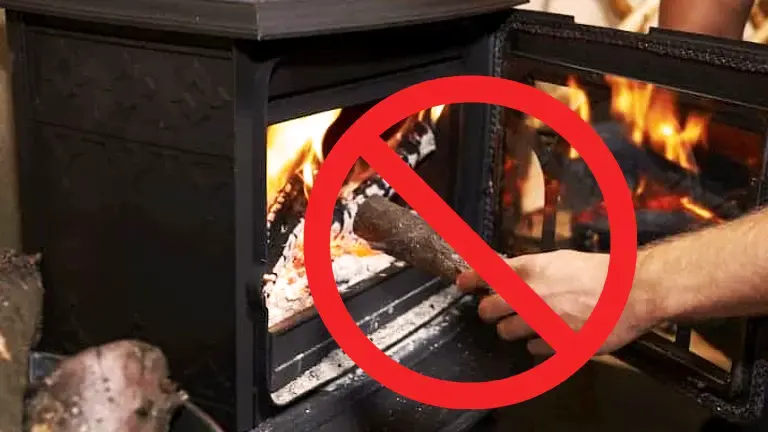
While it’s tempting to fill your wood stove to the brim, moderation is key. Overloading can hamper efficient combustion. Instead of cramming in as much wood as possible, add logs in measured amounts, replenishing as necessary. This approach ensures optimal burning and helps maintain clear, soot-free glass, allowing you to enjoy the beauty of the flames to the fullest.
- Understanding the Risks: Overloading might give the illusion of a longer and hotter fire, but it can lead to numerous problems, with blackened stove glass being the most immediate concern.
- Reason for Blackening: Glass typically turns black due to incomplete combustion. Overloading the stove means that logs might not get the oxygen they need for efficient burning. The resulting incomplete combustion produces excess creosote and soot. These not only tarnish your glass but also gather in your chimney, increasing the risk of chimney fires.
- The Right Amount: Instead of focusing on filling the stove to its capacity, concentrate on the amount of wood that allows for adequate air circulation and effective combustion. A good rule of thumb is adding two to three logs at a time, ensuring they’re spaced well enough for proper airflow.
- Wood Positioning: Make sure to place your logs in a manner that leaves gaps between them. This promotes better air circulation, leading to cleaner glass and a hotter, more efficient burn.
- Monitor & Replenish: Keep a watchful eye on the fire. When the logs have burnt down to coals, it’s usually a good time to introduce more wood. A steady and moderate supply of wood keeps the temperature even and reduces the likelihood of the glass blackening.
- Additional Benefit: A properly managed fire doesn’t just promise a clear view of mesmerizing flames. It’s also more efficient in heating and ensures that your wood stove lasts longer. A clean burn minimizes harmful deposits in both the stove and chimney, reducing your maintenance efforts and enhancing safety.
Pro Tip: To avoid the temptation of overloading, consider using larger logs interspersed with smaller ones. This gives the illusion of a full stove but with better air circulation. As the smaller logs burn and create a good coal base, the larger logs will ignite, ensuring a prolonged and efficient burn. This method can provide a consistent heat output without compromising on glass clarity or overall stove efficiency.
5. Choose the Right Wood
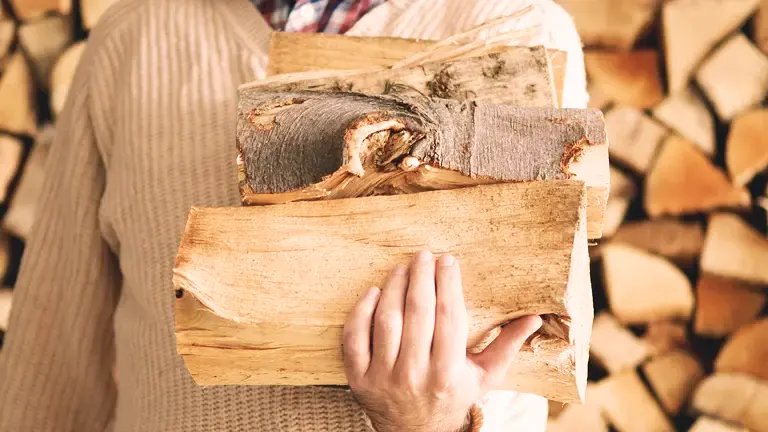
When it comes to fueling your wood stove, the choice of wood can make all the difference. Hardwoods, like oak, ash, and maple, are the preferred choice. They burn hotter and more efficiently, producing less creosote than softwoods. This not only ensures a cleaner burn but also helps keep the stove glass clear of blackened residues. For the best results and a clear, captivating flame, always opt for quality hardwoods.
- Softwoods in the Mix: While hardwoods are generally recommended, some seasoned softwoods, like pine or fir, can be used occasionally or mixed with hardwoods. They tend to ignite more easily, helping in the initial stages of the fire. However, rely on them sparingly due to their higher resin content.
- Wood Density Matters: The density of the wood correlates directly with its burn efficiency. Denser hardwoods provide more BTUs (British Thermal Units) than lighter woods, ensuring more heat output from the same volume.
- Recognizing Quality Hardwood: While hardwoods are ideal, ensure they are free from mold, fungus, or excessive bark. Such imperfections can impact the quality of the burn and potentially produce more smoke or soot.
- Experiment & Observe: Each wood type imparts its unique flame pattern and aroma. By experimenting with different hardwoods, you can discover which ones you prefer both aesthetically and functionally.
- Economic & Environmental Consideration: When sourcing wood, consider local availability. Transporting wood over long distances not only adds cost but also has an environmental impact. Local hardwoods, even if slightly less optimal, might be a more sustainable and cost-effective choice.
Pro Tip: Over time, create a wood rotation system in your storage area. As you source new hardwoods, place them at the back or bottom, using the older, seasoned wood first. This ensures you’re always burning the most seasoned wood available, optimizing the burn quality and reducing the chances of creosote buildup. Additionally, remember to occasionally rotate the logs within the storage to expose all sides to air, further enhancing the seasoning process.
6. Regular Cleaning
No matter how attentive we are, every wood stove will need periodic cleaning to maintain its pristine look. It’s akin to giving your stove its own mini-makeover, reviving its clear, welcoming facade.
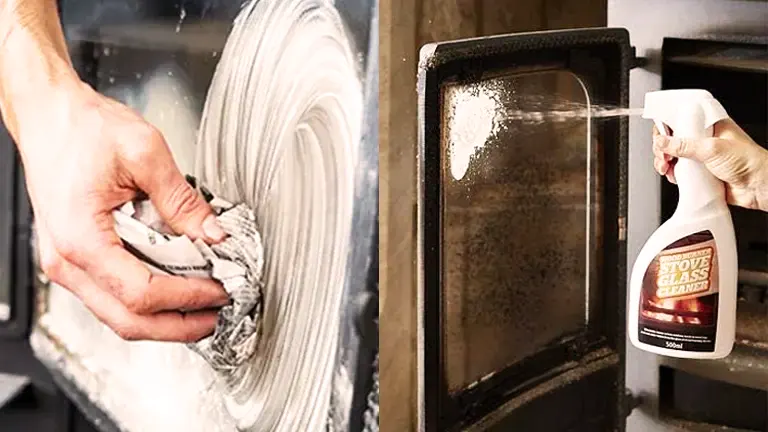
- Traditional Cleaning Method: A trusted trick passed down among many stove users involves using the ash from the stove itself. Simply take a damp newspaper or cloth and dip it into the ash. Gently use this to clean the glass in circular motions. It’s a mild abrasive technique that refreshes the glass without causing any harm.
- Modern Cleaning Solutions: If you prefer commercial products, there are specialized cleaners available designed specifically for stove glass. These products effectively remove soot and creosote, ensuring that the glass remains clear and showcases the fire beautifully.
- Frequency Matters: While the need for cleaning varies based on usage and wood type, a good rule of thumb is to check the glass weekly. By doing so, you can catch minor buildups before they become stubborn stains, making the cleaning process easier and quicker.
- Natural Alternatives: Besides ash, there are other household items that can serve as effective cleaning agents. Solutions like vinegar mixed with water can act as a gentle cleanser for glass surfaces. Another option is baking soda, which, when made into a paste, can help remove tougher stains.
- Safety First: Before initiating any cleaning, ensure the stove has cooled down completely. Not only does this ensure your safety, but cold glass is also easier to clean as it won’t cause cleaning solutions to evaporate rapidly.
Pro Tip: Always wear gloves, even if you’re using natural cleaning agents. This not only protects your hands from potential irritants but also ensures that oils from your skin don’t transfer to the glass, which can cause smudging during the next burn.
Interested in understanding more about cleaning wood stove glass? Dive into the details by clicking here! Wood Stove Guide 2023
7. Inspect Your Chimney
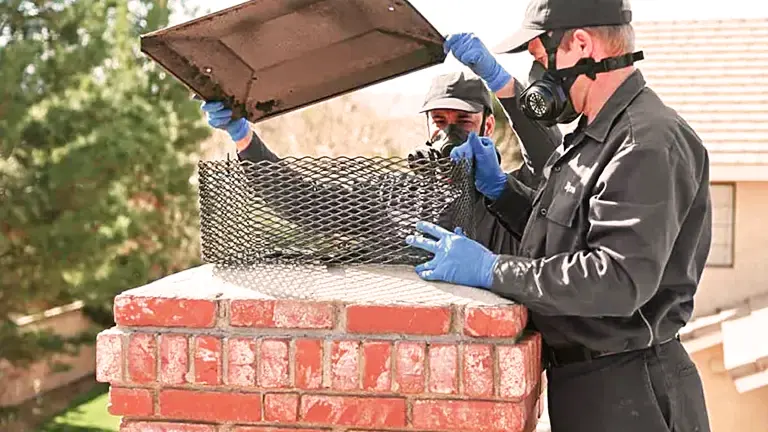
Chimneys are essential components of our homes, effectively directing smoke and ensuring proper airflow for wood stoves. Over time, they can accumulate soot, debris, and even occasional obstructions like nests, which can hinder their function. This can result in incomplete combustion in the stove.
- Annual Maintenance: As seasons change, it’s important to remember to have your chimney inspected and cleaned. Professional chimney sweeps can efficiently remove any blockages and buildup, ensuring your stove operates efficiently and safely. Regular inspections and cleaning help maintain the longevity of your chimney and the safety of your home.
- The Domino Effect: Incomplete combustion due to a clogged chimney not only impacts the stove’s efficiency but can also lead to more rapid soot buildup on your stove’s glass. By ensuring a clear chimney, you’re taking a proactive step toward maintaining clear stove glass.
- Spotting Early Warning Signs: Between professional cleanings, keep an eye out for signs of chimney obstructions. Excess smoke, reduced draw, or a smoky smell in your home can all indicate that there’s an issue.
- Caps and Guards: Consider installing a chimney cap or guard. These devices prevent larger debris and animals from entering the chimney, reducing the chances of unexpected obstructions.
- Safety Implications: Apart from ensuring optimal performance, a clean chimney significantly reduces the risk of chimney fires. Creosote, a flammable substance, accumulates in chimneys over time. Cleaning it regularly minimizes this risk.
Pro Tip: After a professional chimney cleaning, ask for a summary of the findings. This can provide insights into your wood-burning habits and potentially indicate if you’re burning too cold or using wood that’s not adequately seasoned. The more you know, the better you can optimize your stove usage for safety and performance.
8. Check the Gasket
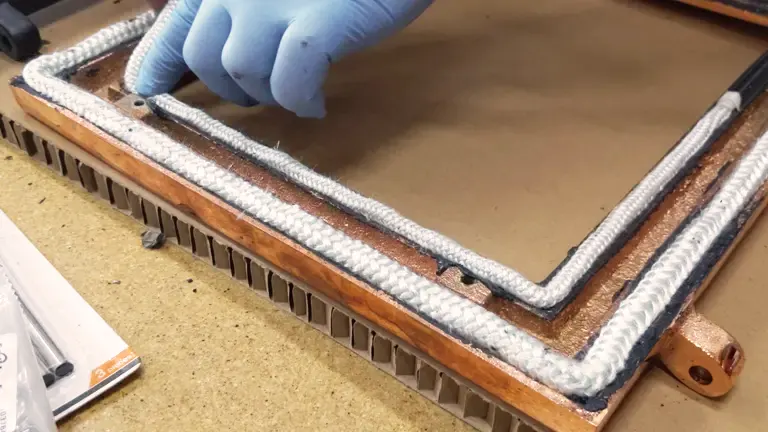
The gasket on your wood stove plays a crucial role. It ensures the door is sealed properly, preventing smoke and air from escaping. When these elements leak out, they can cause the glass to blacken. Periodically inspect the gasket for signs of wear or damage. If you notice any issues or if the seal isn’t tight, it’s likely time to replace the gasket. Regular checks and timely replacements will help maintain your stove’s efficiency and keep the glass clear.
- Understanding the Gasket’s Importance: The gasket is more than just a seal; it helps regulate the stove’s airflow. A compromised gasket can lead to an uneven burn, often resulting in more smoke and soot, which in turn can cause your stove glass to blacken prematurely.
- Types of Wear: Gaskets can experience various types of wear – flattening over time, becoming brittle, or even breaking apart in places. Each of these can compromise the stove’s performance.
- Materials Matter: Most gaskets are made from fiberglass. When replacing, ensure that you choose a high-quality gasket designed for high temperatures. This ensures longevity and optimal performance.
- DIY or Professional Help: While gasket replacement can be a DIY project for those who are handy, if you’re unsure, consider seeking the help of a professional. It’s essential that the gasket is installed correctly to ensure a proper seal.
- Gasket Adhesive: When replacing the gasket, don’t forget to use the appropriate adhesive. It helps hold the gasket in place and ensures a tight seal when the stove door is closed.
Pro Tip: A simple test to check the effectiveness of your gasket seal is the “dollar bill test.” Place a bill between the gasket and the stove door and then close the door. If you can pull the bill out with minimal resistance, it’s a sign that your gasket may not be sealing properly and might need a replacement.
Looking to know more about replacing a wood stove gasket? Find all the insights and guidance right here! How to Replace the Gasket on a Wood Stove 2023
9. Set Up and Use Right
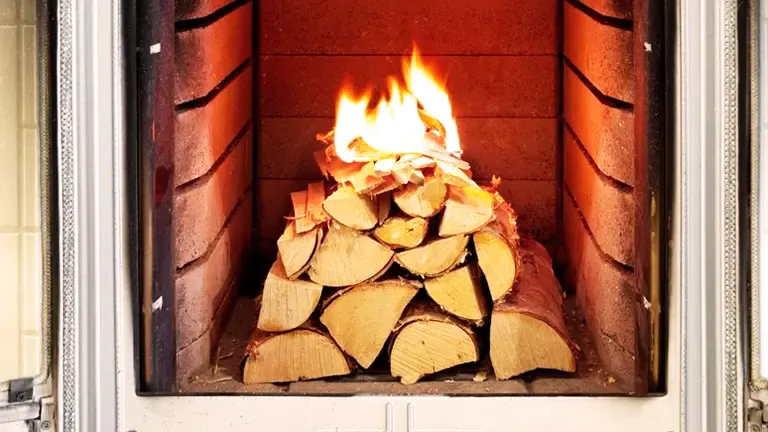
Initiating a fire isn’t just about striking a match; it’s an art of progression. Kick off with slender pieces of kindling, igniting them first. Once they’ve caught on, progressively introduce larger logs. This method ensures a swifter ascent to the stove’s desired temperature, minimizing the likelihood of creosote buildup. By being mindful from the start, you set the stage for a cleaner, efficient burn.
- The Role of Firestarters: There are numerous firestarters available in the market, from wax-based cubes to natural pine cones. Using these can help kickstart the fire, especially in colder conditions or when using wood that is harder to ignite.
- Top-Down vs. Bottom-Up: While the traditional method involves igniting kindling at the bottom, a top-down approach (placing larger logs at the bottom and kindling on top) is gaining popularity. This method results in a longer, more consistent burn with less frequent adjustments needed.
- Maintaining Airflow: In the initial stages, ensure that your wood stove has ample airflow. This can be achieved by fully opening the air vents or dampers. As the fire establishes, you can adjust these controls to modulate the burn rate.
- Log Size Variation: Instead of using logs of the same size, incorporate a mix. Smaller logs ignite quickly, providing the initial heat, while larger logs ensure longevity. This balanced approach means a consistent temperature and reduced soot buildup.
- Safety Precautions: Always use gloves and long tools when adjusting logs or kindling on the stove. This not only protects you from burns but also allows for more precise placements, optimizing the burn.
Pro Tip: Watch the color of the smoke. A well-functioning wood stove with optimal combustion will produce thin, white smoke. If you notice thick, gray, or black smoke, it’s a sign of incomplete combustion, and adjustments might be needed, either in the wood used or the airflow settings.
Conclusion
A clear view of the flames in your wood stove enhances the entire experience of having one in your home. By following the above steps and understanding the reasons behind the blackening, you can keep your wood stove glass pristine and enjoy efficient, beautiful fires all winter long. So, here’s to cozy evenings by the fire, unmarred by sooty interruptions!
Expand Your Understanding of Wood Stoves: Dive into our related articles listed below. Whether you’re a novice or a seasoned stove enthusiast, there’s always something new to learn and discover!
- How to Remove Rust and Restore a Wood Stove 2023
- How to Install a Wood Stove in the Basement 2023
- How to Choose the Best Wood Burning Stove Insert 2023
- How to Cool Down a Wood Stove Quickly 2023
- How to Replace Wood Stove Fire Brick 2023
- How to Replace the Gasket on a Wood Stove 2023
- How to Remove Creosote from a Wood Stove 2023
- How to Choose the Right Wood Cooking Stoves for Your Needs
FAQs
- Why does my wood stove glass turn black in the first place?
The blackening is caused by the buildup of soot, creosote, and other combustion byproducts. If the fire doesn’t burn hot enough or if the wood used is not seasoned properly, it produces more creosote which can blacken the glass. - Does the type of wood I burn affect the cleanliness of the glass?
Yes, hardwoods like oak, hickory, and maple generally burn hotter and cleaner than softwoods, producing less creosote. - How often should I clean the glass to prevent excessive blackening?
This depends on your burning habits, but a weekly check is a good start. If you see visible buildup, it’s time to clean. - Are commercial cleaners better than DIY solutions for cleaning stove glass?
Commercial cleaners are formulated specifically for creosote and soot removal, but household items like wet newspaper or a mixture of vinegar and water can also be effective. - Can I burn my fire hotter to reduce blackening on the glass?
Burning a hotter fire can help reduce creosote buildup. However, ensure you’re not overfiring the stove, as it can damage the unit. - How does proper air circulation prevent blackened glass?
Adequate air intake aids complete combustion, which reduces the formation of soot and creosote. - Will a cracked or damaged door gasket affect the blackening of my wood stove glass?
Yes, if the door gasket is compromised, it can alter the stove’s air intake, leading to incomplete combustion and increased blackening. - Is it safe to use abrasive pads on the glass?
Avoid highly abrasive pads. They can scratch and weaken the glass. Opt for non-abrasive scrubbing tools. - Do newer models of wood stoves have features to reduce glass blackening?
Many modern wood stoves are designed with air-wash systems that direct a flow of air down the inner surface of the glass, keeping it cleaner. - How does burning green or wet wood impact the cleanliness of my stove’s glass?
Green or wet wood produces more moisture and creosote when burned, leading to faster blackening of the glass.
Well, folks, that wraps up our cozy chat on keeping our wood stove glass shining and clear! If you’ve tried any tricks or have a nifty story related to this, we’d absolutely love to hear it. Drop your thoughts, tales, or even your favorite memories by the fireplace in the comments below. Sharing is caring, and who knows? Your tip might just be the game-changer someone else is looking for. Let’s keep the conversation as warm and inviting as our hearths. Can’t wait to hear from you!

David Murray
Forestry AuthorI'm David Murry, a forestry equipment specialist with a focus on chainsaw operation. With over 13 years of experience, I've honed my skills in operating and maintaining a wide range of machinery, from chainsaws to log splitters. My passion for the outdoors and commitment to sustainable forestry drive my work, which emphasizes safety, efficiency, and staying updated with industry advancements. Additionally, I'm dedicated to sharing my expertise and promoting environmental awareness within the forestry community.
8 comments
The article does not mention that 114°C is the condensation point of the gases. Above that compounds do not form. Below sooty shite is everywhere. All the 'tips' are hints to get your stove burning above that temperature but however you do it hot = good/clean cold = sooty/dirty.
Andy Genovese
October 1, 2023 9:07 pmHi I use smokeless coal in mine was told this was OK.i get a lot of red gooey stuff inside why is this.
Helen McCarrick
October 1, 2023 7:37 amWhat's the correct way of using the upper and lower air dampers for the most efficient burn?
Susan Sparks
October 1, 2023 7:34 amGood information love working with fire wood
Mackey o Mahony
September 30, 2023 6:14 pmGlad broken
James Florence
September 30, 2023 3:01 pmI use window glass cleaner. I seems to dissolve the creosote if left for a few minutes.
Alan Robb
September 30, 2023 2:10 pmThanks David, for your article on keeping stove glass clean. 2 questions, 1. where do I place the thermometer on the stove or on the flu pipe above it and... 2. To keep the stove burning overnight I close up the vent leaving a minimal flow. This tends to fog the glass by the morning. Have you any thoughts on this please? Best regards Douglas


I remember when we where kids my grandparents and parents used dampened old newspaper on tje stove door and it was sparling clean in one soft rub it amazed me that something so simple was quicker then all the cleaners in tje world when I got my own my grandad also used the Ash from the stove to clean silverwear amd generaly metals aroumd the house and used it along with old fish bones and dry morning oats to put in soil for the garden in winter he would cover thr top of the soil with the oats amd wrapped the pots in potato sacks he said it kept them warm cozy amd fed ple ty nutrients in winter while he coveted them with old laddered or just old tights my grand mother was discarding to protect them from frost he also used these for the latter work of cleaning the silver and cleaning the stove filling them with any left over Ash for the garden and hanging them in the shed and occasionally in winter toed in small balls kept under furniture to keep out mice or pests entering the house if you use the right woods also for scent the Ash is helpful for repeling spiders as they don't like strong smells and if they do enter they doe as the salt in the Ash kills them because it dries them out which is a little gross to think about being dried out to death but it made my mother grandmother and father very happy to sprinkle a bit under and around door frames
Curiouser and curiouser
October 3, 2023 9:40 am